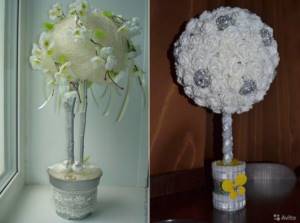
Wedding topiary will not only decorate the wedding table, it can be a good decor during photo and video filming of the bride’s preparations, or the groom will appear on the doorstep with such beauty in his hands
The bride and groom change their plans more than once regarding all the pre-wedding troubles; even the little things cannot be ignored. And if you want to simplify this task for your friends and family, and give them something important on the eve of the special day, let it be a topiary that you can make with your own hands. Such a gift will not gather dust on the shelves of the pantry after the celebration, but will take the most honorable place in the life of the new family. And it may happen that a new bride or groom will receive a topiary made with their own hands from the hands of their parents.
How to make topiary for a wedding: ideas for crafts
There are a great variety of materials that can become the basis of such a tree. One master class (MK) offers to make a wedding topiary from foamiran, another – from white threads, the third master class offers to “grow” a coffee tree with your own hands, or rather two trees, in the silhouette of which the bride and groom can be guessed.
If the tree decorates a formal table, it should blend in with the holiday decor. Or be bright, but nevertheless an organic accent
You can make the following topiaries:
- From snow-white napkins;
- From beads;
- Made from white buttons;
- From tulle;
- Made from light felt;
- From cold porcelain;
- Made from corrugated paper;
- Made from organza and cotton wool.
Such a tree can also be given as a gift for a marriage anniversary. Or, on the next anniversary, decorate the festive table with it, as a symbol of celebration (like a New Year’s tree)
Each master class is remarkable in some way. Using the example of the “organza + cotton wool” option, you can show a simple MK, which even the groom can master if desired. Why not impress the bride with your talents on the eve of the special event?
Wedding topiary made of tulle and satin ribbons
To make topiary for a wedding, needlewomen use different fabrics - sisal, silk, organza, satin, linen and even burlap. Trees decorated with airy tulle and shiny satin ribbons look great. In this master class on making wedding topiary, tulle forms a pillow for touching satin roses in a contrasting shade. If desired, the heroes of the occasion or the givers of the tree of happiness can use fabrics of a different tone, more suitable for the style of their wedding. See below for step-by-step instructions for making topiary.
Necessary materials
- Base ball (foam).
- Pieces of polyurethane foam.
- Tulle trims.
- Satin ribbon 5 centimeters wide for roses.
- Trims with brocade ribbon.
- Hot glue.
- Large beads, glass beads.
- Toothpicks.
- Wire.
- Small pearl beads.
- Plastic flowers.
- Pot.
- Curved trunk.
- Gypsum.
- Heart stickers.
- Scissors.
Stages of creation
Cut a ball of suitable size from a piece of polyurethane foam. Fix the resulting base on the trunk. Save the remaining pieces of foam - they will be needed to secure the future topiary. Make roses. Cut a square of satin ribbon, fold it diagonally and glue it together. When the glue dries a little, attach two opposite corners to the base of the petal, to the lower edge of the triangle. Make the required number of elements, then assemble the rose: roll the first petal into a tube to make the core. Next, carefully glue the petals in a circle.
Pay attention to the back of the product: all elements are on the same level. Fold the tulle trims, you will get a lot of them, because these decorative details will make up the main decoration of the ball
Glue two tulle trims to a toothpick and let them dry. Make additional decorative elements using a thin brocade ribbon: simply fold a piece of it in half and secure it with glue, as shown in the picture. Attach large beads and plastic flowers to a strong wire. When all the details of the topiary decor are ready, decorate the base ball with them. Place polyurethane foam in the pot, glue it to the bottom and edges so that it does not float to the top when plastering. Place the trunk in the resulting mount, carefully check that the wedding tree is level. When the ideal position has been chosen, fill the pot with plaster - you will only need a little of this material. Wait a few days for the fill to dry completely. Start making the finishing touches: make a beautiful bow using white and pink satin ribbons, prepare tulle trims (this time without toothpicks), buy heart stickers, bugles. After the material has dried in the pot, glue the trim pieces, glass beads, and attach the bow to the top of the topiary trunk to the plaster surface. Decorate the flowerpot with stickers. A beautiful “European tree” for a wedding is ready!
Topiary for a wedding: master class
So, to make such a cute tree, follow the simple MK step by step.
Materials you will need:
- Foam ball base;
- Cotton balls;
- Stick for the trunk;
- PVA glue;
- Super glue;
- Glue gun;
- Organza petals;
- A flowerpot, preferably with a floral sponge;
- Acrylic paint (mother of pearl);
- Decorative elements;
- Sewing pins;
- Candles.
You can use anything as a base ball - even a ball
Despite such a considerable number of details, the master class cannot be called complicated. Don’t forget to take a photo if you want to post your MK online later. Any master class welcomes improvisation, so from one idea you can make another with your own hands.
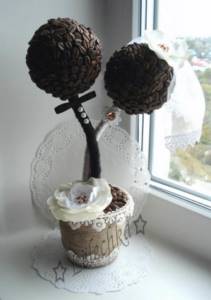
Making a wedding topiary with photographs of the newlyweds and coffee beans

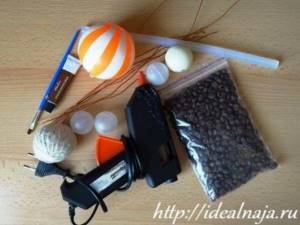
To work you will need:
- Bean, well-roasted coffee
- Photo frame in the shape of a heart
- Cardboard
- Ceramic flower pot
- Wooden sticks for the trunk
- Glue gun
- Alabaster mortar
- Decorations
Stages of making wedding topiary:
- Pour a thick alabaster solution into a ceramic flower pot, in the center of which sticks are placed under the trunk, the number of which depends on the number of photographs and other heart-shaped compositions. These can be sushi sticks, wooden skewers for shish kebab or a beautifully curved tree branch. The trunk can first be wrapped with satin or floral ribbon, covered with beads or sparkles, or spray-painted.
- Using a hot glue gun, coffee beans are glued onto cardboard and a heart-shaped photo frame in two layers to avoid gaps. The first layer of grains is glued with the semicircular side up, the second - with the semicircular side down.
- Photo frames and coffee hearts are glued to the trunks.
- Coffee beans are also glued onto the dried top layer of alabaster. A pot, sticks for trunks, frames and heart compositions can be decorated with ribbon bows, figures of butterflies, doves, dragonflies, lace and other materials, it all depends only on your imagination and the stylistic theme of the wedding celebration.
Do-it-yourself topiary for a wedding: step-by-step instructions
Typically, MKs begin with working with a ball. But in this case, start with a flowerpot. Place a floral sponge in it, and then place a topiary trunk there. The trunk of a tree can be anything - pencils, sushi sticks, twigs and driftwood. Still, it’s better to take something even and straight. On top of this stick you need to attach a base ball. It’s easier to take a foam blank than to make a ball for the crown with your own hands.
But if you’re going to do it yourself, here’s a little master class. Inflate a regular balloon a little; you need to fill it with polyurethane foam from a balloon. The foam will harden, having previously “risen”, the ball will increase in size. Once the rubber ball has hardened, you simply cut it off like the peel of an orange.
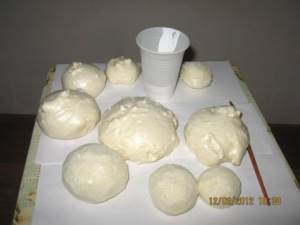
You can make a base balloon without using a balloon. You just need to spray the foam onto the oilcloth base with a small lump, then cut off all excess after hardening using a knife or a round tin can
Well, now to the main MK:
- Cotton balls need to be connected into one sheet, the lower part of it should be treated with PVA glue. Immediately attach the cotton wool to a floral sponge. After the glue has dried, decorate the cotton wool with decorative stones. Such stones can be bought in souvenir shops; they are smooth, not very large, and mother-of-pearl. Choose the shade yourself.
- Petals for the crown can be made from organza. You need to cut out a lot of circles and scorch the edges of the material with a candle.
- Before you start sheathing the crown, you can paint the trunk, and this is where acrylic pearlescent paint comes in handy.
- To get a beautiful crown, you will need the help of sewing pins. This master class offers the following solution - thread a pin that will go through the middle of the organza petal and attach the pin to the base ball. And this must be done with each petal. The organza should thus cover the entire crown.
In fact, the tree for the wedding is ready. But don’t forget about the obligatory finishing decor.
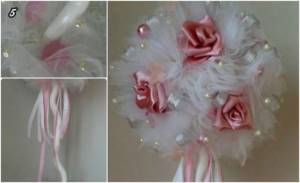
Wedding topiary made of organza (photo master class step by step)
This MK photo will show an alternative way of making a wedding tree from the same materials.
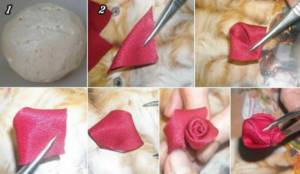
A ball of macroflex is taken as a base and fixed on the trunk. For roses, you need to prepare many squares of fabric with a side length of about 5 cm. How to make a petal is shown in the figure. For one rose you will need 5 petals or more - depends on the size of the future bud
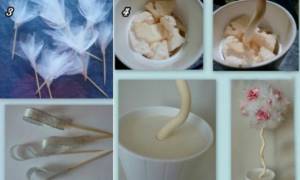
The main decoration of the crown is tulle, so you will need much more of it than roses. The square blank is folded diagonally 2 times and glued to a toothpick. For greater splendor, you can glue 2 elements to a toothpick. Using a thin ribbon, additional decor is made, as shown in the figure. Flowers and beads are strung on thin steel wire. When the decor is ready, we decorate the crown, then fix the tree in a flowerpot, as shown in the photo
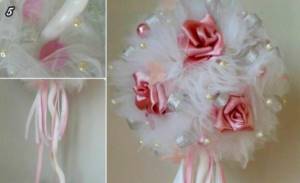
At the final stage, the flower pots are decorated. For this we will need a bow made of satin ribbons, tulle elements without toothpicks, stickers and bugles. You can decorate the flowerpot after the plaster has hardened. The product is ready
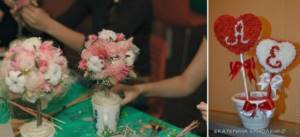
Ideas for creating topiary for a wedding table - photo
Newlyweds from all over the world have already implemented many ideas for decorating a wedding tree. Newspapers, ribbons, lace, corrugated paper, floral mesh, flowers, butterflies, angels and doves can be used as decorative elements. Not only the details of the crown decoration are interesting, but also the containers in which the tree is “planted”. These can be glasses, round, square pots, jars, watering cans. Often, instead of the classic base - a ball - the heroes of the occasion prefer a heart-shaped topiary, emphasizing the romantic nature of the newlyweds' relationship.
Heart made of napkins
A heart-shaped topiary for a wedding, decorated using napkins, is easy to make. You will need the basic elements (pot, solution for attaching the trunk, the trunk itself, the heart base) and napkins of a suitable color that are rolled into balls. The resulting parts need to be completely covered with the heart so that there are no gaps left. See the photo below for this and other types of heart-shaped topiary.

"Cooing Doves"
A pair of doves at a wedding celebration is a symbol meaning reverent love between spouses, peace and harmony in the future family. Beautiful birds can be created using paper, felted wool, and ready-made feather and glass figurines are often used. You can “plant” touching doves on a pot, on the crown of a topiary, or choose a flowerpot with an appropriate design.

Tree with photos of young people
A topiary with a photograph of the newlyweds will decorate the wedding event. A tree with a joint photo of the heroes of the occasion is usually facing the guests. After the wedding, the newlyweds will be able to take the topiary home to eventually insert photos from the wedding celebration. Check out photos of these interesting topiaries below.

DIY wedding tree: finishing touches
You can use anything - beads, feathers, rhinestones, ribbons, lace. Usually “on the spot” it becomes clear what and where will look best. If you have a tree as a gift for your wedding anniversary, then attach a cute card that will be filled with good wishes.
If this is an anniversary gift, then the best decor will be a photograph from the holiday, where the groom and his young wife turned out best.
After the celebration, this decoration will not be removed as unnecessary, like most items from wedding decor, but will migrate with the newlyweds into family life
You can decorate a tree with your own hands like this:
- If you are making a tree in the shabby chic style, which is now fashionable, allow artificial scuffs, and complement this decorative element with others - an old vintage watch, a retro figurine of newlyweds, etc. This is a great solution for an anniversary. This composition can also decorate a holiday table.
- You can indicate the reason for which such a tree was created like this - just buy a pot on which a composition has already been made with wedding rings and other attributes of the celebration. And this souvenir will definitely decorate the festive table, the zone of the young.
You can also put a ring at the foot of the tree, and thus present another gift to your wife. Or earrings, or some other piece of jewelry. This is the best decor for a tree.
Wedding tree: do it yourself
Modern weddings rarely do without traditions. In many ways, they adopted age-old rituals, slightly modifying them. These include the customs of installing a money tree and a tree of happiness at a wedding, consisting of wishes to the newlyweds.
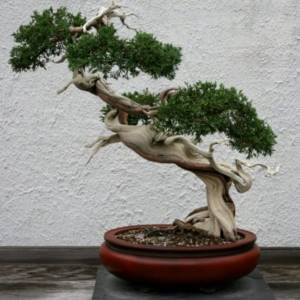
Photo of a wedding tree - bonsai
You can make such decorative elements yourself or do it easier. You can purchase a bonsai (a miniature tree in a pot) for this purpose, or use a small tree or shrub growing in your garden. The latter option is ideal for an outdoor wedding ceremony or a wedding taking place in the fresh air. Attach cards with wishes directly to the branches of such a tree and decorate it with bright ribbons.
How to make a tree of life for newlyweds
There are two possibilities here. The first of them is to draw such a tree on fabric, paper or directly on the wall. Sometimes you can find embroidery. Draw a spreading tree on the material or make an applique. Your task is to create a full-fledged drawing or template onto which further decor will be applied.
Such a tree for a wedding should be made in such a way that the role of its leaves is played by either guest cards or handprints of the guests. Then, on these “leaflets”, each invitee will write a wish for the newlyweds. It is worth thinking in advance where you will attach the drawn image in the future.

Photo of a DIY wedding tree
The second option is to create a three-dimensional tree. To do this, you will have to stock up on foam plastic, wire, real wood branches, and design materials. An important element of the design is the base. A ceramic pot can play its role, the main thing is that it is stable. Fill the pot with earth, plasticine, clay . The filler should give the tree additional stability and firmly hold the structure itself.
The next step is installing the barrel. It can be a metal rod, a tube, or even a thick branch of a real tree. Such a trunk does not have to be straight. The more interesting you make your family tree, the better. Cover the future trunk with glue, and apply paper or braid on top in layers .
Branches are attached to the trunk (for example, from wire). If you want to see the tree as bright as possible, use beads or beads to decorate them. By the way, the branches themselves can be made from beads, for which it is carefully strung on fishing line or threads, and then secured with loops. It is to these loops that you will later attach leaves of wishes.
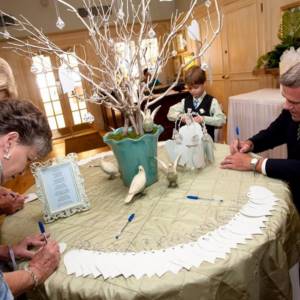
Photo of a homemade tree made of polystyrene foam and wire
How to make a money tree with your own hands?
This wedding accessory is created similarly to a wish tree. The most popular version is to attach a foam ball to the barrel. You can stick banknotes on brackets or pins into such a ball.

Photo of a money tree made by yourself
Try to design the banknotes beautifully. Most often, each of them is rolled into a cone and then inflorescences are formed. The more magnificent the money tree is , the richer the future family will become. You can also use a living plant - a fat plant, which in everyday life is called a money tree. Carefully attach banknotes to its branches. And remember - a tree present at a wedding will definitely bring good luck to the newlyweds!
Wedding topiary (photo ideas)
What to do with the tree of love after the wedding?
Of course, you shouldn’t deprive your tree of attention after planting. If it was planted in the city, of course, it will be taken care of even without the newlyweds. But it’s worth visiting him - who knows, maybe the words about energy are true? If the tree was planted in the forest, it is worth visiting periodically to monitor its fate. Naturally, a tree in your own yard or garden needs to be constantly looked after - and then it will give the young family flowers in the spring and fruits in the summer. However, even a non-fruit tree will delight you with its appearance. And the whole family can decorate the same Christmas tree for the New Year.

Planting the Tree of Love is not just a beautiful “one-time” tradition. It is believed that a family plant reacts very sensitively to spouses, and if there are quarrels in the family, it dries out and gets sick. So the most important thing is to grow feelings for each other and enjoy every day spent together.
How to make a heart-shaped topiary
A heart-shaped topiary will be very appropriate and symbolic at a wedding celebration. Also, such a tree will be a great gift for newlyweds. It can be done in red and white colors. You can do it by reading our master class.

Materials:
- Napkins
- Heart (from any material)
- Superglue or PVA glue
- Sheets of paper
- Red paint
- Branch
- Scissors
- Red beads
- White nail polish
- Red satin ribbon
- Water
- Cling film
- Flowerpot
- Gravel
- Brush
- Stationery knife
Step-by-step instruction:
- Tear the paper into pieces. Mix water and glue and soak the paper in it. Wrap the heart-shaped shape in film and cover it with paper. After the product has dried, cut through the side with a knife and separate the mold from the base.
- Cut the napkins into squares. Place the felt-tip pen in the middle of the square and hold it in this position, wrap the edges over the rod.
- Spread glue on the heart blank and attach the resulting product, then pull out the felt-tip pen.
- Paint the branch with white varnish, then place it in a flowerpot. Then fill the flowerpot with stones. Attach a heart to the trunk. Make a bow from a satin ribbon and secure it to the trunk.
KNOWLEDGE BASE: DIY butterfly for the groom and images with a butterfly
Ready!
Topiary: history of appearance and significance in modern interiors
The word topiary or topiary comes from the term “topia” - a decorative garden plot. The concept came from Ancient Rome and meant various figures carved from the crowns of trees or bushes.
Ancient Roman civilization disappeared, but the idea of beautifully decorating gardens was picked up by the Catholic Church. Then topiary entered social life. Their heyday came in the 17th century: it was then that decorative trees appeared in the residences of rulers of states, incl. and in the Russian Empire.
Then they were forgotten, but in the 20th century topiaries became popular again. Now they were no longer used to decorate gardens and palace walls, but were planted in pots. Today, topiaries are no longer planted. They can be made from any materials.
Topiaries are made in the most bizarre shapes and colors, often combining materials in quite controversial ways. They are otherwise called trees of happiness, believing that they bring joy to the house.
They can be made from:
- coffee beans;
- walnuts;
- fir cones;
- straw;
- sweets;
- napkins;
- silk ribbons;
- plastic bags, etc.