A veil is a decorative part of a woman’s headdress or an additional element of a hairstyle. It exists as a type of veil, performing the same functions - covering the face. Unlike a long veil, a veil is lighter, translucent or completely weightless. Popular as a wedding or holiday accessory. A veil made quickly and easily with your own hands can be made quickly. This accessory will help refresh your look and add romance to it.
You will need:
- Any tape for rigidity (usually crossbar is used for hats);
- fabric for the hat (velvet, satin, felt, etc.);
- fabric for the bow (can be contrasting);
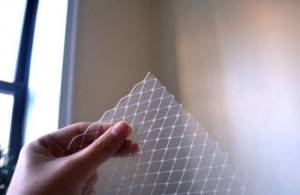
- mesh (for veil);
- padding polyester for lining;
- threads, needle, scissors, pins;
- glue;
- hoop, comb or hairpins for attaching the hat
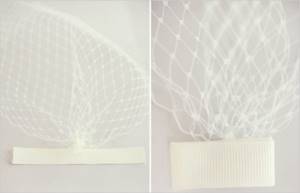
The basis will be crossbar tape, which is used to strengthen the seams.
Twist a ring out of it, the circumference is 50cm. Ribs are made from 20 cm strips. You can attach the tape with glue or hand stitches. This base is sheathed with one or several layers of padding polyester, which will create the necessary volume.
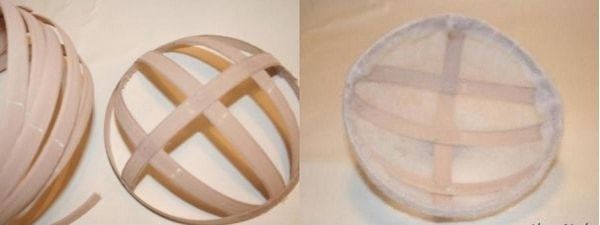
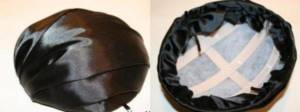
The workpiece is draped with satin fabric (a denser fabric is applied in one layer). The edges are hidden under the hat. After this, the lining is sewn to the wrong side. To do this, cut a circle of fabric with a radius of 15 cm.
For a veil, cut out a circle of the required size from transparent fabric. If the fabric is soft, it is better to make the circle larger to drape the veil vertically.
The veil is attached to the back of the hat, decorating the junction with a bow or other decorative details. To achieve a beautiful drape, try on the hat, securing the fabric with pins.
Secure the desired option with threads. Attach the finished hat to a hoop, comb or hairpin.
Some interesting models for inspiration:
Source: https://cpykami.ru/velikolepnuyu-shlyapku-s-vualyu/
DIY veil for a girl - master class on how to create
Published Aug 22, 2017
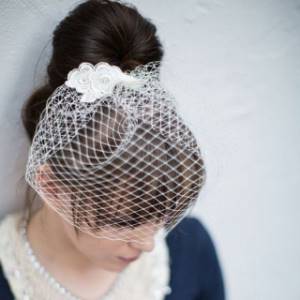
When you see a veil, you just want to say “Voilà.” This cute accessory makes the owner’s look more feminine, mysterious and light. Fascinators are perfect for both girls and women. We will also pay attention to the youngest ladies who also dream of having their own unique jewelry. We will create a delicate veil for them with our own hands.
Our veil will consist of a mesh and a hand-made flower, we will attach it to the hair using a small comb. Light-colored materials were selected for the work, which gives the product an elegant look and is perfect for any outfit. Let's get creative.
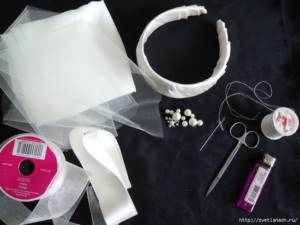
Prepare for work
- thick paper;
- white (or cream, beige, etc.) fabric;
- mesh veil (60 cm x 45 cm);
- ribbon to match the fabric;
- thread;
- needle;
- scissors;
- pencil;
- glue;
- crest;
- barrette.
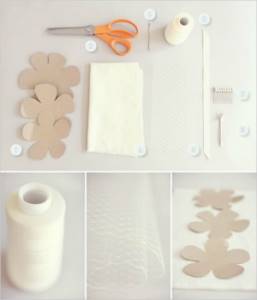
Materials and tools for needlework
Instructions for making a veil with your own hands for a girl
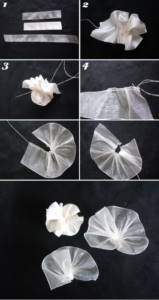
- We take paper and draw flowers on it that are approximately equal in size. We cut out the blanks.
- Using the prepared stencil, cut out flowers (3-4 pieces) from the fabric.
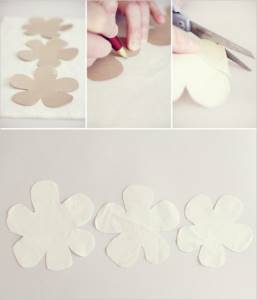
Cutting flowers from fabric
- We place the flowers on top of each other, placing the largest one on the bottom.
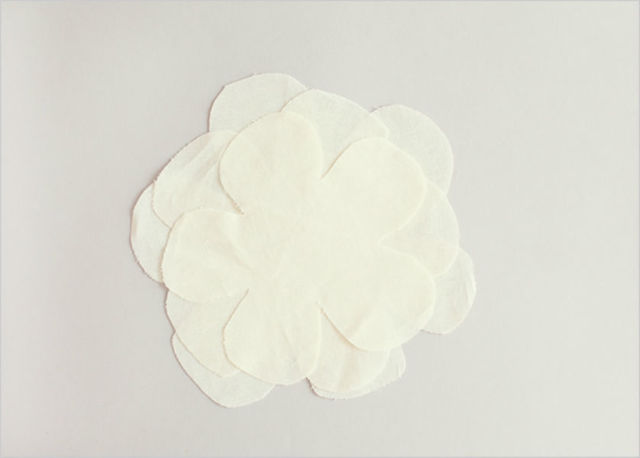
Forming a flower
- We fold our blanks in half, then in half again. Holding the base with your finger, straighten the flower.

Finalizing the decorative element
- We fix the base of the flower with a thread and a needle.
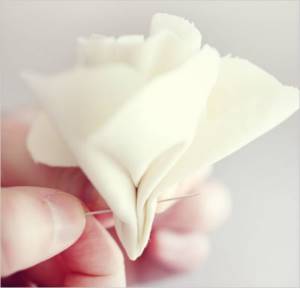
Carefully sew the base of the flower
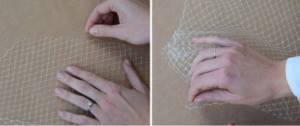
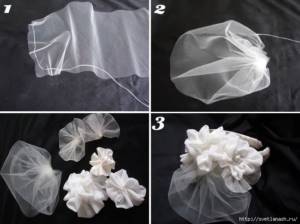
- Take the mesh and assemble its short sides.
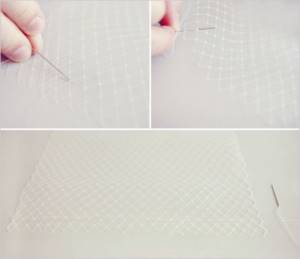
Working with the short sides of the mesh
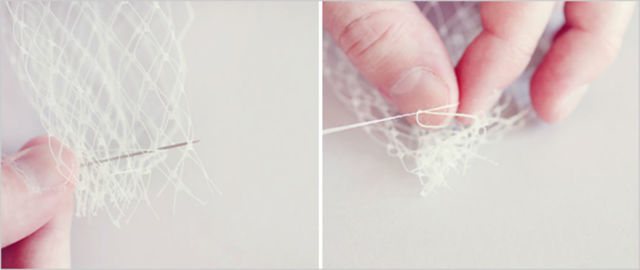
Fixing the thread
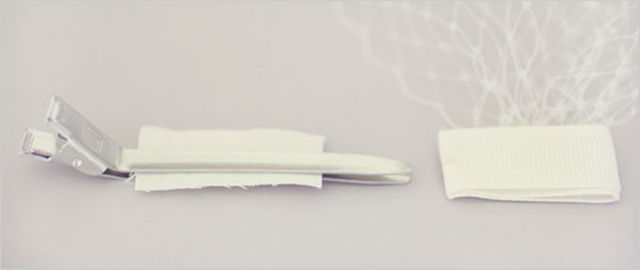
- We sew one side of the mesh to the tape, as shown in the figure.
We use tape in our work
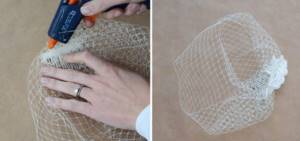
- Glue a piece of fabric to the hairpin. We paste our previous blank onto it - a tape with a mesh. For reliability, we sew these two pieces of fabric together.
Connecting the fabric and the hairpin
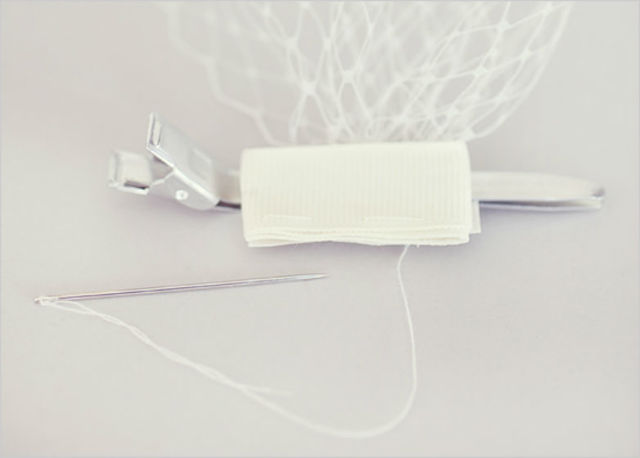
We fix two fabric bases
- We sew our flower to the fabric.
Place the flower on the hairpin - We sew (or glue) a comb to the opposite side of the mesh.
Don't forget about the comb
An irresistible snow-white veil for a girl is ready! Your little princess will be happy and look very stylish.
Video tutorial on creating a veil for a girl
- Catherine
Source: https://lachat.ru/handmade/master-class/vualetka-svoimi-rukami-dlya-devochki
Elegant DIY veil
The oldest and most elegant decoration for girls is the veil. It gives its owners mystery, naivety, style and femininity.
- Despite the fact that store shelves are full of all kinds of different jewelry, it is not so easy for girls to find something for themselves that would emphasize their individuality.
- If you want to get something original, individual, create with your own hands the thing that will accompany you at a party, photo shoot or wedding, complementing your image.
- For example, an elegant veil on a headband is a clear opportunity to create jewelry following your imagination and desire to create, since this jewelry is easy to make and looks very stylish and unusual.
- In this case, the headband is used as the basis for the veil, but it can also be done on a comb.
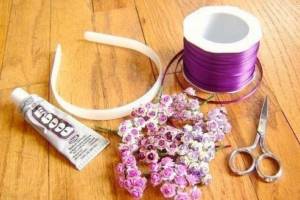
Let's proceed to the first stage. Preparation of the necessary materials .
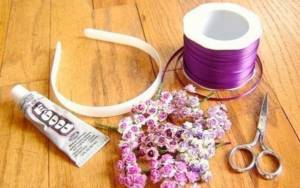
We will need:
- Tape for wrapping the headband
- Needle, scissors and thread (matching the color of the fabric)
- Fine mesh
- Chiffon
- Various beads, beads, crystals from Swarovski
- Transparent thread for sewing on decorations
- Satin and organza ribbon.
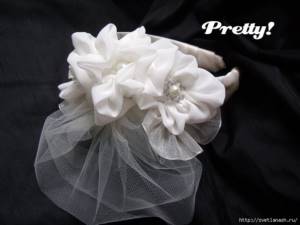
Second phase. Making satin and organza flowers.
We take organza and satin, cut off strips of 25 centimeters, and another strip of organza measuring 40 centimeters.
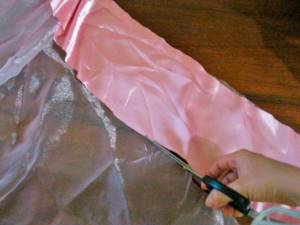
Secure the thread in the needle with a knot. Then make two ties in the center of the first narrow edge of the satin and sew with plain stitches to the second narrow edge of the ribbon. Having reached the end of the strip, tighten it tighter, you get a flower. Secure the thread with two stitches and then cut it.
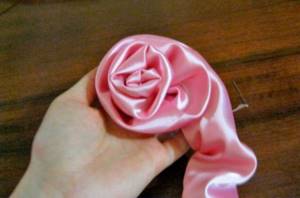
Then we make a flower from organza: we repeat all the above steps, but now only with organza. Only now the seam will go along the long edge of the tape. Once finished, pull the fabric together to form a flower, tie the thread, and then cut it off.
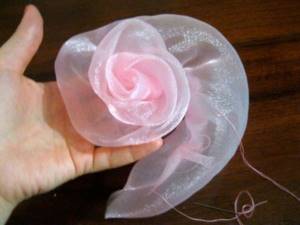
Third stage. We make two flowers from chiffon.
Cut two chiffon ribbons. Raw and uneven edges will be hidden and will not be visible. Fold the ribbon horizontally and sew along the entire length of the edge. Secure the thread with a knot and cut. Do the same with the second strip.
Fourth stage. Veil made of fine mesh.

Cut a couple of mesh rectangles. You choose the sizes yourself.
Then sew from the first narrow edge, going along the entire bottom length, to the other small edge. Thus making a seam similar to the letter “c”. Now pull the mesh a little, secure the thread and cut. We repeat the same process with the second rectangle. Then sew the two meshes together in the middle.
You have: two chiffon flowers, two organza flowers, one satin flower and two veils. It's time to put all the pieces together.
Carefully sew all the flowers onto the headband. Do it the way you like best. Then try on the resulting headband! Bring the veil and move it in the direction you like best. Having found the right place, grab it with a pin, remove the hoop from your head and sew the veil well.
Tip: Before sewing the flowers to the hoop, decorate them with various decorative beads.
An exclusive and elegant accessory that emphasizes your individuality is ready! With such beauty, you definitely need to go out and shine!
Rate us: Loading...
Source: https://LadyTag.ru/74-vual-svoimi-rukami.html
What dress would a veil go with?
Now there are many variations of this wardrobe detail - for every taste and even color. But the most common - white veils symbolize innocence and purity. The veil on the headband can be safely combined with various wedding elements, creating completely unique and inimitable compositions. To make the image original and effective, remember the nuances that will help you make the right choice of dress:
- The veil is often used in retro style, so it goes best with vintage dresses. Veils look great with short (mini and midi) dresses in the style of the 60s. But pillbox hats with hoops are not suitable for such dresses.
- For a pompous wedding dress with lots of decorations, a headband with a veil without an ornament is suitable.
- This type of dress goes well with a cocktail dress or a chic evening dress.
- An excellent choice is a veil and a short outfit.
- A small, undecorated veil that completely covers the face is ideal for a sexy fitted dress.
- The composition of a veil on a hoop and a wedding trouser suit looks harmonious.
- A simple outfit without any decoration is combined with a veil decorated with pearls, beads or rhinestones.
DIY veil. Jewelry for the bride
Wedding portal Articles DIY accessories Jewelry for the bride
The classic version of the veil is becoming a thing of the past, giving way to more interesting accessories. One of these is the veil, which adds femininity and elegance to the bride’s image.
This stylish attribute can be purchased in a store or wedding salon, or you can make it yourself. To do this you will need a minimum of materials and a little patience and imagination. The Svadebka.ws portal presents to your attention a simple master class with which you can create an elegant veil that will become the highlight of your wedding look.
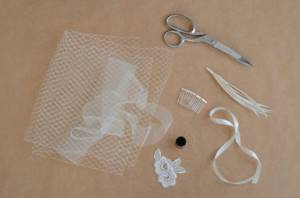
Materials and tools:
- tulle of different types;
- crest;
- flower applique;
- glue;
- scissors.
Time : 30 minutes.
Detailed instructions:
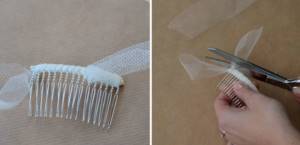
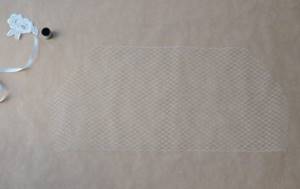
Cut 2 pieces of tulle measuring 14*14 cm.
Trim the two sharp edges into the square, making a semicircle.
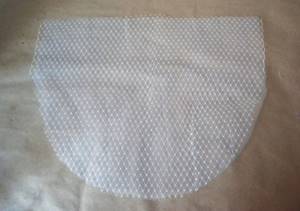
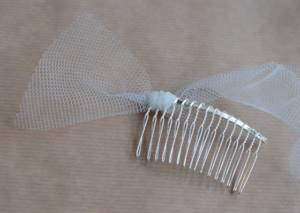
Glue the sharp corners of the tulle to the ends of the comb.
Then apply glue to the middle of the comb and glue the center of the tulle.
Glue the entire tulle to the comb in the same way.
It should turn out like this!
Apply glue to the flower applique.
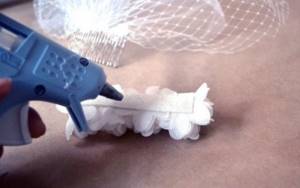
Glue the applique to the comb.
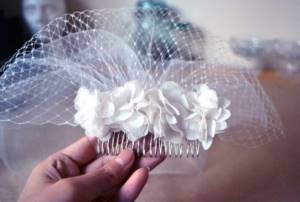
The veil is ready!
Application options
Based on such a simple material as tulle, you can create a wide variety of veils. It is enough just to apply a little imagination regarding their decoration.
As decorative elements, you can use both the proposed floral appliqués and beads, rhinestones, Swarovski stones, feathers, etc. The main thing is that the decoration you create fits perfectly into your wedding look.
Then on your wedding day you will look simply perfect, the portal www.svadebka.ws is sure!
Articles in section (162)
The main accessory of a bride's wedding look is the veil. But the newlywed can also wear this element to the pre-wedding party, making her image more original and thematic. Moreover, you can easily make a veil for a bachelorette party yourself!
It’s hard to imagine a wedding hairstyle without some interesting accessory that makes it original and impressive. Can't find anything suitable in stores and salons? You can make your own hair decoration for the bride!
DIY veil, master class
An elegant, laconic and simple accessory - a DIY wedding veil.
This step-by-step master class will tell you all the secrets of how to make a veil yourself!
The veil is ideal for brides who plan to move and dance a lot, who want to look stylish and unusual, but at the same time maintain something traditional in their image.
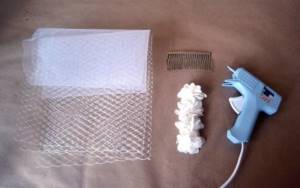
DIY veil materials
- plastic or metal comb,
- 1 m of fine mesh tulle,
- 1 m of tulle in a large mesh,
- white thread and needle,
- glue gun,
- lace,
- decorations to taste.
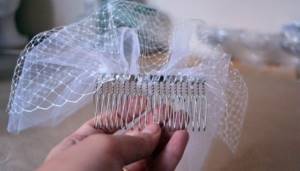
Step 1
Take a comb and fine mesh tulle.
Cut a strip 5 cm wide and wrap the tulle around the comb.
Step 2
Wrap another layer of tulle around the comb, tie a knot, and cut off the excess.
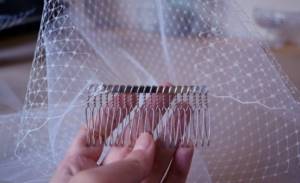
Step 3
Now take the tulle in a large mesh and cut a piece 30 cm wide.
Place on the table and cut off the top edges symmetrically to create a trapezoid.
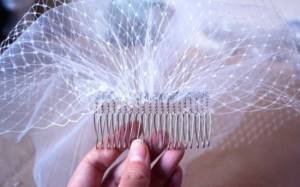
Step 4
Pull the needle and thread through the mesh cells along the top edge.
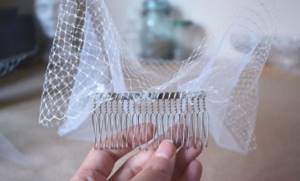
Then remove the needle and pull the thread tightly so that the tulle comes together. Tie a knot and cut off the excess thread.
Step 5
Heat up the glue gun and connect the comb to the tulle. Glue lace and any other decoration of your choice.
If desired, you can sew on decorative elements.
The veil is ready!
DIY wedding veil video
The video shows another simple example of how to make a beautiful veil with your own hands
Enjoy your preparations and have a magical wedding!
Source: https://OneBigDay.ru/vualetka-svoimi-rukami/
LiveInternetLiveInternet
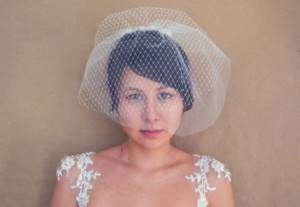
Recently, many brides prefer to wear not a traditional veil to their wedding, but a vintage veil, which looks very beautiful and romantic.

It costs quite a lot. It is much easier to make a veil with your own hands. In this master class, a headband is used as the basis for the veil. But you can also place the veil on the comb to make it look more elegant.
We will need:
1. Fabric or ribbon to wrap the headband
2. Thread, needle
3. Scissors
4. Chiffon fabric
5. Tulle or fine mesh
6. Organza and satin ribbon
7. Beads (you can use Swarovski crystals for a chic and professional look to the veil)
8. Invisible thread for sewing on crystals and beads
9. Hot gun just in case
How to make flowers from ribbons:
Cut a strip of organza and satin ribbon 20 and a half cm long. And also another organza ribbon 40 cm long. To create the first flower, make a knot on the thread with a needle, make a couple of stitches on one end of the satin ribbon in the middle and sew with the most common stitch " needle forward." When you reach the end of the ribbon, pull the entire ribbon tighter to create a double flower. Do not cut the thread yet. Then secure the thread with two stitches so that the flower does not fall apart, and you can cut the thread. Now we create an organza flower: we repeat the whole process, as with a satin ribbon, only we make a seam not in the middle, but from one edge of the ribbon, as shown in Figure 4. Once you have sewn it to the end, assemble the organza into a flower, secure it with a knot and cut the thread.
How to make chiffon flowers:
Cut two strips of chiffon. Don't worry about rough or jagged edges, they won't show. Also try to play with the length and width of the stripes to get different flowers. Fold the chiffon strip in half and start sewing with a needle-forward seam along the edges of the cuts, as shown in Figure 2. Once you have sewn to the end of the fabric, gather it again and sew the ends of the strip together. Secure with a knot and cut the thread. Repeat the process with the second chiffon strip.

How to make a tulle veil:
Cut two rectangles from tulle. Again, you can play with the sizes, you don't have to be super precise with the sizes.
Now start sewing from one narrow edge, continue sewing along the long edge and finish sewing at the end of the second narrow edge. You will get the letter C from the thread, that is, one long edge will remain unstitched. Now gather the tulle and form a veil, as in Figure 2. Fasten the thread and cut it. Repeat the entire process with the second tulle rectangle. And sew both veils together in the middle. You have the following items available: 2 organza flowers, 1 satin flower, 2 chiffon flowers and 2 veils sewn together. Now it's time to put the whole ensemble together. You need to carefully sew all your flowers onto the headband (or you can use a hot gun). You can arrange the flowers in any order, do it the way you like best. But first, try on a tulle veil! Put the headband on your head, place the veil against the headband and turn it in the direction you think the veil will look most advantageous. Once you have found the correct angle, carefully pin it with a needle, remove it from your head and carefully sew the veil to the headband. Helpful tip: Before sewing the flowers to the headband, decorate them with beads and crystals!
The beautiful wedding veil on the headband is ready!

Based on materials from prosvadby.com
Do you need to order a comfortable and respectable limousine for wedding events? Only in the catalog https://rentmeua.com/kiev/arenda-limuzina-kiev/ you can find and rent limousines inexpensively. Here you can get the most accurate and objective information for a quality choice of a limousine for a wedding: from photos of cars to the cost of renting them. White and black, big and small, long and short, whatever you want can be found here!
Instructions. DIY wedding hat
Not all modern fashionista brides are happy to follow classic traditions. Some are ready to replace the usual veil with an elegant hat with a veil. If the assortment presented in stores does not suit you, then you can try to create your own.
Features of self-production
Before you start work, you need to think through everything carefully. First, you should estimate what financial costs await you and how long it will take to make a wedding hat with your own hands.
The budget will directly depend on the style you choose and consumables. So, a mini hat made with a balloon, thread and glue and additionally decorated with flowers or rhinestones will cost you about 500 rubles .

More luxurious options, using fabric, lining material and mesh , will be more expensive, but it is quite possible to stay within 800-1000 rubles .
Don't expect everything to work out quickly and easily . 2-3 days left . If you are starting to sew a hat for the first time, then a slow pace and some mistakes or even alterations are very likely. On average, the work takes from several hours to a day.
Which material to choose?
satin and velvet, shimmering silk and satin are perfect . For airy products, you can choose light fabrics: organza, tulle, chiffon . Denser materials are also suitable: corduroy, suede, fur .
How to attach?
When creating a headdress with your own hands, you need to think in advance about the possibilities of attaching it to your hair .
- Hairpins will help securely hold the hat on your hair. But to attach them, it is necessary to make special loops on the finished product.
- Headbands . A miniature hat can be glued to a headband, which is simply put on the head.
- Combs and hairpins are also a good option for attaching a headdress. They can simply be sewn to the hat.
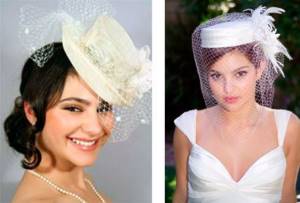
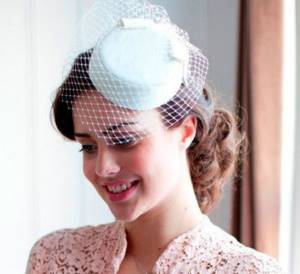
Photos of wedding veils with a headband
The convenience of a veil headband is easy to appreciate when, during a holiday, you have to take off and put on a headdress every now and then, for example, during a photo shoot, or when you need to correct your hairstyle. Sometimes at a wedding ceremony, girls use several veils: for example, headbands with a double mesh (on the face and a bow) are worn for the wedding so that the veil covers most of the head, and after that the headdress is replaced with a shorter version. Look at the photo below to choose the best option for a veil with a headband.