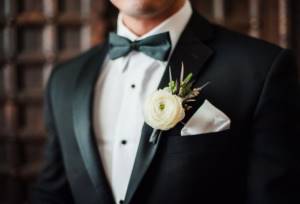
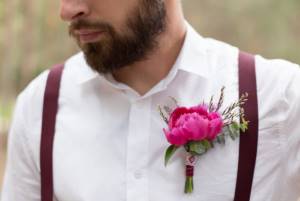
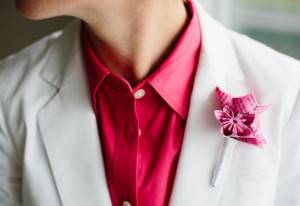
Nowadays there are no strict requirements for the groom’s suit - the style can be the simplest, it is not necessary to follow the classic style. To emphasize the solemnity of the event, there should be a boutonniere in the breast pocket of the jacket. For the groom to make a small attribute with his own hands is not at all difficult - all you need to do is purchase the necessary materials and follow the step-by-step instructions.
Where did the tradition come from?
The word “boutonniere” came into Russian from French; literally translated, it means “flower in the buttonhole.” The attribute itself has been known since pagan times. Men attached a small bud to their wedding vestments before the ceremony, it was believed that this would scare away evil spirits.
Different cultures believed that if this was not done, evil spirits could lead the groom astray from his chosen path, and the wedding would not take place. According to other beliefs, the absence of a boutonniere could provoke misfortune with the bride, so men strictly adhered to this tradition.
In the Middle Ages, the attribute began to be used by knights - by pinning a flower to their clothes on the side of the heart, they said that they were in love and faithful to their lady. At that time, only noble people wore boutonnieres; the miniature bouquet was made by servants. To keep it fresh longer, it was placed in a small flask with water and attached to clothing.
According to the established tradition, after the bride price, the groom gives his beloved a bouquet, and she, in turn, attaches a boutonniere to his suit. You can place it in the main flower arrangement in advance. Then, after the groom gives the bride a bouquet, she will take a flower from it and attach it to her future husband on the side of her heart as a sign of eternal love, as happened in Rome.
In the modern wedding tradition, a boutonniere is more of a tribute to tradition; no sacred meaning is attached to it. This attribute can be ordered from a florist or made by yourself. For this you can use both natural and artificial plants. Usually the bride is responsible for making a mini-bouquet, so the girl can use her imagination and create a unique composition.
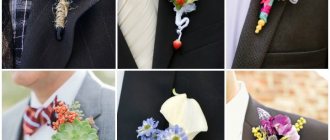
Important! The groom should fasten the boutonniere on the left side of the pocket or lapel of his jacket. If the attribute is also made for guests, single men attach it to the left, married men to the right.
Rules for making boutonnieres from ribbons
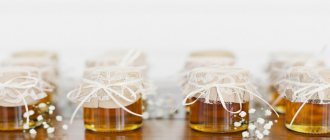
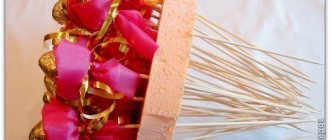
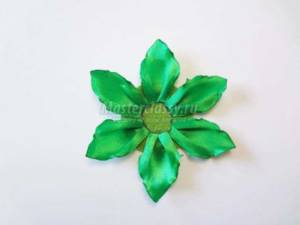
A boutonniere made with ribbons will never lose its freshness, so you don’t have to worry about its appearance. Artificial material is a lifesaver at winter weddings, when frost has a detrimental effect on fresh flowers. The ribbon allows you to create completely different compositions or use it as an addition to a classic flower. Initially, the word boutonniere meant “flower in the buttonhole” when translated from French. The prototype of this accessory was a small bottle with a miniature composition or one flower.
Modern boutonnieres are pinned to clothes; they can decorate a woman’s wrists and hairstyles. In most cases, this accessory is found on the groom's jacket. It is perceived as an essential component of the image. According to the rules, this attribute must be in harmony with the bouquet that the bride is holding. When compiling it, you should be guided by the following rules:
Think over the design, taking into account the theme of the upcoming event, the placement location, for example, on the arm, on the lapel. Ribbon flowers should match each other and harmonize with the outfit. You should not skimp on material; choose high-quality tapes. In addition, it is worth buying them with a reserve so that you can remake them. Don't make the accessory too big. The central flower should not be huge, taking up the entire lapel of the jacket, as this looks vulgar. If you are going to supplement the ribbon composition with a sprig of a fresh flower, then choose one that will not cause allergies. Give preference to those specimens that have a minimum amount of pollen, and artificial materials should not contain easily sprayed coloring elements or dust. If you decide to make ribbon accessories for all witnesses, you don’t have to make them the same. Even if they differ from each other, they are not superior in splendor to the one that adorns the groom. The chosen color of the ribbons should be combined with the outfit and accessories.
Types of accessories
As such, there is no division of boutonnieres into varieties; they can be roughly divided into living and artificial. A mini-wedding composition can also be classified according to style - if the celebration is thematic, then all the attributes must correspond to the general idea.
If earlier a separate large flower was used as a boutonniere, now there is another option - creating a real miniature bouquet from one main plant and several additional ones. A boutonniere for the groom made from fresh flowers can carry a deeper meaning, according to the language of flowers.
The following plants are commonly used:
- Rose. The most common flower for weddings. A white bud means innocence, a red boutonniere for the groom means passion, pink means the beginning of love, yellow means happiness and joy, and orange means intoxicating feelings.
- Peony. A boutonniere for the groom made of peonies, regardless of the shade, symbolizes love, beauty and protection. This is one of the noblest flowers in China; only noble people could grow it.
- Lily. A large bud symbolizes purity, wealth and prosperity in the family.
- Lilac . If the wedding takes place in the spring, lilac is one of the best options, since it is identified with the first and only love.
- Calla. Symbolizes love blessed by higher powers.
- Jasmine. In some countries, modesty and purity of love are attributed to this flower, in others it is believed that it symbolizes passion and ardor of feelings.
- Mistletoe. It has long been considered a symbol of lovers.
- Daisy. Symbolizes eternal pure love.
- Aster. Identified with grace, sincerity and love.
Depending on the style of the wedding, the boutonniere can be supplemented with other natural elements at your discretion. For example, cereal ears, bird feathers, wildflowers, twigs with berries, leaves or blades of grass of bizarre shapes are suitable.
A boutonniere made from artificial materials also has its advantages - it will not lose its original appearance during the celebration and will remain with the newlyweds for many years as a symbol of strong love. To make an attribute, satin ribbons, beads, pieces of fabric and other materials can be useful.
Attention! It is not necessary to follow the language of flowers; you can use any plants you like if they suit the image of the groom and the style of the wedding as a whole. However, if it is important to you what flowers symbolize, we examined this in more detail using the example of a wedding bouquet.
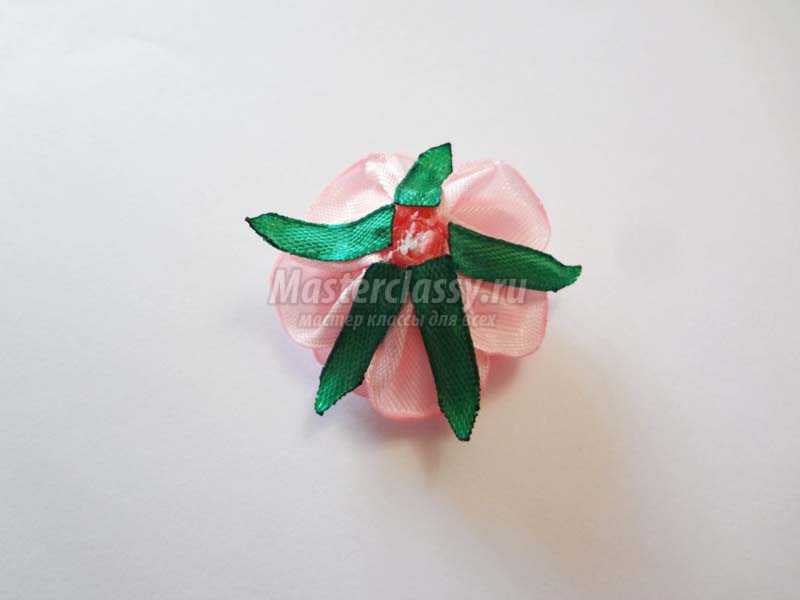
How to make a boutonniere from satin ribbons for the groom
Making a boutonniere with your own hands using ribbons for the groom is not too long or troublesome. When you have decided on the main composition, you should collect all the decorations that will serve as an addition. Walk around your apartment and you will definitely find something interesting: rhinestones, buttons, beads, bows, wire, mesh, ribbons. If the stem of a living flower is inserted into the composition, it is better to play it safe and purchase several. After all, plants are very fragile and can be easily damaged.
You should not overload the accessory with details such as bows and beads, since the line between elegance and absurdity is very easy to step over. Don’t be afraid to use your imagination, because this approach will allow you to create a stylish, beautiful and unique decoration. The main thing is that there is no rush, then the result will please you. If you have a desire to make a boutonniere with your own hands using ribbons, we are ready to share a master class with you.
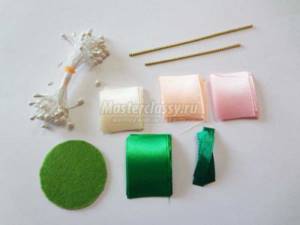
Necessary materials
To create you will need the following:
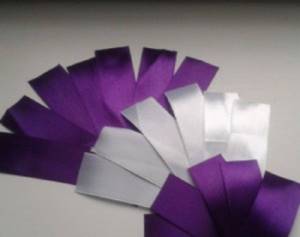
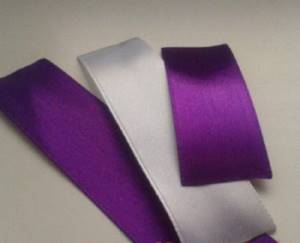
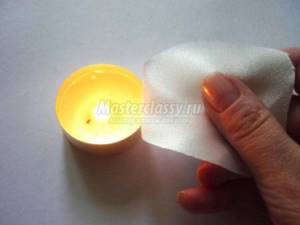
matching threads, needle; satin ribbons of one, two, or three colors, the width of which is 2.5 cm; scissors; candle; decorative pin; button; ruler.
Stages of creation
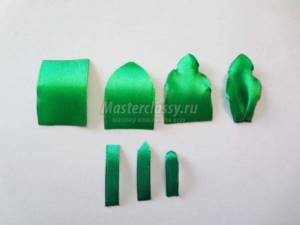
We cut the ribbons into the following sections: 6 by 8.5 cm, 7 sections by 11 cm, 5 by 6 cm.
We seal the edges with fire so that they do not crumble. We carefully pass the burning candle over the braid.
We bend the 11 cm tape in the middle to form a right angle. We bend the edge that is directed to the right back, comparing it with the base. The first petal is ready.
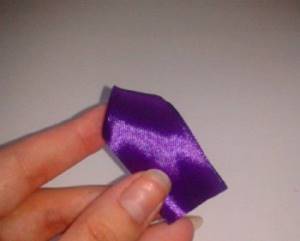
We thread the base of the leaf with small stitches and lower it to the knotted end of the thread.
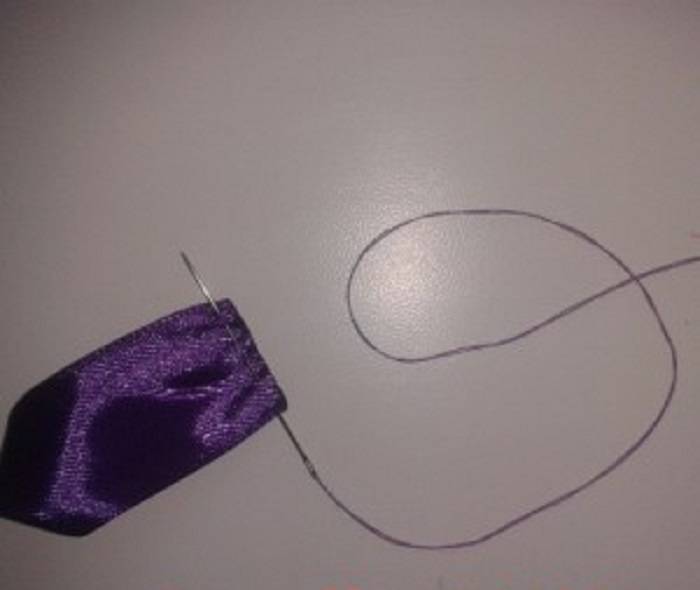
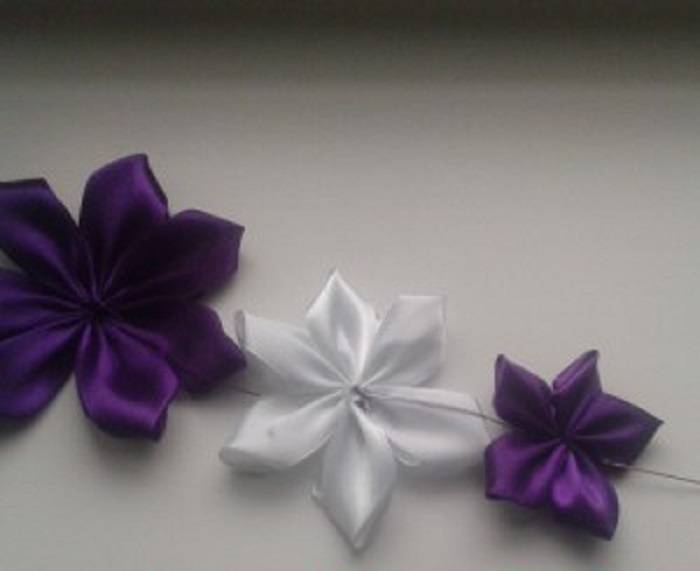
We do this with the remaining six pieces of ribbon. We collect the flower with threads and secure it tightly with a knot.
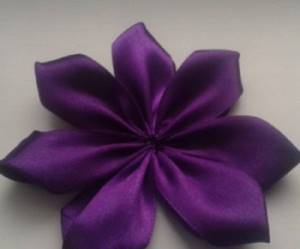
We will do the same with ribbons of 8.5 and 6 cm. Three flowers of different sizes are ready.
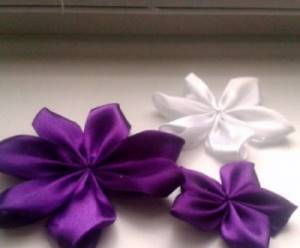
It is necessary to connect the flower by threading a thread through the center of the largest, medium and small.
Sew on a button. From the reverse side, a decorative pin is threaded through the boutonniere and attached to the jacket.
Do it yourself
Let's consider the most sophisticated options.
Mini composition
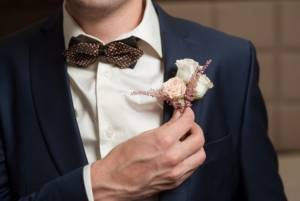
How to make a boutonniere for the groom? The easiest option to create a mini-composition is to use one large bud and several branches with small inflorescences or berries. Many people prefer to choose a rose, lily or kala for this, which are suitable for almost any image , and the shade can be selected depending on the color of the groom’s suit.
To make a boutonniere, you will need the following materials:
- 1 large fresh flower (you can take several, with a reserve);
- sprigs of gypsophila or hypericum;
- green tape;
- floral wire;
- safety pin for fastening;
- scissors.
Before creating a boutonniere, you need to cut the stem of the plant at an acute angle and place it in water for at least 4 hours, this will allow the bud to stay fresh longer. It is advisable to decide in advance on the desired length; usually 1 cm of stem is enough to create a durable composition. It is recommended to dip a cut of a flower in liquid paraffin or wax so that there are no wet spots left on the groom’s suit.
Then you need to cut two pieces of wire approximately 7 cm long, pierce the stem crosswise with them as close to the bud as possible and bend them parallel to the stem. Additional plant branches also need to be strung on floral wire, bent on one side with a hook. Having collected all the elements together, you need to intertwine the wires together and wrap them tightly with tape. The finished boutonniere is secured with a safety pin.
Gypsophila and hypericum are more suitable for roses or peonies, and for lilies and callas it is better to choose greens without inflorescences, but with larger leaves.
In the form of a mini bouquet with lavender
If the wedding will be held in the style of Provence, rustic, vintage, or the newlyweds simply decided to hold the celebration in the fresh air, it is best to make a flower arrangement of wildflowers. In this case, lavender is often chosen as the base, which symbolizes admiration.
You can use lavender as a single composition, wrapping it in a kind of linen wrapper. In addition, you can add additional elements - spikelets of cereals, thin green blades of grass or small wildflowers in pastel shades. This boutonniere should not be weighed down with bright accents or large buds. You should not use wire; it is better to secure the mini-bouquet with twine or other material that suits the style.
Beaded boutonniere
A boutonniere made of beads will become a truly beautiful and unusual decoration for the groom’s wedding suit.
Below are detailed instructions with photos on how to make such a brooch in the shape of a forget-me-not.
- Take a wire 50 cm long and string 10 beads on it.
- Bend the wire in half and twist the ends, fixing them.
- String beads onto each tail, bend the wire along the contour and secure the ends again.
- Do this procedure again. The first petal is ready.
- Make 5 more petals in the same way. The distance between them is 1 cm.
- Take a wire 10 cm long and put a large white or yellow bead on it.
- Bend the wire in half and twist the ends together.
- Place the wire with the bead in the center of the petal blank.
- Secure the ends of the wire by crossing them.
- Wrap the stem with green adhesive tape.
Forget-me-not is ready.
You can make 3-5 of these flowers depending on the size of the boutonniere.
Video on how to make a boutonniere from beads.
Stylist
Unusual boutonnieres for the groom should be combined with the overall style and color of the image. For example, a boutonniere for the groom in blue will go with every suit. Tatiana Vorobyova
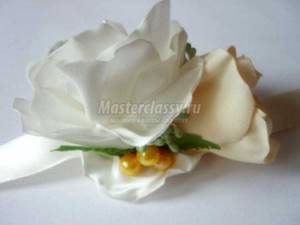
From satin ribbons in the shape of a rose
A boutonniere for the groom made of satin ribbons is most often made in the form of a rose, since the result always lives up to expectations, even if a beginner takes up the matter. There are many ways to make a bud that looks like a real one. For the simplest manufacturing option, the following materials will be required:
- ribbon of the desired shade;
- a needle and thread matching the color of the base;
- glue gun;
- lighter or candle.
The cut edges of the tape must be singed immediately so that the finished flower does not begin to bloom. Then the tape is placed with the wrong side up, 1.5-2 cm is removed from the edge, and the long end is bent at an angle of about 30 degrees so that the front side is on top. At the same angle, the tape must be bent again, but this time upward. This must be done until the tape runs out, so that the folds do not fall apart, it is advisable to fix them with pins.
Then the entire lower side must be sewn with a stitch “forward with a needle, but at the end do not make a knot, but pull the thread - the ribbon will begin to gather itself into a bud, all that remains is to give it the desired shape. The core should be dense, but the outer petals can be given any shape and volume. The folds need to be coated with glue so that the bud holds its shape. When it is ready, you need to make a knot in the thread and cut off the excess part.
You need to sew a wire frame to the wrong side of the resulting rose, then attach other decorative elements to it. These can be individual ribbons, feathers, artificial greenery, beads, etc.
The advantage of an artificial boutonniere for the groom is that you can create a composition of any shade, even if such plants do not exist in nature.
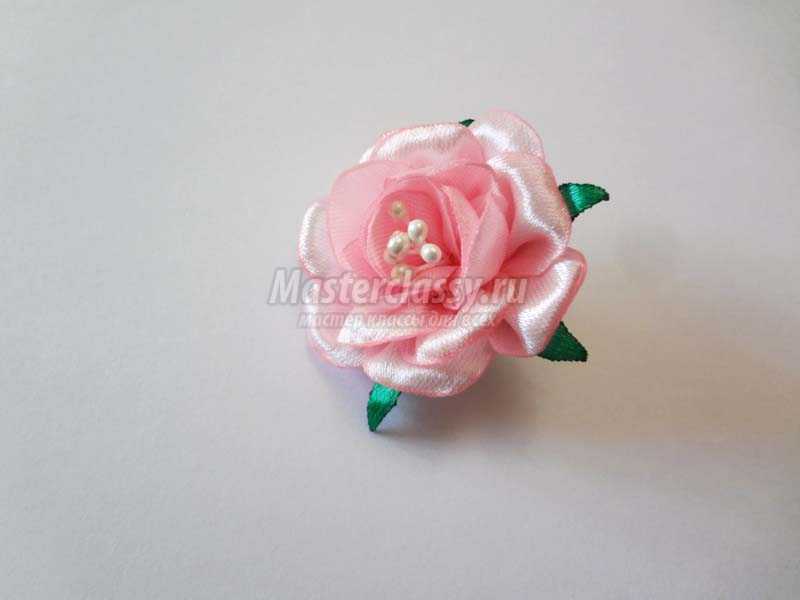
From ribbons - other decorations

Rose is not the only flower that can be made from ribbons. To make an original boutonniere, you will need the following materials:
- ribbons 4-5 cm wide in two shades - green for the stem and any other for the petals;
- stamens (can be purchased at hobby stores);
- fishing line;
- threads to match the color of the petals;
- green tape;
- candle or lighter;
- scissors;
- ruler.
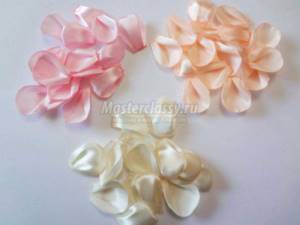
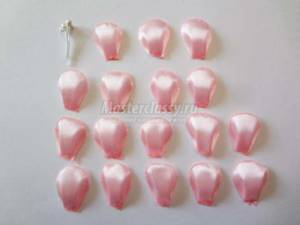
Cut the ribbon for the buds into rectangles 6 cm long. For one flower you will need 3 petals; it is best to make a boutonniere from three inflorescences.
Scorch the edges of each segment. Place one rectangle wrong side up, with the long side facing you. Fold two corners towards the middle, stitch along the bottom side, tighten the thread, forming a petal. Cut off the excess part and singe the edge. Do the same with other rectangles.
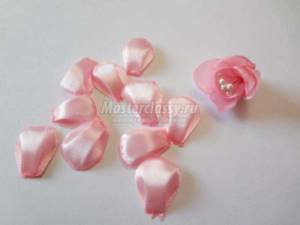
Then you need to collect each flower, first forming a bud, and then placing several stamens in the center.
Having fixed the desired position, firmly sew the petals together from the wrong side. Sew a wire to the bottom of each bud, form a stem and wrap it first with tape and then with green satin tape. To give the flowers a finished look, you need to cut out a square of green ribbon for each inflorescence, fold it diagonally several times and sew it to the base of the bud, forming a receptacle.
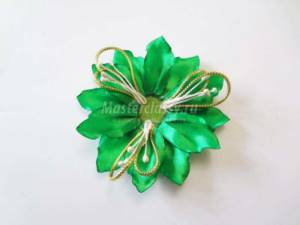
Interesting video: accessory using the kanzashi technique
A boutonniere for the groom using the kanzashi technique will turn out very beautiful. The petals for each flower are made separately, glued for strength and joined together. The result is a delicate composition that is not inferior to natural plants. In the video master class you can see how to make such a mini-bouquet yourself.
How to make kanzashi wedding boutonnieres step by step
Prepare the accessories necessary for making wedding accessories. Delicate squares of peach, cream and soft pink will be used to create three buds of wonderful roses. Green pieces in two formats are necessary for the leaves of the composition. The gold lace adds a sparkling touch.
To make leaves from strips of green satin, follow simple hardware processing steps. Dome both the wide and narrow sections, then singe the edges. But in wide details, stretch the cut edge to get a slight wave, then the leaves will look more believable. And bend the wider green leaves at the base to create oval details.
Next, prepare another type of oval kanzashi petals. Take all the prepared parts in pastel shades. Round off with sharp nail scissors, then singe the sections. But this step is needed only to eliminate protruding threads, and there is no need to stretch the satin. Make folds at the base of each petal to make it more voluminous and teardrop-like.

For one boutonniere you need to make 3 roses of different shades, absolutely identical. Prepare 17 petals of each color.
Glue the first row of 6 wavy green leaves onto the felt circle.
Lay out the petals to simulate flowers. Each rose will consist of 5 rows and three double-sided stamens (or six single ones).
Cover 3 double-sided stamens with three petals, directing them inward, forming a bud. Then add 4 petals inside too.
The third and fourth row will consist of 5 petals.
Model a flower. Apply glue to the front side of the petals of the two outer layers so that the bud is open.
Model the last fifth row from narrow green petals, gluing them in a circle.
Make beautiful delicate roses in cream, peach and pink colors.

Add a second row of green petals of the same size to the felt base. And also glue loops of gold laces. You will have a total of three pairs of loops since we are using different sized laces. To the same golden loops add two double-sided stamens.
Start gluing the roses on top.
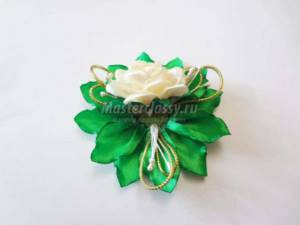
All flowers are glued to a felt base with green leaves at an angle.

Make an elegant wedding accessory. And in order to attach it to a dress or jacket as a boutonniere in the future, add a pin at the back.
The diameter of the finished product is 9-9.5 cm - a very elegant miniature that is sure to attract the attention of others. And of course, the method of application proposed here is far from the only one, because such a bouquet of roses will also look beautiful as a girl’s hairpins or as decoration for a handbag, purse, or cosmetic bag

| Comments to the news “Wedding boutonnieres Kanzashi. Master class with photos step by step" already 0:
Interesting on the web:
E-book “The best handicraft master classes.”
After that, click the “Get book” button.
"Masterclasses" 2011-2017
. All articles on the site are copyrighted, copying is strictly prohibited. In case of partial citation, a direct indexed link to the “Masterclasses” website is required.
Attention! It is forbidden to use expressions in the form of obscene and insulting. HTML tags and URLs are not allowed
Recommendations
To combine the images of the bride and groom with each other, it is advisable to make the bouquet and boutonniere in the same style, or even better, from the same flowers. If this option is not suitable, you need to select plants that are as similar in appearance or shade as possible.
Before making a wedding attribute, it is recommended to consider the following nuances:
- A boutonniere that is too large will make the look heavier. The composition should complement the groom's suit, and not distract attention to itself.
- First, it’s better to practice on spare colors, since not everyone can make the perfect option the first time.
- It is better to choose flowers without pollen, otherwise it may stain the suit, and for some people present at the wedding, allergies may worsen.
- It is also not advisable to use plants with a strong aroma, since the groom will have to wear the boutonniere all day.
- If boutonnieres are made for witnesses and guests, such compositions should look more modest than those of the groom.
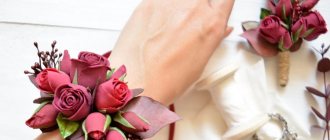
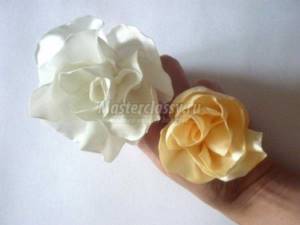
Wedding boutonniere on hand - master class
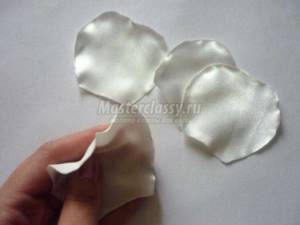
To make a petal template, cut out a square of cardboard measuring 5x5 cm. Then in this square we draw the shape of a cut heart, that is, there should be a small indentation on top.
Now we fold a strip of satin fabric in as many layers as it is necessary to cut out the petals. The result should be a square approximately the same width as the template. We attach a cardboard petal and cut it along the contour. For a large flower you need 13 petals, and for a small one - 7. Both flowers can be made in the same color, or one of them can be made from fabric of a different color. It all depends on the desired result.
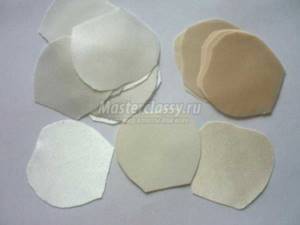
First, we singe an even cut of the petal. To do this, we very quickly hold it near the candle flame.
We form the wavy edge of the petals by scorching the edge over a candle flame. Having scorched one section of the petal, stretch it a little with the fingers of both hands.
Let's start assembling the flower. We gather its smooth edge onto a needle and thread and form some folds, after which we secure the thread.
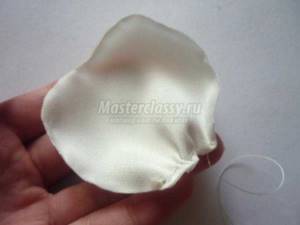
We twist the first petal into a bud without cutting the thread. We try to keep the petal as closed as possible, since there will be no stamens inside and if it opens, the flower will lose its appearance.
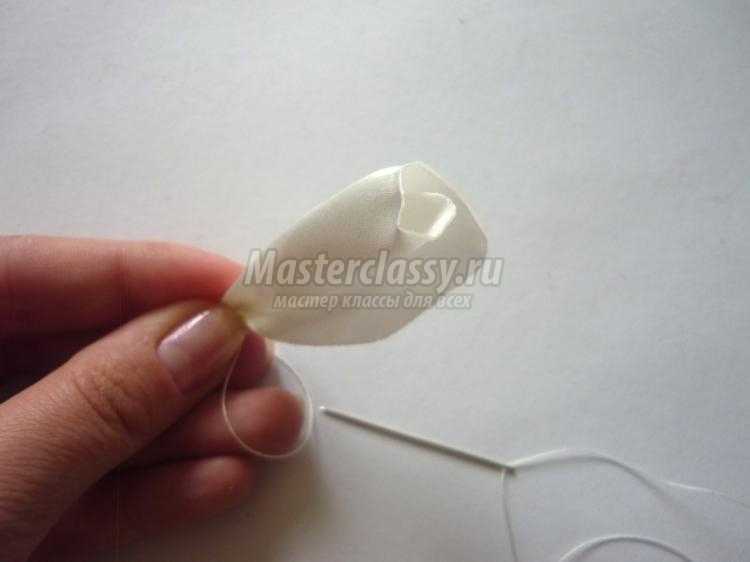
In the same way, we collect all the other petals and wrap them around the formed bud. Distribute the petals as evenly as possible. We get very beautiful flowers that look like real ones.
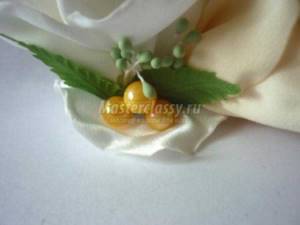
Now you need to make a flower arrangement. The master class offers one of the options, but you can decorate the boutonniere as you wish. First of all, we fasten both buds so that they look up. To cover the sides of the flowers so that the fabric sections are not visible, we cover them first with stamens and then with green leaves. Additionally, you can insert beads on a thread.
We cut out a circle with a diameter of 5 cm from the fabric and singe the edge, stretching it.
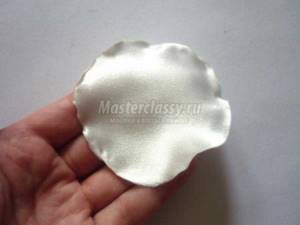
We plant the flowers exactly in the middle on this circle. Most likely, the flowers will fall in one direction, so we support them on both sides with large beads. This will serve as decoration and make the boutonniere more stable.
A satin ribbon 40 cm long must be ironed, the ends cut off at an angle and singed. Attach the ribbon to the back of the flower.
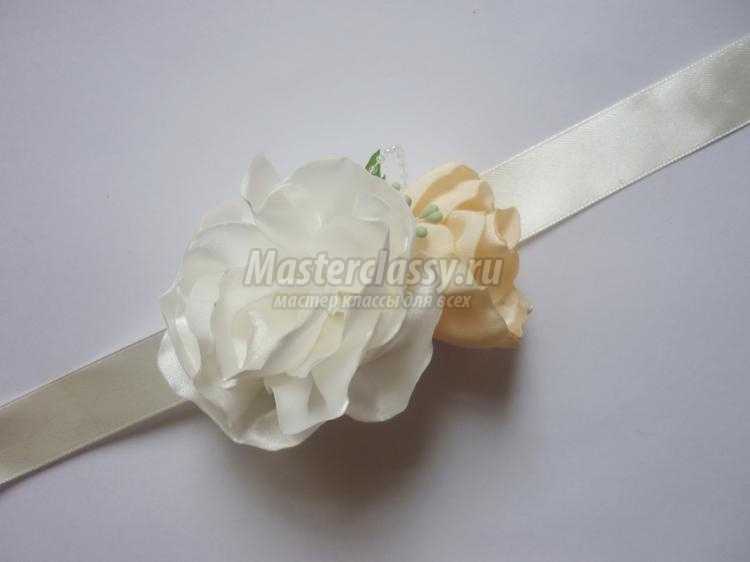
Wedding boutonniere made of satin on hand
ready. We get a very beautiful decoration that can be used not only as a boutonniere, but also as a hair decoration. You can also make a beautiful boutonniere for the groom with your own hands.
Wedding boutonniere on hand. Photo
Antonina Mazur Antonina Mazur
| Comments to the news “Wedding satin boutonniere for hand. Master class" is already 0:
Interesting on the web:
E-book “The best handicraft master classes.”
After that, click the “Get book” button.
"Masterclasses" 2011-2017
. All articles on the site are copyrighted, copying is strictly prohibited. In case of partial citation, a direct indexed link to the “Masterclasses” website is required.
Attention! It is forbidden to use expressions in the form of obscene and insulting. HTML tags and URLs are not allowed
Summary
With the right amount of imagination and patience, anyone can make an original boutonniere that will emphasize the solemnity of the event. For stylized weddings, you can use not only flowers in the composition, but also any available materials, such as a boutonniere for the groom made of foamiran.
Olesya Tregubova
Wedding planner, wedding blog author
Previous article
“Sick, get treatment!” or hospital-style bride price - scenario
Next article
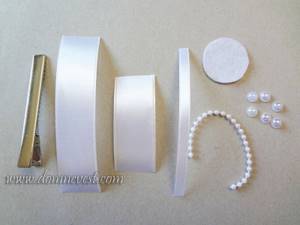
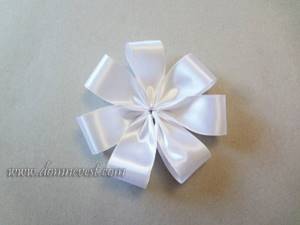
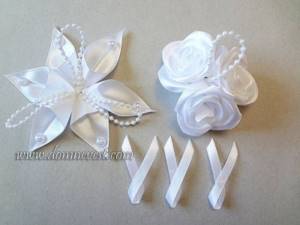
DIY satin ribbon boutonnieres step by step:
- In this master class, only white fittings will be used for boutonnieres. Prepare pieces of ribbons of three sizes, half beads and beads on a thread, felt parts and a fastening base in the form of a clip or pin.
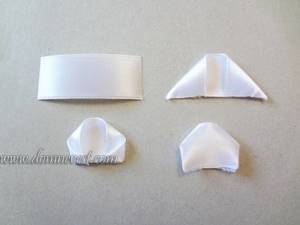
- Take 7 of the 13 pieces measuring 2.5*10 cm, they will be needed to create the bottom layer of the boutonniere. Fold each piece in half, but do not wrinkle (do not iron) the tape at the fold. Having closed both ends of the segment, leaving the wrong side inside, go through the stitches at the very edge. To do this you will need a needle and white thread. Gradually string all 7 petals one by one. Tighten the knot.
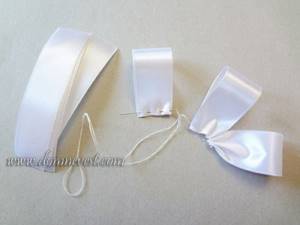
- Cut off the rest of the thread. The result will be a white flower from the simplest petals. This will be the bottom layer of the boutonniere.
- There will still be 6 pieces left from a tape measuring 2.5*10 cm. Use them to create a second layer of cupped leaves. To model them, you also need to bend the segments. In this case, it is advisable to iron the bend. Using a hot soldering iron, cut each folded piece diagonally into 2 pieces. Use the part located at the fold of the tape to create the second layer. It will look like a sepal. For each leaf you need to select one mother-of-pearl pearl.

- The top layer is the most important. It consists of three small roses. To make the petals, use 27 pieces of 2.5 * 6 cm tape. In each triangle, bend two adjacent corners symmetrically, aligning the sides with one wide side. Then bend the resulting sharp corners inward. The result should be rounded rose petals.
- Use 9 petals to create each bud. Twist the first part into a bundle, glue all the rest, distributing them evenly around the circumference.
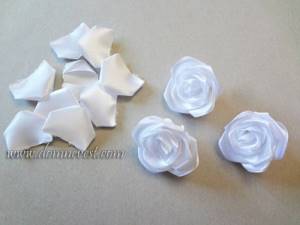
- Model 3 identical roses. Glue the flowers at an angle, and between them place one loop of white beads on a thread.
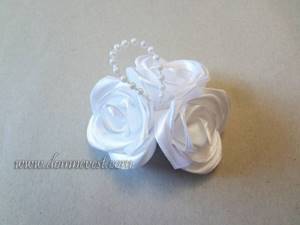
- Sew 6 sepals into a snowflake. Glue a half-bead onto the sharp corner of each ray.
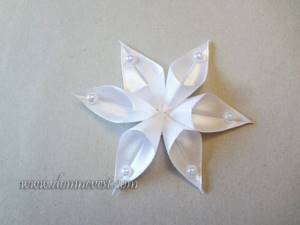
- Glue 3 more bead loops onto the snowflake, spacing them evenly. Also make loops from a thin ribbon measuring 0.5*10 cm.
- Glue the flower arrangement onto the snowflake, attach the white loops in the center so that the narrow tails peek out.
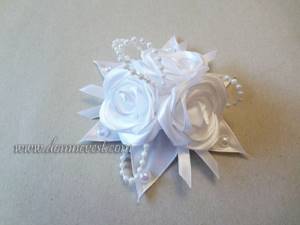
- Now the 2 main parts of the decoration are ready. The boutonniere assembly is almost complete.
- Connect the resulting layers.
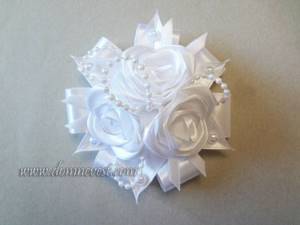
- Prepare a felt circle and a clip (pin). Glue the mount to the back of the product.
- Use this method to make the required number of boutonnieres for your wedding.
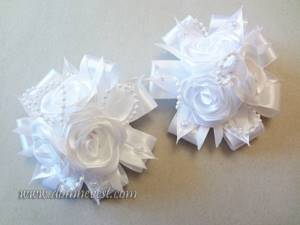
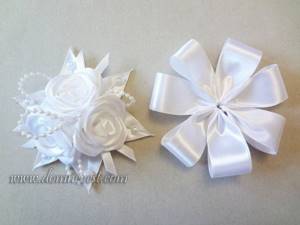
As you can see, it’s very easy to make boutonnieres from satin ribbon with your own hands, but, nevertheless, they look very beautiful. They can be used to decorate the suits of the groom and his friends, as well as to complement wedding decor items.
Signs and beliefs about the groom's boutonniere
In the twentieth century, the flower in the buttonhole gained universal recognition. The flower in his buttonhole became an integral part of Oscar Wilde's costume. He did not appear in public without this accessory. Currently, products of this type are not so common, but they are a must-have accessory for a wedding. There are even a number of signs and beliefs associated with the groom’s boutonniere:
- It must be attached exclusively to the left “heart” side of the groom. Then love will be strong and long.
- A boutonniere made from live or artificial plants must be secured with a pin, which will protect the groom from the evil eye from envious people.
- The groom should not part with the gifted product during the wedding ceremony, therefore, if it is made of fresh flowers, then it is necessary to have a spare accessory.
- After the wedding, the product is kept as a family heirloom.
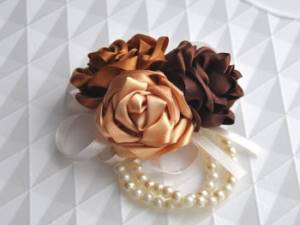
Peony
For a lush peony, it is better to take a ribbon of several shades of the same color. It is necessary to cut 5-6 small round flat petals and 25 large ones. This can be done using a cardboard template or randomly. Burn the edges of each petal in a candle flame, and the heating will cause the petal to bend slightly, which will add liveliness and naturalness to the flower. Make a center out of a square of ribbon by wrapping it around a piece of cotton wool and pulling it into a ball with thread. Around the middle, stick first small petals, then large ones in a checkerboard pattern.
It is better to glue the last two rows with the curve outward so that the flower looks open.