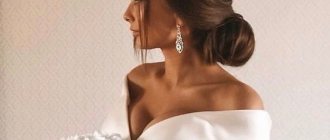
Every girl dreams of looking charming at her wedding. Creating the perfect look will require a lot of effort, because you need to choose a dress, makeup, hairstyle, and accessories that not only suit the bride, but also match each other. A girl is quite capable of doing her wedding hairstyle on her own, having thought through all the details and choosing the ideal option. To easily act as your own hairdresser on your wedding day, first experiment by watching the step-by-step instructions for performing festive hairstyles.
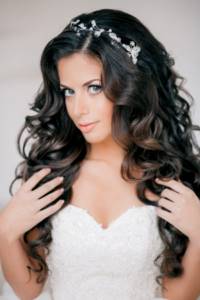
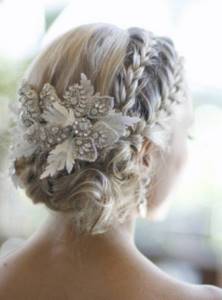
Hairstyle options for brides with long hair
A girl with beautiful long hair can easily choose a wedding hairstyle to her taste by choosing any option:
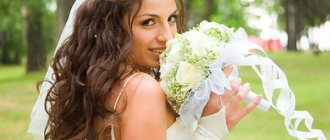
- Let them down to show off the beauty of your hair. This is ideal for girls who want to create a romantic look.
- Gather the strands into a ponytail.
- Make a beautiful bun of hair using a roller.
Long hair is the pride of every girl, but managing it is not so easy. Be sure to try to do your hair yourself a couple of weeks before the celebration, watching the step-by-step implementation of different styles. This is necessary in order to be able to choose the ideal option, determine the amount of time it will take to complete the hairstyle, or to remain able to find a specialist if, after several attempts, creating a masterpiece is not crowned with success.

Wedding hairstyle based on a ponytail
Owners of gorgeous hair should pay attention to the step-by-step example of a wedding hairstyle based on a ponytail. To create it, purchase or find at home the following materials in advance:
- comb;
- hairpins;
- invisible;
- small rubber bands;
- strong hold varnish.
Step-by-step hairstyle:
- On the parietal zone it is necessary to select a triangle. Pin this hair up so as not to interfere, gather the rest into a ponytail, which needs to be secured with several bobby pins and an elastic band.
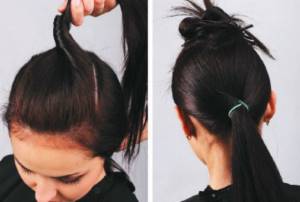
- Braid the hair in the parietal area into a spikelet on the side. To create a more voluminous braid, slightly pull out thin strands.
- Fold the spikelet in half and secure with pins.
- Divide the tail into 3 equal parts, each of which must be divided again into 2. Braid the pigtails and secure them with elastic bands. There should be 6 braids in total.
- Pull them together with an accordion, secure with bobby pins and hairpins.
- Distribute the strands in the resulting bun to make the hairstyle voluminous.
- Fix everything well with strong hold varnish.
- Attach the veil using bobby pins and bobby pins.
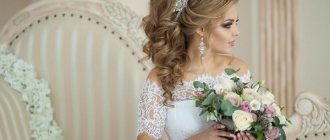
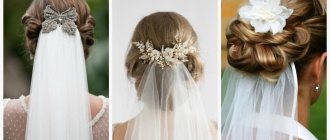
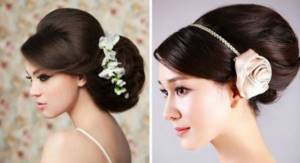
In the Greek style with a tiara
The popularity of the Greek style in hairstyle has been actively growing recently. This option is perfect for creating a delicate romantic image of the bride, and will also go well with a Greek dress or in the Empire style. There are many variations of Greek styling; let’s look at the step-by-step implementation of a high hairstyle with a tiara and braids. To create you will need:
- comb;
- small rubber bands;
- hairpins;
- invisible;
- strong hold varnish;
- diadem.
Step-by-step wedding hairstyle:
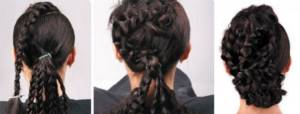
- Comb your hair and make an even parting from the forehead to the crown.
- Separate a thin strand on the left, divide into three parts and begin to weave a braid, throwing strands to src=»https://svadbavo.ru/photos/uploads/articles/592/592_5.jpg» class=»aligncenter» width=»700″ height=”233″[/img]
- As you weave, attach thin strands on one side.
- It is important to pull the braid back and up. Secure the finished braid with an elastic band.
- Weave the braid on the right side in a similar pattern. It is important to maintain symmetry.
- By analogy, weave 1 more braid on each side on top of the first. It is necessary to adhere to the same tension of braids, strands, and their symmetry.
- Curl the remaining curls with a curling iron. You should start from the back of the head and move up. To fix the curls, you must use varnish.
- Lift the curled curls on both sides and secure with bobby pins or hairpins.
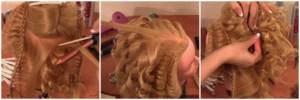
- Pull the braids up loosely and secure with bobby pins, hiding the ponytails under the strands.
- Decorate your hair with a tiara.
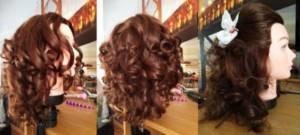
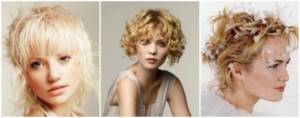
Loose curls
For brides with luxurious long hair, a hairstyle with loose, slightly curled curls is perfect. This design option is always in fashion and looks stylish. To create curls you will need a curling iron, flat iron or curlers. The larger the diameter of the curlers, the rounder the curls will be; You should not choose small ones so that the result does not turn out to be “lamb”. Let's look at the step-by-step creation of chic curls using a curling iron and iron. Required accessories:
- hair comb;
- curling iron/iron;
- fixing varnish;
- foam, gel.
Step-by-step curling:
- Wash and dry your hair. To keep your hairstyle in place and prevent your curls from unraveling, you should definitely use foam or gel, and finally fix it with hairspray.
- Separate the top part of the hair with a horizontal parting and pin it up. You need to start twisting the strands from the bottom, slowly moving to the top of the head.
- Wind the strand around the curling iron in a spiral, moving from bottom to top. It is better to take smaller curls, then they will warm up evenly and curl beautifully. Hold the curled strand for about 20-30 seconds.
- Curl all your hair this way. Fix with varnish.
Step-by-step creation of curls using an iron:
- Before creating your wedding hairstyle, wash and dry your hair.
- Wind thin strands around your finger and secure them at the roots with a bobby pin or clip. Curl all your hair using this principle.
- Use an iron to press each curl so that the strand is completely clamped.
- Release your curls and curl the ends if necessary.
- Fix with varnish.
Choosing a hairstyle based on hair volume
Your hair can be either straight or with small or large curls:
- Direct. Such strands are easy to curl if they are short in length. But if your hair is long, then you shouldn’t curl it. It is best to curl the ends or strands directly near the face. They can be collected into an elegant, beautiful bun. Enhance your face shape with a comb, pearls and other jewelry.
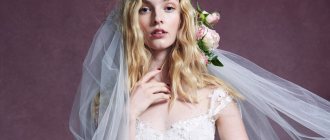
- Curly. If the bride has curled curls, then they can be used to create a hairstyle. If you have small curls, then it is very difficult to straighten them, so if the curls are at least slightly below shoulder length, then you should not straighten them. Best hidden under a veil with a tiara and other jewelry.
These were the basic wedding hairstyles step by step, which are selected based on the hair type and hairstyle features.
Step by step hairstyles for medium hair
Medium hair length is ideal for a wedding hairstyle. They are easier to manage than long ones, and there are many more styling options than short ones. For medium length, a bun, a shell, a bow, or a Greek style with a ribbon are perfect. To find the perfect hair design, you will have to try different variations.
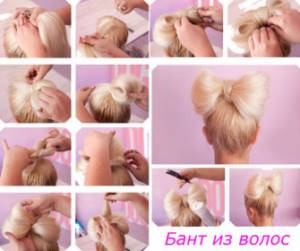
Hair bow
A hairstyle in the form of hair laid in a bow looks original at a wedding. Fresh flowers or a beautiful hairpin will help decorate it. To create you will need:
- iron;
- comb;
- hairpins, invisible;
- varnish
Step-by-step execution of the bow:
- Gather your hair into a ponytail at the top of your head.
- Separate the bangs and secure with a clip.
- Make a loop from the tail, tying it with an elastic band to match your hair. The end of the tail must be left in front.
- Divide the loop into two equal halves and spread it to the sides, pressing it to the head.
- Throw the remaining tail over the middle of the “bow” and pin it at the back with bobby pins.
- Decorate the bow as desired, attach the veil with hairpins.
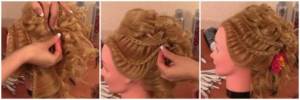
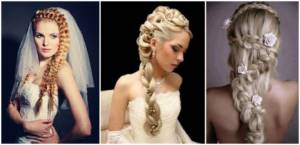
With weaving and flowers
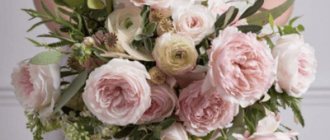
To create a stylish wedding hairstyle on medium hair, braiding is well suited: braids in different styles and techniques. The French classic braid, air braid, fishtail braid, openwork braid, and French waterfall are popular. Creating a braided hairstyle does not require much effort or special skills. To give your braid a festive look, you can use fresh flowers as a decorative decoration, for example, the same ones that are included in the bouquet.
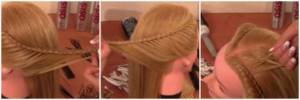
Step-by-step execution of a French braid:
- At the top of the head, separate the upper part of the hair for braiding, divide into 3 equal parts. Place the right strand on top of the middle one, and the left one on top of the other two.
- Place all the strands in your left hand and separate them with your fingers.
- Separate a small part of the hair from the right side of the braid and add it to the strand. Move it all to the left.
- Move the middle strand to the right. It is necessary to ensure that the strands do not mix or become entangled.
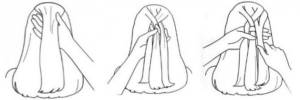
- On the left side, separate a thin strand and attach it to the braid. Move to the right and the middle part to the left.
- Using the same principle, braid the braid to the end.
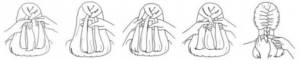
- The wedding French braid is ready. If desired, decorate it with flowers, hairpins, and attach the veil with bobby pins.
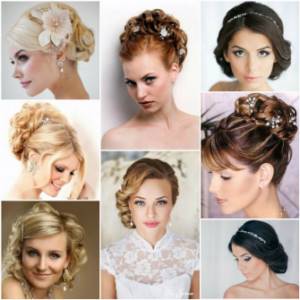
Which wedding hairstyle to choose? Short hair
First, you should understand the options for hairstyles for short hair. They are the simplest, most budget-friendly, but at the same time, many craftsmen manage to make something new and unusual.
- The list of short wedding hairstyles for women includes several types. You can create soft, curled ends by moistening them with water first. If you have bangs, you can make them oblique or reduce them. Bridal hairstyles with a long veil suit short hair. You can try an interesting option by making a voluminous hairstyle using small curls.
- Shaved part of the head. The newest option, in which you need to shave off one part of the skull, leaving a light fluff. The other part may have a small portion of hair down.
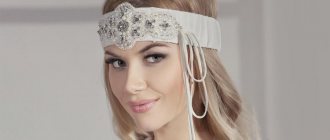
- Basic styling. Use mousse to style your hair and add a chic veil to your look. The technology for performing a wedding hairstyle is very simple. If you want to increase the volume of your head, then add additional jewelry to it: hairpins, a tiara.
These are the most popular hairstyles for short haircuts. Short wedding hairstyles are very easy to do, and you also don’t have to worry about your financial resources. The main thing is to combine the dress and hairstyle correctly. You can increase the volume of your head with a bun or specially created natural or artificial hair.
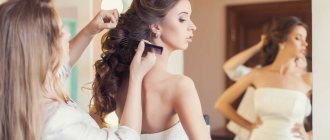
How to make your own hairstyle for short hair?
Brides with short hair should focus on jewelry in their hair, because they can emphasize the style of the chosen image. Such jewelry does not have to fit perfectly with all elements of the image - makeup, dress, veil. Retro-style looks, a bob haircut, and a “naughty” hairstyle can be excellent hairstyle options for short hair for a wedding. In order for the styling to keep its shape, it is necessary to use fixing agents - gel, varnish, foam.
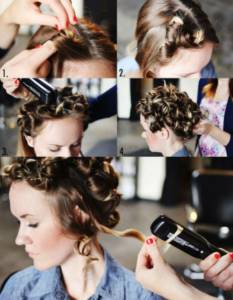
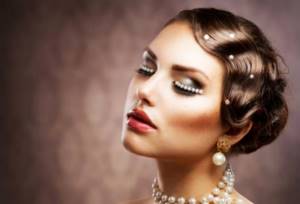
Retro waves
A retro wave hairstyle will look great on short hair. To complete it, it is important to be patient and follow the step-by-step instructions. You will need:
- comb (comb or small);
- means of fixation (foam, varnish);
- in some cases - special clamps.
Step-by-step implementation of retro waves:
- Part your hair sideways and apply a fixative to the part where you will begin working. Comb well.
- Place the index finger of your left hand on your hair at a distance of 5-6 cm from the roots.
- Place the comb with its teeth towards the head at a distance of 2 cm from the finger. Create waves by lifting your hair up with a comb.
- We place the middle finger of the left hand in place of the index finger, and move the last finger over the comb, forming a comb. Move the comb another 2 cm lower.
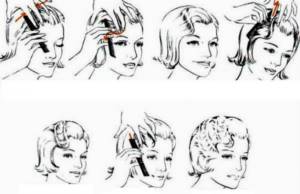
- Place your index finger on the comb again, leaving the middle finger in its place. 2 ridges and 1 depression formed between the fingers.
- By analogy, do the same on the other side. It is important that the styling is symmetrical. Retro wedding hairstyle is ready.
Naughty careless styling
To create the image of a naughty girl, short hair is perfect. This hairstyle will look stylish, fashionable, and the bride will be satisfied with her appearance. For styling you will need a little: a comb, a curling iron, a fixing agent, 2 small hairpins, and a tiara if desired. Before creating a hairstyle, you must thoroughly wash and dry your hair, apply foam or gel.
Step-by-step installation instructions:
- Starting from the back of the head, curl your hair using a curling iron with the ends facing outward. Do this with all your hair.
- Twist the bangs and curls at the temples with flagella and secure with hairpins on the parietal area.
- Decorate your hair with a tiara and attach a veil.
Eventually
The image of a modern bride is far from a white dress in the shape of a cake and the traditional Leaning Tower of Pisa made of hair on her head. Nowadays, a wedding look is, first of all, freedom of choice combined with beauty and naturalness, emphasizing the bride’s individuality and impeccable sense of style, and modern trends in wedding hairstyles emphasize this once again.
Olesya Tregubova
Wedding planner, wedding blog author
Previous article
Grace and nobility: Mermaid wedding dresses – lace and with sleeves
Next article
Step-by-step videos on how to do wedding hairstyles
To learn how to create a beautiful, stylish hairstyle and do it yourself for a wedding celebration, you will need a lot of time to train, study step-by-step instructions, and master classes. The video below with detailed instructions and a visual display of the sequence and installation rules can be a useful help for you. Look at an example of a step-by-step implementation of a simple but stylish hairstyle for long hair:
Master class on doing hairstyles in the style of the 60s
Retro style is back in fashion. It is often chosen for parties, meetings and even weddings. When decorating a celebration in the style of the 60s, it is important to take care that the bride’s image matches the chosen theme. A retro wedding outfit, winged makeup and hairstyle will help you achieve this. By watching the video below, you can learn how to do your own hair in the style of the 60s. The styling is suitable for both long and short hair:
DIY Gibson hairstyle
A beautiful hairstyle, the Gibson bun, is popular and is often used as a wedding hairstyle. The bun will help create a gentle, romantic, feminine image. The undoubted advantage of this hairstyle is the ability to create it yourself at home without any special skills, special accessories or outside help. To see how easy this hairstyle is to do, watch the video with detailed step-by-step instructions and try to do it yourself:
Preparation
Everything you need for self-styling can be easily found in any hair cosmetics store, and you can choose the desired style and see “live” how this or that styling is done without leaving your home - on the Internet.
This is exactly what we will do today, but first let’s remember the most important points that will need to be taken into account:
- If you are not a professional in hairdressing, then choose the simplest wedding hairstyles that do not require special skills. Many of them look stunning, despite their simplicity and ease of execution.
- Start choosing in advance so that you have time to practice and correct possible mistakes.
- Find a good friend who can help bring your ideas to life. Braiding braids or making a bun at the back of the head on your own is very difficult - second hands will not be superfluous at all!
- Buy and prepare all the necessary tools and styling products.
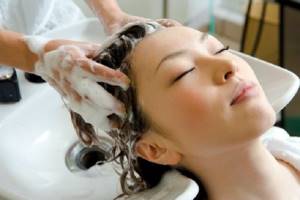
Another important point is that all hairstyles are done only on clean hair. Even if you just decide to exercise, still wash and dry your hair.
This is necessary in order to understand how cleanly washed hair will “behave”, how the styling will hold on it, and what products are suitable for creating a hairstyle.
Otherwise, on the most important day, you may make the unpleasant discovery that the mega-popular hairspray does not fix your curls at all, and thoroughly washed strands do not want to curl in the desired direction.
So, everything you need is at hand, your friend is ready to help, and you can start creating your hairstyle at home.
Let's look at a few examples of easy hairstyles that you can easily repeat.
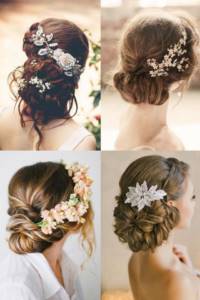
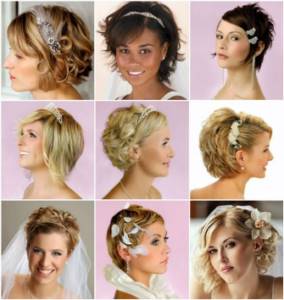
Photos of stylish wedding hairstyles with and without bangs
It doesn’t matter what length your hair is - waist-length or just shoulder-length, straight or with lots of curls, obedient or not, with or without bangs. For any type, you can choose a suitable option, and look simply gorgeous on your wedding day. Below are examples of popular, elegant hairstyles for brides, after looking at which you can choose something for yourself.
DIY Babette
Babette is an elegant hairstyle, a classic of the 60s. This hairstyle looks perfect with fluffy, A-line, and straight dresses. It is easy to attach a veil to it, it will be fluffy, which looks very harmonious with an airy, fluffy dress.
Babette can be done on long and medium hair, with a roller or backcomb. We will consider step by step the option of creating such a hairstyle with a roller. They come in large, small and medium. The latter are the most popular.
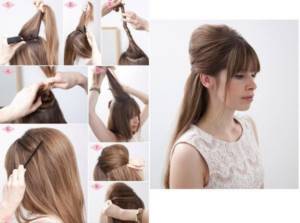
To create a babette:
- Comb your hair thoroughly and lightly spray with hairspray.
- Pull your hair into a high ponytail at the top of your head.
- Extend the tail a few centimeters to the side of the forehead, secure with hairpins
- Place a roller at the base of the tail and secure with hairpins.
- Distribute the hair over the surface of the roller so that it does not “peek out”.
- Carefully place the ends of your hair under the roller and hide them.
- Secure your hair with hairpins.
- Apply hairspray over the creation, smoothing the hairstyle with your hands for a babette shine.
You can decorate this hairstyle with an elegant comb and/or veil.
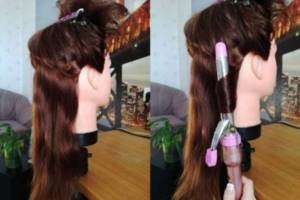
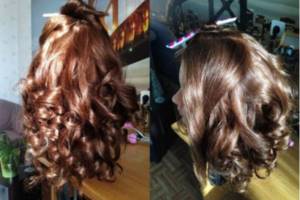
DIY curls
Curls at a wedding are a classic of the genre. This hairstyle is so popular on your wedding day because it is the height of romance. They are suitable for long, medium hair... and even short hair! To do this, simply attach false, curled strands to your hair. And voila, the curls are ready.
Curls are elegant and beautiful! It's true if they are made, true. If not, it's a sad song. Curls can be pulled off with a curling iron, flat iron, curlers or a special device that sucks in straight strands and releases curled ones.
You've probably heard of this? If not, don't worry. To make your curls beautiful on your wedding day, read the step-by-step instructions for creating chic curls using a regular curling iron with your own hands!
So, to create curls:
- Comb your hair and apply a quality styling product. The curls should last
- Make four ponytails. One is behind, on the occipital zone, the second is on the left temple, the third is on the right, and the fourth is on the frontoparietal zone.
- We'll start curling from the back. Let that ponytail loose.
- Select the bottom tier of hair and secure the rest of the hair with a clip.
- Take small strands from the tier and curl them carefully.
- When the entire tier is in curls, wrap them in curls, securing them at the roots of the hair with a hairpin. Let them cool down and remember the shape.
- Do a similar manipulation with the entire occipital area. There will be 3-5 tiers in total, depending on the thickness of the hair.
- Having completed the occipital zone, move on to the temporal zones. There will be 2-4 tiers.
- Move on to the remaining ponytail and loosen the area. There will be 6-7 tiers in the fronto-parietal zone.
- The whole head is in curls fixed with clamps? Walk like this for 20-30 minutes.
- Let your hair down and separate it into curls with your hands.
- Apply a medium hold hairspray to avoid weighing down your curls. Don't comb.
Ready! If you do everything right, this hairstyle will last a day or more.
Well done curls are fabulously beautiful. Be sure to test them several times, using the step-by-step instructions as a guide.