Making a treasury for a wedding with your own hands is not that difficult. To do this, you need some tools and materials - their availability and range will determine how beautiful and neat your work will be.
You also need to take into account that the “cash register” of a young family should be in the same style as the design and some details - the young couple’s glasses of champagne, champagne, a wish book, a fireplace, etc. The minimum requirement for the design of the treasury is a neutral decor that will not look foreign in relation to other items.
Round treasury
Another “quickie” option, because a Raffaello box is perfect for such a treasury, however, for a full-fledged “treasury” you will have to use two boxes, or glue two components of the box together.
Another option, with a simple lid, can be made by shortening the top lid from the Raffaello box, or you can make it yourself.
Editor's choice: DIY wedding ring cushions
To do this, you need to cut a strip of 20 by 50 cm from thick cardboard (the dimensions can vary arbitrarily). This strip is glued together, a base is cut out for it, with allowances for gluing, which must be cut with fringe. Glue the base to the side.
The lid is made in a similar way, but the width of the strip will be no more than 10 cm. A slot is made in the center of the lid. Both the lid and the side of the box are decorated.
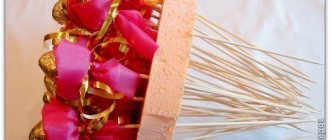
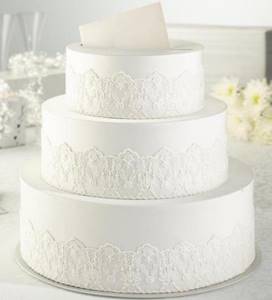
Cake piggy bank
If newlyweds love sweets, there is an interesting solution for them - a wedding treasury made with their own hands in the form of a cake. The principle is as follows:
- Three round boxes of different diameters are placed one on top of the other at the same center.
- Holes are cut between the boxes - exactly the same as in the previous version.
- The boxes are fastened together, so it looks like one whole with the decor on the lid.
- A large cake box is decorated. So the wedding treasury is ready! Anyone who has at least a drop of imagination and a little patience can make such a miracle out of boxes with their own hands.
- The “cake” is placed on a special stand.
Treasury for a wedding - chest, master class
A fairly common form of wedding cash register is a box with a convex “blown” lid, in which there is a slot for money. There are a lot of decor options, and they are limited only by your individual requirements. This thing can be made from a box of a suitable size, or you can make it yourself from scratch. A mini master class will help you understand the details.
To work you will need:
- Glue Moment “Crystal” or “Gel”
- Pencil, ruler, scissors, non-writing pen
- Large cardboard 100cm by 70cm
- Paper for decoration, decorative elements - flowers for scrapbooking, braid, half beads, etc.
- Scheme - presented below
First step. Cut out a template from thick cardboard. Draw all the folds with a non-writing pen - this is called scoring. Make a slot for envelopes. Fold carefully along the folds
Editor's choice: Chamomile wedding: how many years have we been together and what to give. Photo review
Second step . Cover the outer sides with scrapbooking paper or fabric. Next you can glue the chest together.
The third step is decor. Photos with decoration options for inspiration:
Treasury-box
If the box has a hole for an envelope, then the top lid of the box opens to place the envelope there. Boxes can be of different shapes, including heart-shaped or oval. The easiest way to make a box is from a shoe box, since it has a ready-made opening lid. The step-by-step instructions for making such a treasury are as follows:
- the inside is covered with paper;
- the outside of the box is decorated with silk fabric, the corners are decorated with ribbon;
- Artificial flowers and rhinestones are attached to the lid.
Do-it-yourself treasury-heart for a wedding
The wedding treasury option, beloved and sought after by many couples, as a symbol of love, is quite simple to make.
Much simpler than the same chest. The cutout can be located in the very heart, or on its side, but in this case these edges should be straight, but not convex, since the treasury will stand on one side, and on the other there will be a slot for envelopes. A small master class.
To work you will need:
- Thick cardboard (beer), watercolor paper, newspaper for template
- Pencil, ruler, scissors, meter tape
- Glue Moment “Crystal”
- Paper for scrapbooking, or fabric - in a word, everything for decoration, braid
Editor's choice: Musical fairy tale for a wedding, tips for organizing
First step. Fold the newspaper in half, draw a drop and cut it out. The heart template is ready. Transfer it to cardboard and cut it out. Using a centimeter, measure the length of the edge of the heart - this will be the length of the side. Determine the width arbitrarily, but add centimeter margins to it for gluing, and cut these allowances with fringe or teeth. Glue design paper onto this strip in advance. Try it on your heart, mark the location of the slit and make it.
Second step. Glue the heart together. Cover with paper. Decorate the slots and joints of the cardboard with braid.
Third step. Decor!
The best option is a ribbon encircling the heart, plus a small bouquet that duplicates the bride’s bouquet. This design can be made in any color and will fit perfectly into any wedding style.
Treasury in the form of a house
Options with a box or casket may seem too simple to some. A good way to make the treasury more original is to make it in the form of a house. For this you will also need cardboard, colored paper, glue, scissors, pencil, ribbons, and paper tape. So, a master class on making a treasury-house.
- The pattern of the house is applied to the cardboard; remember that the upper part of it opens, so the roof of the house is cut off.
- The pattern is glued together, the roof is secured with tape, which will serve as hinges.
- Windows are cut, you can also make shutters and paste a photo of the bride and groom into the windows.
- The product is covered with colored paper and decorated with ribbons, from which you can make bows and roses.
Boxes are in use!
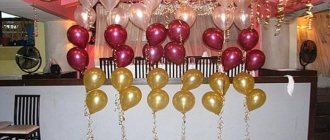
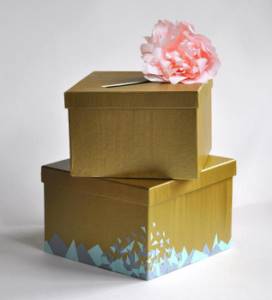
The wedding should be beautiful! How to make a wedding treasury with your own hands so that it serves as a holiday decoration? You can get by with very simple details, such as shoe boxes of different sizes. The shape of these elements of the future piggy bank of the newlyweds can also be varied. Shoe packaging is already a dense and reliable material that does not require reinforcement, so it will make a substantial wedding treasury. With your own hands (a master class for such work is given below) you can decorate it with whatever you want. You can borrow some ideas from us. Well, what's the matter?
- It’s good, of course, to choose shoe packaging so that they are of different sizes, but the same dimensions are also suitable.
- Place the boxes one on top of the other to create an interesting design.
- On the lower lid, use a pencil to mark the location of the upper one along all tiers.
- Remove the lids and set aside.
- From inside the top box, mark a hole in the bottom through which money will fall into the lower tiers of the structure. This hole should be made as wide as possible so that the bills do not get stuck, because there will be a lot, a lot of them, but at the same time, you need to leave the sides in order to glue all parts of the structure.
- Alternately, combining the previously marked contours, except for the bottom box and the top cover, mark large holes for money.
- Cut all holes on the lids and boxes using a stationery knife.
- Mark and cut a hole on the top cover for money.
- Place all the boxes into a single structure, checking the alignment of the holes inside.
- Using reliable glue, glue together all the lids and boxes, except the bottom ones: the bottom box should open, providing access to the donated money.
- You can start decorating the treasury.
Chest
Since this is a treasury for money, then it is quite logical to make it in the form of a chest. The shape itself will decorate the interior, and the exterior can be decorated in various ways. To make it you will need cardboard, glue, scissors, and a ruler. The main stages consist of the following points:
- using a ruler and pencil, mark the template on cardboard;
- cut along the main lines, the upper part is bent in a semicircle - this is the lid, a slot is made in it for envelopes;
- the entire product is glued together - the shape of the chest is ready.
After this, the chest should be decorated. There are several possible ideas here:
- cover with colored or velvet paper;
- decorate with foil, then the chest will take on the appearance of being made of metal;
- paint it in any color or apply wedding-themed designs (connected rings, hearts, initials of the bride and groom).
The chest is decorated by gluing ribbons, strips of lace, artificial flowers, rhinestones, and bows.
What is a chest made of?
By making a chest yourself, you can not only save money, but also decorate it in accordance with the theme of the wedding.
A money chest can be made in the form of a beautifully decorated cardboard box or a classic suitcase. But it’s also easy to make such seemingly complex products as a money box in the form of a cake with several tiers, a house, or an interesting box. But no matter which option you choose, the following materials are required for mastery:
- cardboard box or sheet of thick cardboard. The quantity and shape depend on the chosen chest model. You can purchase a plastic or glass box. If you have skills in working with wood, you can make a product from it. This money chest will last for many years and will become a family heirloom.
- PVA glue or glue gun. The glue must be of high quality. The strength and beauty of the future product depends on this.
- scissors and stationery knife;
- masking tape;
- colored or corrugated paper for finishing the casket. You can use satin, silk or velvet fabric.
- elements for decoration: ribbons, beads, beads, decals, shells, bugles. An interesting design would be a collage of photographs of spouses.
- figured hole punch. With its help you can make various figures to decorate your chest.
If you want the casket to serve not only during the celebration, but also to be preserved as a keepsake, use only high-quality materials. Having prepared everything you need, you can proceed to the next stage - creating a chest.
Making a casket
You can make a money chest from a shoe box:
- The front of the chest may be slightly lower than the back.
- It is necessary to select a box of such a size that the length is equal to the sum of the height of the front wall and the width of the box.
- The lid can be made curly.
- After this, the box must be covered with paper or cloth.
- Decorate the chest with various accessories.
If you want to make your own pattern from a sheet of cardboard,
It’s worth finding a suitable scheme in advance. For example, the photo shows a diagram of a rectangular casket.
Detailed instructions on how to make a chest with your own hands consist of several steps:
1.Cut out a template from cardboard
Carefully bend the folds and allowances. We seal all the allowances to the inside of the chest with glue or regular tape
2.Cut out a strip of cardboard. We glue the cut strip at the junction of the inside of the box. This will help to securely fasten the walls of the casket together. 3. In order for the box to look like a casket, the lid must be given a convex shape. Thick cardboard does not take on this configuration well. Then longitudinal grooves can be made on the inside of the lid using scissors or a stationery knife. This must be done carefully so as not to cut the cardboard through. Otherwise you will have to start all over again. After this, the lid will easily take a rounded shape.
We connect the lid to the bottom of the box using tape. It is better to glue it to the inside, then the joints will not be visible.
4. The resulting gaps in the lid of the money chest are covered with cardboard cut to the shape of the holes. They are also attached with tape. For reliability, you can use a furniture stapler.
5.Next, it’s worth making a cutout with a hole for envelopes. To do this, draw a rectangle about 1 cm wide and the length of an envelope on the inside of the lid. Using a utility knife, cut a hole.
6.You can start draping the box. To do this, we measure the base and cover separately. In accordance with the parameters, we measure a piece of fabric or decorative paper of the required size. First, the lid is sheathed, then the remaining parts of the chest.
7.After this, you need to make a hole in the lid fabric. There is no need to rush, because the entire appearance of the casket depends on accuracy. The edges of the cut hole are processed using a lit candle.
8.The final stage is decorating the money chest. Here you can use your imagination to the fullest. The main thing to remember is a few tips:
•the sides of the side walls and the joining places should be decorated with satin ribbons to match the main color of the casket;
•the lid of the chest should not be decorated with heavy elements, otherwise it will begin to sag;
•if the main color of the drapery is neutral, use contrasting colors, red or purple, for cladding;
•a chest for collecting money, decorated with photographs of the newlyweds, looks romantic. They are placed on the sides.
A master class on making a casket is shown in the video
Making a gift box in the form of a chest with your own hands is not difficult. You should follow the instructions and the casket will become a real masterpiece.
Treasure chest
Money is hidden in a chest, this has been the custom since ancient times. And the wedding treasury, made with your own hands in the form of a chest, will become the first repository of the family budget. This item can be made from thick cardboard according to the proposed pattern.
In order for the wedding treasury, made with your own hands, to have a beautiful shape, without creases or distortions, all the fold lines along which the chest should be folded must be pressed using a sufficiently narrow, but not sharp object, such as a knitting needle, a sushi stick, or, finally, , the blunt side of a knife with a rounded end. The triangular marks on the side flaps need to be cut, removing the falling parts. This trick will allow you to carefully glue the side panels to the main panels. You can strengthen whatman paper or cardboard from which the wedding treasury is made (it’s not so difficult to make such beauty as in the photo with your own hands, believe me), using another layer of paper. This must be done if you plan to place voluminous and weighty decor on the chest.