The loaf in Slavic culture occupied a central place in wedding and even funeral traditions. Like Easter cake, it is a ritual bread. Nowadays loaves are mainly used to welcome official important guests. And ordinary people bake them exclusively for weddings. What distinguishes a loaf from other baked goods made from sweet dough? Since this is ritual bread, it is served with salt. The bride and groom, who were greeted with a loaf of bread, had to pinch off a piece, then dip the bread in a salt shaker and eat it. This symbolized the promise to “taste a pound of salt together.” After the newlyweds, all the wedding guests ate the loaf. Another distinguishing feature of ritual bread from simply delicious baked goods is the abundance of decorations. And not just vintage, like the original cake, but traditional. After all, every detail of the decor carried a special symbolic meaning and influenced, as our ancestors believed, the future life together of the young married couple. Therefore, the topic of our article will not be baking, but decorating loaves. We will present a master class on decorating wedding bread below.
Loaves in the pagan culture of the Slavs
Our ancestors baked this bread even before Christianity came to Rus'. The loaf must be round, in honor of the Sun God Yaril. It was very important that the dough rise. The higher the loaf came out, the greater wealth awaited the young. By sympathetic magic, the woman who kneaded the dough, baked and decorated the ritual bread passed on a piece of her destiny to the bride. Therefore, only special “loaf makers” were allowed to do such work. They had to be married, happily married and have children. And widows were allowed to bake only so-called funeral loaves. Such ritual bread was shared among the relatives and friends of the deceased. Nowadays you can order a wedding loaf in pastry shops. But if you put a piece of your soul into bread, it can affect the fate of the young. Previously, the process of kneading dough and baking was accompanied by ritual songs and reading prayers. Perhaps today we can do without it. But decorating the product remains an important step. Therefore, you need to know how to decorate a loaf with your own hands.
Wedding loaf: signs and traditions
- The symbol of family happiness is baked by several women (and their number should be odd) together with the godmother of one of the parties, but for this they never invite widows, childless and divorced women who could pass on their destiny to the newlyweds.
- The baking of the loaf was scheduled for Saturday, and this was already the beginning of the holiday. The procedure included several stages, each of which was accompanied by ritual songs and prayers.
They evaluated the loaf after baking: if it burst - a bad omen for the family, if it burned - the husband will be grumpy.
The symbolic meaning of decorative details
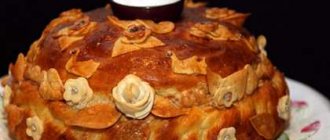
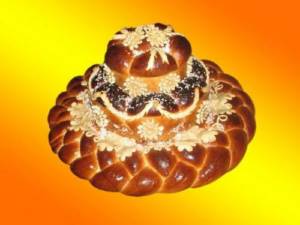
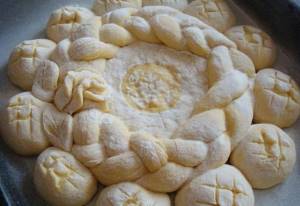
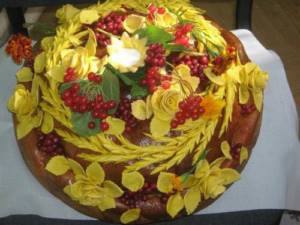
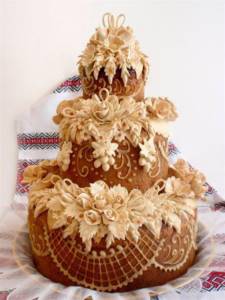
Let’s not forget that this bread is ritual. Therefore, you need to approach its decor differently than decorating a cake. What is important here is not fantasy, but knowledge of the symbolic meaning of certain elements. First of all, don't forget to leave room for the salt shaker. It should be placed strictly in the center of the loaf. Floral ornaments should be placed around the salt shaker. As a rule, this is a pigtail (a symbol of a long-term relationship), ears of wheat (fertility, which in a wedding loaf is identified with having many children), flowers and leaves (well-being and prosperity), doves and horses, stars (happiness, fidelity). In Ukraine, bunches of viburnum are an invariable attribute on such ritual bread. This is not only a national symbol, but also a sign of love and marital fidelity. Of course, you can take a more modern look at decorating the loaf and decorate its surface with wedding rings, swans, and figurines of the bride and groom. You can stay true to pagan traditions and display stylized phallic symbols on the loaf. But it’s better to stick to the “golden mean”.
How to serve a wedding loaf
The custom has not changed since ancient times: the loaf is placed on a wedding towel, which is specially embroidered for the occasion, and presented to the newlyweds. This usually happens after the wedding (or registration at the registry office) before guests are invited to the table. In the old days, the loaf was presented to the groom's mother. Parents congratulate the newlyweds and bless them for life together. One of the godfathers of the couple shared it, and the children carried pieces to the guests. A two-kilogram loaf can serve up to 50 guests.
The presentation of the loaf is the final stage of the wedding ceremony, the end of the period of youth of the bride and groom. It was baked only once - at the first marriage. The newlyweds had to thank and kiss the loaf three times. The top went to the young, it was supposed to be salted and eaten, and the one who bit off the largest piece was declared the head of the family.
There is another option - the bread needs to be broken off, and the larger piece goes to the one who is... more greedy. Which one is more aesthetic is up to you to decide, the main thing is not to spill the salt! The middle was taken to the guests, and the bottom was given to the musicians (you could find a baked coin there). It was customary to give jewelry from the loaf to the bride's unmarried friends.
Together with pieces of loaf, the newlyweds shared their happiness, and the guests thanked the newlyweds with gifts.
Whether to observe ancient traditions today is up to everyone to decide for themselves. But, in any case, they deserve respect.
We have prepared for our readers a master class on preparing a wedding loaf with photos - you can do all this in your kitchen at home without any problems.
Since ancient times, it has been the custom that the loaf in Rus' was considered not a simple food, but something much more than food, a cult dish with almost mystical significance. They baked it on special holidays. They were decorated with various figures that carried semantic meaning and depicted certain events that took place in the life of the family or served as family amulets for it.
As for the wedding loaf, here ritual traditions were observed especially strictly and strictly. After all, the wedding loaf symbolized the beginning of the life of a young couple just setting foot on the difficult path of family life and especially in need of the protection of the good spirits of the earth, water and air.
The size of the loaf and the figures decorating its surface were supposed to show how rich the groom’s family was, accepting into its bosom a new family member - the bride - the future keeper of the family called to continue it. The loaf is a symbol of wealth, fertility and a happy, well-fed life.
Let's move on to the manufacturing process. To prepare a delicious wedding loaf at home, you need to take the following set of products.
Ingredients for a wedding loaf:
- Flour - 8.5 cups.
- Egg – 5 pieces.
- Milk – 0.5 liters.
- Sugar – 1 glass.
- Salt – 1 teaspoon.
- Butter – 200 grams.
- Yeast – 1 tablespoon.
For lubrication:
- Egg – 1 piece.
- Vegetable oil – 1 tablespoon.
Master class on preparing a loaf for a wedding with photos:
To prepare dough for a loaf, you need to start by warming the ingredients.
Heat milk, melt butter. You need to take the highest grade flour and also make sure that it is not cold.
Break the eggs into a deep container. Mix them with sugar and beat into a strong foam.
The better the sugar is dissolved, the fluffier the resulting dough. Melt the butter in a separate container and pour it into the foam. Add salt and yeast.
Heat the milk until warm and also add it to the dough. Mix the contents of the bowl using a mixer or just a spoon and begin pouring flour into the dough.
You shouldn’t pour in all the mixture specified in the recipe at once, for the reason that each housewife’s glasses are different and you may end up with too much. Add flour one glass at a time, constantly stirring the dough. It should be elastic, but not too hard. If you have already cooked from yeast dough before, then focus on the dough for baking buns. Place the prepared dough in a warm (but not too hot) place and leave for about two hours to rise.
As soon as the workpiece doubles in volume, knead it with a spatula or with your hands and let it rise again. The second rise occurs much faster than the first time, so you should not leave the test for a long time. Punch down the dough that has risen a second time and place it on a cutting board sprinkled with flour or greased with vegetable oil. Divide the dough into three unequal parts.
Roll the largest lump into a ball and place it in a round mold or frying pan. We cut the medium-sized piece into three more parts, roll each part into a rope, and braid it. It should be long enough to wrap the dough ball around. Place it around the ball and secure the ends.
We use the last piece of dough to decorate the loaf. Add flour to a cutting board and knead the dough until firm. We do this so that the figures are easier to cut and hold their shape more firmly.
Using a knife or available molds, cut into shapes in the form of swans, ears of wheat, leaves and flowers.
We stick all this beauty on the surface of the loaf in random order and place the loaf on the layering. To make the cake a beautiful yellow color, you need to grease it with beaten yolk. To do this, break the egg, separate the yolk and add half a teaspoon of water to it. Beat the mixture and apply it with a brush to the surface of the loaf and decorations. As soon as it rises and acquires a magnificent shape, you can send it for baking.
We heat the oven to a temperature of 200 degrees and put our work in the oven. After twenty minutes, reduce the heat to 170 degrees and leave the loaf in the oven for another forty, maybe fifty minutes. It depends on how hard your oven bakes. If the heat is sufficient, then forty minutes is enough. To prevent the product from burning, after it acquires a beautiful yellow color, you need to cover it on top with a piece of foil.
There is no need to immediately remove the finished loaf from the oven. Turn off the oven, open the door and let the cake cool slightly in this position. Then take it out and grease the surface with vegetable oil.
NOTE: Baking a wedding loaf should be entrusted to a married woman, and a happy marriage in which several children have already been born. By baking a loaf of bread for young people just getting married, she guarantees them family happiness and well-being, and also bless them for multiple prolongation of the family.
According to tradition, the groom’s mother should present the loaf to the newlyweds. A salt shaker is placed on the loaf, into which the young people must dip the broken piece and feed each other. The mother, at the same time, makes a speech welcoming the young couple, and the father of the bride serves the young couple glasses with a drink to wash down the traditional piece of the first bread broken together, which should not seem too salty.
MAY YOU LIVE HAPPILY EVER AFTER!
Vedernikova A.V.
It is difficult to meet a wedding that did not include a traditional loaf. It can be purchased ready-made, ordered from a bakery, or baked at home. It is most preferable to make your own wedding cake, since during the entire process you can fill it with positive energy and program it for further well-being. So, how to bake a beautiful loaf for your wedding with your own hands?
What to make jewelry from
Mastic is a beneficial material for decoration. Elastic, like plasticine, it is good for sculpting all sorts of figures or complex fragments. In addition, it can be tinted. Mastic and marshmallows will turn the product into a super elegant wedding loaf. Photos of such culinary masterpieces look impressive. You can create multi-tiered wedding cakes, because mastic (if stored correctly) is a very durable material. But if you want to know how to decorate a loaf according to Slavic traditions, you need to learn how to work with dough. After all, our ancestors did not know what mastic was. They made all the decorative details from dough. But it is important to know not only how to create decorative elements, but also what to sculpt them from and when to attach them to the surface of the loaf.
Towels for a wedding loaf
The towel on which the loaf is placed must be chosen very carefully if you want to observe all the traditions. After all, embroidery on a towel was not done for decoration, but for magical purposes. Each pattern has its own meaning; it simultaneously protects against dark forces and brings happiness and prosperity to the family.
Patterns depicting grapes or hops symbolize prosperity, prosperity, and joy. The firebird or peacock refers to the solar cult and also calls for happiness. Often other birds were also embroidered on towels, always in pairs - usually falcons, swans, roosters and others. They symbolize the newlyweds.
Dough for decorating loaf
You can set aside some of the material from which we will bake our wedding cake. Based on the fact that the loaf must certainly be large (each participant in the celebration is entitled to at least a small piece), at least six hundred grams of dough will be needed to decorate the product. But a caveat must be made here. If we decorate our loaf before putting it in the oven, the butter dough will spread and mix with the base during baking. Because of this, decorative details will be barely visible. Therefore, for decoration they use unleavened dough, like for dumplings and dumplings, or shortbread dough. In this case, the decorative details will be more prominent, convex and retain clear outlines. Modern technologies allow us to paint jewelry in different colors. But our ancestors used burnt sugar, egg whites, buckwheat and rye flour for these purposes.
What to do with the wedding loaf after the wedding
If not the whole loaf was eaten at the wedding, then it is worth giving a piece to those guests who could not come for a good reason. If the young people decide not to share the loaf with guests - this is sometimes done in order to “preserve” happiness in the family - then they must eat it themselves, sharing it only with their parents. In this case, the salt from the loaf can be poured into a bag and stored as a talisman. The same is the case with the towel and the icon with which the parents greeted the newlyweds.
There is also such a sign: young people must dry part of the loaf. If someone in the family is sick, you need to eat a small piece of wedding cracker. Making crackers out of a wedding loaf would be a good idea anyway, if no one is eating it. There are no bad omens in this regard, but it would still be a shame if a lovingly baked symbol of family wealth, happiness and prosperity turns moldy.
A wedding is a special celebration. The celebration is accompanied by many unique symbolic rules and rituals. The wedding loaf is one of the main differences of the ceremony.
Butter dough decorations
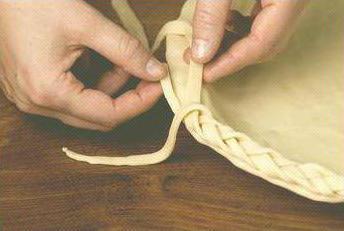
So that the decorative details do not blur, but remain in relief, they should not be attached to the surface of the pie immediately, but fifteen to twenty minutes before the loaf is ready. An exception may be dough braids. Since this is a fairly large decoration, it needs more time to bake. In addition, the braid, like a hoop around a barrel, holds the surface of the wedding cake together, preventing the dough from spreading. This decorative detail is very easy to make. Cut three equal strips of dough. Their length should be two and a half times the diameter of the loaf. We fasten one end of the three strips together. And then we braid the braid. We lay it around the perimeter of the top of the product. We hide the tip of the braid underneath. After all, this braid should symbolize the infinity of marital happiness. You can weave another small and thin braid, decorating the place for the salt shaker with it.
Classic wedding loaf recipe
Traditionally, newlyweds are greeted with a wedding loaf of salt. There is a deep meaning in this. Bread has always been a symbol of wealth, and with the help of salt our ancestors protected themselves from spirits. The custom of welcoming newlyweds with a wedding loaf is still an indispensable part of the holiday. According to the rule, the groom's mother holds the wedding loaf, and the bride's mother holds the salt shaker. This is how parents symbolically give their children a farewell message before starting an independent life, wishing them a strong and happy family.
Required ingredients:
- bread flour – 1.5 kg;
- yeast – 20 g;
- chicken eggs – 10 pcs.;
- milk – ½ tbsp.;
- butter or vegetable oil – 100 g;
- salt – 2 tsp;
- sugar – 1 tbsp;
- spices to taste - vanilla, cinnamon, poppy seeds, etc.
Cooking instructions:
- Heat the milk slightly and dissolve the yeast in it. Add spices to taste.
- Take 9 eggs, separate the yolks from the whites. Mix the yolks with sugar until a homogeneous mixture is obtained and combine with dissolved yeast. Beat the whites.
- Sift flour, add salt. Place ¾ of the sifted flour in a deep bowl, make a wide depression in the middle. Slowly pour in the solution of yolks and yeast, add butter (preferably) or vegetable oil, and a mixture of proteins.
- Knead for 20-30 minutes. To make the dough smooth, during the kneading process you can add the previously set aside portion of the sifted flour. Place the finished dough in a clean, tall form, cover with a scarf, and leave in a warm place for 1.5-2 hours. When the dough has risen, it must be kneaded again and allowed to rise again.
- Divide the finished dough for the wedding loaf into 3 parts. Make a ball from one part. Divide the second part and roll it into three thin strands, braid them and wrap the ball along the bottom edge, securing the ends. The third part will be needed for decoration. Typically, a wedding loaf is decorated with bunches of viburnum, ears of wheat, petals, flowers, and figurines of swans. There are two ways to bake. The first is to place the decorations on the loaf immediately or attach it 20 minutes before it’s ready. In the second case, the contours will be clearer. Make a hole in the middle of the loaf for the salt shaker.
- Preheat the oven to 200°C. Place the loaf on a baking sheet lined with parchment paper, beat the egg, and brush the top with the resulting mixture, except for the decorations. Then they will stand out against the rosy background of the holiday bread. Place in the oven.
- After the loaf has browned (about 20 minutes), reduce the temperature to 180°C. Bake for 60 minutes or slightly more. It is not recommended to open the oven while baking. When the loaf is ready, it must be cooled by opening the oven. After 20 minutes, take out the loaf, place it on a round holiday plate, cover the top with paper napkins and leave overnight.
To do this you will need:
- rye sourdough – 300 g;
- wheat flour 2 grades – 100 g;
- peeled rye flour – 600 g;
- water – 400 ml;
- fermented rye malt – 2 tbsp. l.;
- salt – 1 tsp;
- sugar – 150 g;
- honey to taste – 80 g.
Step-by-step instruction:
- Pour hot water over the malt and stir. Add starter, sugar, salt, honey to the cooled mixture and mix thoroughly again.
- Add 100 g of rye and 100 g of wheat flour, mix until smooth, knead for 15 minutes using a mixer. Slowly add 500 g of rye flour, knead by hand for another 20 minutes. Fun fact: wheat flour is added to prevent the dough from being sticky and heavy.
- The finished dough is placed to proof in a warm place for 5 hours.
- Further preparation, decoration of the wedding loaf and baking do not differ from the process of cooking according to the classic recipe using wheat flour.
A wedding loaf made from rye sourdough will certainly be remembered by both the newlyweds and the guests of the holiday. Indeed, in addition to its special taste, rye dough contains a record
amount of vitamins.
It is precisely the exceptional health benefits that make a rye loaf stand out from a wheat loaf.
Roses
Flowers on a wedding loaf symbolize family happiness and motherhood. Roses look especially festive on the cake. How to beautifully decorate a loaf with this “queen of flowers”? Cut out four circles from unleavened dough. Place their edges on top of each other and roll them up. Break it into two halves, squeezing it in the middle with your fingers. Two small roses will come out. To make a large flower, let's resort to another method. Take one circle of dough and twist it in the center, straightening the edges nicely. On top of it we will put another similar piece, and then another and another, until a lush and beautiful rose comes out. Let's attach leaves to the flowers. To do this, roll out the dough into a thin layer and cut out rhombuses. Then we will make cuts on them with a knife to give them a resemblance to rose leaves. Using a needle, draw veins on the dough.
Wedding loaf recipe
There are many recipes and decorations for a wedding loaf, and each master adds his own ideas. Here is one of the most popular options. Products to be prepared for baking:
- sugar – 7 table. spoon;
- eggs – 10 pcs.;
- flour - 7-8 cups;
- dry yeast – 20 g;
- milk – half a glass (can be half and half with water);
- butter – 100 g;
- salt – 2 tsp;
- ground cinnamon;
- zest of one lemon (optional)
Dissolve yeast in milk with a teaspoon of sugar. Break 9 eggs, separating the yolks (reserving the tenth for greasing the top of the pie). Grind the yolks and sugar, combine with the milk-yeast starter. Mix well. Sift the flour into a large, tall bowl (you can do it several times) and make a funnel in the center of the mound. Pour the yolks with milk into the well, add the rest of the ingredients (butter, salt, whipped whites and spices). Stir until smooth and place on a table previously sprinkled with flour. Add flour in parts and knead until the dough is pliable and stops sticking. It is easier to knead with dry, oiled hands. This takes up to 30 minutes. The mass of the dough at the exit is about two kg. Transfer to a tall container and leave in a warm place. When the dough increases, it must be kneaded and put back in a warm place without drafts. After it has risen again, you can move on to baking. Separate part of the dough (about 500 g) for decoration, and roll the main mass into a ball and place on a baking sheet covered with parchment.
Details of floral ornament
Everyone knows approximately what a wedding loaf should look like. Photos present it as a round and tall bread, the top of which is decorated with flowers, ears of viburnum, bunches of viburnum, and oak leaves. Stems are the easiest plant decoration to prepare. Elastic dumpling dough can be rolled into very thin ropes. Even a child can make viburnum berries. You need to roll small balls of dough. In the colored version of the loaf, you can tint it with paprika powder. These balls should be cut in half and the semicircles should be placed in clusters. Creating spikelets (a symbol of fertility) will be somewhat more difficult. Roll out the dough into small sausages (two to three centimeters long). Using nail scissors, we make cuts on the sides to make it look like ears of wheat.
Swan birds
Doves are a favorite character for decorating ritual pies. But on the Easter cake this bird symbolizes the Holy Spirit, and on the wedding cake it symbolizes peace and love. Therefore there should be two pigeons. These birds are easy to make. Roll out strips of dough three centimeters long and 0.5 cm wide. Tie knots at the edges. On one of them we cut out the beak with the tip of a knife, and on the second - the tail. Let's flatten the main piece of dough. We draw the wings with a needle, and ruffle the feathers with nail scissors. How to decorate a loaf with two swans? They will be as easy to make as pigeons. Using your fingers, roll the dough into two sausages six centimeters long. Let's stretch each of them so that a large oval (the swan's body) is formed at one end, and a small ball (its head) is formed at the other end. We attach both birds to the loaf. We form a beak and eyes on the ball, and bend the flagellum (neck) beautifully. We make a tail on the oval, draw wings and feathers.
How to cook at home
How to bake a loaf for a wedding? Recipes for fluffy bread have been passed down from generation to generation and cherished in every family. Nowadays you can find a huge number of loaf options, but the traditional method of baking bread remains popular.
Holiday loaf recipe
For yeast dough:
- Sugar 1 glass.
- Yolks 4 pcs.
- Squirrels 6 pcs.
- Milk 0.5 l.
- Yeast 100 g.
- Salt 1 tsp.
- Vanillin to taste.
- Butter or margarine 300 g.
- Raisins 1/2 cup
- a.Flour 1 kg.

Playing with colors
In order for the decorative details to be as different as possible from the background of the base, you need to know when and how to decorate the loaf. You can stick them on at the very beginning, before sending the product into the oven. But then you should not lubricate them with yolk. In this case, the cake itself will come out rosy, and its decorations will be white. You can go beyond such a monochrome “grisaille” and make a colored loaf. In this case, burnt sugar, cocoa, turmeric, paprika powder, and crushed dry tomatoes should serve as paints. Since the decorative details of the loaf are also edible, the dyes should be exclusively food-grade.
Kneading dough
How to bake for newlyweds? This process requires careful preparation, as well as compliance with all rules. When the dough is ready, you can start kneading the dough. How to do it?
First you need to separate the whites from the yolks. This can be done using an empty plastic bottle. One of the yolks should be left for greasing the workpiece before baking. What to do with the rest? The remaining yolks should be gently ground with sugar. The resulting mass should be added to the dough. Wheat flour should be poured into a deep container, separating a small amount to form decorations. This will require approximately one glass.
In a separate container you need to beat the whites. Now you need to prepare vegetable-based butter or melt the butter in a water bath. You should make a small depression in the flour, and then pour the yolks with the dough and the whipped whites into it. You should add salt and oil to the mixture. After this, you need to knead the dough into a loaf well. As a result, the mass should stop sticking to your hands. This process can last about 30 minutes. The dough should be smooth and elastic.
When the mass is ready, it should be transferred to a bowl and placed in a warm place for two hours. After this, the dough should be kneaded and left for some time. It should rise.
How to “stick” jewelry on a product
If we use the same yeast dough for decoration as for the wedding cake, we should not attach it to the base before baking. In the oven, all the details will blur and become barely noticeable. How to decorate a loaf with pieces made later? Fifteen to twenty minutes before the loaf is ready, take it out of the oven. You need to work very quickly. After all, overcooling an unbaked product can cause the dough to fall off. Brush the top with sugar syrup or beaten egg white. We attach decorations to this culinary “glue”. Place in the oven and bake until fully cooked.
Preparing the dough
So, how to bake a loaf for newlyweds? First of all, you need to prepare yourself. It is not recommended to bake baked goods in a bad mood. After all, the loaf gives rise to a new marriage. Therefore, you should bake it only in a good mood. All loaf recipes begin with preparing the dough. This is the most crucial moment. Since not everyone can bake a loaf of bread at home, you should follow the sequence and do everything carefully.
To begin with, it is recommended to slightly warm the milk or water. The liquid should be warm, but not hot. Milk should be poured into a deep container. You should also add dry yeast here and stir everything carefully. Add sugar to the liquid. One spoon will be enough. It should dissolve in the milk.
After this, you need to add a small amount of wheat flour to the dough. It needs to be sifted through a sieve. The result should be a dough similar to pancakes. The finished dough should be lightly sprinkled with flour and then covered with a towel or napkin. In this form, the mixture should stand for 1-1.5 hours. You can get the dough out when it has expanded to its maximum size. If this is not done in time, cracks may form.
If desired, you can speed up the process. To do this, place the container with the dough in a bowl filled with warm water. Please note that with this method it is necessary to change the water regularly. This is necessary to maintain a certain temperature.