Wedding accessories
- Cool DIY wedding craft ideas
- Master class: wedding ship made of candies
- How to make a box for the newlyweds' treasury
- Paper pompoms for wedding hall decoration
- DIY wedding signs
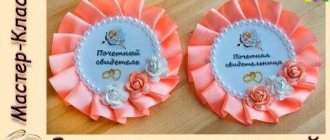
- Bows for wedding guests
The pre-wedding days are filled with various chores. You need to have time to do a lot of important things and not lose sight of anything. Accessories for a wedding are one of the most important elements of its design ; they must match both the overall style and color scheme. These decorations can be ordered from craftsmen, purchased in wedding salons, or made yourself.
Cool DIY wedding craft ideas
Do-it-yourself wedding accessories are a fashionable trend, because now various handmade items are especially valued.
Cool things given by guests or decorating the banquet hall will become a special highlight of the holiday and will be remembered more than once
Handmade craft ideas:
- Joking gifts can be a great addition to the main present. For example, an ordinary brick - you need to make a small recess in it and disguise rolled up bills in it. Present to the newlyweds with the words that this is the first brick for laying their house.
- A popular joke is a transparent piggy bank called “Family Budget.” This is a box divided into 2 halves: for husband and wife. But the piggy bank is designed in such a way that when the husband puts coins in the hole marked “Husband,” the money goes into the compartment for the wife.
- The original idea is to hand the newlyweds a tight rein with a hint that they should hold each other in their hands and save the family. You can sew them from ordinary kitchen gloves, and make the spines from a washcloth.
- A set of glasses or wine glasses decorated with ribbons, lace, and rhinestones is an excellent gift that can be placed on the table on your wedding anniversary.
- A pleasant and warm gift is wedding bears, crocheted and dressed in a tie and veil. Such a gift will remain in the house for a long time as a reminder of a happy day in the life of a married couple.
- A tablecloth made from paper bills is a fun and interesting idea for giving a cash gift to newlyweds. Banknotes can be arranged randomly or in a pattern, especially if you prepare banknotes of different denominations.
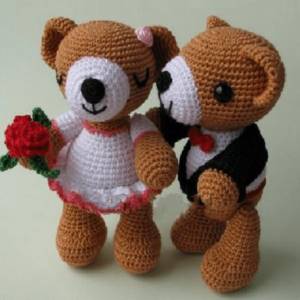
Wedding bears
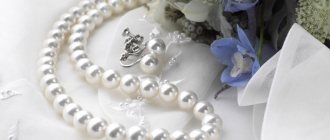
An interesting gift - a set for newlyweds.
This is a beautiful box containing an elegant cover for the wedding certificate, comic vows of the newlyweds and a pen to sign them with.
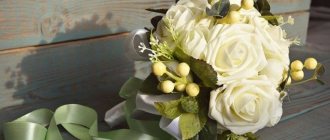
Double bouquet using kanzashi technique for the bride
The tradition of throwing a bridal bouquet to unmarried bridesmaids continues to be popular. But often the bride feels sorry to part with her bouquet, so a double is used . It is not difficult to make such a kanzashi composition with your own hands - the bouquet will turn out very elegant and festive if you use this technique.
To prepare a duplicate bouquet, you need to purchase the following accessories :
- satin ribbon of different shades: for flowers, leaves and handles;
- cardboard roll (for example, from food foil);
- foam ball;
- scissors;
- wire;
- openwork ribbon;
- more decorative details (rhinestones, beads, pearls);
- hot-melt gun with transparent glue.
To prepare one flower you will need about 40 cm of tape: 11 pieces 2.5-3 cm wide and 7 cm long
How to do:
- Bend the edge of the ribbon into a triangle and hem it with thread of a similar shade. Pull the thread in so that the ribbon gathers into a petal shape. Prepare 10 more parts in the same way.
- Cut 5 cm of wire with a diameter of about 6 mm. Bend one edge into a small loop.
- Coat the edge of the petal with glue and wrap it around a loop of wire. Attach 2 more petals in a circle - you get a bud.
- Next, glue 3 petals in a more straightened form, and another 5 petals in the third row - you will get a rose.
- Cut the green satin ribbon into pieces with sides of 5 cm. Fold in half and singe the edges over the fire. Drop a little glue onto the edge and press the leaves under the flower bud.
- Cut the foam ball into 2 equal parts - you will only need one half. Cut a place in it so that you can insert a cardboard roll.
- Cut the roll to leave a neat little handle that is comfortable to hold in your hand. Coat the edge thoroughly with glue and insert it into the foam base.
- When the glue is completely dry, wrap the handle with tape and secure with glue.
- String the roses onto the ball using pins or glue them so that there are no empty spaces left.
- Additionally, decorate the composition with rhinestones or beads, feathers - as your imagination dictates.
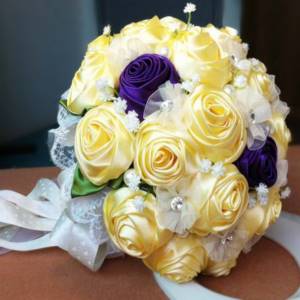
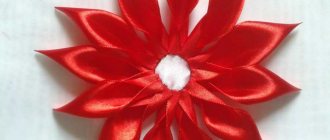
Kanzashi wedding bouquet
It’s so easy to make unusual, attention-grabbing kanzashi wedding decorations for the bride with your own hands. The groom's boutonniere will look harmonious, as will small details of the holiday , for example, invitation cards or wine glasses for the newlyweds.
Master class: wedding ship made of candies
It’s easy to make a sweet gift with your own hands or just an option for treating guests with goodies - a ship made of candy. It will take several hours to create, so it’s worth freeing up the evening.
First of all, before starting work, you should make a sketch on paper: what size the ship will be, the height of the masts and various decorative details
Then you need to prepare the necessary materials:
- Styrofoam;
- polyurethane foam;
- organza;
- satin ribbon;
- PVA glue and heat gun;
- double sided tape;
- wooden skewers;
- foil, corrugated paper;
- candies.
Progress:
- Cut out the base of the ship from foam plastic and fill its interior with polyurethane foam.
- Cover the outside of the polystyrene foam with corrugated paper. It is important to do this carefully, without leaving gaps.
- Use skewers to depict masts with slats. Cut sails from satin fabric and fasten them to the masts. Install the masts “on deck”, sticking them into the mounting foam.
- Glue the candies to the base of the ship using double-sided tape. Alternatively, you can make small cones out of paper, stick them into the “deck”, and put candy in the holes.
Additionally, the ship can be decorated with a decorative anchor, a lifebuoy and figurines of the bride and groom.
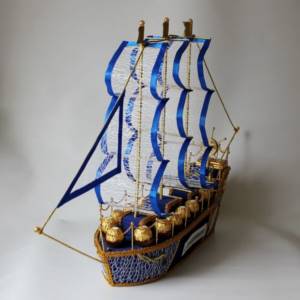
Wedding ship made of candy
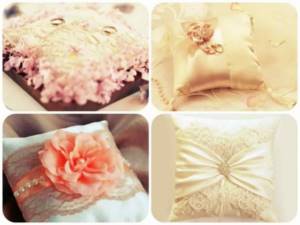
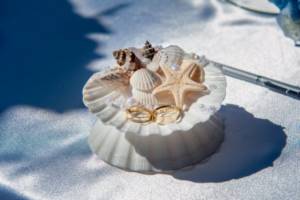
Ring pad
The pillow can be made from brocade, silk, satin ribbons, lace, organza. Decoration can include flowers made of fabric or ribbons using the kanzashi technique, or embroidery. Suitable decorations include beads, pearls, precious stones, rhinestones, buttons, etc. The shape of the pillow can also be chosen in any way - heart, square, circle, cloud, flower. Its size is small - 10-15 cm.
You can secure the rings to the pillow with ribbons:
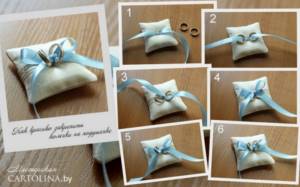
Making a ring pad in the video:
In the case of a themed wedding, you can deviate from the rules and use completely unusual things as pillows for rings. For example, for a nautical-themed wedding, a real shell can play the role of a pillow. At the same time, you can decorate it either completely symbolically with a simple anchor or a bow on the side, or you can completely decorate it with fabric and accessories.
How to make a box for the newlyweds' treasury
At weddings, there is often a tray on which cash gifts in envelopes are placed. But this is not very practical, because money can easily fly away from him. Therefore, it is better to make a box that can be called the “ Treasury of the newlyweds ” - such a creative souvenir will definitely not go unnoticed.
A master class on how to design such a craft involves creating a heart-shaped box. But if you have an empty candy box of the desired shape, then the task will be greatly simplified.
What you will need:
- thick cardboard;
- masking tape;
- stationery knife;
- satin fabric;
- beads or rhinestones, beads;
- heat gun;
- scissors.
Progress:
- Draw a round heart on a piece of cardboard. Cut out two copies - this will be the top and bottom of the box.
- Cut a long strip of cardboard approximately 20-30 cm wide (depending on the desired height of the product). Using your hands, make a bend in the shape of a heart, cut off the excess length. Attach to the bottom using masking tape.
- Make a slit about 10 cm long and 1 cm wide on the top of the heart.
- Using masking tape, glue the top to the box.
- Cover the craft with satin or any other fabric, gluing it not over the entire surface, but only along the edges. Cover the joints with beads, rhinestones or any decorative details. To decorate the box, you can use not only fabric, but also shiny spray paint. But to prevent it from crumbling later, you will need to coat the surface with varnish.
- Decorate the perimeter of the money slot with beads. Decorate the upper part of the box with fabric flowers.

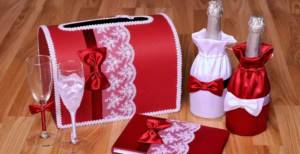
Wedding box in the shape of a heart
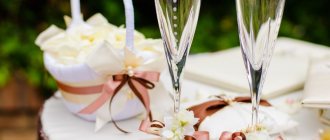
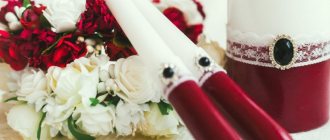
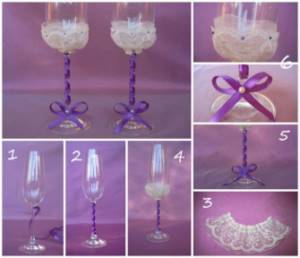
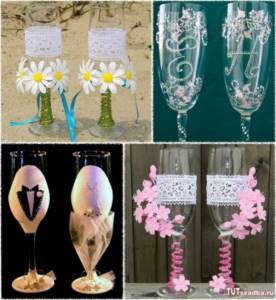
Newlyweds' glasses
The newlyweds' table is decorated with 2 bottles of champagne and glasses, decorated in the same style. They are decorated with ribbons, polymer clay details, lace, fabric, and rhinestones.
To decorate with lace, you need to wrap it around the glass and cut it to the required length. Glue. You can add ribbon, flowers, rhinestones on top.
On a note! The stem of the glasses can be decorated with the same lace, ribbons or flowers.
Examples of wedding glasses design in the photo:
Related article: Blanket “10 loops”: master class with description and video
Paper pompoms for wedding hall decoration
Bright pom-poms can be a wonderful decoration for a wedding hall . It’s very easy to make them with your own hands; you will need the most common materials, so the decoration will be very economical from a financial point of view.
For one paper pompom you need:
- 8 sheets of thin paper;
- lace or strong threads;
- large scissors;
- fishing line
Progress:
- Cut the sheets into rectangles with sides approximately 80*50 cm. Stack them on top of each other. Paper for crafts can be multi-colored or plain, but always thin, like packaging paper. The greater its width, the larger the diameter of the ball.
- Fold the sheets like an accordion, making even folds 3-8 cm wide. Fold until one strip remains on the table.
- Bend the strip exactly in half, and tie the resulting fold with thread, but do not tighten it too tightly.
- Cut the edges of the strip in the shape of a semicircle - at this moment the sheets must be held firmly with your hand so that they do not move apart.
- Carefully unfold each edge from the center, holding the fold with your free hand. Unfold the folds slightly along the fold lines.
- Separate each sheet of paper from each other and gradually fluff the ball.
Tie a fishing line of the required length to the craft and attach the pompom to the ceiling or in another part of the banquet hall. also looks interesting on trees when the wedding takes place outdoors.
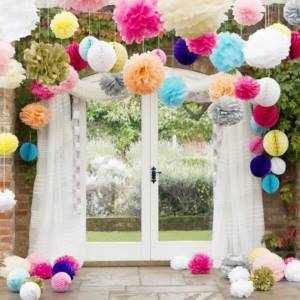
Paper pompoms for decorating wedding interiors
DIY wedding signs
Large weddings cannot do without signs, especially if the celebration takes place outdoors . On the signs you can write directions to places for photo sessions, to a buffet or rest room, as well as various humorous inscriptions.
You can order such paraphernalia from wood, but if this is not possible, then a handmade one will help out: signs made of cardboard, made by yourself, will be no worse. What you will need :
- thick cardboard;
- wooden post (beam);
- double sided tape;
- black film (self-adhesive);
- scissors;
- crayons of different colors;
- paper;
- pencil.
Progress:
- Draw an arrow of the desired size on paper and cut it out. Place the resulting stencil on the cardboard, trace it with a pencil and cut it out as well. Instead of scissors, you can use a sharp stationery knife - the lines will be smoother.
- Glue the self-adhesive film to the arrow and cut off the excess pieces. The film must be purchased with a matte finish, since the inscription will be difficult to read on a glossy one.
- Use chalk of any contrasting color to write a phrase.
- Glue double-sided tape to one edge of the beam and secure the sign.
The original sign board is ready!

Signpost at a wedding