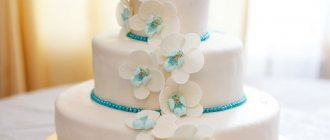
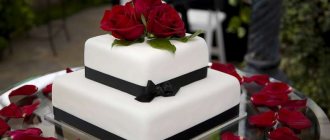
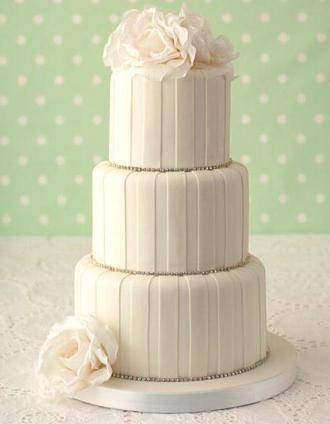
The wedding cake is an integral part of this event. Some people prefer to order it from a pastry shop, while others want to create a work of art themselves. It is worth saying that not everyone can cope with such a difficult task. After all, a dessert in honor of a wedding should not only be tasty, but also very beautiful.
With his appearance, he simply must attract friends and relatives. Therefore, if you decide to bake a cake for your wedding, then you should take this into account. It is also very important to prepare all the materials that may be needed in the process and decide on a dessert recipe.
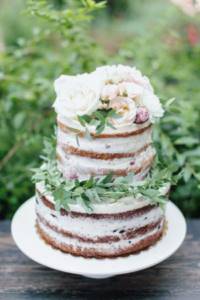
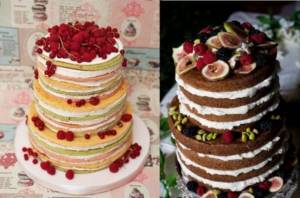
DIY naked wedding cake: recipe with photo
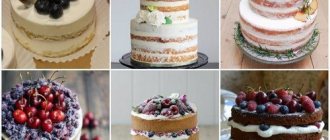
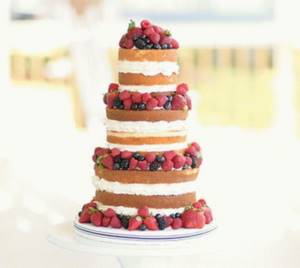
A naked cake is one whose layers are not hidden by fondant or cream. Most often, such a dessert is made with your own hands, and demonstrates the skill and imagination of the future wife. The final design looks quite cute and more “rustic”, which refers to the tradition of the bride baking a holiday loaf.
If the wedding is decorated in a certain style, then the design of the cake should correspond to the general concept of the celebration and be in harmony with the decor of place cards, table numbers and other accessories.
Products and Tools
To understand how to make a three-tier wedding cake without mastic with your own hands, you will need to take 2 sponge cake molds 16 cm and 21–26 cm in diameter.
If the sponge cake is being baked for the first time, then its edges will need to be trimmed, since it is very difficult to get an even golden hue without experience, and you will also need to prepare a sharp saw knife and parchment paper.
Preparation of dough for 6 cakes (3 per tier) involves preparing the following ingredients:
- butter, 925 g;
- powdered sugar, 1.23 kg;
- vanilla seeds, 4 pods;
- vanilla extract, 6 tsp;
- eggs, 19 pcs.;
- flour, 1.4 kg;
- baking powder, 9.5 tsp;
- vegetable oil, for greasing molds;
- hot water, 18 tbsp. l.
Master class with photos
Step-by-step instructions for making a naked wedding cake at home:
- The finished cakes are allowed to cool and carefully cut into 2 parts.
- A special circle is placed on the board, which itself will support the dessert in one position and help move it.
- The first cake is placed on top of the circle. Buttercream is used as a filling for a wedding cake. Each cake is coated with it, and fruit is placed on top of the cream.
- Then they fix around the sliding form in which it was baked. This is done so that the cream does not flow out from the sides.
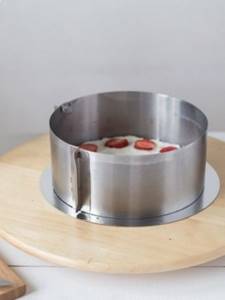
- Then the cut cakes and creamy fruit filling are laid out in layers in the mold until it reaches the edge of the mold.

- The top layer is coated and placed in the mold for 10 minutes in the refrigerator.
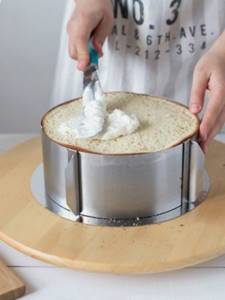
- The slightly cooled tier is removed from the mold, excess cream is removed and sent to cool for another 2-3 hours so that it hardens. The same is done with cakes of smaller diameter.
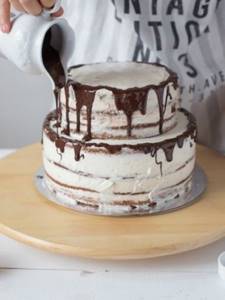
- After complete cooling, the upper tier is placed on the lower one.

- Drizzle chocolate over the edges of the cakes in a thin stream to create drips.
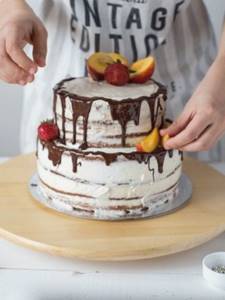
- At the final stage, decorate the naked cake with fruit.
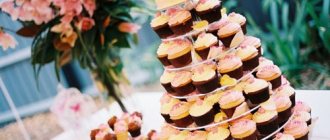
A good alternative to a naked wedding cake is a wedding cake with cupcakes, as well as other portioned desserts for the holiday.
For the fifth wedding anniversary
We offer to bake a very beautiful cake for your 5th wedding anniversary, which will look no worse than a custom one.
The following products will be required:
- flour - a glass;
- eggs – 9 pcs.;
- sugar – 230 g;
- butter – 30 g;
- cream – 600 g;
- starch - 4 tbsp. spoons;
- marshmallows – 200 g;
- cherry – 150 g;
- vanillin;
- salt;
- food coloring;
- boiling water – 6 tbsp. spoons
The cake consists of two filled sponge rolls placed vertically on top of each other. The lower one is wider, the upper one is a little narrower. Both are decorated on the sides with inscriptions and small thematic designs - hearts, rings, etc.
- First you need to prepare the drawings, which will be made from a special paste. They are applied directly to the pastry paper on which the roll biscuits will be baked.
- The paste is prepared by mixing the protein with sugar, softened butter and flour. Add a little food coloring to this mixture.
- On paper we draw stripes of the same width corresponding to the width of the roll - the lower or upper segment of the cake. In the middle of each strip, you can write a congratulatory inscription and drawings with a pencil.
- Using a pastry bag, paint the pastry paper with paste, tracing the designs and inscriptions.
- Then this paper is placed on a baking sheet, turning it over with the painted canvas facing down. Place the baking sheet in the freezer.
- Now it's the turn of the biscuit. Sift the flour with salt in advance and mix with starch. In another container, beat the yolks, adding sugar little by little until they turn white. Add vanilla, without stopping the mixer, pour in hot water.
- In a separate bowl, beat the egg whites vigorously. Pour flour into the yolks, stir a little and then carefully fold in the whites. Gently, stirring the mass from bottom to top so that the whites do not shrink, make biscuit dough.
- On a baking sheet taken out of the freezer, spread the dough evenly, directly on top of the drawings.
- The oven should first be heated to 180 degrees. Place the biscuit in it for about 12 minutes. You can’t bake it too much, because it will be difficult to roll up a roll from such dough.
- Turn the finished biscuit over while warm, cut it into strips and remove the pastry paper from them. We act carefully so as not to damage the drawings.
- One by one, quickly wrap the biscuit strips in a slightly damp towel, rolling them into a roll. We wait until everything cools down.
- If the oven is small and, accordingly, the baking sheet is small, then we bake two biscuits with pictures and cut them into corresponding strips.
- Prepare the cream by whipping cream with marshmallows and cherry juice.
- We decorate the cake. Grease the cooled biscuit strips wrapped in a towel with cream and roll them into two rolls. One will be wider, you can spend 5 strips on it, the other will be narrower - it will take 3 strips.
- Place the rolled rolls in the refrigerator to soak for half an hour. Then we take it out and place it vertically on a beautiful dish, one roll on top of the other. We decorate the cake as you like - cream edging, roses, sweets, sprinkles, chocolate.
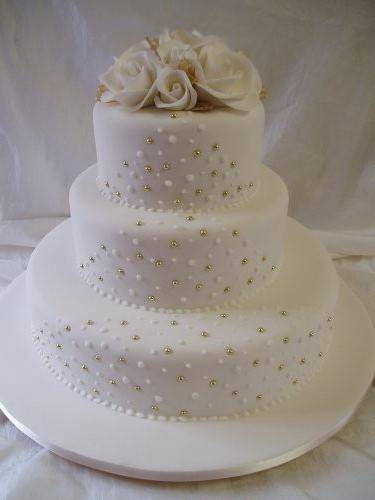
How to make a multi-tiered wedding cake yourself
- First you need to put the soaked tiers in the refrigerator so that they become more rigid. This will make working with them easier.
- Under each cake, place a circle of cardboard 5 mm smaller in diameter than the cakes wrapped in cling film.
- The upper circle is placed on the lower cake and circled with a needle or sharp knife, without penetrating too much into the biscuit. After this, the template is removed.
- Inside the outlined space, places for supporting wooden sticks or cocktail tubes are marked. This is done so that the lower tier does not sag under the weight of the upper one.
- A stick is inserted into one of the marked places until it stops, and the tree is outlined with a food marker. Then they take it out and cut off the excess. The same is done with all the other rods.
- After this, the top tier is placed on the cardboard circle and carefully transferred to the prepared place. Once the cake is assembled, you can decorate the top with swans, roses and other elements. Read here how to make swans for this dessert.
If the filling is very delicate or the cake is heavy, the number of rods needs to be increased.
How to assemble a multi-tiered cake is clearly shown in the video:
The sponge cake must be kept chilled and removed from the refrigerator only 20 minutes before serving. Also, the blanks are stored in disassembled form until the evening before the celebration, so that the lower tiers do not sag under the weight of the upper ones.
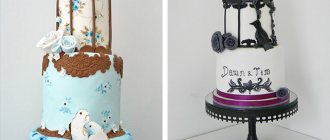
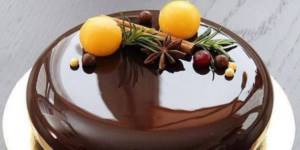
Wedding cakes made from mastic. Photo. Nuances in preparation
These mastic cakes are especially popular. They are very beautiful, and there are a lot of ideas for their design. But it’s not at all necessary to come up with grandiose bouquets of flowers. A simple design that even a beginner can handle is by no means the worst thing.
Perhaps the easiest, but no less beautiful decoration for a wedding cake can be ordinary mastic balls or confectionery sprinkles.
Bows of various sizes can also serve as a simple but elegant solution. You can play with colors, because no one said that wedding means it has to be white.
The most ordinary stripes on a cake can add real zest and elegance to a sweet dessert. A wedding cake made from mastic is actually not so much difficult to decorate as it is to “assemble”. The main difficulty in cooking is attaching its tiers if there are several of them. If there are two tiers, then usually the second is simply placed on the first. But in this case, the sponge cake should not be too soft or with a delicate filling, otherwise the lower tier threatens to be crushed under the weight of the first.
Everything becomes much more complicated when there are three or more tiers. Then a substrate of the required diameter is purchased for each of them, and each layer of the cake is placed on it. In addition, each tier is strengthened with special wooden sticks. They are used to pierce all layers (except for the very top) in several places and cut them so that their height exactly matches the height of the tier itself. Thus, the upper tier on the base will lie not just on the lower ones, but also on wooden sticks that will not bend and will firmly hold the weight of the entire cake, preventing the dessert from deforming.
Now you know how to make a mastic cake with your own hands. The master class revealed in detail all the stages of preparing this delicious dessert. And if before reading our article the task seemed impossible for you, now you are probably excited about this idea and will delight your loved ones with a wonderful, incomparable cake! We believe in you! Everything will definitely work out!
Homemade wedding cake

DIY wedding cake at home
Wedding bustle! I think every girl and woman has encountered it on the eve of her own wedding or the wedding of her daughter or son. A lot of things need to be prepared: rings, dresses, bouquet, hall, table and of course the main attribute - the wedding cake!
Well, since we have a culinary site, we will prepare a homemade wedding cake, with our own golden hands! I very much doubt that it will be the bride who will cook it, more likely a mother or mother-in-law, or maybe a grandmother or aunt will have the strength to please her granddaughter/niece?
Homemade wedding cake recipe:
- For the base, prepare a honey sponge cake. In order for the cake to be tall and voluminous, you will need to bake 2 biscuits and divide them into layers. First, prepare one biscuit. Sift 2 cups of flour.
- Separately, beat until white and the mass increases in volume: 3 eggs, half a glass of sugar and a pinch of salt.
- Take 3 heaped tablespoons of honey and melt over the fire, as soon as it melts add 1 tsp. soda and as soon as the reaction begins, the soda begins to boil, immediately remove from the heat and stir.
- Add honey to the beaten eggs and beat well. Add all the flour little by little, whisking or stirring well.
- Line a baking pan (30 cm in diameter) with parchment, pour the dough into a large pan so that it takes up 1/3 of the part. Cover the top of the pan with foil to prevent it from burning. Bake in the oven for 45 minutes. Check the readiness with a stick; if the dough sticks, put it back in the oven for another 10-15 minutes.
- Remove the foil from the pan. Line a cake rack with a kitchen towel and carefully place the cake on it. Remove parchment from cake. Leave to cool for 6-12 hours. Prepare another sponge cake as well.
- When the biscuits have cooled, divide each of them into 2-3 layers.
- Now let's prepare the cream. Whip 600 ml of store-bought special whipping cream 30% fat, add 1 regular jar of boiled condensed milk and beat again. You will get caramel cream.
- Place an even bottom layer on the cake stand. Divide the cream into 4-5 equal parts and brush each cake. The top cake should be smooth and do not spread cream on top.
- Now prepare the cream for the sugar mass (mastic). Separate 6 egg whites, add a little salt, 2 packets of vanilla sugar. Beat in a water bath, add 1 cup of sugar and beat some more. Cool the whites a little. Remove from the bath and beat until stiff peaks form. Add 1.5 sticks of butter (82% fat) in pieces and beat until thick and white.
- Coat the cake thinly with butter-white cream, leveling it with mastic. Place in the refrigerator for 1-2 hours until the butter hardens.
- You can make mastic and various decorations to your taste!
- Beforehand, we make lace from icing, roses, flowers, paint them silver with a spray, and when dry, decorate the sides of the cake.
- We cover the cake with white fondant and decorate it, placing a figurine of the bride and groom in the center.
Ingredients: for the biscuit:
- 2 tbsp. flour
- 3 eggs
- 0.5 tbsp. Sahara
- 1 tsp soda
- 3 tbsp. honey
for cream:
- 600 ml whipping cream (30% fat)
- 1 can of boiled condensed milk
for cream under mastic:
- 6 proteins
- a pinch of salt
- 2 packs vanilla sugar
- 1 tbsp. Sahara
- 1.5 sticks of good butter (82% fat)
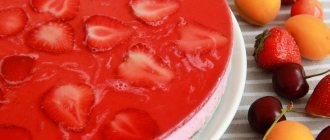
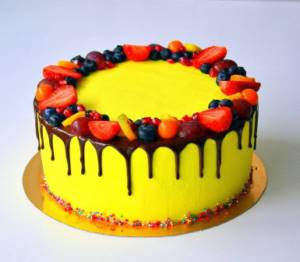
How to decorate a cake with whipped cream, jelly, frosting?
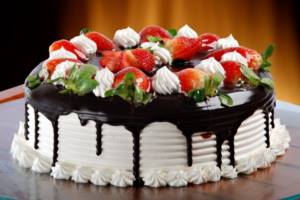
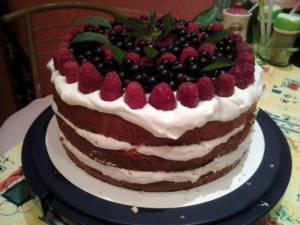
Store-bought whipped cream is often used to decorate cakes. This option is ideal if you do not know how to work with mastic. Often the cream is combined with berries such as strawberries, raspberries and mulberries.
decorate the cake with whipped cream, jelly, icing
decorate the cake with whipped cream, jelly, icing
An excellent option for decoration is jelly. You can make a separate top layer from it or simply cut it into pieces and place it on top. The result will be a kind of broken glass. You can place the “shards” on top of the cream.
decorate the cake with whipped cream, jelly, icing
decorate the cake with whipped cream, jelly, icing
An excellent option for decoration would be chocolate icing made from cocoa, milk, butter, sugar and flour. You can watch the video on how to make chocolate glaze.
decorate the cake with whipped cream, jelly, icing
decorate the cake with whipped cream, jelly, icing
How to make a beautiful and simple wedding cake?
The wedding cake is an integral part of this event. Some people prefer to order it from a pastry shop, while others want to create a work of art themselves. It is worth saying that not everyone can cope with such a difficult task. After all, a dessert in honor of a wedding should not only be tasty, but also very beautiful.
With his appearance, he simply must attract friends and relatives. Therefore, if you decide to bake a cake for your wedding, then you should take this into account. It is also very important to prepare all the materials that may be needed in the process and decide on a dessert recipe.
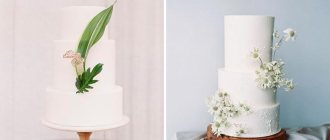
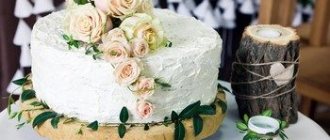
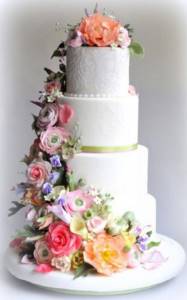
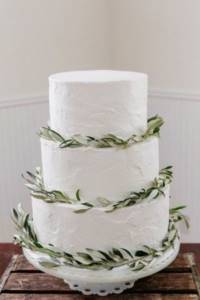
Decoration from fresh flowers
Decorating a wedding cake with fresh flowers has become another favorite trend these days. A culinary masterpiece, immersed in delicate greenery or luxurious variegated floral colors, looks very elegant and natural. This design option is quite often used for wedding celebrations held in eco-style. Original floral bouquets, wreaths and even individual petals are unobtrusively woven into the overall concept of the culinary idea.
Ideas for simple and delicious wedding cakes
There are a large number of products that even an inexperienced housewife can make.
A simple option is to purchase ready-made cakes and coat them with some kind of cream. For example, sour cream or cream. You can also place nuts, fruits and much more between the cakes. If you are comfortable with dough, you can bake sponge cakes or shortbread . Then coat them with cream and pour cocoa on top. You can place pomegranate or strawberries on top of this dessert.
Most often, one-tier cakes are created at home. They are easier to manufacture than multilayer ones. After all, in order to bake a cake with several layers, you need to have some skills. If you have experience working with such cakes, then you can safely create and surprise your guests.
How to decorate a cake with bananas, strawberries and oranges: ideas, photos, decoration recipe
Banana is a very nutritious fruit with a lot of vitamins. In addition, it contains a lot of protein, so the product is recommended to be given to children.
Options for decorating with bananas and oranges:
- Make a jelly top. To do this, lay fruit on top of the cake and pour it with frozen jelly. This is all done in a springform pan so that the cake can be removed.
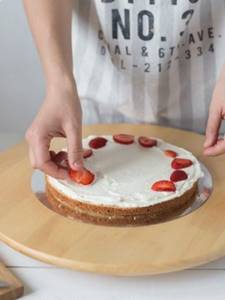
- Flowers. Bananas and oranges can be used to arrange flowers on top of the cake. To do this, the fruits are thinly sliced and laid out in the form of buds or blossoming flowers. Strawberries are generally an excellent berry that makes beautiful flowers. To do this, large berries are cut lengthwise.
- Hill. The fruits are placed on top of the cream in the form of a slide. You can make a fruit mosaic.
- Glade. This option is ideal if you have a few different fruits. It is necessary to divide the surface of the dessert into zones and lay out the fruit.
decorate the cake with bananas, strawberries and oranges
decorate the cake with bananas, strawberries and oranges
decorate the cake with bananas, strawberries and oranges
decorate the cake with bananas, strawberries and oranges
How to bake a cake with your own hands?
Any thing that a person creates is priceless. After all, human labor is especially valued, because if someone has done something unusual for the first time, then it is impossible not to appreciate it. To make the cake yourself, you need to decide on the recipe and prepare all the materials and products that will be needed.
Preparation
Before you start making dessert, you need to prepare various materials and equipment. Their set depends on the cake recipe you have chosen. If the dough is biscuit, then you will need molds of different sizes.
A blender is simply indispensable for preparing dough and cream. Bowls are also an integral part of the cooking process. They must have different sizes.
Recipe
To prepare a delicious wedding cake, you need to decide on a recipe. Let's look at the simplest and at the same time delicious cake.
To prepare it you will need:
- 0.5 kg flour;
- 0.5 kg sugar;
- 0.5 kg butter;
- 0.5 kg almonds;
- 12 eggs;
- zest of one lemon;
- salt and nutmeg.
- eggs 6 pcs;
- 0.5 cream;
- lemon juice;
- be sure to add a pinch of salt;
- butter 140 gr;
- gelatin sheets;
- sugar.
This is one of the easiest wedding cake recipes. Even a girl who has never worked with dough before can bake it. Based on the list of products, it is necessary to prepare materials and equipment. They will become assistants in the cooking process.
Step by step guide
Separate the yolks from the whites. Then you need to add sugar and butter to the yolks. Beat all this well and add almonds and the zest of one lemon. It’s good to beat everything again.
The finished dough must be poured into molds and placed in the oven, heated to 200 degrees. After the cakes are cooked, they will need to stand for 12 hours.
We've sorted out the dough, now let's move on to preparing the cream. First you need to soak the gelatin plates and melt the butter. Divide the egg into two parts. Then take the yolks and beat with lemon juice and zest. You need to add melted butter to this mixture.
Place the half-ready cream in a steam bath and slowly stir in the sugar. The mixture must be stirred until the sugar is completely dissolved. As soon as the cream begins to become thicker, you need to add dissolved gelatin to it. Mix everything, remove from heat and let the cream cool.
Now you need to assemble the cake. Each cake must be coated with pre-prepared cream. Afterwards, let the dessert soak for at least a couple of hours. Now you can safely start decorating the wedding cake. If you wish, you can use the same cream or any other one that you like.
How to decorate a cake with icing
Thin shiny icing is a fairly popular way to decorate cakes. To prepare it you will need:
- icing sugar – 200 gr.;
- oil – 2 tsp;
- water as needed.
Cooking time: 15 minutes.
Calorie content: 48.93 kcal.
Mix the ingredients and melt in a water bath. For smoothness and density, you can add a little water. Constantly stirring the mixture until the glaze becomes shiny and smooth.
Types of glaze:
- Lemon or orange. Add 1 tsp to sugar and butter. zest and 2 tbsp. l. lemon (orange) juice.
- Passion fruit glaze. Add 2 tbsp to butter and sugar. l. fruit puree.
- Coffee shop. Pour in 2 tbsp. l. water and add 1 tsp. instant coffee.
- Chocolate. Add 1 tsp. cocoa and 2 tbsp. l. hot milk.
- Original glaze. Cream cheese is used to prepare it. 100 gr. beat cheese with 50 gr. icing sugar for about two minutes or until consistency is smooth. It is advisable to use it immediately, so the surface of the cake will be smooth and the taste will be delicate.
- Lemon glaze. Add 2 tsp to the main ingredients. finely grated lemon zest and 2 tsp. milk.
- Honey. Pour 2 tsp into the cream cheese and icing sugar. milk and the same amount of melted honey.
Principles of decorating with glaze
- When cooking, be sure to stir vigorously to prevent the ingredients from burning;
- Chocolate can be replaced with cocoa. For example, if the recipe requires 100 g. chocolate use 50 g. cocoa and the same amount of butter;
- after decorating with icing, the confectionery product must be kept in the refrigerator for at least 3 hours;
- For snow-white color you need to add a drop of blue dye. The tint neutralizes the yellowness imparted by butter;
- You can also melt the chocolate for the glaze in the microwave.
Mirror glaze
Makes the surface glossy and smooth.
Before cutting, it is necessary to wet the knife in hot water or heat it, otherwise the mirror glaze will crack.
To prepare it you will need:
- chocolate – 1.5 bars;
- glucose syrup -150 ml;
- water – 75 ml;
- sugar -150 gr.;
- condensed milk – 100 gr.;
- gelatin – 12 g (melt in 60 ml of water).
Cooking time 30 minutes.
Calorie content: 170.75 kcal.
Preparation:
- Soak the gelatin and leave to swell;
- Mix glucose syrup with sugar and boil;
- Remove from heat and cool;
- Add gelatin and pour in condensed milk;
- Pour the chopped chocolate into syrup and beat with a blender;
- Place the resulting mass in a cold place overnight, and in the morning heat it in a microwave oven to 35C, beat again and begin coating the cake.
How to decorate a cake at home?
There are several ways to decorate a cake at home. Some are used frequently, while others are used very rarely. Let's look at the simplest ways to decorate dessert for a wedding.
Sugar icing
This method is the simplest and most accessible. To do this, you should prepare the following products:
- 7 tbsp. spoons of milk;
- 7 tbsp. spoons of powdered sugar;
- butter;
- vegetable oil;
- a little vanilla;
- dye of any color.
First you need to remove excess crumbs from the biscuit. A silicone brush will help you with this. After that, the dessert needs to be covered with cling film and sent to a cold place for several hours. While our cakes are cooling, you need to mix two types of butter with each other using a mixer.
While beating, add vanilla, then milk and powdered sugar in small portions. Add a dye of the required color to the finished cream.
We take out the cake and start decorating it with icing. To do this, take a smooth spatula. With its help, apply a thin layer of cream to dessert. Carefully coat the sides. Next, you need to let the glaze harden; to do this, put the cake in the refrigerator for 15 minutes.
After hardening, apply another layer of cream. To get a perfectly smooth surface you need to use a wide spatula. You can level the surface with water. To do this you need a spray bottle.
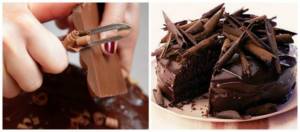
Colored chocolate
This is the most popular and simple decoration. You can color chocolate using regular food coloring. But it is worth noting that only white chocolate is suitable for this. It must be melted in a steam bath and dye added.
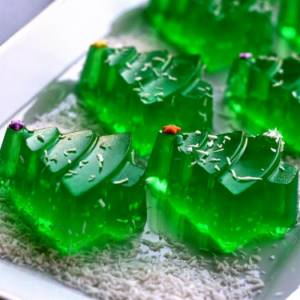
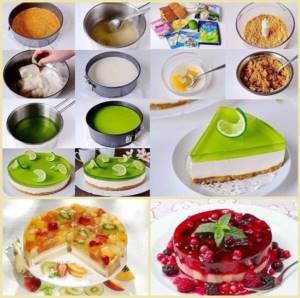
How to decorate a jelly cake
Now it's time to talk about how to decorate a homemade cake using jelly. Theoretically, you can buy a concentrate of this product in a store, dilute it according to the instructions and decorate the cake with it. This is even a very good option, allowing you to get a wonderful decorative element without much labor. Although in fact, jelly is not so difficult to make yourself. To do this you need to have on hand:
- fruit juice – 0.6 l;
- powdered sugar – 200-250 g;
- instant gelatin – 1 sachet.
Let the gelatin swell in one glass of juice, then melt in a water bath. After this, pour the remaining juice into the mixture, add powder, stir everything well and put it in the refrigerator. There is no need to let the jelly harden completely. It just needs to set a little. Place the finished cake in a springform pan so that the sides rise above the cake layers by about 30 mm. Remove the prepared jelly mass from the refrigerator and place in the mold. You can immediately put fresh fruit on the surface of the jelly and put the cake in the refrigerator for 12 hours. What to do with the rest of the jelly? It can be put into molds and put in the refrigerator. When they have cooled a little, place them on a jelly surface that has not yet hardened. By the way, it is not necessary to make jelly from juice alone. You can take several varieties of multi-colored fruit drinks, divide the surface of the cake into sectors and make a colorful fill. Or you can make the surface monochromatic, and put colored figures on it.
DIY wedding cake - 14 ideas
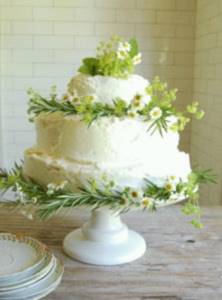
DIY wedding cake
Gone are the days when guests were served huge custom wedding cakes during hot summer weather. Simple and stylish DIY wedding cakes , made in the style of minimalism, are a new fashion trend that came to us not so long ago. With a few layers, a little frosting, buttercream, and pretty decorations, you can easily make this wedding cake at home.
If you think your wedding cake looks too modest, add fruit or fresh flowers.
Decorating a wedding cake with flowers, details with photos
As we have already mentioned, you can decorate a wedding cake with fresh flowers. No special knowledge is needed here. You simply take flowers in special cones filled with water and insert them in the desired places on the cake according to the composition.
It is much more difficult to make flowers yourself from mastic.
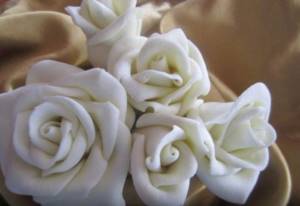
We present you with step-by-step instructions on how to make them and attach them to the cake:
- First you need to make a base for the flowers: a small ball of mastic is attached to toothpicks and cooled so that the mastic hardens. To ensure that the workpieces are smooth and not spoiled, toothpicks can be inserted into the sponge.
- From the necessary equipment that will be needed to prepare flowers:
- glass of water;
- powdered sugar;
- white mastic;
- 2 circles of different sizes (this could be a glass and a glass, for example);
- toothpick;
- a special stick with skewers;
- knife;
- brush.

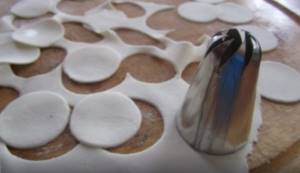
- Roll out a layer of white mastic 2 cm thick and squeeze out small circles on it using a glass:
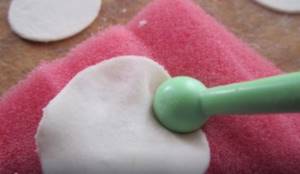
- Using a special stick with a skewer, roll one side of each mastic circle:
- Turn up the corner where you rolled it on both sides using a toothpick:
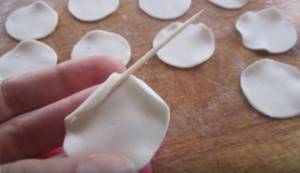
- Brush each petal of the future rose with water:
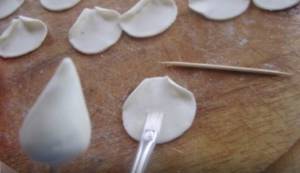
- Attach the petals to the blank on a toothpick:
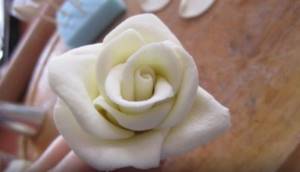
- Make larger circles from the mastic and repeat the same procedures with them. Attach 3 petals to the rose bud on each side at once. The more times you do this, the more magnificent your rose will be:
Decorating cakes with sprinkles
Sprinkles are a universal decoration for any cake. There are a huge number of sprinkles: in the form of flowers, stars, balls, squares, circles, butterflies... They have a very rich range of colors. You can find multi-colored, golden, silver sprinkles with pearlescent tints. Toppings made from nuts, chocolate, coconut, cookie crumbs and meringue are common.
Ways to decorate cakes with sprinkles
- The powder is used only on a sticky surface. Sprinkle the cake when the icing, cream, or cream has not hardened.
- If you want to create an aquarium effect, use jelly filling and sprinkles. Pour in half of the jelly filling, freeze, sprinkle with sprinkles and fill with remaining jelly. Alternate layers of jelly with coarse sprinkles, and your cake will be incredibly beautiful!
- To decorate the sides of the cake with sprinkles, place the cake on a larger towel. Sprinkle the sprinkles onto the sides of the cake and onto the towel, then gently lift the sides of the cake while pressing down on the towel with the sprinkles.
- Make a sprinkle design this way: take a piece of paper, cut out the shape of the cake, draw the desired design, pattern, inscription, number. Cut out the design. Cover the cake with the template without pressing it against the surface of the cake. Sprinkle the sprinkles thickly and remove the template.
I recommend watching this video!
CAKES 20 IDEAS OF JEWELERY CAKES BEAUTIFUL
I recommend a photo gallery of cakes decorated with sprinkles!
Choose the most original ways to decorate your cake. Create an incredibly beautiful cake with your own hands and your guests will appreciate it in the best possible way.
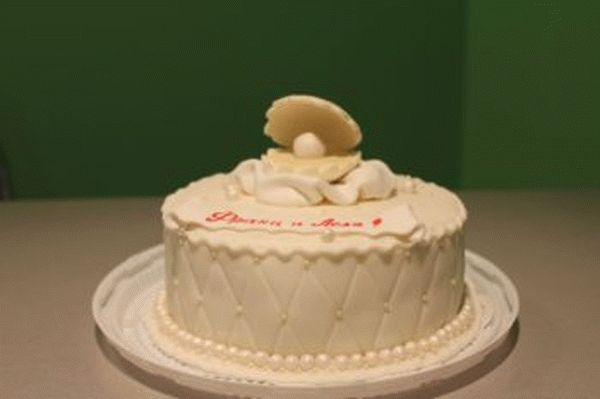
Beads in cake decor
Various kinds of edible beads can be used in the design of a wedding cake, giving it “flirtyness” and enthusiasm. They can either match the cake or have a contrasting shade. Inedible beads can also be used as an original decoration on a wedding cake. For example, these could be pearl threads that can be hung between the tiers, emphasizing the beauty of the confectionery creation.
A beautiful delicacy made from mastic
Mastic is an amazing material from which you can make many different figures and elements of a festive dessert.

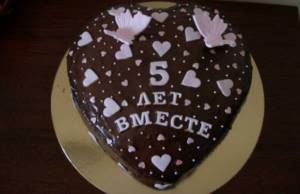
One of the options for a beautiful decoration for a wedding is a cake in the shape of a red heart with white swans, a symbol of marital fidelity. It's really simple to prepare, and it looks very beautiful and festive.
Ingredients:
- eggs – 4 pcs.;
- sugar – 1 tbsp;
- sour cream – 210 g;
- condensed milk – ½ can;
- flour – 320 g;
- baking powder – 1 tsp;
- cocoa powder – 4 tbsp. l.;
- creamy curd cheese – 170 g;
- butter – 55 g;
- powdered sugar – 55 g;
- frozen cherries – 125 g;
- mastic white and red.
How to cook:
- Beat eggs and sugar with a mixer until fluffy foam forms.
- Add sour cream and condensed milk, mix everything.
- Sift the mixture of flour, baking powder and cocoa through a sieve into a container with the rest of the products.
- Pour the dough into a heart-shaped mold. If it is not there, then you can increase the amount of ingredients by about one and a half times, pour the base into a large baking sheet and later cut out the heart from the finished cake.
- Place in the oven at 180 degrees for 30 minutes.
- Prepare the cream: mix cream cheese, butter and powdered sugar. Beat the mixture a little with a mixer or whisk.
- Thaw the cherries, remove the pits, and drain off the excess liquid.
- Cut the slightly cooled cake into 2 parts. Apply the cream to the bottom layer of the sponge cake, lay out the cherries, and cover with the top.
- Roll out the red mastic into a large circle. Place the pieces on top and remove the folds with gentle movements, giving the shape of a heart. Trim the remainder about 3 cm from the edge of the cake, and tuck the ends under it.
- Cut out swans from white fondant. Glue them black eyes (you can use black peppercorns) and a beak made from the remains of red mastic.
- Brush the bottom of the finished birds with warm water and glue to the heart.
This cake is ideal if a small number of guests are invited to the wedding.
Meringue cake decoration

Meringue is a snow-white, crispy and very tasty decoration. It is laid out on a layer of chocolate, jam, or cream.
Meringue recipe
Ingredients: a glass of powdered sugar, 5 chilled eggs, a bag of vanilla (optional).
Preparation process: separate the whites from the yolks, pour the whites into a dry, fat-free deep container. Beat the whites until fluffy (10-15 minutes). Gradually add powder (1-2 teaspoons) and immediately dissolve it. Add vanilla and dissolve it well. Preheat the oven to 100 degrees, cover a baking sheet with parchment paper and transfer the protein foam into a pastry syringe. Pipe the egg white mixture onto the baking sheet, creating beautiful balls or other shapes. The meringue is dried, not baked; the time the future meringue stays in the oven depends on the size of the pieces. Approximate drying time is 1.5-2 hours.
I recommend watching the video master class!
MERINGUE (MERINGUE)