A book of wedding wishes. Manufacturing details
1. The ring binder will serve as the basis for the future book of wishes. Inside the folder there is a glossy layer that makes it difficult for any material to stick to it. Therefore, the thin shiny film must be carefully cut off with a stationery knife.
2. According to the size of the folder, you need to cut a blank for the cover from fancy paper. Fabric or even thin leather will do. The size of the wrapping material should exceed the size of the folder by 1.5 - 2 cm. These are allowances for hems.
3. Paper or fabric is glued to the outside of the binder. Make sure there are no wrinkles or irregularities.
4. Tapes 0.5 cm wide are glued on both sides, on the sides of the folder. These are the future beginnings of the book.
5. Thin paper is suitable for lining the inside cover. It needs to be cut to the size of the book.
6. You can glue the paper inside the cover using PVA glue. The finishing will hide all the unevenness and hide inside the place where the ties of the book meet the cover.
Master class on creating a book of wishes for guests
1) In order to make a book of wedding wishes we will need:
DIY wedding wish book photo 1

Inspiration. 2 sheets of thick cardboard measuring 24 x 21 cm. 2 sheets of white cardboard, maybe designer. Size 22 x 19 cm. 1 sheet of scrapbooking paper (can be purchased at craft stores). 10 sheets of white cardstock or design paper measuring 23 x 20 cm. Crinkle design paper or any other flexible thick paper. Hole punch and metal rings. Flowers for book decoration. Lace 3 cm wide. Small pearl buckle. Silver satin ribbon. Shaped hole punch for processing corners. Double-sided tape, ruler, pencil, scissors and hot glue gun. A pre-prepared sheet with the inscription “Book of Wishes” (can be printed on a printer). Size 15 x 9 cm.
2) First we need some crumpled paper to wrap around a sheet of thick cardboard. It should retreat from the cardboard by 2 cm on each side.
DIY wedding wish book photo 2

3) Wrap the cardboard, sealing the crumpled paper using a hot glue gun or double-sided tape. The corners must be folded and carefully sealed.
DIY wedding wish book photo 3

DIY wedding wish book photo 3a

4) We will also wrap the second sheet. We should have 2 halves - the basis for the book.
DIY wedding wish book photo 4

5) Having measured exactly 6 centimeters from each edge of the base, mark with a pencil the places for the holes and use a hole punch to make them. Repeat the same with the second sheet. Metal eyelets can be installed in the holes.
DIY wedding wish book photo 5

6) For the front side of the base, you need to cut out a sheet of design paper measuring 19 x 21 cm and glue it to the base with double-sided tape.
DIY wedding wish book photo 6

7) We will place a piece of lace at the bottom of our workpiece.
DIY wedding wish book photo 7

 The ends of the lace need to be sealed on the back side of the workpiece.
DIY wedding wish book photo 8

9) The satin ribbon should be threaded through the buckle. Then place it just below the lace and secure it on the reverse side with hot glue.
DIY wedding wish book photo 9

DIY wedding wish book photo 9a

10) The reverse side of the workpiece must be covered with a sheet of white cardboard (or design paper), gluing it with double-sided tape.
DIY wedding wish book photo 10

11) Take a pre-printed inscription, size 15 x 9 cm. Use a figured hole punch to process the corners.
DIY wedding wish book photo 11

12) Glue it onto the workpiece, hiding one corner under the lace.
DIY wedding wish book photo 12

13) Decorate the almost finished book cover with white flowers.
DIY wedding wish book photo 13

14) Glue small cream-colored roses onto the white flowers. The legs of the roses can be twisted in any way you like.
DIY wedding wish book photo 14

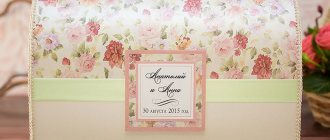
15) Add some pearls and our book cover is ready!
DIY wedding wish book photo 15

16) Inside the book we insert 10 sheets of pre-prepared cardboard with holes for rings. Using metal rings we fasten the cover and sheets.
DIY wedding wish book photo 16

A book of wedding wishes will turn out to be interesting if you write questions for the guests on the sheets, for example:

DIY wedding wish book finale
How can you replace a wish book?
If a regular wish book seems too trivial or is not possible to do it yourself, then there are several alternative solutions. For example, a composition in the form of a tree, a vase or a garland.
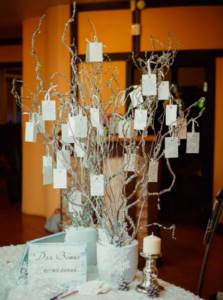
Tree
The wedding wish tree looks very original. You can use a ready-made tree in a pot or a dry branch for this. Decor:
- Take a pot of soil and a tree branch with many branches.
- Wipe the branch from dirt and remaining leaves, and insert it into the ground.
- Decorate and label the pot so guests understand its purpose.
- Place it on a separate table. Place a stack of leaves on a string and a glass with handles nearby.
Guests will come to the table, write congratulations on leaves and hang them on branches.
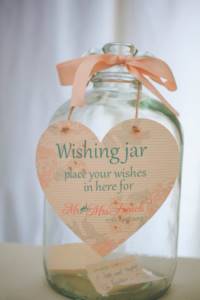
Vase for wishes
A vase for congratulations has the same principle as a tree. True, the execution of the composition is even simpler. Prepare a vase in advance in the style of wedding decor. Place it on a separate table, place some leaves and a set of pens next to it. Guests will be able to congratulate guests even anonymously.
Fairy lights
Garlands can be made in the form of a chain of rectangular strips. Place a separate table and mark it with the inscription “Wishes to the newlyweds” for the guests. Leave a lot of rectangular stripes on it that match the color of the banquet hall, pens and a glue stick. Each guest will be able to congratulate the newlyweds and fasten the ring. At the end of the holiday you will get a beautiful garland as a keepsake.

More and more foreign traditions are coming to modern holidays. The book of wishes gained momentum very quickly. Such an element at a wedding will preserve kind words from guests for a long time, bring the young family back to memories of a wonderful day and remind them of the love of family and friends.
Style
All accessories present at the wedding should be of the same style to create a harmonious atmosphere. The design of the wish book differs depending on the theme of the celebration. For example, you need to think about how to personalize the accessory for the following wedding styles:
- Nautical. Usually the wish book is designed in blue, light blue or turquoise, sometimes in combination with white. Shells, starfish, boats, anchors and steering wheels are used as decoration.
- Provence . The book must be made in lilac color, less often - in rich purple. The decor is watercolor images of wildflowers in pastel shades or dried lavender sprigs.
- Glamor. For decoration, bright and noble colors are used - pink, red, fuchsia, emerald, indigo, etc. The decor is created from rhinestones, sparkles, chains, brooches, beads and beads.
- Love is . The cover usually depicts the wedding plot of the comic book of the same name. The characters of the story can be hand-drawn on the pages, and no additional decor is required.
- Retro. It is best to design such a book of wishes using the scrapbooking technique - find old yellowed newspapers, preferably with text in English, glue black and white photographs of the bride and groom, and pick up a ribbon to fasten the accessory flaps.
- Rustic . The book is covered with burlap, and dried plants or polymer clay flowers are attached to it. You can also use lace ribbons and carved frames for the wishes of guests.
- Vintage. The design is similar to the retro style, but mostly pastel shades are used, and brooches, beads imitating pearls, stylized locks and keys are used as decoration.
In all of the listed styles, the book can be completed independently. The main desire.