When preparing for a wedding, newlyweds pay a lot of attention to global things: renting a banquet hall, buying wedding dresses, searching for wedding specialists, etc. But don’t forget about the little things, without which it is impossible to create a festive and romantic atmosphere at the celebration.
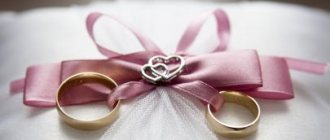
Modern marriage registration is not complete without a beautiful pillow on which wedding rings are placed. And if previously they were placed in the registry office on a special tray, the same for everyone, now newlyweds are trying to purchase an original pillow for rings for their wedding, reflecting the style of their celebration. But why buy if you can make this important accessory yourself! The Svadbaholik.ru portal will tell you how to make a cushion for rings.
Pillows for wedding rings: materials and decor
- A piece of small fabric, 0.2*0.2 meters in size.
- Stuffing agent.
- Materials for decoration: lace, beads, ribbons, rhinestones, beads, white feathers.
- Hand needle or sewing machine.
- Threads, scissors, glue gun.
The choice of fabric for a pillow needs to be approached carefully. After all, wedding rings are imprinted on it - a symbol of the unity of two hearts. It is best to fill the pillow with padding polyester or holofiber. A specialized department in a children's world or sewing store is quite suitable. Buying a couple of linear meters is enough to ensure that the wedding ring pillow is not empty.
Types of wedding ring pillows
Wedding pillows made using a sewing machine and their varieties
If you have a foot and electric machine at home, then making an accessory for the newlyweds’ rings is quite simple.
What does that require:
- Choose your favorite fabric.
- On the wrong side of the workpiece, use chalk or a special pencil to mark it in the form of a square, with a side of 20 cm. This is the standard size of the ring pad.
Cut out two squares from white satin, and two squares from colored satin - Using scissors, cut out two squares.
Fold the colored squares in half (right sides facing in) and secure the edges with pinsSew the squares, lay out the sewn squares so that the seam is in the middle
- On the main front side of one of the squares, manually, using a needle, fix all the decorative elements from: lace, beads, ribbons, rhinestones, beads, white feathers.
Turn the resulting pocket right side out so that the seam is in the middleBaste the unstitched edges, retreating 0.5 cm from the edge
- Sew the wedding ring pillow along three geometric guides from the wrong side of the material.
We sew two white squares together, folding them with colored stripes inward, turning them right side out - Turn the pillow blank out from the fourth, free side.
- Stuff the festive accessory with cotton wool or padding polyester.
We stuff the pillow with filling, secure the unsewn edge with pins, carefully sew it up by hand, and secure the strip of fabric with a pin. - Overlap the edge of the fourth side or carefully bend it inward, and sew the last section of the product.
We tie a knot on the gray stripe in the center with a thread, decorate with a sparkling broochUsing a satin ribbon in a Bantu tone, we tie the wedding rings
- Apply the intended decorative elements using a glue gun.
Types of fabrics for making wedding pillows
Wedding paraphernalia for the bride and groom serves as a symbol of endless, eternal love, and the moment of giving this first gift to each other is extremely important. A bright, eye-catching pillow will highlight the solemnity of the touching and memorable moment of the exchange of rings between the bride and groom.

Typically used to make this accessory:
- noble velvet;
- smooth velor;
- natural silk;
- shiny brocade;
- elegant satin;
- delicate chintz.
Most often, plain fabrics in white shades are used for wedding pillows, in harmony with the bride’s dress.
For weddings in a classic style, the following product colors are offered:
- snow-white;
- creamy;
- cream;
- light pink;
- blue.
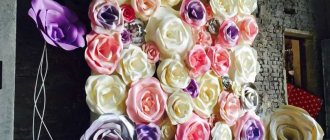
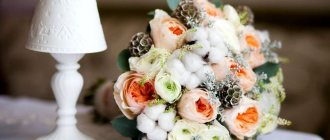
For themed weddings in Provence or vintage style, you can make an exception and present the newlyweds with wedding rings on an original burlap pouffe with a beautiful decor of lace and ribbons.
Square wedding ring pillow with satin ribbon pillowcase
An effective accessory for attaching rings. Wide ribbons for weaving consist of a satin border, sold in a store or sewing studio. Choose your favorite ribbons by color and size. We lay out the future pillowcase in the form of a square on the desktop.
We place the lace at a distance of 2 cm from the edge of the satin square, fix it with needles and sew it on
We adjust the satin ribbon along the lace stripes
We alternately pull each horizontal tape through the vertical guide. We fix the ends of the product with safety pins.
We connect the top part with the bottom and sew along the perimeter at a distance of 0.5-0.7 cm from the edge, leaving a section for turning inside out
When all the strips are woven to the end, we perform the sewing operation around the perimeter of the pillow. The second, back side of the pillowcase is made of satin fabric of the same color without decoration. We sew cut-off lace elements into the sides. Then we proceed to the final sewing operation.
We turn them inside out, straighten the corners, stuff them with synthetic down or holofiber and carefully sew up the open area with a fine needle.
The next step is to apply decoration elements to the front of the ring pillow. Using glue, fix the thin tape.
Attach a ribbon for the rings in the center of the pillow
We make a beautiful fluffy bow from ribbon
Decorations for the newlyweds will be placed on it. The finishing touch is a decorative buckle or large bow.
We turn the ribbons for the rings down so that the front side of the ribbon is visible from above, apply glue to the middle of the wide satin ribbon and glue the bow
Glue a paper flower on top for scrapbooking
That's all. A magnificent wedding pillow for rings made of satin ribbons is ready.
A beautiful do-it-yourself pillow for rings is ready
Wedding pillows made using thread and needle, glue and their varieties
A wonderful individual example. Just a few operations and the pad is ready!
- Choose a material.
- Draw and cut out two squares measuring 20*20 cm using scissors.
- Draw a straight dotted line for your glue gun to follow.
- Using a neat seam, go along three sides of the product, and leave the fourth side untouched for a while.
- Turn the work material right side out.
- Fill the resulting square blank with halofiber, cotton wool or padding polyester.
- Finish the free edge on the fourth side of the pillow so that the fabric does not fray, and wrap it inside the product.
- Make a blind seam on the last side or seal with glue.
- Decorate the front side with decorative elements and lace on the sides.
Round Wedding Decorative Ring Pillow
For a stylish round shape that goes well with the fine work of the jeweler, a dense material is best. Two pieces of crepe de Chine or satin would be just right. We draw a line along which the pillow will be glued together. Don’t forget to add tucks in the upholstery in two or three places and lace elements on the sides. Using a glue gun, glue sections of the working material. Remember about the free area for turning the festive accessory outward. It is not easy for a non-professional to make an even round seam. Using glue instead of threads will give the product an ideal shape. Synthetic padding polyester or artificial wool are perfect for filling. For decorative elements, you can buy lace ribbon and thin white ribbons. They are fixed separately for each ring or tied together. A similar, round, original shape with rings in the center is ideal for a wedding.
Basic Ring Cushion Styles
- Classic - white, standard shape, made of satin or similar fabric with ribbons and lace.
- Glamorous - made of expensive fabric, matching the main style of the celebration, with decorations made of pearls, beads, lace, flowers, ribbons, rhinestones, feathers, etc.
- Personalized – a pillow decorated with personal embroidery.
- Rustic style - using burlap or any other rough fabric, with lace, flowers, ribbons, knitted elements and other details.
- Thematic - it all depends on the style of the event, for example, retro style, nautical style.
- Original shape - a pillow in the shape of a starfish, heart, flower, flower bed, cupcake, box, etc.
Heart Shaped Wedding Ring Pillow
Materials and tools for making a symbolic heart-shaped ring holder
To make an original pillow for wedding rings with your own hands, you need to decide on your thoughts and dreams in advance. The main form of manifestation of love is the human heart. Therefore, the design of a heart-shaped pillow is the most classic and suitable option.
We form a heart from a wire based on a paper cutout
We cut off the remaining wire, taking into account that the ends should overlap each other by 2-3 cm, wrap the ends of the wire with tape as tightly as possible
This shape can be achieved either with a glue gun or with a machine, if you are a professional seamstress who knows how to make seams evenly and accurately.
We wrap the outline of the heart with yarn at different angles and in different directions to completely cover the space in the center of the wire frame
To prevent defects and mistakes, you need to make a heart stencil on paper. Then cut it out with scissors and place it on the work surface of the festive fabric. Using chalk, mark the edges of the future pillow for the rings. Cut out the two resulting hearts again, not forgetting to leave a fabric allowance for the seam.
Glue the lace and pull the ribbon into the button
It is best to decorate the finished front side of the pillow for rings with a wide ribbon and a bow with a wide bead. The wedding rings will take up space just around the perimeter of the bow. Any color scheme of your choice. Of course, you should avoid dark colors.
The cushion for the rings is ready - put the rings on the ribbon and tie a bow
Manufacturing process
To begin with, you need to buy the required amount of starting material, however, you can use almost any fabric from home supplies. Especially if you love handicrafts and often make various crafts with your own hands. Also an important step when making a pillow with your own hands are patterns. After all, only thanks to them you will get a beautiful and even product. To make them yourself, simple hard cardboard is quite suitable.
Once the patterns are ready, you just need to trace them on the canvas with a pencil. What is important is that the patterns need to be made a little more, since it is worth taking into account the supply of fabric that is needed for the seam. In addition, when sewing blanks with your own hands, you need to try to make the seam even, so that as a result the pillow for the rings itself turns out beautiful and neat.
Another important recommendation is that before you start making this element of wedding decor with your own hands, you should think about its final design . This will help you know what your final ring pad should look like and will allow you to quickly achieve the intended result.
Ring mount
Options for attaching rings may be different. You can show your own ingenuity and add individual details.
- Firstly, choose auxiliary materials such as velvet and pearls. Using a glue gun, attach two large pearls and several small beads. Your wedding rings won't fall off when you pair them with this mesmerizing combination.
- Secondly, use satin ribbons as a ring holder. Tie two bows in an original way and attach them to the pillow with drops of glue. Place two rings on top of the bows. Such a fastening mechanism will ensure the reliability of the design and impeccability, originality of appearance.
- Thirdly, ribbon and fabric flowers can be an excellent solution. You can roll them from a variety of colored, satin ribbons. A master class on making them can be completed in 10-15 minutes. Fasten and tuck the end of the ribbon, and make satin flowers in a circular motion, placing one edge on top of the other. Ready-made fabric bouquets with several beads threaded through rings will firmly hold the entire original composition.
Thus, a wedding is an exciting, touching event in the life of every young man. In order not to spoil the mood, you need to carefully think through all the events in advance. Hall decoration, champagne, glass decoration and ring cushion. Everything should be in the same style. There are many options. There are no comrades for color and taste. The choice of the shape and method of making a pillow for rings is yours, dear newlyweds, and dear parents.
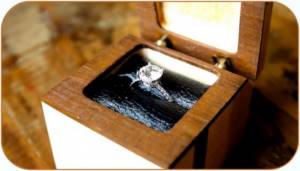
DIY wooden ring box
Hello, dear readers and DIYers! In this article, Zach, the author of the YouTube channel “Workshop Edits” will tell you about the making of an engagement ring box that he designed and made for a special occasion - his upcoming wedding with his beloved. How romantic, you say. Well, well, techies can also be lyricists.
This homemade project is not very easy to make, but the master will show you some carpentry techniques that can be used for other homemade products.
Materials. — Brazil walnut and maple boards — Sheet leather — Hinges — PVA glue — Polyethylene foam — Sandpaper — Tung oil — Secondary glue.
Tools used by the author. — Screwdriver — Miter saw — Electronic caliper — Svenson square — Hand router — Radius cutter with thrust bearing — Thicknesser, orbital belt sander — Japanese saw, miter box — Cordless nailer — Clamps — Hand jigsaw, vice, ruler, pencil, knife. Manufacturing process. To begin with, he sketches out a preliminary drawing of the future box.
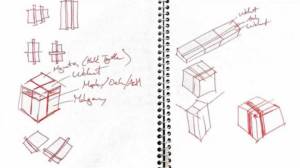
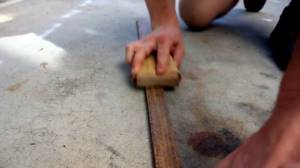
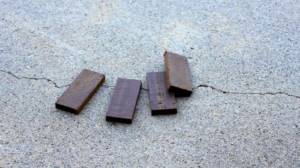
The author selects two hardwood species as materials: maple and IPE (Brazil walnut). Being different colors, they just create the required contrast. The IPE wood turned out to be somewhat rough, and the master had to clean it up a little with sandpaper.
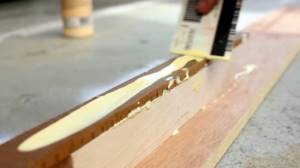
After that, he cuts the IPE plank in half, glues all three planks together, and tightens them together with clamps. The glue dries overnight.
He plans to make the box the same way he used to make composite end grain cutting boards.
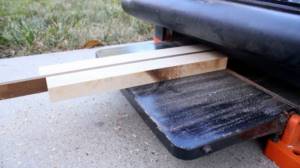
The finished block of multi-colored wood is passed through a surface planer, processing both sides.
Zach wants this box to have a special, unique design (which is understandable, given its purpose). So, with an electronic caliper, he measures the thickness of the workpiece processed on a thicknesser and transfers the measurements to one side of the maple board.
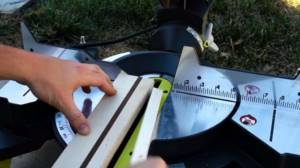
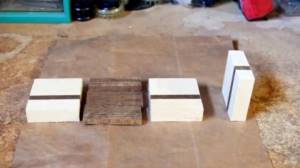
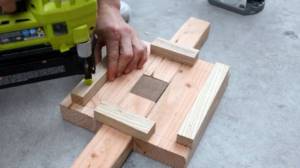
Having deliberately made one side longer than the other, the author sets the miter saw stop to the 2¼-inch mark (to do this, he fixes a Swanson square to the saw table), and cuts 4 small square segments from the block.
He does the same with the second half of the IPE wood plank.
Now it's time to form the shape of the box. The craftsman arranges all the elements in such an intricate way. He wants to make an additional insert between the future lid and the body of the box.
Then he proceeds to gluing them together step by step.
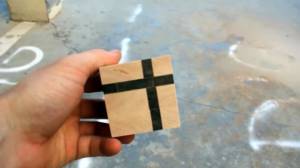
After a few minutes of processing, the author gets this neat cube.
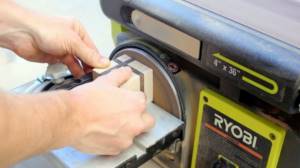
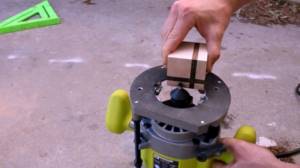
The author did not have a milling machine. Wanting to shape the edges of the box lid, he comes out of the situation in the following way: he simply turns the hand router upside down. To make the required chamfers on the edges of the top of the box, Zach uses a corner mill with a thrust bearing. If desired, the edges can be made rounded.
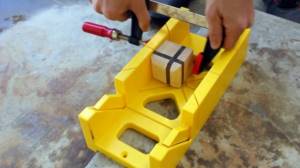
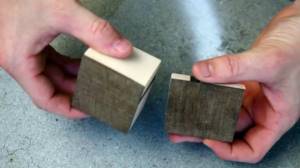
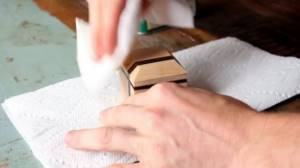
The ribs of the workpiece are sanded with 220-grit sandpaper. The next step is to give the workpiece the actual shape of a box, hollow inside, with a bottom and a lid. To do this, Zach clamps the block in a miter box and cuts the block into two halves with a Japanese saw.
The cut surfaces are thoroughly cleaned with sandpaper. Now it's order!
The author initially wanted to cut out the inner cavity of the box with a Forstner drill, but unfortunately, this attachment with a sufficient diameter was not in the master’s arsenal.
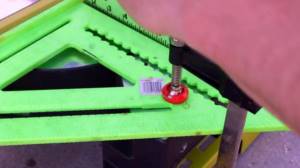
Once again, a successful technical solution: Zach decides to design a special device for milling. He takes two 2X4 pieces and cuts them into four pieces so that later they can tightly surround the box on all sides, and tighten it between them using pocket holes and screws.
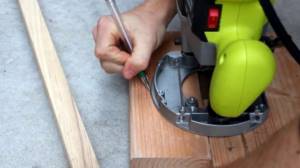
The stops are secured to the base using a nailer.
Now the author gradually selects material from the center of the cover blank and body in 7-8 passes, gradually immersing the cutter into the material.

Surprisingly, the most difficult part of the job was installing these miniature hinge hinges. It was necessary to calculate the location for them as accurately as possible and make four very neat holes. The electronic caliper came in very handy here.
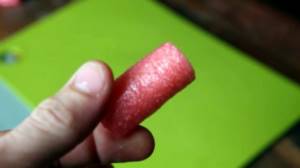
He does the same process with black sheet leather, wrapping it around the cylinders and also gluing it. To finish the pad, he did this operation twice. Somewhat reminiscent of sushi rolls, isn't it?
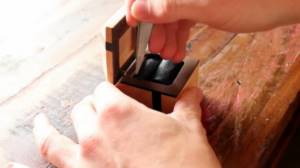
Using tweezers, the pad is inserted inside the box.
I thank the author for interesting carpentry techniques and beautiful carpentry!
The author's video can be found here.
Source
Become the author of the site, publish your own articles, descriptions of homemade products and pay for the text. Read more here.