Needlework
07/16/2018 Anastasia Prozheva
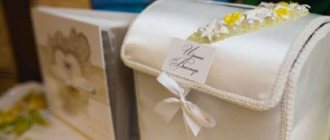
The treasury at a wedding is used to store cash gifts from guests. It can also be used in various competitions related to money, bride price, and cake sale. It is quite easy to make a wedding treasury with your own hands using available materials. The main thing is to decorate it in the same style as the entire wedding. The treasury can be in the form of a casket, chest, heart, house, cake. It often opens from the bottom, but not always.
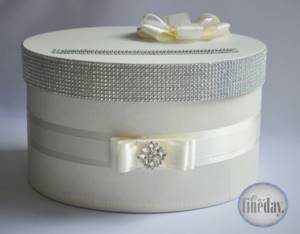
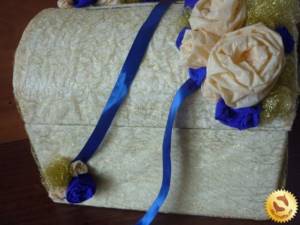
Treasury box
As a base, you can take any box you like from shoes, dishes, equipment, or sweets. The size is selected depending on the number of guests. It should be noted that many people give money in envelopes, sometimes handmade, which are much larger than a regular postcard. All this should go inside easily.
To prevent the hole for money from looking too big and ugly, you can cover it on both sides with lace.
If the box is too small, but you like its shape, you can increase its size, for example, in height, using thick cardboard. It will not be noticeable behind the decorations. If the box is too large, then you can make it smaller by cutting off the corners and changing the shape. As a last resort, use it as a material and simply cut out the parts according to the template.
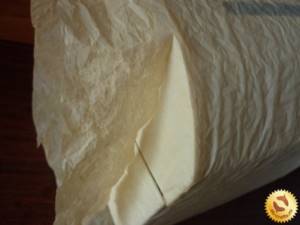
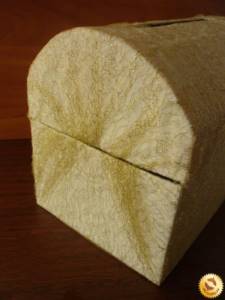
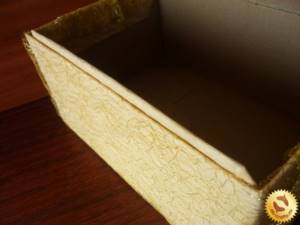
The treasury from the box can be covered with corrugated paper, fabric, or painted. To give volume and soft relief, you can lay padding polyester between the box and the fabric. It is not the stretched fabric that looks interesting, but the glued, wrinkled one. To do this, grease the sides of the box with glue, do not pull the fabric tightly, and use your hands to chaotically create a pattern with tucks as in the photo:
This way you can not design the entire box, but, for example, only the sides or the roof.
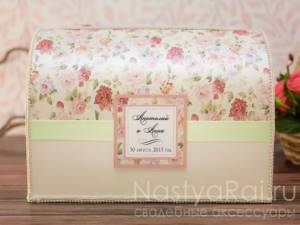
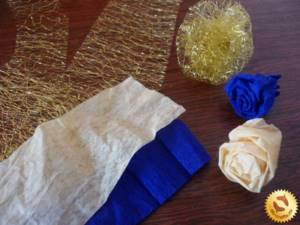
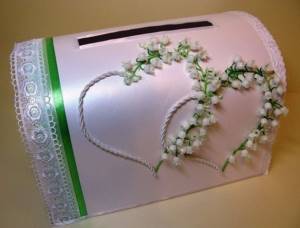
Further decoration as desired. These can be photographs of the newlyweds, ribbons, bows, flowers, lace, half beads, rhinestones. Design example:
Related article: DIY leather necklace
Such a treasury can be opening from the top or bottom. This is especially important if it will later be used to store memorabilia from the wedding.
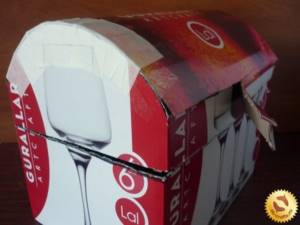
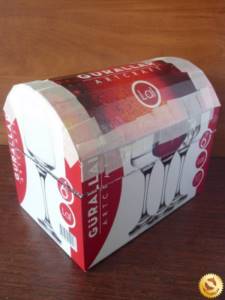
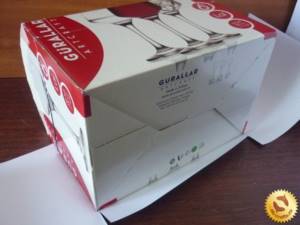
Do-it-yourself wedding money chest (master class, photo, step by step)
Do-it-yourself wedding money chest (master class, photo, step by step)
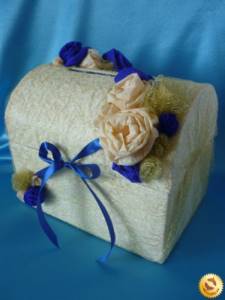
In this master class I will create and show step by step in the photo how to make a wedding money chest with your own hands from an ordinary glass box, into which guests throw envelopes, postcards and bills at the wedding.
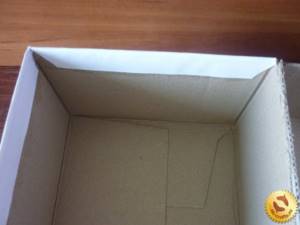
It seems that such an accessory is optional, but on such a day everything should be perfect down to the smallest detail. So, to create and decorate a wedding money chest we will need: • a box; • Whatman paper; • PVA glue; • brush; • decorative paper; • organza; • corrugated paper; • satin ribbon; • glue gun; • regular and masking tape; • scissors; • ruler; • pencil. First, let's take the internal partitions out of the box. Let's start forming the chest lid.
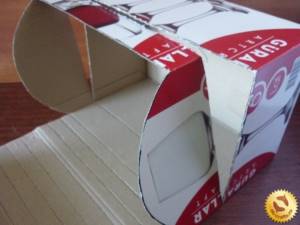
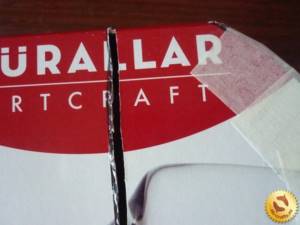
Next we draw a part of the circle (arc) on the side. On both sides we make indents of about 5 cm and draw a straight line. We do the same on the second side and connect all the lines on the front wall. It is important that all lines are parallel to the base of the box.
Cut out the top part with scissors.
It is necessary to make sure that the lid of the chest can bend freely. Otherwise, it will simply break and become deformed. Therefore, we make big (fold) lines at intervals of about 1.5 cm. It is necessary to push the lines under the ruler with the back of the scissors on the inside of the lid.
We cut the drawn lines on the front and side walls. On the inside of the back wall we draw a big (fold) line.
We fasten the top part to the side walls using regular tape. It holds firmly, but it is better to stick masking tape on top of it, since we will then cover the box with paper, and this is unlikely to be possible with regular tape. We also cut off the excess cardboard to make even joints. Just don’t throw away the cut strip - we will need it in the future.
We fasten all sides with tape.
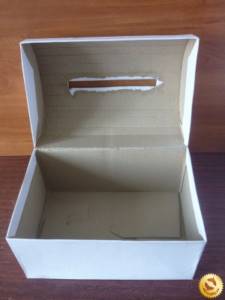
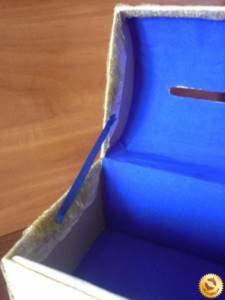
Place the lid with the inside facing up and cut a hole in the center for the envelopes. The thickness is 1-1.5 cm, and the length is at your discretion.
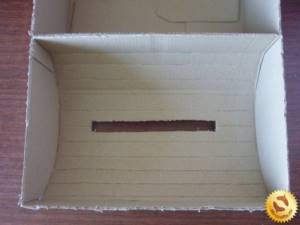
It is necessary to cut off a few millimeters of cardboard along the bottom of the lid so that after pasting the chest can be closed.
Now we will cover the entire chest with white Whatman paper. Let's start from the bottom. We cut out a strip with a size equal to two side walls, the front one and allowances of 1 cm on all sides. First, we glue the front wall in the center of the cut paper, and then we glue the sides. You need to smooth the surface and press down briefly so that the paper does not come off.
We cut the paper at an acute angle in the corners and seal all the allowances.
We glue the side walls of the lid. In this case, the allowances on the convex side should be cut to repeat the rounded shape. Next, cut out a strip of paper equal in size to the bottom, back wall, and top of the lid. Allowances should be left only on two sides: bottom and top. We seal the rest of the box.
On the reverse side, we make a cut in the hole so that we get allowances and glue them inside.
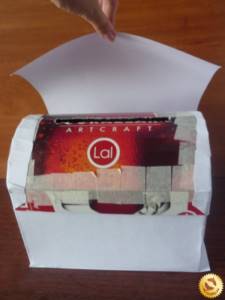
We cover the entire chest with some beautiful decorative paper in the same way as we covered it with whatman paper. Just do not glue it with PVA glue, but just glue the edges with a glue gun.
You can wrap the chest in organza or some similar material for greater effect. We take organza of such a size that it completely envelops the box. We wrap it completely to its full length, placing the chest in the middle of the material. We glue the allowances inside.

We make drapery on the sides and glue it to the inside of the chest using a glue gun.
Take a cut strip from the lid and cover it with decorative paper. Glue to the inside of the front wall. This protrusion will help the lid stay in place.
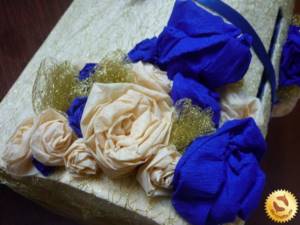
All that remains is to decorate the chest inside and out. Outside there will be voluminous flowers made from the material we used throughout the entire work. We cut strips of different lengths and widths.
Fold the strip in half.
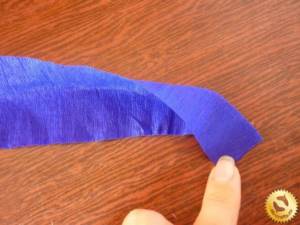
We bend the corner at the very beginning.
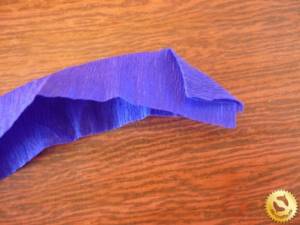
We begin to twist the ribbon to the end, holding it with our fingers at the base.
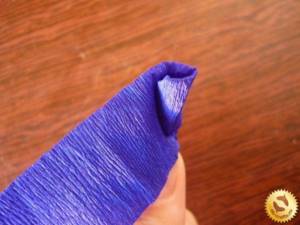
We glue the flowers with hot glue in a chaotic manner.
Let's make ties for the chest by gluing ribbons to the bottom and lid under the flowers.
Decorating the inside. Before gluing the entire surface, you need to secure the cover with tape. We glue one end of it to the lid, and the other to the side.
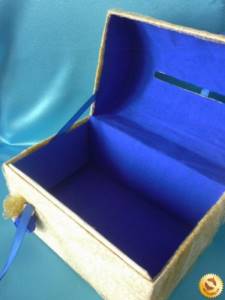
We cover the entire inside of the chest with corrugated paper.
This is the chest in which the newlyweds will collect their first family budget.
Source: www.do-crafts.ru
Recommended material for you
See also:
- DIY decorative chest made from rulers and boxes or a Wedding gift from Treasure Island
- Homemade chest from a box with your own hands, braided with newspaper tubes (photo, master class)
- DIY elephant chest (master class, photo)
- DIY chest or casket made from matchboxes (master class, photo)
- DIY wedding glasses. A selection of videos. Master classes
Rate a homemade product, a master class, an idea. Comments
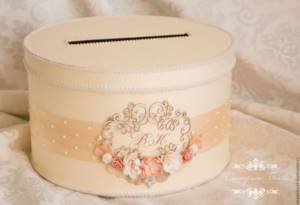
Treasury chest
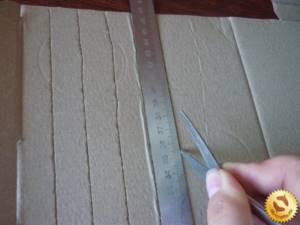
The chest can be made according to a template from whatman paper, cardboard, or a tall box. If a box is taken as a basis, then the upper corners need to be rounded using a compass or plate, a lid of a suitable diameter, and cut with a stationery knife. To ensure that the top part closes without creases or distortions, the cardboard used for its manufacture should be punched. It is not necessary to use special creasing machines. All you need to do is use a ruler and a teaspoon. Instead of a spoon there may be a knitting needle or a non-writing pen. It is advisable to place the furrows at the same distance from each other.
Master class on making a wedding treasury chest:
The chest can also be made of wood. But then to make it you need to have either the necessary tools or a ready-made chest. Any decoration is possible. From burning, wood carving, to scrapbooking. If a rustic style casket is used as a treasury, then there should not be any elaborate decorations. For decoration you can use burlap, linen, linen.
Wedding decor
No matter what and in what form the wedding treasury is made (with your own hands, of course), it should be wedding beautiful. If the celebration is held in a certain style, then the treasury must correspond to the general trend in order to become an integral part of the holiday. If there is any color feature, then it must be reflected in the piggy bank. Otherwise, the decor of the wedding treasury can be anything - organza and chiffon, lace and silk, beads, rhinestones, flowers, birds, butterflies, pebbles, shells, glass marbles... You can use funny pictures, for example, in the style of the world famous chewing gum "Love" is..." or photographs of the newlyweds. Everything that will create an atmosphere of love and celebration will harmoniously complement the decor of the wedding treasury. It is convenient to attach all elements using a hot gun, but if you don’t have one, you can use transparent universal glue - “Moment” or “Titan”.

Seams, especially in chest-type designs, can be decorated with lace braid - it will hide flaws in the work and unobtrusively complement the decor. This same option is perfect for decorating a slot for money. But do not forget that if the structure is not too strong, then you do not need to pile a lot of decorations on it, otherwise it will simply collapse under their weight. Pastel shades of the top covering and several decorative elements, coupled with lace braid, are sufficient decor for a wedding treasury, made with your own hands with the wishes of love, happiness, wealth and prosperity.
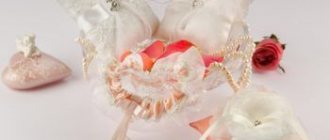
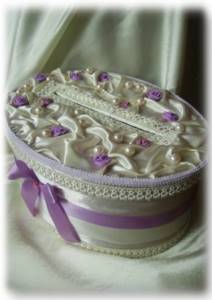
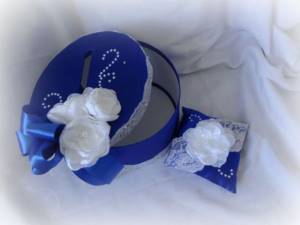
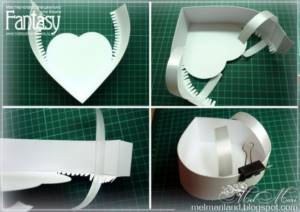
Treasury-heart
Such a treasury is made from a ready-made box or glued together from cardboard or whatman paper according to a template. The slot for money can be placed on the lid or on the side, it can also be glued with lace or half-pearls can be glued around it. Decor as desired. Ribbon bows, paper flowers, beads, rhinestones, and lace look beautiful.
Treasury pattern:
Manufacturing step by step on video:
Design examples:
How to decorate a wedding money box - original ideas
A gift box for money using scrapbooking technique is a luxuriously decorated attribute. Scrapbooking is a technique of cutting out three-dimensional patterns from cardboard and paper. This decor is applied as a separate layer to the product. This is how the casket or box takes on a carved appearance. Everyone, with practice, will be able to compose a lovely wedding-themed composition.
You need to decorate a box for money in a festive and romantic way. The first layer of finishing is the main one. Shiny paper, lace, satin, paper decorations using the scrapbooking technique will create the background. Colors white, cream, lilac, pink, gold will brighten your mood.

Wedding money box decor
Additional decorations with highlights: pearls, satin ribbons, braid will add tenderness and sophistication. Volumetric flowers made of paper, guipure, silk must be included in the design in the form of compositions. Swans, hearts, rings, monograms - symbols of love will be appropriate. When decorating your treasury, show your imagination, and your item will definitely be unique.
Decorating a money box for a wedding will help turn it into a memorable keepsake for many years to come. Perhaps in the future it will store various little things or photographs of the family, including wedding ones.
Watch a video of making a money box for a wedding with your own hands:
Treasury-house
This design symbolizes the united life of the young, perhaps the desire to acquire a new day. The treasury turns out to be beautiful, unusual and will delight you with its appearance for a very long time.

You can come up with a pattern yourself or take a ready-made one. The lid is hinged. You can glue it at one end to the wall. The house is decorated with windows and doors made of colored paper, ribbons, and fabric. Photos of the newlyweds are also suitable for decoration. The material for making the house can be cardboard, whatman paper or plywood. If whatman paper is used as the base, then it needs to be reinforced with finishing material, for example, covered with thick wallpaper.
Related article: A selection of beautiful openwork jackets knitted and crocheted (From Sabrina)
First house
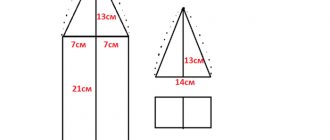
It is important for every family to have their own home, albeit small, but definitely their own. And the first such house for the newlyweds, symbolic of course, could be the wedding treasury, made with their own hands on the eve of the celebration. You can make a pattern for a treasury house for a wedding using the drawing below.
This piggy bank can have absolutely any decor. There is no need to weigh down the shape with additional parts if the piggy bank-house is made from whatman paper. After the pattern is transferred to thick cardboard, all fold lines must be drawn with a thin, blunt object, without cutting through the paper. Windows and money slots must be cut out before the product is assembled into a single whole. A wedding treasury-house, made with your own hands for a holiday, can have a removable bottom on which the entire structure is installed. You can see what such a thing looks like in the photo below. Cute, isn't it?
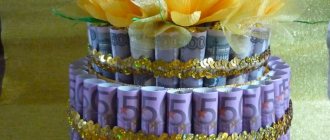
Treasury cake
This option can be made from 2-3 round boxes of different diameters. To do this, they are placed one on top of the other in the shape of a cake, glued, and a hole is made in the bottom and lid in the middle of the layout, connecting the boxes into one.
If there are no suitable boxes, you can make a cake from whatman paper. To do this, cut out the parts according to the diagram, glue them and decorate them as you wish.
Design options in the photo:
Whatever type of treasury it is, it must have strong walls and a stable, dense bottom. If necessary, you need to consider a special solid stand. For example, a beautiful tray is suitable for a treasury cake.
Box
The easiest way is a treasury in the form of a box, but, of course, not an ordinary one, but beautifully decorated with ribbons and covered with some elegant paper. For this option you will need cardboard of sufficient size, satin ribbons, brightly colored velvet paper, scissors, a ruler, pencil, and glue. The work steps are as follows:
- using a ruler and pencil, draw the outline of the box on the cardboard;
- then it is cut along the marked lines, and an ordinary box is glued together, in the upper part of which a narrow hole is cut along the length of the envelope for money;
- the blank is covered with velvet paper, bows and roses are made from ribbons, which are also glued to the box.
The finished product looks like the one shown in the photo: