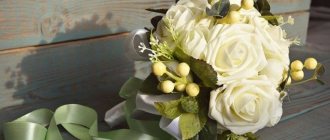
When someone close to the bride or groom has a severe allergy to pollen, or they want to make their holiday unusual, they use foamiran.
This material, created specifically for needlework, has a foamy structure and is ideal for making flower buds. If you carefully choose the material and take the time to create inflorescences, then wedding bouquets made from foamiran will not be inferior in beauty to real flowers.
What is foamiran and where can you buy it?

Foamiran appeared on the market of materials for creativity and handicrafts a long time ago. Its name is consonant with the name of the manufacturer - “Foamlran”; it is often supplied to Russia from Iran. The material has gained popularity due to its unique properties: with slight heating, foamiran can be given absolutely any shape. At the same time, it is environmentally friendly. The material is also rich in color palette. All these characteristics made it so popular for creating flowers, jewelry and toys. He rightfully earned the love of many needlewomen. Foamiran can be purchased at art and craft stores. Online stores offer a large assortment at quite attractive prices, and they also deliver goods to any region. Craftswomen who have at least once created jewelry from foamiran know how easy and pleasant it is to work with it. The material is pliable, the products are bright and neat. So that even novice craftswomen can create charming flowers, we have made a selection of master classes. For clarity, step-by-step instructions with photos.
Advantages of artificial compositions
Foamiran is a material that allows you to create a natural bridal bouquet from an artificial substance. It helps in situations where the girl or groom is allergic to natural materials, bad weather conditions are expected in the form of high temperatures, prolonged exposure to the sun, strong wind or cold. It will be relevant for an extreme wedding in the form of a parachute jump, underwater registration, bungee jumping and other situations where fresh flowers are unacceptable. In addition to these advantages, foamiran also differs:
- safety for the environment during its production and disposal;
- absence of odors and pleasant texture;
- resistant to various stains and easy to clean with simple liquids such as water;
- durability, the ability to pass on a wedding accessory made from foamiran as an inheritance heirloom or keep it in a personal collection;
- ease of creation if all recommendations are followed;
- a wide range of colors, even those that do not exist in nature, possible shapes of parts created by hand.
Types of foamiran
Marshmallow

Silk
Glitterny

Foamiran with flock

Foamiran with a pattern
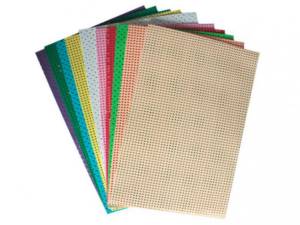
Perforated
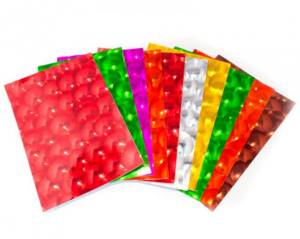
3D foamiran
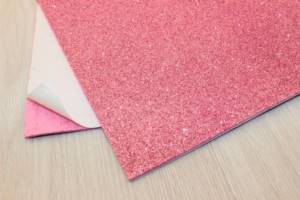
Foamiran with adhesive base

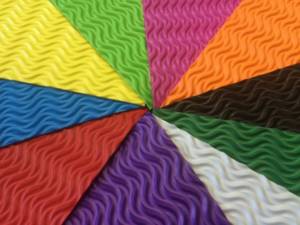
Textured

Decorative
Raised
Velvet
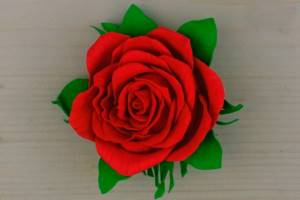
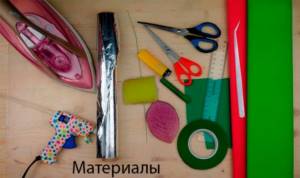
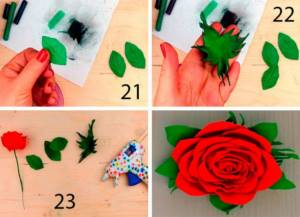
Gorgeous rose
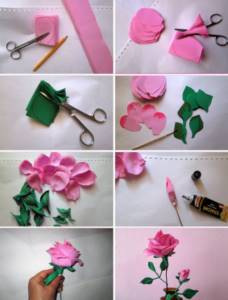
You will need: red and green foamiran, ruler, scissors, glue gun, iron, instant glue, foil, green and black pastels, tweezers, lighter, floral wire, tape tape, plastic mold sheet, stationery knife.
Master Class
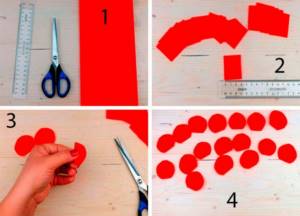
- Cut 25 rectangles of red foamiran measuring 3x4 cm.
- Fold the rectangle in half and cut off the corners. Do this process with all the pieces.
- Heat the petal by holding it near the iron for 5 seconds, then stretch it in all directions so that the foamiran becomes thinner and twist the edge of the petal outward. Make a fold, pinch with tweezers and secure with a lighter. Repeat this process with all the blanks, forming petals.
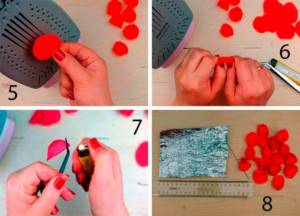
- Prepare a rectangle of foil measuring 10x15 cm.
- Shape the foil into an oval shape and glue it to the end of the floral wire.
- Apply glue to the bottom of the petal and wrap it in foil.
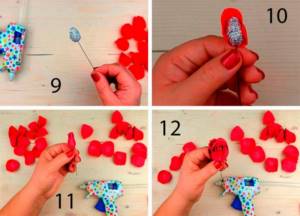
- Glue the petals to form a rose.
- Wrap the wire with tape, securing it with glue at the beginning and end of the stem.
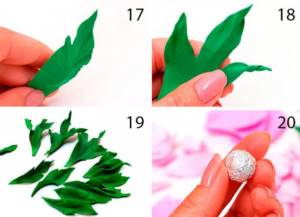
- Cut out 3 leaves from green foamiran.
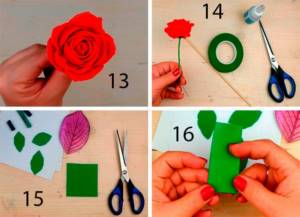
- Cut out a square of green foamiran measuring 7x7 cm.
- Fold the square in half 2 times.
- Give a leaf shape at the edges where there are no folds, then unfold the sepal.
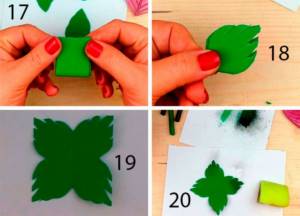
- Make small shavings with a stationery knife from black and green pastels, mix them and darken the edges of the sepals with a sponge.
- Warm up the leaves and press them onto the mold.
- Heat and mash the sepals to give them a realistic look.
- Glue the sepal to the base of the bud.
- Glue the leaves.
A gorgeous foamiran rose is ready!
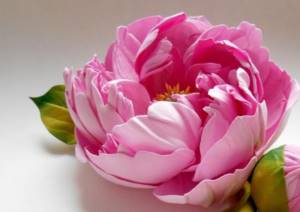
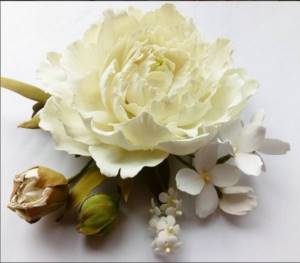
Wonderful peony rose from foamiran: master class
These roses are characterized by tenderness, softness of flowers and volume of buds. Types of peony roses: with an open or closed center, monotonous, with iridescent shades. For this master class, a monotonous view is used, which even a beginner can cope with.
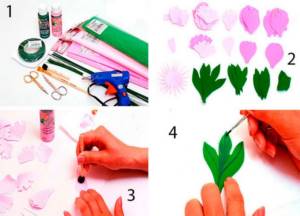
To make a peony rose from foamiran you will need:
- Sheets of pink foam, 0.5 mm thick;
- Brown or red acrylic paint for leather;
- Sheets of cardboard for making petal templates;
- Thick wire for the stem and a bead for the core;
- Super glue or PVA;
- Pencil and scissors;
- Hair dryer or iron.
To give the flowers softness and volume, choose 0.5 mm thick foamiran.
To make a peony, you can use foamiran of various colors: pink, white, red
The number of petals in a peony rose is less than for a regular rose, but due to the size of the leaves, we will get a large rose, and by working with acrylic paints we will add volume. There will be 5 sizes of petals in total: 1 – 10 pcs.; 2 – 10 pcs.; 3 – 15 pcs.; 4 – 9 pcs., 5 – 6 pcs. (for the leaves of the stem) each of which is painted a different color (usually shades of pink or red), starting from the dark middle, ending with the light cut of the flower.
Manufacturing instructions:
- If there are no ready-made templates, then we make 5 standard sizes of future petals. To do this, you need to draw variants of patterns on a sheet of cardboard and cut them clearly along the contour;
- To give a real look, type 1 and 2 paint the upper part of the petal pink and the lower part yellow;
- The rose has stamens, which are best made from pieces of soft wire, and the stamens themselves are made from cotton wool wound on wire. After which, you can safely paint them yellow. We firmly glue or wrap the resulting base for the petals onto a stem of the same color.
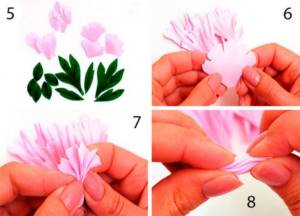
- Using an iron, shape the petals. To do this, we apply the petal to a heated iron and, squeezing the upper part, fix the position by slightly twisting the flagella, and if this is not enough, hold it longer.
For greater volume, you can heat the lower part of the petal with a hairdryer or match.
Further actions:
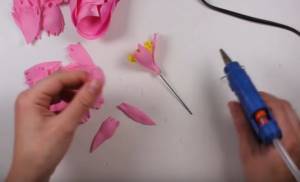
- We begin to glue the first type of petals onto the base with super glue, while slightly shifting them relative to each other, which will give more volume. It is necessary to combine sizes 1 and 2 during the gluing process, otherwise the rose will not be lush.
- Similarly, we glue type 3 petals of a larger size, with less twist at the base of the petal.
- We make the last row on the bud less twisted to give it fullness.
In general, it is better to create the last row separately from the entire flower, so that at the end of the work you can simply insert and glue it from below.
Additional tips:
- To prevent the petals from falling, after gluing 2-3 types, make a holding backing in the form of a wound thread with dense cotton wool.
- We paint the stem green and glue 5 types of petals to it, which will create rose branches, they are also green.
Exquisite peony

You will need: foamiran in light pink, dark pink and green, scissors, tape, acrylic paints in yellow, green and pink, thick and thin floral wire, glue gun, thread, tassels, foam sponge, foil.
Master Class
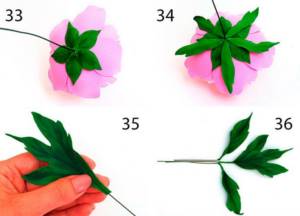
- Take a close look at the pattern of the flower details presented below.

- Prepare foamiran and cut out the blanks according to the pattern: A – 10 light pink petals; B – 10 light pink and 5 dark pink petals; C – 10 light pink petals; D – 5 dark pink petals; E – 5 dark pink petals; Z – 3 green leaves; M – 6 green leaves; K and L – 5 green sepals each; F – 1 light pink blank in the shape of a sun.
- Tint the petals with pink paint.
- Draw the structure of the leaves using green paint.
- To give a realistic shape to the petals, take blanks A, B and C.
- Fold the petal into an accordion, twist and unfold. Do this process with all petals A, B and C.
- Take petals D and E, then give each of them a concave shape. To do this, place your thumb in the center of the petal and stretch the foamiran along the edges.
- Fold the sheet in half, then accordion-fold and unfold. The edges can be curled. Give a realistic look to each leaf in the same way.
- Roll out a circle of foil with a diameter of 1.5 - 2 cm.
- Make a small hole in the balls, fill them with hot glue and insert a thick wire as a stem.

- Place the sun-shaped blank F onto the stem and tie the rays with thread.
- Paint the tips of the rays yellow to create the stamens.

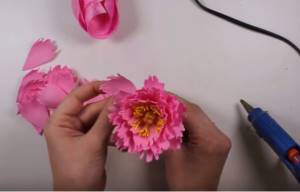
- Glue 10 petals A with a glue gun. It is worth noting that the petals need to be glued in a circle, placing them in a checkerboard pattern.
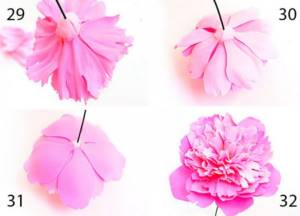
- Glue petals B, then C, D and E.
- Glue the sepals L and K.
- Glue thin wire to all the leaves.
- Connect the leaves together and secure the tape with tape, making branches.
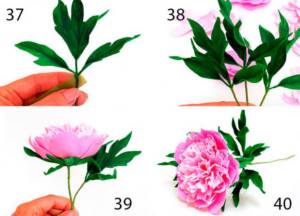
- Glue the branches to the stem.
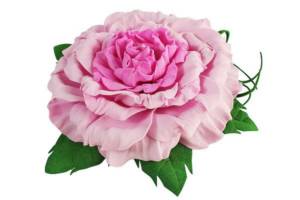
The foamiran peony is ready! I recommend watching this video!
Peonies from foamiran DIY Tsvoric Peonies from foma
Foamiran - material characteristics
We are talking about sheets of decorative material that can be easily molded when heated. The blanks are simply cut to the desired shape, then shaped and pressed depending on the task at hand. The main supplier of foamiran is the Iranian company Foamiran Co., which proposed and developed a new type of product for arts and crafts.
The name of plastic suede refers to the characteristics of the sheet; they resemble dense suede or a structured sponge. Foamiran has good ductility, but stretches quite well, but not more than 10% of the total length. The blanks are easy to process, but this must be done with care due to limited strength. They can be given any shape by embossing, pressing the blanks with molding elements, or twisting them with your fingers.
An important property is safety and environmental performance. Foamiran is not a source of toxic substances during the manufacture of decor and their use in home interiors. Relatively resistant to precipitation and UV radiation.
For coloring, you can use any materials - from eye shadow to oil paints. Paintwork materials are well absorbed due to the porous structure of the material. As an alternative for coloring, you can use watercolors, pastels, crayons, and embossing powder.
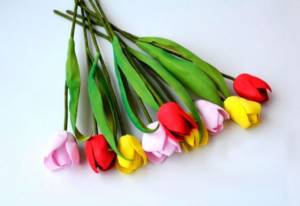
Tulips
You will need: foamiran in bright colors, green foamiran, floral wire, dry pastel, wet wipes, tape, floral buds, glue, scissors, ruler, iron, cardboard, toothpick.

Master Class
- Draw a tulip petal 6 cm high and 3.5 cm wide in the center on the cardboard, then cut out the template.
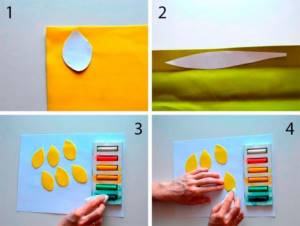
- Draw a tulip leaf 25 cm long on cardboard and 3.5 cm wide in the center, then cut out the template.
- Trace the petal template onto foamiran with a toothpick and cut out 6 petals.
- Trace the leaf template onto green foam paper with a toothpick and cut it out.
- Tint the petals and leaves of the future tulip using a damp cloth and dry pastel.
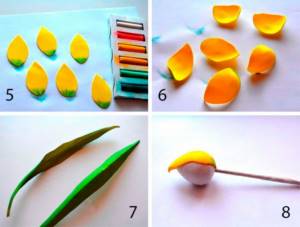
- Heat each petal by applying it to the iron, then give them a realistic shape by stretching them in width and length.
- Heat the tulip leaf and fold it in half lengthwise.
- Glue 3 petals to the flower bud, completely covering it.
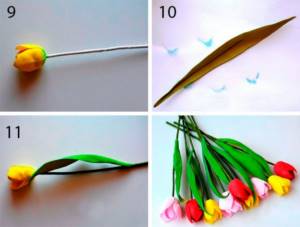
- Glue the remaining 3 petals, placing them in a checkerboard pattern.
- Glue a piece of floral wire into the leaf.
- Wrap the stem with tape and attach the leaf.
- Make a whole bouquet of tulips in the same way.
Foamiran tulips are ready!
creative flowers

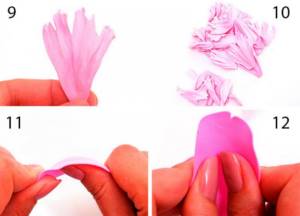
You will need: textured foamiran in bright colors, glue stick, glue squares, cocktail tubes, shaped hole punch (optional).

Master Class
- Cut the foamiran into 12 strips of the same size.
- Glue the ends of each strip together to form a drop.
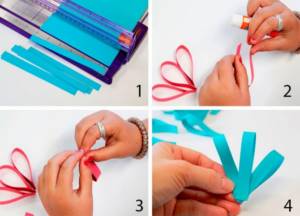
- Glue 12 droplets together to form a flower.
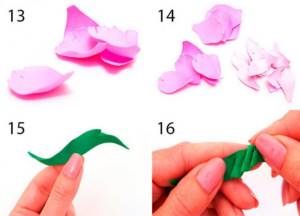
- Prepare 2 circles of different diameters of foamiran of a different color. For convenience, use a figured hole punch.
- Glue a larger circle as the core, and attach a smaller circle on top, through a glue square.
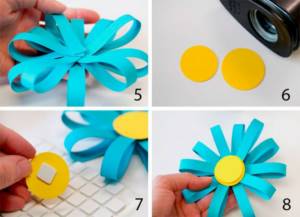
- Glue a tube on the back of the flower as a stem.
- Seal the place where the tube is attached with a circle of foamiran.
- Cut out leaves from green foamiran and glue them to the stem.
- Make a few more daisies in the same way.
Creative foamiran flowers are ready! I recommend watching this video!
Hair bands Simple Flowers made of foamiran
Advantages of wedding arrangements made from foam
Fresh flowers are certainly beautiful. They carry positive energy, create a special mood, and add expressiveness to the image of the newlywed. However, there are situations when it is better to replace a composition made from natural plants with a man-made bouquet-understudy. And this is not only a ritual of passing the “marriage baton”. Although throwing away a heavy arrangement, often assembled on a porta bouquet, is not the best solution.
A bouquet of flowers from foamiran is appropriate:
- At a wedding photo shoot. Surprisingly, a handmade accessory will look more attractive than the real thing. Especially if the newlyweds decide to capture the second wedding day, it is unlikely that fresh flowers will be preserved in the best possible way by that time.
- In winter, if you plan to take a long walk in the fresh air - sleigh rides or other similar activities. It is better to leave the real bouquet in a warm room, and take a backup made of foam with you, so as not to be left without beautiful photographs.
- During the heat. Today it is fashionable to make bouquet arrangements on your own stems, that is, without a porta bouquet or other means of additional moisture. During a summer wedding, fresh flowers will have to be periodically placed in water so that they “come to their senses.” In the meantime, the bride will continue the ceremony with a beautiful foam arrangement. And it’s unlikely that anyone around you will notice the substitution, the man-made buds made from this material look so natural.
- As a souvenir. With a bouquet composition made of foam, you can decorate the interior of the newlyweds’ home and, looking at it, relive the happy moments of the wedding. But dried flowers are unlikely to evoke such emotions.
- The bride may also be allergic to pollen or floral scent. Then it is better for her to do without an arrangement of natural plants.
Chrysanthemum
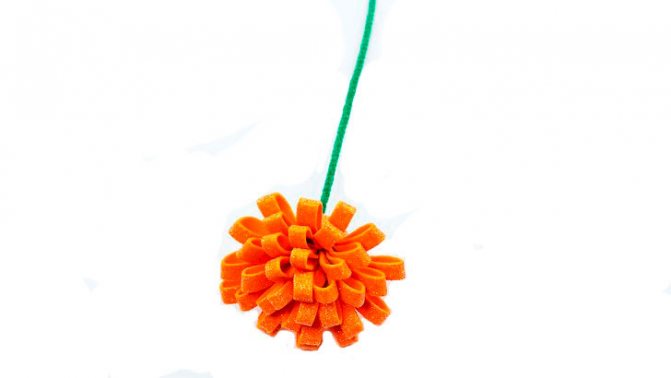
You will need: glitter foamiran, scissors, glue gun, soft green wire.
Master Class
- Fold the foamiran sheet in half lengthwise, then cut it.
- Take one piece and apply glue along the edge.
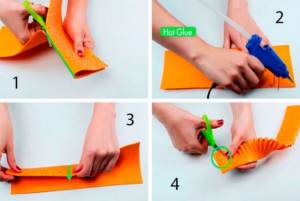
- Fold in half and glue the workpiece.
- Cut the fringe along the entire length of the strip.
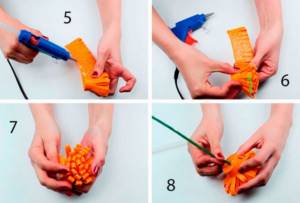
- Apply glue and twist the strip to form a bud.
- Apply glue to the back of the bud and insert a soft wire as a stem.
The orange foamiran chrysanthemum is ready!
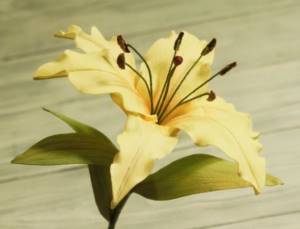
Lily
You will need:
- sheets of foamiran green and white;
- paints (preferably acrylic);
- sheet of cardboard;
- stamens (they can be purchased at a craft store);
- heat gun;
- wire (for the stem);
- iron;
- brown felt-tip pen and pencil;
- toothpick;
- scissors.
Master Class
- On cardboard we draw the outline of a lily petal, 6 cm long, and cut it out.
- We apply this template to white foamiran, trace it and cut it out. To create a lily we will need 6 such blanks.
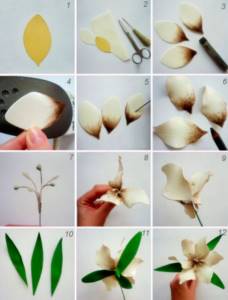
- We tint the petals on both sides. A light pink or lilac color will look more natural.
- Next, heat the petals on an iron. While they are heated, use a toothpick to press out the veins. This will make our flower whiter, more textured and more realistic.
- We also heat the edges of the petal to give them wavy curves.
- On each petal we draw the bottom and dots with a brown felt-tip pen, making it look like the petals of a living flower.
- We glue the prepared stamens to the wire.
- On a sheet of green foamiran we draw 3 oblong leaves for the lily and cut them out.
- Heating with an iron gives texture to the petals.
- We assemble the flower: first glue 3 petals around the stamens, glue the remaining three next row, observing the checkerboard sequence.
- The last step will be gluing the green leaves.
The foamiran lily is ready! I recommend watching this video!
Flowers from foamiran
Interior composition in the spirit of shabby chic
There are interior styles where you can’t do without floral decor. This also includes shabby chic. It is characterized by accessories such as garden watering cans, baskets, even bird cages filled with flowers. The next mini master class will tell you how to make a bouquet from foamiran for this incredibly romantic style.
- Let's make roses using the technology described in the previous MK. Let’s just take more complex color combinations for them, for example: milky, peach, light pink and lilac. It is better to make leaves, berries and sprigs of greenery from Iranian olive-colored foam; it looks more noble than ordinary green.
- Let’s take a ready-made basket “a la shabby chic” made from aged wicker. The product can be purchased at an interior decor store.
- We cut out a base from foam plastic that matches the bottom of the basket and glue it inside. Let's fix the flower arrangement in it, starting with large elements and ending with small ones. The base must be completely closed. You can additionally decorate the charming accessory with artificial butterflies or birds.
How to make a peony from marshmallow foamiran: video
Poppy
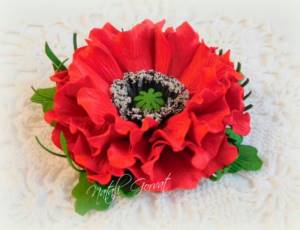
Poppy made from plastic suede turns out very bright and beautiful. It is not difficult to create even for beginning craftswomen. For clarity, we offer you a master class on making red poppies.
You will need:
- red and green foamiran;
- sheet of cardboard;
- toothpick;
- black threads;
- glue gun;
- scissors;
- 20 cm wire;
- bead with a diameter of 2 cm.
Master Class
- Draw patterns of poppy petals on cardboard and cut them out. You can make several templates of different shapes to make the poppy more realistic.
- From green foamiran we cut out a circle with a diameter of 6 cm.
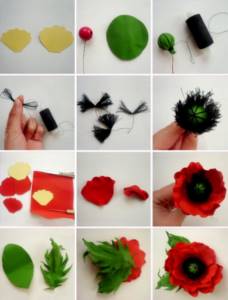
- We insert the wire into the bead and secure it by twisting it. This will be the stem of the flower.
- Using an iron, heat the circle and wrap the bead in it. The edges are secured around the wire.
- We wrap the resulting ball with black threads, as shown in the photo.
- Next, cut out the red poppy petals using the templates.
- To give the petals a wavy texture, fold them like an accordion and twist them, squeezing them with your fingers.
- Next, glue the red petals to the stem. It is enough to make two rows to make the flower lush.
- Cut out leaves from green foamiran. To make the leaves realistic, we make cuts along the entire edge and roll them between our fingers.
- Cut the wire and glue the leaves.
Foamiran poppy is ready!
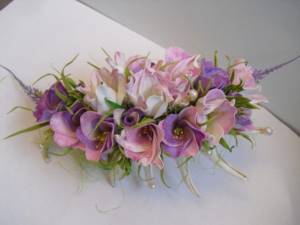
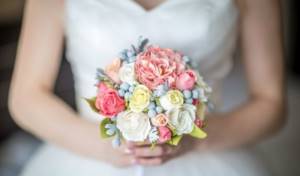
Bouquets from foamiran
Fans of fresh flowers are distrustful of their artificial counterparts. But floral arrangements made of plastic suede are real works of art and should be viewed in this light. This is a unique interior decoration, an exquisite gift or a women's outfit. Here they look completely appropriate, without causing trouble and worry, like quickly withering living plants.
Practical advice
When making a flower arrangement from foam, you need to think about its shape, color scheme and filling. Do not forget about the symbolism of a particular plant; not all of them are suitable for a wedding or a gift. According to established tradition, callas, carnations and gladioli are considered “persona non grata” in the bride’s bouquet, as well as very dark, almost black flowers.
The optimal shape of the composition is spherical, when the plants fit tightly to each other. This way they wrinkle less, cover the base they are attached to well and look more natural. Excessive variegation is undesirable: natural picturesqueness can be achieved using 3 – 4 contrasting shades.

Today it is fashionable to give homemade bouquets in baskets or decorative boxes. They will then take their place in the interior and will delight the owner for many years.
How to care for plastic suede flowers
Products are cleaned from dirt with a damp sponge, without adding detergents. Thanks to its smooth surface, the material repels dust, grease, soot and splashes, preventing them from penetrating into the structure, so there is no need to use active chemicals.
It is forbidden:
- Expose compositions to open sun for a long time.
- Wash using solutions containing chlorine or acetone.
- Locate within reach of pets.
- Water from the shower or leave to soak in the bathroom. Prolonged exposure to water destroys the material.
If treated with care, hand-made beauty made from plastic suede is very durable. So it makes sense to think about creating something original and impressive from this enchanting material. Below are the two most popular options for using foamiran.

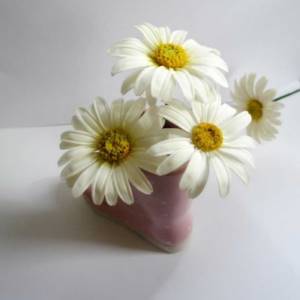
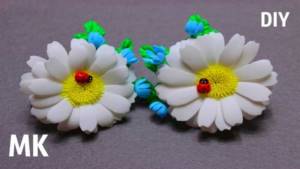
Chamomile
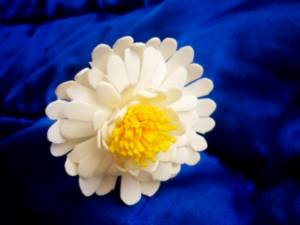
Chamomile has long been considered a symbol of family. Despite its simplicity, it is a very sunny and bright flower. It is no coincidence that weddings are so often decorated with daisies. To easily create a charming daisy from foamiran, we suggest using a step-by-step master class and photos.
You will need:
- white, yellow and green foamiran;
- sheet of cardboard;
- protractor;
- ruler;
- pencil;
- glue.
- thin stick for the stem or wire.
- iron or candle.
Master Class
- We cut out 4 circles of different diameters from white foamiran (for example, 9 cm, 8, 7, and 6 cm). To make the circles even, use a protractor.
- Using scissors, we make the shape of the petals around the entire circumference, then cut them, leaving about 3 mm to class=”aligncenter” width=”700″ height=”920″[/img]
- We heat the ends of the petals and give them shape.
- From yellow foamiran you need to cut a long strip (about 27 cm) 2 cm wide. This will be the center blank.
- We make cuts along the entire length of the strip with scissors to create a fringe.
- Next, lubricate the strip with glue and twist it.
- We attach the core to the wire.
- Next, we string the petal blanks onto the stem, starting with the smallest circle, and do not forget to lubricate with glue.
- For the backing from green foamiran, cut out a circle and make cuts. It will be the final row in creating the chamomile.
Chamomile from foamiran is ready!
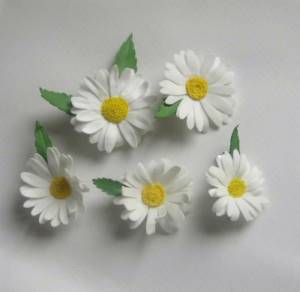
Making chamomile from Thomas
To work you will need the following tools and materials. This list includes:
- Two sheets of white foamiran;
- Pattern of chamomile, heartwood;
- Floral tape;
- Scissors;
- Simple pencil;
- Iron to add volume;
- Yellow pastel.
We transfer the flower templates onto a white sheet of plastic suede. To create a chamomile you will need 5 blanks. Turn on the iron and process each petal. When the base of the workpiece warms up a little, give it the desired shape.
We make the core from yellow fom. To do this, cut out a strip 1 cm wide and 8 cm long. Use scissors to make a fringe in the upper part. Glue it to the metal wire and gradually twist it.

Now we fix the white blank onto a metal wire with a core. Carefully form the flower. We will mount the stem from wire. We wrap the metal surface with floral tape.
Tender rose
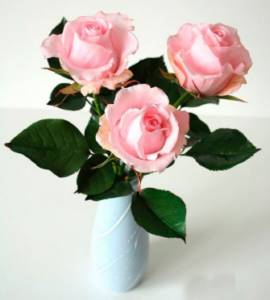
Rose is the queen of flowers. A flower beloved by many women can be made from foamiran; moreover, it will not wither and will please the eye for a long time.
You will need:
- green and pink foamiran;
- scissors;
- glue;
- a piece of foil;
- thick wire.
Master Class
- From foamiran we cut out two types of petals of the future rose, identical in shape. But different in size. You should get 5 petals of each size.
- Place each petal on the iron and use your fingers to stretch the edges.
- We make a small ball from a piece of foil and attach it to the wire.
- Glue a small petal around the ball.
- So we glue petal by petal in a circle, forming a bud.
- We make leaves from green foamiran and glue them to the stem.
The foamiran rose is ready! I recommend watching this video!
Realistic rose from foamiran, flowers from Thomas Tsvoric
Peony assembly
When you have all the parts prepared (you also need to pay attention to the stem), assembly is performed. This peony can be made on a long or short stem, but it looks especially advantageous in a bouquet. It will be appropriate as an addition to a gift, as it will become an elegant decor in the office or at home.
Start gluing the petals around the circle with overlap:
As a result, you will get the assembled center of the flower:
Glue large petals:
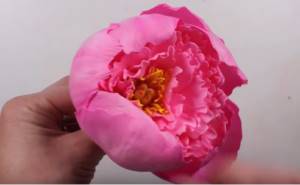
After gluing the large petals, your first flower will be completely ready. You will be able to enjoy its perfection. Continue the work by making small peony buds. They are suitable for large bouquets, decorative hair hoops, and wedding boutonnieres.
Ranunculus
You will need:
- red foamiran;
- scissors;
- foil;
- glue gun;
- wire for the stem.
Master Class
- Cut out red petals of different sizes. To make the flower lush, it is better to make as many petals as possible.
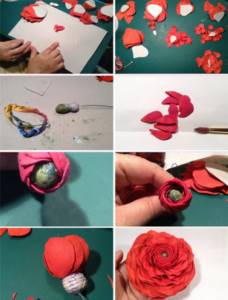
- We twist a small ball of foil or other material and attach it to the wire.
- Next, we form the flower: starting with the smallest petals, glue them one by one, overlapping. Before doing this, give them a wavy shape.
Ranunculus from foamiran is ready!
Sunflower
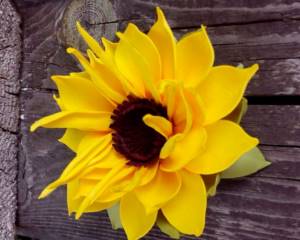
Using foamiran you can create a wide variety of flowers. Hydrangea and sunflower also turn out great. They are made approximately according to the same principle, the only difference is the color of the foamiran. We invite you to create a sunflower using our recommendations.
You will need:
- foamiran (white or yellow, black, green);
- thick paper;
- paints (can be acrylic);
- green floral ribbon.
- toothpick or wire.
Master Class
- We cut out petals from foamiran in four different sizes, 12 pieces of each.
- If you use white foamiran, then you need to paint all the petals with yellow paint. To skip this step, you can take yellow right away.
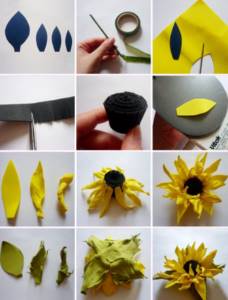
- We make green leaves: either from white foamiran followed by painting, or directly from green.
- We twist the black strip of foamiran, having previously cut the edge along the entire length, and glue it together. The length of the strip is about 1 m and the width is 2 cm. The result is the core of a sunflower.
- We heat all the petals and then glue them around the center. We complete the process by gluing green leaves.
The foamiran sunflower is ready! I recommend watching this video!
Foamiran flowers, elastic band with chrysanthemum / DIY TSVORIC