Almost every girl has dreamed since childhood of a magnificent, beautiful and unique wedding. Wedding dress, makeup, bouquet, restaurant, banquet, car, wedding rings, shoes, suit for the groom - great and close attention is paid to every nuance to make the celebration truly unforgettable and perfect. No small emphasis is placed on one of the most piquant, delicate accessories - a wedding garter.
OK
How to choose a wedding garter?
If the bride is not a fan of needlework, you can purchase a headband in a store or make a custom-made accessory.
To achieve this, it is important to consider some of the nuances of choosing a wedding garter:
- Size. When choosing the required size of an accessory, you need to find the “golden mean”. A product that is too large can fall off your foot at the most inopportune moment, while a narrow elastic band will pinch the skin and cause discomfort.
- Design. The design of the accessory is also of great importance. Sparkling rhinestones and large beads will be appropriate on the legs of a young girl, but older ladies should stick to the classic style.
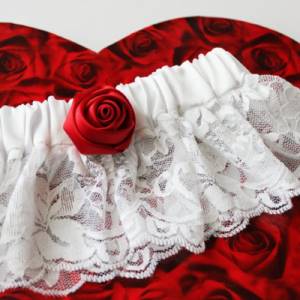
- Color. The garter can be any shade. White and beige ribbons are considered a win-win classic, which can be diluted with contrasting lace or a bow. However, many girls boldly decide to experiment and wear bright garters in contrasting colors: scarlet, pink, blue.
- Textile. You should immediately forget about synthetics and cheap materials - on such an important day you should not skimp on fabric. When choosing an accessory, take into account the sensitivity of your skin; for example, organza can cause irritation.
Bride's Garter: Choosing an Accessory
Even if the bride does not want to throw an intimate item of clothing into the crowd, a garter can be worn to please her young husband. The right choice of garter will create a sexy image of a young bride.
Below is an interesting video of the bride's bandage being removed:
On which leg does the bride wear a wedding garter?
In order for the garter to fulfill the function that old traditions attribute to it, it is necessary to correctly place the accessory on the leg . There are no strict rules on this matter, but it is believed that the garter should be placed on the young person’s right leg just above the knee.
Many people wonder how many garters a bride should have at her wedding. In some regions of North America, it is customary to wear the tape on both legs at once, and each option has a specific meaning :
- The garter, located on the right leg, is usually intended for single guests of the holiday.
- The second piece of jewelry, located on the left, is considered a more intimate item and is removed at the end of the evening. Taking off her garter, the girl says goodbye to innocence and a free life. This type of garter is also called a “honey garter” because it marks the beginning of the honeymoon.
How many garters should there be at a wedding?
If the bride wants to use only one garter to perform the custom, she should choose the right side. This way the accessory will be charged with the necessary love energy and will bring good luck to its future owner , who will soon start a family.
Stages of creating a wedding garter
- Choose the type of future accessory, taking into account the appearance of the dress. The garter should be in harmony with the dress in color, material and style;
- Decide on materials: fabric, decor. You will also need an elastic band to keep the garter on your leg;
- Take measurements. The garter is worn on the leg above the knee. You need to measure the circumference of your leg at its location. The elastic band for the garter should be slightly smaller than the obtained size. The fabric for the garter will need 1.5-2 times the length of the elastic.
- Buy everything you need;
- Bring your idea to life. The garter can be sewn by hand or on a sewing machine. The decor is best sewn on with threads, but it can also be glued using hot glue.
Design options
Previously, the bride's garter was a lace ribbon sewn with her own hands. Now there are a huge number of options for this accessory. Most often, it is sewn from lace, silk or satin, decorated with a variety of decorative details: brooch, cameo, rhinestones, stones, feathers, buttons, embroidery, 3D appliqués, etc.
You can embroider or put rhinestones on the garter with the initials of the newlyweds or the wedding monogram, making it personalized.

The bride's garter can be either narrow or wide. It’s up to you to decide which accessory to buy for your wedding! Just keep in mind that a narrow garter will look better on a miniature leg, and vice versa.
A garter can both reflect the personality of the bride and emphasize the style of the celebration, for example, for a nautical wedding, the garter can be sewn from blue fabric and complemented with a brooch in the form of an anchor or a steering wheel; for a celebration in the style of Marie Antoinette, it can be decorated with a cameo and feathers; for a vintage wedding, it can be sewn made of fabric with a floral print and decorated with pearls.
The role of wedding traditions
The first primitive orders and rules of marriage began to emerge in the ancient world during the time of the Egyptian pharaohs. Nowadays, every country can boast of centuries-old wedding traditions, and their number is constantly growing. Many old customs have been forgotten because they have lost their relevance, but new ones are replacing them.
This happens because couples in love strive to make their first holiday together perfect, their ideas are gradually adopted by others, and so a new tradition arises. All customs are designed not only to make the wedding more interesting, but also to introduce future newlyweds to the general idea of marriage.
At different times, there were their own concepts of an ideal celebration, and now new canons are being created, which will then become outdated. The world is changing, and the tastes of young people are also becoming different, but at the same time, new traditions invariably appear that are accepted by the majority and exist for a long time.
Interesting! Also learn how to properly put on and take off the accessory at a wedding according to tradition.
When and how to remove the garter?
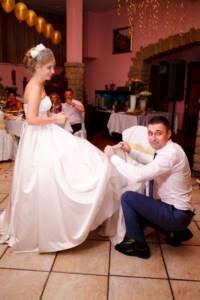
In addition to its aesthetic function, the bride's garter also plays an important role at the end of the celebration. What is it for? To find out which guy will get married next. After the bride throws the bouquet to her unmarried friends, she sits on a chair in the center of the hall, the groom kneels in front of her, carefully finds the garter, slightly lifting the hem of the dress, and slowly removes it with his hands so that the photographer has time to take a couple of successful photos.
If the groom hesitates, the bride can help him. And when the garter is in the hands of the groom, you can throw it to your unmarried friends. The one who catches her will soon lead his chosen one down the aisle. After this, the guy who caught the garter and the girl who caught the bouquet perform a dance (if, of course, they came to the wedding alone). It is believed that they can make a great couple.

Want to make the garter tossing experience more fun and spicy? Play out this humorous scene: let the groom take off not your garter, but your huge panties, which he quietly pulls out of his pocket and shows to all the guests. An alternative option is that instead of a garter, the groom discreetly throws a thong to his friends. The deception will be revealed only when the guy catches the deception. Surprise and laughter are guaranteed!
Tip: Don't like the garter toss idea? Replace this intimate accessory with the groom's boutonniere!
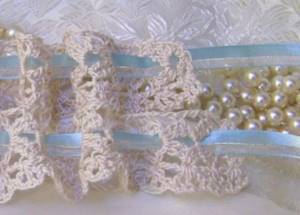
Crochet garter without elastic
Satin and lace garters are beautiful. But when the bride knows how to knit, she will prefer to make the product herself using this technique. Knitted garters look original and unusual; in addition, natural threads are used in the manufacture of a knitted accessory, so the risk of irritation from wearing a wardrobe item made of synthetic materials (as is the case with the use of lace or organza) is reduced to zero.
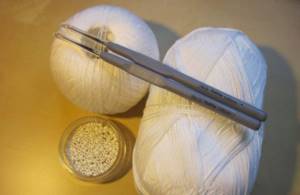
Required materials and tools
- Scheme.
- There are two types of threads: some are thicker (560 m/100 g), others are thinner (400 m/100 g) white or another color.
- Crochet hook for 0.6 and 0.9.
- Beads with large holes so that the hook can easily penetrate them.
Stages of creation
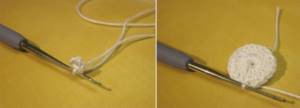
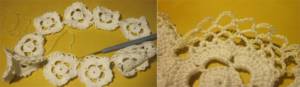
- As shown in the diagram, the design of the product will consist of several colors connected to each other. First you need to knit the required number of flowers. To do this, use denser threads and a 0.9 crochet hook to pick up 4 air loops and connect them into a ring.
- We begin to make the first row: we collect three air loops. We braid the ring that was made in the previous step with 20 double crochets.
- Second row: cast on one air loop, then make 7 more loops and a single crochet, which we thread into the 4th loop of the chain of the first row. We braid the entire row in the same way.
- Third row: having cast on three air loops, we make 10 double crochets over the arches that were made in the previous row. We braid the entire row, only in each subsequent arch we collect not 10, but 11 double crochets.
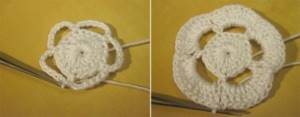
- The fourth row consists of single crochets, which alternate with air loops. The flower is ready, we knit as many blanks as needed for the bride’s garter (about 12 pcs.)
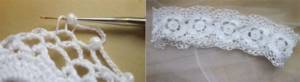
- Using thin threads and another crochet we knit an openwork mesh: into the chain stitches of the previous row we make single crochets, followed by 5 chain loops, then again a single crochet. And so on along the entire row of the bride’s garter.
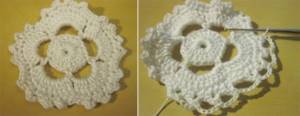
- By tying the blanks with an openwork mesh, we connect the flowers into a continuous strip.
- We continue to weave the openwork mesh in the same way for three more rows.
- When weaving the fourth row, the number of air loops above the arches increases to 8 pieces, and a bead or large beads are woven into the air loops above each arch. The bead must be placed in the center of the arch.
- We weave pearls (beads, beads, etc.) around the entire perimeter of the bride’s garter at the top and bottom. The product is ready.
Knitting is something that many handicraft brides can do. This is an excellent opportunity to make a garter in the style you want, putting your soul and skill into the knitted product. Since the garter is small, it will not take much time to knit it. However, you shouldn’t delay and leave everything for the last days; it’s better to put together a couple of options, and before the wedding, choose which one is preferable. A selection of photos will help you choose a garter.
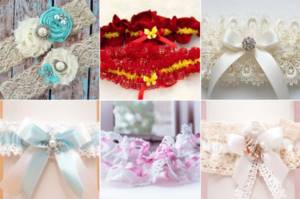
Kinds
When visiting a wedding salon, girls' eyes widen at the splendor reigning there.
Usually there are so many different garters on offer that choosing the one you like the most is quite difficult.
Thin
Narrow garters are widely used. They are practically irreplaceable in such cases:
- If the wedding dress is voluminous, with numerous decorative elements, a thin garter will look more harmonious with it than a wide one and will avoid overloading the image.
- If the bride has chosen a short wedding dress, then a thin, elegant garter is perhaps the only option possible in this case.
- Sometimes a girl doesn’t feel like wearing a garter, but tradition obliges her to do so or the groom wants to please his friends. In this case, a thin garter will be an excellent compromise solution.
Wide
A wedding garter made of wide lace or satin ribbon is an indispensable option for lovers of massive jewelry. This classic model has a number of advantages, namely:
- it is easily put on the leg and just as easily removed from it, without twisting or curling into a tube;
- it is securely fixed in place due to the fact that an elastic band is usually attached to its center;
- it can easily be matched to any dress and any underwear.
If the garter is decorated with lace and the groom will remove it according to tradition, care must be taken to ensure that the lace matches the lace trim of the dress.
Double
Such garters are relevant if you plan to observe two traditions at once. The groom takes one of them at the wedding celebration while beautiful music is playing, and throws it to his friends, and the luckiest guy keeps it as a souvenir.
The other, called “honey”, remains on the bride’s leg until the wedding night, and then becomes a family heirloom. It is desirable that both garters be in the same style, with one of them usually being wide and the other thin.
They are put on one leg: first, higher, thin, then wide, just above the knee. The wide one goes to the groom's friend, and the thin one goes to the groom himself. If desired, the bride can choose different garters, choosing a wide one for her dress and a thin one for her underwear. This option is quite acceptable, because no one except the groom sees a thin garter placed above a wide one.
With decor
The decor of these accessories has virtually no restrictions. It all depends on the wishes and financial capabilities of the bride. There are models decorated with precious stones, antique brooches, and pendants made of precious metals.
More common decorative options are the following:
- All kinds of bows made of satin ribbons of different widths.
- Beads, sequins, rhinestones and beads.
- Handmade lace.
- Flowers from various materials.
Recently, fresh flowers are sometimes used to decorate these details of a wedding dress. This decor looks quite unusual and interesting, but it has a significant limitation: the bride’s dress must be fluffy, with crinolines, otherwise the flowers will very quickly lose their attractiveness. If the dress is not lush, but you really want to decorate the garter with fresh flowers, you can use a little trick - put on the garter immediately before removing it. The option looks interesting when the flowers on the wedding garter repeat the flowers in the bride’s wedding bouquet.
Made from white lace with feathers
Bride's lace garter - traditional option
To make this accessory you will need:
- narrow lace 1 cm wide;
- elastic band;
- satin ribbon;
- decorative elements;
- white threads;
- sewing needle.
Work order:
- Determine the underside of the lace. Baste it to the elastic band in several rows.
Baste the lace to the elastic band
- At the end of the work, gather the lace and cut off the frayed edges. Sew the product on a machine, connecting the two edges, remove the bastings.
Gather the product to make the lace look softer and fuller
- Gather the feathers into a bunch and wrap them with thread. Make a bow from a thin satin ribbon.
- Attach the feather bun and bow to the garter using a glue gun or thread. If desired, the garter can be supplemented with other decorative elements.
Decorate the garter with a satin bow and small feathers
LiveInternetLiveInternet
Quote from Ksenia_ja's message
Read in full In your quotation book or community!
Garter Bride. Traditions, ideas and master class
HERE HERE
HERE HERE GARTER IDEAS
Source
Olga Samoilova
Garter Bride
DIY bridesmaid garter? Nothing is impossible!
We will talk about the history and function of the wedding garter below. But first, let's talk about how to make this elegant accessory yourself. A do-it-yourself bride's garter will be a wonderful gift for a friend for a bachelorette party, and the bride herself can easily sew a small souvenir. Of course, you can buy this thing in a store, but it’s much more interesting to make it yourself. Moreover, for this you will need at most an hour of time and a little imagination. And if you are a creative person, then not only will it not be difficult, but it will also give you pleasure to make this piquant detail of a lady’s toilet with your own hands.
So, to begin with, it would be a good idea to measure the circumference of your leg just above the knee (the location of the finished product). We multiply the resulting number approximately twice and go to the “sewing accessories” department of the store, beloved by all needlewomen. For what? It is in this department that we will find everything we need for our future masterpiece of applied art.
We will need:
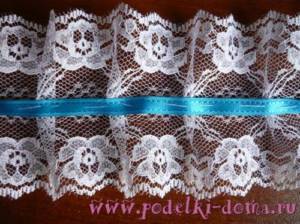
- satin ribbon or sewing for the base of the future garter (the width depends on the project you have planned), the length is the same number that you calculated before going to the store, multiplied by two again. - Lace for finishing, which can be different in width - the narrower one is sewn on top, and the wider one - on the bottom, or it can be the same, the length is the same as that of a satin ribbon. Just keep in mind that the lace is sewn on both sides. You can use organza instead of lace. If you want the garter to be fuller, use two layers of finishing. - Underwear or any other elastic band, slightly narrower than a satin ribbon, and a length equal to the volume of your leg with the addition of one centimeter for the seam. — Various nice little things for decoration - beads, beads, ribbons, rhinestones, etc. The selection of colors depends on your taste and the color scheme of the wedding dress.
Procedure: 1. Cut the satin ribbon into two equal parts. 2. Sew lace to one of the cut parts on both sides, as shown in the picture.
Sewing pattern for a bride's garter
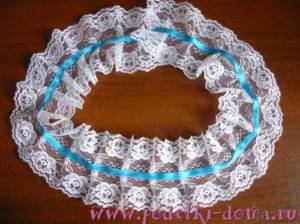
3. Place a second piece of satin ribbon on top of the base with sewn lace and sew it on. 4. We stretch an elastic band between the ribbons and fasten it on both sides with safety pins. 5. Try on a garter so that it does not stay on the leg and does not squeeze it too much. 6. Fold in half and sew. The garter is ready. 7. Now you can use your imagination to decorate your creation. You can embroider with any available materials.
Ready-made garter for the bride
History of the origin of the garter
Now the garter is used only as a decorative element of a wedding dress, and is worn only on one right leg. And in the old days, garters served as parts that supported a lady’s stockings.
The famous "Order of the Garter" is said to have something to do with the history surrounding this accessory. One day, the beautiful Countess of Salisbury, dancing with the English King Edward III at a ball, accidentally lost her garter. The fallen object caused a wave of ridicule among those present, to which the king proudly declared: “Let the one who has unclean thoughts be ashamed!” Subsequently, it was this phrase that served as the motto of the order of the same name.
Garter location
But let's return to the modern garter. Just like throwing a bouquet, the tradition of throwing a garter to the groom's unmarried friends came to us from America. Only American brides wear not one, but two bandages on their right leg - one above the knee, and the second just above. The first is intended for single friends, and the second is for a young husband. And the second garter is removed on the first wedding night - that’s why it’s called “honey” or “sweet”. The “honey” garter is kept as a talisman.
Where did the tradition of garter throwing come from?
In the old days, it was believed that whoever brought a piece of the newlyweds' clothes from the wedding would have great luck. Of course, everyone tried to take away a tasty morsel, which did not delight the newlyweds. This is how the tradition of “voluntary donation” of amulet items from newlyweds in the form of a bouquet and a garter arose. And so that representatives of the male part of the population who are especially thirsty for family happiness do not show cynical antics in their zeal to get the desired part of the toilet, the groom personally (and sometimes “with his own teeth”) removes the piquant part from his beloved’s leg.
Removing a wedding garter with your teeth
In America, this process is no less significant than the first dance of young people. Yes, and in Russia it is quite welcome.
The bride takes off her garter
However, if the newlyweds, for reasons of modesty, do not want to show the bride’s leg to not quite sober guests, the bride can independently remove the garter and give it to the groom. There are no clear rules here - it all depends on your wishes.
Source
You can make a garter without a sewing machine, just with your hands.
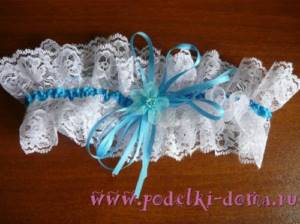
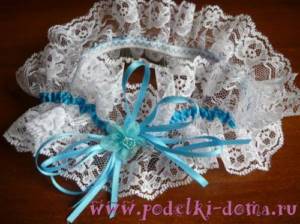
Materials: — Satin ribbons. (white and lilac, wide and thin) - Elastic lace (white) - Threads, scissors, needle, beads and three hours :). We take lace that is wider and cut off two parts from it, each equal to 2.5 times the circumference of the leg. Sew the edges. We do the same with the second lace. Next, we take one piece and begin to make folds at approximately the same distance, securing firmly with separate stitches. The final girth should now be like a leg. But if it’s a little less, it’s not a big deal. Our lace is elastic. We apply the second part of the same lace face to face to the one that is already all in folds, and we also begin to make folds that coincide with those on the first part. When we fix the folds, we sew one part to another at the same time. I would like to draw your attention to the fact that the folds are not sewn with one single thread, not a whole thread, the thread is constantly cut off and started again. This is so as not to lose the elasticity of the lace due to the solid thread. With the second lace we do everything exactly the same. Then we put the smaller lace on the wrong side on the front side in the middle of the wide lace, at the seam site, and sew them together using separate stitches. Well, the base is almost ready. The next step will be to mask the inner seam that will be adjacent to the leg. Cover the seam with satin ribbon. Since the ribbon is not elastic, you need to sew it on as much as possible, stretching the lace. In order not to stretch it in your hands, we simply put the lace on the largest book on which it will fit. Now we sew the ribbon with an oblique blind seam at two edges. We remove the half-finished garter from the book and put it back on the book, but now facing us. In order for the garter to stay on the leg well, the elasticity of the lace is not enough; you still need an elastic band. We choose an elastic band with a ready-made frill. Extra beauty won't hurt us. We take the length of the elastic as slightly less than the circumference of the leg. The elastic band should be slightly stretched on the leg, but should not pinch the leg. Sew the elastic bands together. Again we stretch the lace and elastic onto the book and in this stretched state we sew it with a hidden oblique seam at two edges. We take it off, check it, measure it so it doesn’t sting :). Now in the middle you need to sew a lilac satin ribbon onto your face. Again we stretch it over the book and sew it on, leaving long ends of the ribbon for the bow. Since the ribbon is quite narrow, we sew it not at two edges, but at the middle with a hidden seam. We tie a bow. Everything is ready Here is the first one so that the groom can pick it off with his teeth and throw it away to the unmarried :)) And here is the second one, for the first wedding night
source
History, traditions
The bride's garter is a common attribute of every wedding in the West. In our country it is also becoming more and more popular every year. This item of women's clothing is an elastic strip of fabric or tape. Previously, it was worn to support stockings. However, a wedding garter is an elastic band decorated with rhinestones, lace and satin ribbons, and does not serve any function other than aesthetic. The bride can wear one or two garters. They are worn under the knee on the right leg. The garter, which is called “sweet” or “honey”, is worn 10-15 cm above the knee and removed during the first wedding night. And the groom throws the garter, which is called “lucky”, to his single friends during the wedding banquet. According to tradition, bachelors gather around the bride sitting on a chair. The groom must lift the skirt of the wedding dress and remove the garter. If it cannot be found under numerous petticoats, then the bride can take it off herself and give it to the groom. You can remove it either with your hands or with your teeth. In this case, the bride can stand next to the chair and put one leg on it. But this should not be done if the wedding banquet was preceded by a religious wedding. Once the garter is successfully removed, it is thrown to the unmarried men. Happiness and a quick marriage await the one who catches it. In addition, according to custom, the young man must then dance with the girl who caught the bouquet or put a garter on her leg to the music. This very interesting tradition will diversify your wedding banquet, adding spice and a special wedding spirit. In addition, a garter is a small but very nice detail of a wedding dress that every girl likes so much. Your Wedding.ua!
Source
A simple solution
Here is another beautiful bridal garter. Making it with your own hands is not so difficult, and the process itself will not take much time and money.
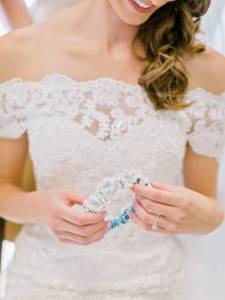
If you have an average foot, then, most likely, lace elastic headbands will fit perfectly on it. Ready-made chiffon flowers and airy feathers will complement delicate lace.
A thin elastic bandage can be transformed with pearls and rhinestones. To ensure they lay beautifully, glue them to a tulle base to match the fabric, and only then sew the assembled composition to the garter.
Experiment with lace and trim colors to create your own perfect garter.
Interesting video: another video tutorial
You can clearly see in the video how to sew a bride’s garter with your own hands.
There is nothing complicated in making a garter, and guests will surely like a home-made accessory more than a purchased one.
You just need to select the materials in such a way that the image of the bride forms a single whole. In this case, both the newlyweds themselves and their loved ones will enjoy the tradition of garter tossing.
Why does a bride need a garter at a wedding?
These days there are many interesting garters that can be used in only two cases:
- At the wedding;
- At a romantic dinner that will definitely have an intimate continuation. After all, this playful piece of clothing can provoke bold fantasies.
If everything is more or less clear with the second point, then the role of the garter at a wedding may not be clear to everyone.
At a wedding celebration, the garter serves as a decorative element of the evening.
And in the near future. The bride throws the bouquet. The girl who caught the bouquet and the young man who caught the garter must dance to a slow romantic composition.
In addition, the garter serves as a symbolic accessory for the first wedding night. This is a symbol of the beginning of an intimate relationship. As a rule, he stays with a young family, in a secluded place.
Removing the garter at a wedding has long been a practice. The first case of garter removal was recorded back in 1348 in Calais! King Edward III saved his beloved by putting her fallen garter on his leg and threatening his retinue. After such an unprecedented event, the Order of the Garter was even proclaimed.
DIY lace garter for a wedding
Instead of buying a garter for your wedding, you can make your own. The best material for this is lace. This material is ideal for weddings. After all, it is light and airy, like the bride herself. Lace is often present in dresses and other clothing details. For the garter, the softest and most pleasant fabric is chosen.
It is undeniable that a garter that you made yourself is a very nice souvenir for the one who caught it, and for the bride and groom it is another wonderful memory of one of the most important days in life.
To make a lace garter, you need to have on hand:
- Lace ribbon – 1 meter.
- Elastic tape.
- Satin ribbon – 1 meter. The narrower it is, the more beautiful it will look as a decoration.
- Scissors.
- Sewing machine.
- Centimeter.
- Needle.
- White threads.
- Satin ribbon color threads.
- Glue gun.
To make a beautiful garter, you need to follow these steps:
- Determine the front and back sides of the lace ribbon;
- Determine the volume of the leg. To do this, you need to measure your leg at its widest part with a centimeter;
- Cut the required length of elastic band;
- Connect the edges. First baste and then stitch on a sewing machine;
- Now you can decorate the elastic ribbon with lace, satin ribbon, and various beautiful details. It is very convenient to glue decorative elements to the garter with a glue gun.
Throwing a garter at a wedding is a warm and kind tradition that all newlyweds want to observe. One of those details that will make this day unforgettable and original.
All these issues must be approached with full responsibility and every detail must be taken into account. And then this day will become real magic and one of the most pleasant memories of a happy life together.
Knight's Order named after... linen
In the 14th century, the Order of the Garter even appeared in England - a secular knightly union of King Edward III, with the help of which he planned to fight the aristocrats who encroached on his power. But I didn’t come up with a name for the order. At a ball in honor of his organization, the bejeweled blue embroidered garter of the king's dance partner Joan Kent, Countess of Salisbury, fell at Edward's feet. The gallant monarch lifted his underwear, tied it on his sleeve and uttered the French phrase “Honi soit qui mal y pense.” Shame, they say, on those who think badly of this. And he immediately announced the creation of the Royal Order of the Garter, whose motto was this phrase.

Nonsense, from today's point of view. However, for centuries, the robes of selected members of the order were decorated with a piece of women's underwear (knights must worship the Beautiful Lady!). It was not forbidden to wear a garter on a chain or on the left leg below the knee. Over time, women began to be accepted into the order, who were required to tie a sign of belonging to an elite organization on their left arm above the elbow. The garter even ended up on the English coat of arms. And now he girds it with a light blue strap, on which the same motto is emblazoned.
How to make a garter for a bride for a wedding with your own hands?
Many young couples strive to create a wedding with their own hands, making accessories, decorations and decorations themselves. The garter was no exception, the production of which was devoted to many master classes.
Watch the video on how to make a garter for the bride with your own hands:
Garters are made not only from openwork lace and shining lace, but are even crocheted.
We offer several simple options for creating a wedding accessory that you can make yourself.
In order to sew a lace garter, you need to stock up on the following:
- wide strip of lace 1 meter long;
- thin satin ribbon for decoration (you can choose any color);
- sewing machine, thread, needle;
- glue gun;
- several goose feathers;
- scissors.
The lace must be elastic so that the resulting decoration fits tightly on the leg. Having measured the required strip of fabric, the excess lace is cut off and the edges of the piece are sewn together.
Photo of a handmade garter for a bride for a wedding
It is better to attach all decorations for the future accessory using a glue gun. Rhinestones and beads are usually used, but goose feathers look delicate and airy. A narrow satin ribbon will be needed to make an elegant bow out of it, which is also glued to the workpiece. You can choose absolutely any color, but it is recommended to use a soft blue or blue tint.
A satin garter also looks very stylish. The technology for making a silk accessory is not too different from creating a lace ribbon.
Many girls find it difficult to imagine a sexy crocheted garter on their leg. However, by choosing high-quality threads and an interesting pattern, you can create a real work of art.
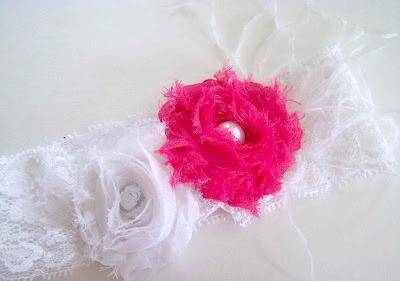
How to create a model in fuchsia color - master class
- Measure your leg size.
- Cut the lace and satin ribbon to the desired length; in order to correctly calculate the length of the fabrics, multiply the leg volume by 1.5.
- For the bow, cut two 2.5 cm wide ribbons so that their length is 20 cm. Then for the corner, cut 15 cm of the same fabric.
- Melt all edges. Before doing this, fold the piece in half lengthwise and cut the edges at an angle.
- Connect the wrong sides of the ribbon and lace and stitch them together using a machine from both edges.
- Measure the length of the elastic: to do this, subtract 7 cm from the volume of the leg. Pass the elastic between the lace and the ribbon.
- Pull the elastic a little and sew the ends together. Then carefully sew them with hidden stitches on the front and back sides.
- To make the bow, take 2 long pieces and fold them in half so that the edges are in the middle. Sew them together.
- Connect the two resulting ribbons, thread them through the middle with a needle, then attach a short piece to the bows so that the needle threads it through the center. Tighten them and sew them together.
- We tie a satin ribbon of a different color into a bow so that the tails remain. Using a glue gun, glue it to the bow. In turn, glue it to the garter in the place where the seam was.
- Glue a ribbon rose to the bow. Your garter is ready!
Sources:
https://tamada.expert/provedenie/svadebnye-traditsii/podvyazka/krasivaya-i-praktichnaya-podvyazka-nevesty-svoimi-rukami.html https://vplate.ru/aksessuary/podvyazka-nevesty-kak-sdelat/ https ://wedding-fabric.ru/molodozheny/nevesta/podvyazka-svoimi-rukami.html
Video: how to sew a bride's garter with your own hands
Knitted garter
You will need:
- yarn;
- hook;
- decor - ribbons, beads.
Work order:
- Crochet flowers and connect them together.
You can choose any pattern for knitting a garter.
2. Close the knitting in a circle. Decorate the resulting product with satin ribbons and beads.
Join knitting in a circle
Photo gallery: crochet garters
Bridal garters can be made using any of the master classes presented above, or you can come up with your own unique design. Such wedding accessories will become a real highlight of your outfit, and handmade ones will add a touch of warmth and happiness.
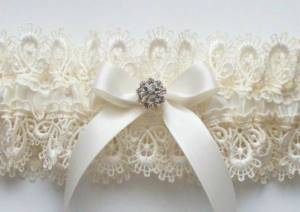
Master class on making
Lace is considered the most elegant and lightest material, so it is considered an ideal option for sewing a garter. Since brides most often choose dresses and underwear with lace inserts for their wedding, a garter sewn with them in the same style will add an unusual charm to the girl’s image. To create a lace decoration, it is recommended to use soft material. For the work you will also need scissors, pieces of satin ribbon, goose feathers, a glue gun and thread with a needle (if you plan to sew without a sewing machine). The length of the elastic ribbon is selected in accordance with the volume of the newlywed’s leg; for this purpose, its widest part is first measured.
The sewing process itself is as follows.
- The prepared tape is joined at the edges and basted by hand, then stitched on a sewing machine.
- The next step is decoration, which can be done in various ways. Using a glue gun, feathers are fixed to the base of the garter or replaced with other elements of decoration.
- A bow cut from a satin ribbon is also attached to the base. Despite the fact that the main color in the bride’s image is white, it is recommended to complement it with details of a blue or light blue shade. Therefore, it is best to make the bow not snow-white, but blue.
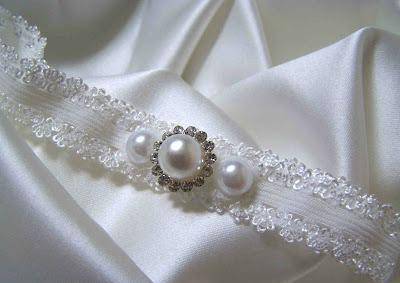
A satin garter will look no less original. To make it, you will need a piece of satin ribbon (at least 65 cm long), ready-made lace (7 to 10 cm wide), satin fabric (20x20 cm), 1 cm wide elastic band and decorations in the form of pearls, stones and beads. Sewing is done in steps.
The classic version - how to sew
Here's what the bride will need:
DIY sewing process:
- Use a meter to measure your leg circumference.
- Cut two ribbons of the same size: in order to correctly calculate its length, multiply the volume of the leg by 1.5.
- Place both pieces of fabric with the wrong sides facing each other, then sew them together using a machine. Don't forget to backtack at the end and beginning of the stitching.
- Measure the length of the elastic band; to do this, subtract 7 cm from the leg volume.
- Attach pins to the ends of the elastic and pull it between the ribbons.
- Fold the product in half with the right side inward and sew its ends using a machine. Before sewing, pull the elastic a little by the pins.
- Cut 17 cm of satin fabric and thread it through the buckle so that it is in the middle.
- Fold the resulting ribbon right side inward and sew.
- Turn the ribbon with the buckle inside out, fold the seam and tighten the resulting bow with thread, then use the same thread to sew the buckle to it.
- Sew the resulting bow and buckle onto your garter and enjoy a beautiful, classic style garter.
How to make a wedding garter
Not long ago, a foreign tradition came to us: at the end of the wedding, the groom throws a garter from his wife’s leg, and the bride throws her bouquet. The bridesmaid who catches the bouquet will be the first to marry, and the first bachelor to marry will be the one who catches the bride's garter.
And although a garter is not a significant accessory, every bride still wants to choose it as original as possible. Some people make the garter themselves, using improvised materials, to avoid unnecessary costs. And if you make it yourself for your friend, it will become an unforgettable gift. And it will look more original than store-bought garters, which may not suit the bride.
Of course, to learn how to sew good and complex things, you need to spend a lot of time and put in a lot of effort. But making a lace strip on the bride’s leg will not be difficult; our master class will help you with this.
First you need to figure out what your creation will look like and buy everything you need in the sewing department.
Traditionally, garters are made white, just like the bride's dress.
You can decorate it with flowers made of satin ribbons.
Or flowers and patterns using the kanzashi technique, beads, rhinestones, feathers.
Some brides prefer to add elements of red to the garter, because scarlet is the color of love.
Having decided on the style of the future wedding garter, you can begin making it.
What's happened
The first garters appeared several centuries ago, and at first they played only a practical role - they supported stockings and the lower part of pantaloons.
In this regard, the design of this thing left much to be desired, which cannot be said about modern models, decorated to suit every taste. Nowadays, in most cases, garters are used only for weddings, and specifically for one stage of the banquet. The groom takes this little thing off his beloved’s leg and throws it to the side where the bachelors are lined up.
It is believed that whoever catches the bride's garter will be the next unmarried wedding guest to find love. The tradition originated in the 90s of the last century in America.
It is important to take into account that everything in the bride’s image should be harmonious. Even the garter, which will be hidden under the dress almost the entire time of the holiday and will only appear to others for a few minutes, is selected in accordance with the outfit and other accessories.
Interesting! People are used to removing the garter with their hands, but it will be much more interesting if the groom does it with his teeth.
It is necessary not only to comply with the color scheme, but also to choose stylized decorations if the wedding is planned in a specific theme.
How to make a garter for the bride with your own hands
So how to sew a garter for the bride with your own hands? Master class with photos for those who are far from sewing skills. For this we need:
- rubber;
- lace;
- satin ribbons;
- glue;
- beads, rhinestones and other decorations as desired.
The first thing to do is measure the hip circumference at the level where the garter will be located. We multiply the resulting length by 1.5 or 2, depending on the desired splendor of the accessory. This will be the required amount of lace. Next, we make a drawstring with an elastic band.
To do this, take a ribbon 2-3 cm wide, equal to the length of the lace. Using a sewing machine or hand stitch along the top edge. We apply lace to the bottom edge and stitch it to the ribbon.
The next step is to retract the elastic. To determine the required length, subtract 2-3 cm from the resulting hip volume. We secure the ends of the elastic with a pin and grind down the side sections.
So, the main part is ready and all we have to do is decorate the garter. It all depends on your imagination. Alternatively, you can make bows from ribbons and stick beads on them.
Which garter to use and whether it is needed at all is up to you to decide. When choosing, be sure to take into account the style of the dress and your style as a whole, so that the accessory becomes a truly integral part of the look.
You can buy a bride’s garter at any wedding salon, and if you don’t like anything, you can make it yourself, armed with lace, elastic, ribbons and other decorative elements.
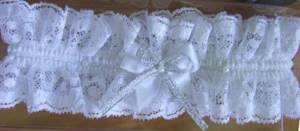
Thin lace garter with satin bow
Snow-white lace makes a cute accessory
You will need:
- wide white lace - at least 3–3.5 cm;
- white satin ribbon - 0.6; 1 and 2.5 cm;
- half bead for decoration;
- elastic band;
- threads;
- sewing needle;
- pin;
- lighter.
Work order:
- 1. Measure two pieces of lace, 70 cm each.
Make two pieces of lace
- Fold two strips of lace overlapping slightly and baste. Then machine stitch using a zigzag stitch. If this type of stitch is not available, install a regular one.
Baste the lace pieces
- Along the length of the lace, cut a satin ribbon 1 cm wide, leaving a margin of 1–2 cm.
Cut the satin ribbon to a length equal to the length of the lace piece
- Baste the tape to the wrong side of the lace piece and then use a sewing machine to stitch along the edges, departing 1 mm from each. Remove the basting stitch. Cut off the excess tape and burn the edges with a lighter.
Sew a satin ribbon to the lace blank
Make two lines on a typewriter
- Cut an elastic band 35 cm long. Attach a pin to one edge and thread the elastic band into the workpiece, gathering. Then secure both edges with machine stitching.
Insert an elastic band into the blank
- Sew the garter into a circle. Finish the edges with an overlock stitch or fire to prevent them from fraying.
Turn the garter right side out, all that remains is to add the decor
- Make a bow from a satin ribbon.
Use a piece of satin ribbon to make a decorative bow.
- Attach the decor with glue to the seam, and glue a half bead in the middle.
Attach a bow to the garter
How to sew in a classic style
In most cases, girls choose a white wedding dress, and only some accessories in this case are made in the form of a color accent; the garter can also be made white. How to make a garter for the bride? To do this you will need the following materials:
- white lace 3.5 cm wide;
- white satin ribbons 1 and 2.5 cm wide;
- white elastic;
- needle and thread, safety pin;
- scissors, ruler, lighter.
To make a standard garter, you need to cut 2 elements of 70 cm long from the lace braid, overlap them by about 3 mm and sweep them together with a needle and thread. The seam is then sewn by machine or stitched by hand, after which the basting thread is pulled out.
DIY bride's garter
Necessary materials:
- Lace (it is desirable that the lace is soft, made of good material. Hard synthetics can cause discomfort),
- rubber,
- threads (which should match the ribbon),
- satin ribbon (length measured by leg circumference),
- scissors,
- needle,
- decorations (beads, seed beads, rhinestones).
Making a leg garter step by step:
Pull the elastic over the area where the garter will be worn. Mark this length with a margin of 1-2 cm.
Cut off the length of the bandage and another 15-17 cm on the lace ribbon. Using pins, connect the lace first in the middle of the elastic, then along the edges. In the remaining places, gather the lace a little to create small waves. It is advisable that wide lace be at the top and narrow at the bottom. Baste while stretching the elastic.
Using small stitches, gather the lace into small folds. Stitches can be created in the center and along the top edge. At the end you should get an accordion. If desired, arrange the lace evenly to create equal folds.
Sew the elastic along the seam line. The elastic should be shorter than the ribbon, so connect the ends together. Next, we sew the two edges of the original wedding accessory, closing the lace into a ring.
Now the most important and interesting work remains - decoration. Here your taste and color preferences play the main role. Jewelry must be sewn on carefully and efficiently so that when the groom throws the accessory you made, it does not fly apart and all your efforts are not in vain.
Once you have finished sewing on the embellishments, the bride's garter is complete. Try putting it on. So how?
See even more wedding accessories in our “Wedding” section.
In order not to forget the page address and share with friends, add to your social networks:
How to make a lace accessory for the bride
Materials for garter:
- two red satin ribbons;
- rubber;
- lace.
- Take your foot measurement.
- Cut the lace, in order to correctly calculate its length, multiply your leg volume by 1.5.
- Apply a red satin ribbon, the width of which should be approximately 2.5 cm, in the middle to the front side of the lace and baste.
- Use a machine to stitch along the edges of the red fabric. Don't forget to backtack at the end and beginning of the stitching.
- After you have stitched on both sides, carefully pull out the basting.
- Measure the desired length of the elastic, subtract 7 cm from the leg volume.
- Attach a pin to the ends of the elastic and pull it between the lace and additional fabric. Make sure that it does not twist during operation.
- Fold the garment in half with the right side facing inward and machine stitch the ends.
- To make a bow, cut a 35 cm wide ribbon and another 1.5 cm wide.
- Cross the ends of the wide piece to make a loop. Place its upper part under the intersection of the ends.
- Wrap the intersection with a narrow piece, slightly pulling the wide one together. Sew the resulting bow from the wrong side.
- Sew a bow to the garter.
- Your luxurious Raffaello garter is ready!
What does it mean to catch a garter at a wedding?
If the bride's bouquet is always caught by unmarried girls who want to quickly meet their soulmate, then the garter is the prerogative of the guys. What happens if a young man catches this accessory and what to do with the garter:
- According to the most common belief, the owner of a woman's garter will soon invite friends to his own wedding.
- The French believe that a man catches a garter at a wedding in order to become a happy man for whom Fortune always smiles.
Removing the garter can happen in different ways. In the simplest version, the groom simply removes the garter with both hands while his betrothed is sitting on a chair, and then throws the accessory to his friends. However, some couples make the throwing process more fun, and the groom removes the tape with his teeth, diving under the skirt of his beloved girl with his head. This method is quite problematic - the elastic band of the product can cause pain to the bride, so it is better to do it with the hands of the newly-made spouse.
Signs associated with the bride's garter