Needlework
05/24/2018 Anastasia Prozheva
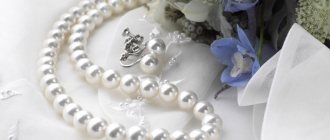
The bride's wedding look is completed with jewelry. And they should be in harmony with the dress and all accessories. It can be difficult to find suitable ones on sale, especially if the dress is something special or made by yourself. In this case, you can make a wedding beaded necklace yourself. Beads are perfect for a wedding dress and will complete any look.
Who is it suitable for?
Any decoration emphasizes a woman’s character, mood and style. Creating wedding necklaces from beads and seed beads is easy. You can easily do them yourself. The decoration looks airy and goes perfectly with the wedding look.
The most common beaded necklace for a wedding is a string of beads with airy crocheted loops that add volume to the decoration. Another option is to use beads and beads in the form of clear diamonds. But a straight dress would be more suitable for this type of decoration.
For photo zone
This is a relatively new trend - the creation of a separate photo zone at a wedding, but has already won love and recognition. To decorate the photo zone, you can simply pull up a large banner with an inscription or photo of the bride and groom. You can order it at any photo salon, and come up with the external design yourself. The slate board also looks unusual, where each guest can leave his wish to the young people.
A more traditional option is a flower wall. It looks very bright and festive. Flowers can be either real or made of paper. A more unusual option is a wall covered with greenery and moss.
Flowers or hearts can hang from the ceiling like a garland. Instead, you can use multi-colored ribbons.
Hanging picture frames look beautiful. Arches and balloon compositions can also be used as decoration for a photo zone. A few photo ideas for creativity:
Related article: Do-it-yourself corrugated paper lilies with candies with video
Master class on creating a wedding photo zone:
The perfect bridal look for an accessory
To ensure that your outfit matches your jewelry, you need to choose it carefully.
- If your dress has open shoulders or a neckline, make an openwork airy necklace.
- If the neckline is V-shaped, the bride's beaded necklace should be the same shape.
- The dress should have the same elements as the necklace to create a unified look.
Thus, everything should complement each other: earrings, bracelets, handbag, shoes. But don't overdo it. The main thing should be the dress, and everything else just complements it.
When choosing shoes for your outfit, you need to think about the fact that you will be on your feet all day. Therefore, shoes should be comfortable, but matching the color of the dress.
Attention! Shoes should not look like a separate element, otherwise you will look ridiculous.
Beaded wedding bouquet
Advantages
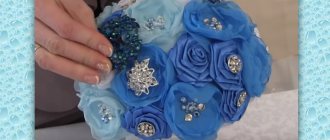
For those who are considering the option of a wedding bouquet made of beads, here are several advantages:
- the bouquet will not wither and will remain a memorable souvenir of your wedding for a long time. And if memories suddenly come flooding back, you can always hold it in your hands and feel the emotions from the past;
- The color of the beads can be matched to the dress. The color palette is so diverse that any idea can be realized using this material;
- flowers can be made of any size and shape. You don’t have to start from real flowers, you can use your imagination and create something magical;
- Beaded flowers practically do not differ in weight from real flowers. But unlike real ones, beaded flowers cannot be torn or crushed;
- This bouquet is not at all afraid of weather conditions. It tolerates heat, cold and rain well. You can also apply a drop of your favorite scent to complete the look of a romantic bride;
- With the help of beads you can fit the bouquet into the image of the bride. The materials used both in the dress and in the bouquet look interesting;
- With such a bouquet, all eyes will be focused on the bride. Originality is highly valued in the modern world;
- Rainbow tints in the sun look spectacular. With the right angle, you can get fabulous photos.
Lack of wicker accessories
Despite all the originality and practicality of such a bouquet, it has its drawbacks:
- You will have to fork out some money for such a bouquet; handmade work is not cheap;
- When weaving a bouquet yourself, you need to spend a lot of time;
- It will not be easy for beginners to create a whole wedding bouquet;
- The bridesmaids will have to give up the fun tradition of throwing a bouquet or purchase a separate bouquet for this purpose.
How to make it yourself
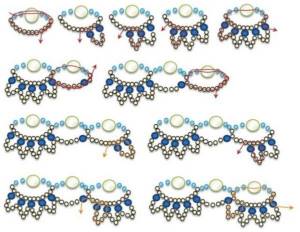
Let's take a closer look at how to make a “Bride” necklace from seed beads. You will need: fishing line, beads and seed beads.
- We put 4 beads on the fishing line and connect them into a ring.
- Next we thread 4 more beads and close the ring again. In this way we assemble a chain of the required length.
- Now we make the edging along the edge of the row on both sides.
- We thread the fishing line into the bottom bead and put on 6 bugles, push the fishing line into the same bead, connecting the semicircle. And so the whole series.
- We make a row on the other side in the same way.
- If desired, you can connect the beads of 2 rows with transparent beads, or you can leave it like that.
- We make the clasp and everything is ready.
Interesting! You can make other wedding decorations yourself from beads. Here at this link we looked at many original options. For example, a bouquet.
Making “Wedding Flowers” – master class
You will need: pearl, snow-white, transparent, silver bugles, thin fishing line. The weaving pattern below is a wedding beaded necklace “Wedding Flowers”:
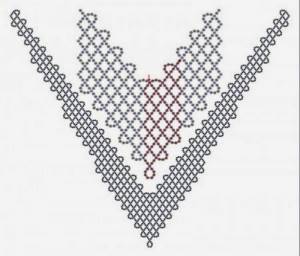
We weave a mesh:
- We collect 21 bugles, return to the 19th bead, tighten and thread 5 more pieces.
- We skip five and go to the 6th, and so on the whole row. You now have three cells.
- At the end of the row we thread 6 pieces and go to the 3rd of the previous row, etc. In this way, we weave a mesh of the length you need. We choose the color at your discretion.
Next we proceed to weaving the top flower.
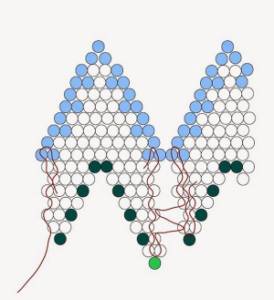
- We take 2 types of bugles: snow-white and silver.
- We collect 6 snow-white, 3 silver and 1 snow-white beads. We thread the needle from bottom to top into the 5th. We tighten it.
- Then we take 1 snow-white bead and insert the fishing line into the 3rd bead from the beginning.
- Then we thread 1 snow-white one and enter through the 1st one.
- Then we collect 1 silver and 1 snow-white, passing through the 12th (which we collected before). To keep the product neat, do not forget to tighten it all the time.
- We take 1 snow-white one and go into the bulging one.
- Then we thread 1 more bead and thread it into the final one in this row.
- Next - 2 snow-white, 3 silver, 1 snow-white.
- We pass the fishing line into the initial bead in this row.
- We get a picture in the form of a mosaic.
- When there are 2 beads left until the end of the row, we collect 1 silver, 1 snow-white and insert them into the 4th from the bottom. We tighten it.
- We skip 2 more times, each time adding 1 bead.
- Finishing the last row of the 1st petal, we thread 2 snow-white, 1 silver and 1 snow-white beads and insert them into the first of the collected ones. Then we dial one and go to the 4th in this new row. We're done.
- We collect 4 snow-white, 3 silver and 1 snow-white, enter into the first one.
- We pass 1 and go to the 4th in this row.
- Next, we pass the fishing line with one bead into the 6th one from the top.
- When there are 2 beads left, pick up 1 silver and 1 snow-white bead and go to the 4th one from the bottom.
- The next petal begins, and so on.
- When finished, lay out the resulting petals and collect 6 center silver beads. Tighten and pass 2 more times in the center. So the first part is ready.
The second part is made like the first, but in each row 2 bugles are added.
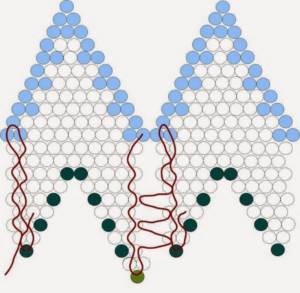
We collect our flower. We connect the upper element with the lower one and make the middle, securing one large bead.
How many of these flowers you want to make is up to you. For some, three are enough: one in the center, the other two symmetrical to each other. Sew on the clasp. The necklace is ready!
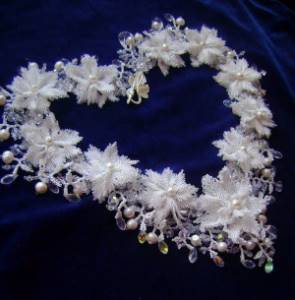
Making the “Wave” option - master class
You will need: beads, 7 mm cut beads, Czech beads and thin fishing line.
Wedding necklace made of beads - diagrams:
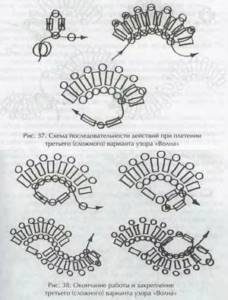
The necklace consists of small elements.
For one element we take a bead, 11 cut beads and seed beads.
- We cut the fishing line 40 cm, collect 1 bead, 1 “cut” bead, then 5 more beads and pass the fishing line into the second bead from top to bottom, tighten. It turns out to be a loop.
- Next, we collect 1 bead and 1 “cut” bead, pass the line through the lower bead of the previous element and the “cut” bead, and tighten.
- The cut beads should be parallel to each other.
- We collect 5 beads and make a loop.
- Along the bottom, between the beads of the cutting, one bead is obtained. Thus we continue up to 10-11 pieces.
- Next, we pass the fishing line through all the lower beads, tighten and secure.
- Then we collect one large bead, securing it, we pass the fishing line again through all the same beads. In order for the element to hold well, it is necessary to fasten the bead several times. There should be 19 such elements.
- In order to assemble all the elements into a single whole, we cut off 1 meter of fishing line, pass it through one of the elements, then into the outermost bead and secure the fishing line. We also thread the clasp here.
- Next, we pass the fishing line along all the upper beads. When we have passed the fishing line through the large bead, we begin to pass it through the second element, starting with the outermost bead.
- Next, we draw the fishing line through the entire row, but this time through the second element.
- Then we thread it through the outermost bead of the first element and pass it into the bead of the second element. In this way we collect the entire row. The product is made slowly, but looks very original.
Holiday necklace
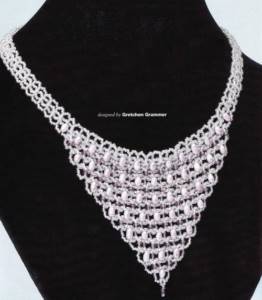
Materials:
- white beads No. 10-11;
- clear crystals;
- long pearls;
- clasp;
- fishing line
Weave a chain of suitable length, as in diagram 1-2:
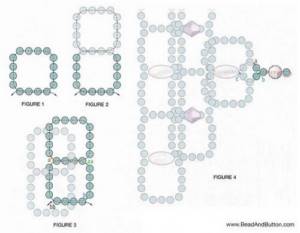
Weave exactly the same one to the first chain without displacing the fragments, weaving 13 pearls one at a time in the right places (Diagram 4).
Weave a new row with 12 offset crystals to the 12 central fragments (schemes 3-4). Reduce each next row by 1 fragment on each side. Alternate crystals and pearls through the row; when decreasing the row, reduce their number by 1. As a result, the decorative part should be: 13 pearls, 12 crystals, 11 pearls, 10 crystals, 9 pearls, 8 crystals, 7 pearls, 6 crystals, 5 pearls , 4 crystals, 3 pearls, 2 crystals, 1 pearl, 1 crystal.
Related article: Crochet flower: video for beginners with description of patterns
Tips for brides
Properly selected jewelry will highlight your refined taste. The main thing is that it matches your image. If the necklace is voluminous, then the dress should be more modest, and the decoration should follow the neckline of the dress.
Accessories in light or silver shades will go well with a white dress. Gold jewelry will go well with cream-colored clothing. If the dress is of different shades, it is better to choose jewelry with precious stones.
If you want to impress, make a wedding beaded necklace, a master class for which we offered. It guarantees impressive results.
Brooches
Beginners should try creating jewelry from felt and beads. To do this, a base is cut out of thick felt and then trimmed with sequins, stones, rhinestones, and beads. If you show a little imagination, then, even without experience, you can create a masterpiece.
And for those who want to weave rather than embroider, we offer a pattern for weaving beaded children's brooches depicting insects.
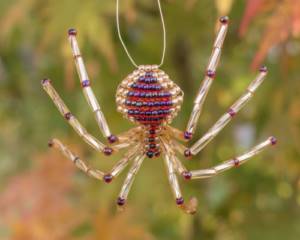
Spider woven from bugles and beads
These brooches will decorate a little girl's dress or jacket.
