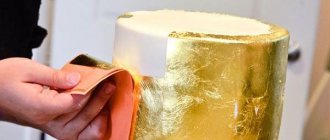
Material for sculpting sweet decorations
This is interesting: TOP 5 best cakes for children's birthday + step-by-step PHOTOS
The most important step in making decorative elements for a mastic cake is choosing the type of paste. Today you can find several dozen recipes for its preparation, but not every professional reveals his secrets and adds individually selected ingredients to the mastic.
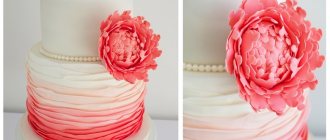
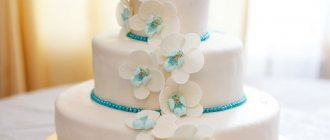
Flowers made from mastic
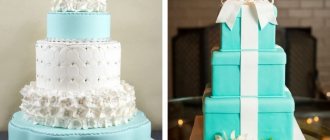
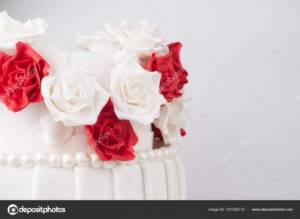
Mastic roses on a wedding cake
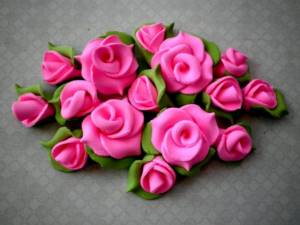
Roses made from mastic
Flowers made from mastic

Orchids from mastic
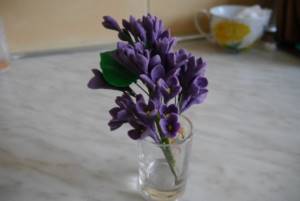
Lilac flowers made from mastic
In any case, beginners in this business have two options for behavior at the presented stage:
1Re-read a huge variety of recipes and choose according to the description the one that is more suitable for your purposes;
2Purchase ready-made material from the store.
Regarding the goals, it is worth clarifying. Different types of fondant are designed for different ways of decorating cakes: one is good for sculpting flowers and other complex elements, while another is designed for covering the product and giving it a perfectly smooth surface.
In most cases, both purposes are used - both leveling the cake and decorating it with various decor. Therefore, you need to pay attention specifically to industrial mastic, which is ideal in both cases.
Most stores offer white industrial confectionery paste. To form colored elements, confectioners independently add the desired color of dye to it.
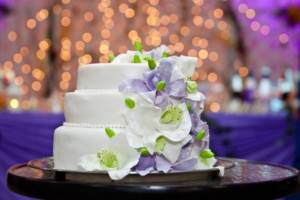
Wedding cake with fresh flowers and greenery
A wedding cake with fresh flowers and greenery is one of the most popular desserts for your big day, and for good reason!
These decorations add color to a simple cake at a relatively low cost. This allows the bride and groom to skip more expensive decorative techniques.

The advantage, of course, is artificial flowers, as they are cheaper than real flowers, and you also have an endless variety of design options.
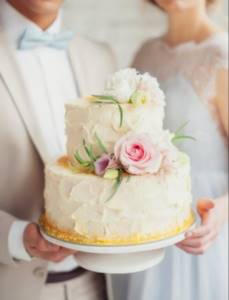
When it comes to choosing decor for your ceremony and reception, it's no secret that brides pay a lot of attention to fresh flowers. Adding them to your wedding cake as well is a great way to tie the elements of your wedding together with the overall theme.

Incorporate fresh flowers into your cake, arrange the flowers in an elegant cascade down the confection, or add height to the design by incorporating floral tiers—the options are endless! You can see a photo of a wedding cake with flowers below.
Paste flowers for beginners
The presented method does not require skill honed over years and special kitchen utensils. Everything that is found in the everyday life of every housewife is used.
So, we will sculpt voluminous daisies.
To do this, we need blue and yellow paste, a tube 15-20 centimeters long and 2-3 in diameter (maybe, for example, the handle of a rolling pin or some small case), a roller for rolling (a smooth glass or a flat bottle is often used), sharp knife, ruler, deep plate, plastic bottle cap), gauze.
Stage 1
1Roll out both pastas to a thickness of 3 millimeters, maybe a little thinner. Cover the yellow mastic with gauze and press it on top over the entire surface with a roller. We remove the gauze and get a relief surface.
2Next, take a cork from a plastic bottle and cut out twice as many circles from the resulting relief layer as there are planned flowers. Place the resulting elements on a separate surface, for example, a baking sheet.
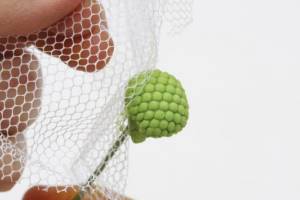
Using gauze we get relief centers
Stage 2
3Roll out the blue paste to a similar thickness. We apply a ruler, cut the layer into even strips 0.5 centimeters wide and apply the middle of each strip to the tube, wrap it with the ends and glue it on the back side so that it looks like a balloon on a string.
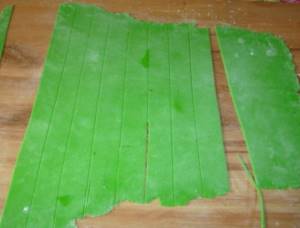
Cut into thin strips
4 We fill the entire tube with such elements, let it dry a little and remove it, moving the mastic to the side. These will be the petals of our daisies and you will need a lot of them.
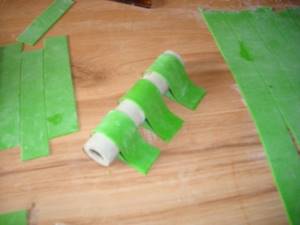
The ends of the strips must be glued well
Stage 3
5Now you need to connect the manufactured elements. To do this, place a cap from a plastic bottle in the middle of the recessed plate. Place a yellow mastic circle on top of it, with the relief surface facing down. Lightly moisten the top side with water.
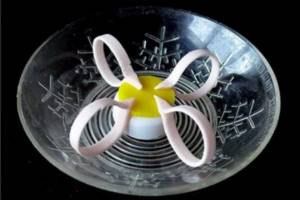
Carefully attach the petals to the center
6If the petals have long tips, they must be cut to a length that is sufficient for the end of the petal to reach the center of the yellow circle.
The ends of the petals should not be long
7When pruning, make a sharp, triangular-shaped tip.
To obtain a three-dimensional flower, place the petals on the yellow center with the ribs up. So that the top view resembles a circle with rays.
8 It is recommended to attach the first four petals to the center on four sides. This method will allow you to produce an even flower. In this case, we glue the next 4 and 8 elements in the center of the already glued ones.
9 In order to make the flower double-sided, at the end we attach another center on the reverse side.
Ready-made daisies from mastic on a cake
10The finished flower must be dried for several hours and you can start decorating.
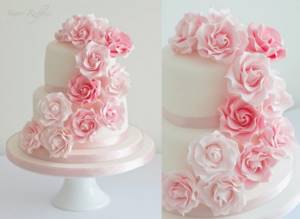
Pastry rose
Another very popular element of cake decor is the rose. To make it you will have to work a little more than when sculpting a chamomile, but the result exceeds all expectations.
What you will need:
- Red or pink pastry paste;
- Silicone kitchen mat;
- Roller for rolling;
- Round shape for working with mastic;
- Sticks for modeling mastic products;
- Kitchen sponge;
- Purified water;
- Paint brush;
- Wooden toothpicks;
- Sugar (powdered).
Stage 1
1First of all, you need to prepare the surface by covering the table with a silicone mat (the mat must be absolutely dry).
2 Sprinkle the mat a little with powder, roll the mastic into a ball and begin to turn it into a layer using a silicone roller. We continue to roll out until we obtain a layer about 3 millimeters thick.
Too thin a layer will not allow you to make a beautiful decoration
Stage 2
3Next, take a round mold for working with confectionery paste and cut out many circles from the layer.
4 Separate the circles and place them on a separate baking sheet.
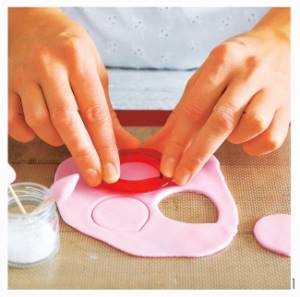
Cutting out the petals
5Pinch off a small piece of mastic and roll it into a ball, then form a cone with a convex circle from the ball. This will be the middle of our rose.
Stage 3
6Place a sponge in front of you, with one circle on top of it. We pick up a modeling stick with a spherical tip. Conventionally, we divide the circle into three horizontal parts, two of which we roll out with a stick to create a slightly wavy surface - these are our petals.
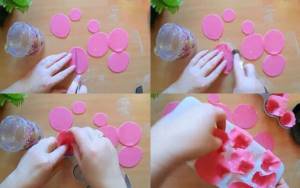
Roll out the sheet using a stick with a round tip.
7 Repeat the procedure with all the remaining petals.
Stage 4
8Prick our cone (the middle of the flower) onto a toothpick, attach the toothpick to the sponge. Take water and a brush and lightly wet the surface of the cone.
9Attach the petals one at a time, wrapping each one around the center, pinned on a toothpick.
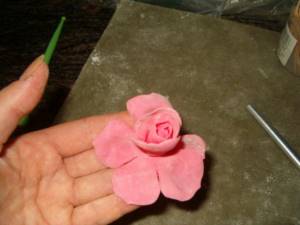
Attach the petals by moistening them with water
10 Repeat until the rose has the required splendor and size.
Stage 5
11At the end of the work, the flower must be sprinkled with powder and left for several hours in a dry place to harden.
Traditional cakes with flowers made from buttercream or buttercream
Working with butter cream is not particularly difficult: this cream is easy to prepare, soft and flexible, and at the same time retains its shape perfectly. True, it has a short shelf life - a cake with butter cream cannot even be stored in the refrigerator for more than three days .
You can prepare buttercream in various ways: with powdered sugar or condensed milk, with sugar syrup. We invite you to watch the video of the basic buttercream recipe and familiarize yourself with the main rules for its preparation:
Instead of buttercream, you can use buttercream to decorate the cake. Take cream of maximum fat content (at least 30%, the higher the better), cool well before whipping. For simple flowers, you can quickly use ready-made vegetable cream in cans - they are usually white or chocolate in color.
It’s not at all difficult to make cream with different flavors , you just need to add the appropriate ingredients to the main recipe:
- for vanilla taste, add 2 g vanilla sugar or 1 tbsp. l. vanilla liqueur;
- for coffee – 1 tbsp. l. coffee liqueur;
- Get strawberry or apricot cream by adding 1 tbsp to the basic recipe. l. appropriate syrup;
- for cherry flavor - 1 tbsp. l. cherry juice;
- You will get chocolate cream if you add 1 tbsp. l. cocoa powder;
- for a rum taste, pour 1 tbsp into the cream. l. Roma;
- for a nutty taste, add 3 tbsp. finely ground nuts.

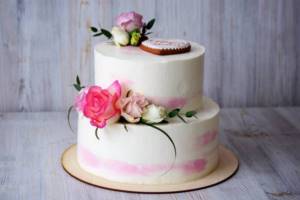
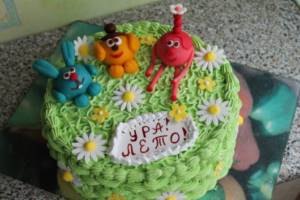
Cake with cream flowers
For cream flowers, not only the taste is important, but, of course, also the color - it is important that the cake looks delicate or, conversely, bright. You can always use ready-made food dyes, but if you don’t have them on hand or want to make do with natural products, remember the following tricks and you can create flower arrangements in any shade:
- the yellow color is obtained by adding saffron diluted in water or ground lemon zest;
- for green, squeeze the juice from the spinach;
- the orange color comes from the juice of orange or tangerine peel;
- for red or pink, use raspberry, strawberry, cherry syrups or juices;
- The chocolate color of the cream can be easily achieved using melted chocolate or cocoa powder.
Other colors can be obtained by mixing creams of corresponding colors
To decorate a cake with voluminous flowers, you will need pastry tools: culinary bags with various attachments (the shape of the future bud will depend on the shape of the attachment) or cornets. Simple elements for the cake can be made using a folded triangular pastry sheet. video for various ways to decorate a cake with realistic flowers using pastry nozzles :
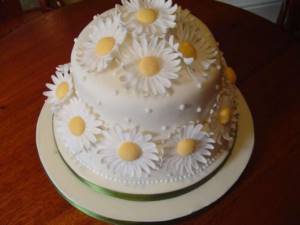
White daisies
White daisies are considered a very delicate decoration for a cake, especially one intended for a girl. So, if you are preparing a delicacy for a young lady’s holiday, a decoration made from these innocent flowers will come in handy more than ever.
We decorate delicate cakes with daisies
What do you need to have?
- White confectionery paste;
- Yellow paste paste (or yellow food coloring);
- Chamomile shape for working with mastic;
- A round mold for working with confectionery paste or a cap from a plastic bottle;
- Purified water;
- Wooden toothpick;
- A small piece of gauze;
- Paint brush;
- Silicone rolling pin and silicone mat;
- Powdered sugar.
Preparation:
1 Roll out white mastic on a flat surface covered with a silicone mat.
Roll out the paste to 3 millimeters
2Take a “daisy” shape and press firmly onto the resulting white layer;

Chamomile shapes
3 Separate the resulting flower from the rest of the mass and place it on a baking sheet;
4 We take a toothpick, use it to align the petals of the flower and draw a relief on them so that the flower looks as much like a real one as possible;
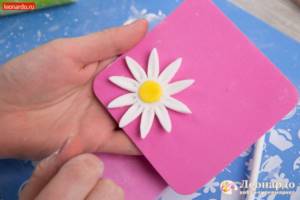
The relief on the flower makes it more realistic
5 Take the chamomile shape again and squeeze the flower out of the layer;
6Align the petals, draw a relief, moisten the middle with water and place the previously obtained flower on top (it is necessary to apply it so that the chamomile appears lush and there are no gaps between the petals);
7 Roll out yellow mastic on a silicone surface or mix white with yellow dye and also turn it into a thin layer;
8 Take the gauze, place it on top of the yellow layer and press down firmly with a silicone roller or rolling pin;
9 Separate the gauze from the yellow mastic;
10Take a round mold or cork from a plastic bottle and cut out circles from yellow paste that will be the center of our flower;

The cores must be glued with the relief facing up
11 Wet the center of the resulting chamomile with water using a paint brush and attach the resulting yellow circle, with the relief surface facing up;
12Prick the chamomile onto a toothpick and leave to dry for at least two hours.
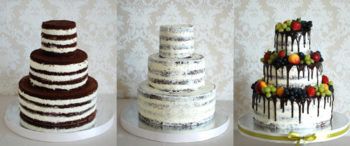
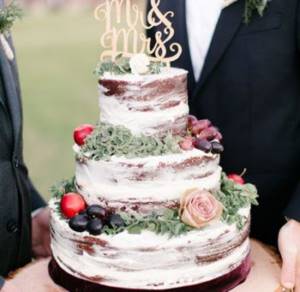
Why should you choose open cakes for your wedding?
A Naked Cake style cake is an opportunity to highlight the individuality of a wedding celebration. The main advantage of such a treat is that it can be decorated in completely different ways. It all depends on the theme of the wedding, your desires and imagination! In addition, you can not only choose a custom wedding cake, but also bake a naked dessert with your own hands!
It is better to choose an open wedding cake for a celebration designed in the appropriate style. This element will only further emphasize the theme of the holiday and maintain the necessary atmosphere.
Choose an open dessert if you plan to:
- Eco wedding;
- Holiday in rustic style;
- Boho celebration;
- Summer wedding outdoors.
Due to the absence of mastic and a large amount of cream on the cakes, the cake looks as natural and unusual as possible. Such a treat can be safely given to children without worrying about the child’s body’s reaction to food dyes and chemical additives.
Advantages of open cakes:
- The naked dessert will arouse genuine interest among guests, because such cakes are just beginning to appear at weddings in our country;
- You can bake such a treat yourself, saving on the services of a pastry chef;
- Mastic is a fairly high-calorie component of cakes. By refusing it, you will take care of the figure of each invitee;
- An open cake is an ideal option for a wedding in the hot season, because... the treat will not “flow” under the sun’s rays, which means it does not require additional storage conditions, unlike desserts with mastic;
- A wedding cake with open layers can be decorated in a variety of ways. Thanks to this, the treat will be made exclusively in the style of your wedding, and will correspond exactly to your desires;
- The absence of an additional layer of mastic or cream will allow you to save on dessert, because the weight of the cake with open layers will be much less.
We are sure that you will find more than one plus in the direction of Naked Cake! The main thing is, don’t be afraid to give up traditional cakes and choose what your couple really wants!
Useful tips
For those who are just starting to learn the basics of working with confectionery paste, there are some tips and secrets from professionals.
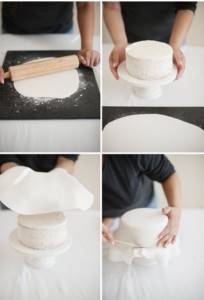
1Before covering the cake with confectionery paste, you should level its surface as much as possible with thick cream. Oil cream is considered the most ideal for this purpose.
2In order to carefully roll out the mastic and transfer it to the surface of the item to be decorated, you can put the paste in the middle of two pieces of polyethylene. First grease both sections with a little vegetable oil. Upon reaching the required thickness, remove one bag and transfer the layer to the product upwards with the second bag. Sprinkle the outer mastic side with powdered sugar and smooth it well with your palms.
3Mastic is not suitable for decorating very soaked cakes, since high humidity leads to deformation of the paste and distortion of decorative elements.
4After decorating the cake, it should be sealed, placing it in a bag or box wrapped in cling film.
5The paste can be stored for up to ten days, while maintaining favorable storage conditions. The mastic is packaged in polyethylene or plastic containers. The main thing to avoid is moisture ingress. Also, do not unnecessarily open the package of paste, since excessive evaporation of moisture will lead to drying.
VIDEO: Roses made from mastic
Roses made from mastic
Roses from mastic. Step-by-step lesson on making roses
How to decorate a naked cake for a wedding: fashionable ideas
The open dessert should definitely be remembered by the guests of the festive feast for its beautiful design in accordance with the general style of the celebration.
For a classic delicate wedding in a romantic style, an open cake with white and pink cherry and apple flowers, slices of fruit in caramel icing is ideal; a wedding in a “retro” style will be wonderfully complemented by a wedding “naked cake” with flowers in the form of multi-colored roses and balls of delicious caramel.
The most popular and fashionable ideas are the use of the following techniques in decoration:
- Berries and fruits.
- Natural flowers.
- Sweet figures.
- Cream decorations.
- Sprigs of lemon balm and mint.
This video shows one of the options for decorating a wedding “naked” cake:
Berries and fruits
An excellent decor for open wedding desserts is made from juicy berries and fruits, which are placed in a bright scattering on the snow-white or creamy surface of sponge cakes.

The overall impression of the delicacy will be greatly enhanced by the bright colors of the fruit compositions beautifully arranged on the delicacy.
Fragrant berries and pieces of fruit will not leave guests indifferent. In addition to wonderful taste, berry and fruit decorations are useful in a large amount of vitamins. On a multi-layer dessert, you can place rows of candied fruits and traditional fresh strawberries, blueberries or raspberries.
To prevent the laid fruit and berry decor from moving, it is covered with a thin layer of transparent jelly.
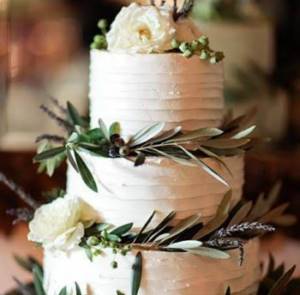
Natural flowers
If you want to decorate an open cake for a wedding in a non-standard way, you can decorate the cakes with fresh flowers.
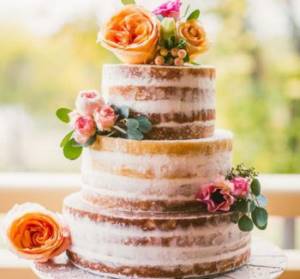
For decoration, the same flowers are selected as in the bride’s bouquet. The floral arrangement on the cake will look harmonious in combination with the colors of the decoration of the hall for the wedding celebration.
An eternal classic - red roses on a white cream filling, placed on each tier of the cake. Delicate blue violets go perfectly with dark chocolate filling.
When choosing a cake decoration made from fresh flowers, it is recommended to pre-treat the selected specimens to prevent early wilting.
Sweet figures
An excellent decoration for a wedding dessert can be made from sweet miniature figures. Often, small copies of figurines of the bride and groom, figurines of a pair of swans, and cooing doves are placed on the upper tier.
Mini-figurines are usually made edible, but recently it has been customary to decorate a wedding cake with porcelain figurines and beautiful toppers, which can then be kept as souvenirs of the wedding celebration.
All this wedding paraphernalia reminds of the general purpose of the festive celebration - the wedding day.
This design of cakes brings elements of chic into the holiday atmosphere and brings smiles of admiration to the guests.
Cream
An open wedding cake can be decorated with various cream compositions in the form of multi-colored floral patterns of roses, daisies, lilacs, etc.
Even a simple scalloped wave of cream filling placed on the edge of the sponge cake will give the cake a unique look.
And if you place scatterings of live red small berries on a white cream surface, you will get a bright accent composition that attracts attention.
This video will help you decorate a cake with your own hands:
When making your own wedding cake, decorating with cream is not at all difficult. To do this, the prepared butter or protein cream must be placed in a special pastry bag and carefully squeeze out a small portion of the cream and draw any figure on the cake.
With sprigs of mint and lemon balm
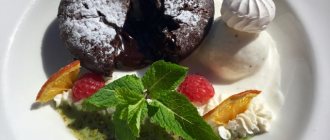
Fragrant green sprigs of mint or lemon balm placed on the cake layers will add freshness and fragrance to a Provence style wedding cake. The bright greenery of the leaves will look contrasting on the sand or chocolate surface of the cakes, symbolizing spiritual harmony, purity and love for nature.
Decorating a wedding cake with green branches will perfectly complement an eco-style wedding ceremony, and if you add a sprig of fragrant lemon balm to the bride’s bouquet, this will be an interesting wedding decor solution.
A wedding “naked cake” in any design is considered a masterpiece of confectionery art. It seems to represent the openness of the soul, the truth of real values - strong love, marital fidelity and a friendly family.