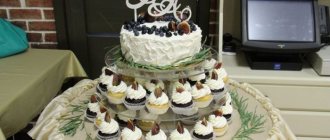
The table decoration is definitely a cake. At the same time, the three-tiered one looks like a real king of the feast, be it celebrating a wedding, birthday, anniversary or any other date.
Even the most famous confectioners in the world consider such pastries to be the pinnacle of culinary art. Needless to say, a three-tier cake is not an easy job. But believe me, even “mere mortals” can do it. The main thing is to be patient, set yourself the goal of doing everything carefully and learn a couple of tricks. That's what we'll talk about.
Other people's mistakes are the best educational material
If you think that to prepare a three-tiered cake it is enough to stack three cake layers of different diameters on top of each other in descending order, then quickly give up this idea! Otherwise, you will simply waste time and transfer products. You shouldn't act at random.
What happens if you don't follow the technology? The most common side effect is deformation of the lower cake, which cannot withstand the pressure of the upper ones. It may simply fall apart or float in one direction. Due to deformation, the top cakes will warp and perhaps even collapse. Effective, isn't it? To avoid such embarrassment in the middle of a banquet, it is worth paying attention to theory.
MK for a multi-tiered cake
So…
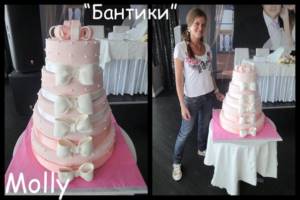
After a forced rest for a month due to weaning from breastfeeding, I received an order for a wedding cake with 5 levels. I’ll be honest, I’ve never made such huge things before and decided to do a fair amount of preparation for such an order.
Having sifted through a bunch of information and sat in vain on Internet forums, I found almost nothing useful, except for a couple of tips.
Thank you very much to OlenkaOlga, who suggested a couple of aspects to me regarding diameters, transportation and strengthening! Everything was very useful, the rest I came up with along the way.
So initially it was necessary to calculate the diameter of each tier. Having roughly estimated the weight of the contents of the cake, I realized that the height of each cake would be about 10-12 cm and the size would be 6 cm smaller than each lower tier, visually it looks proportionally very beautiful, because no matter how much you take the bottom cake, count -6 cm for the next one. And another piece of advice, cut out cardboard or paper in your sizes and try them on one another, this helps to visually imagine whether the tiers will look good in diameter.
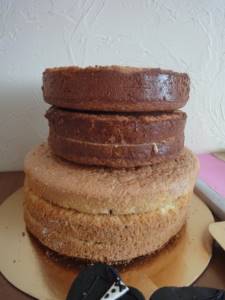
It turned out like this. Bottom
5th tier – honey cake with butter cream – 41 cm (when baking)
4th tier - shock boiling water with cherries and cream 35 cm
3rd tier – vanilla sponge cake with peach yogurt soufflé and peaches 30 cm
2nd tier – vanilla sponge cake with banana cream and bananas 24 cm
1st tier – vanilla sponge cake with raspberry cream 18 cm
The question immediately arose of how to bake such a large honey cake, because... Both my mother and I have a large oven, but the baking tray has curved edges and you can only place 30 cm on it. After thinking, I invented the “bicycle”
In the photo I had already pressed it a little, but when baking the surface was even.
I filled the entire baking sheet with foil so that it was level with the edges, then I covered the entire baking sheet with a final layer of foil and got a large and even surface. Please note that when baking in the oven, the top sets faster than the bottom, because all the layers of foil bake more slowly, so it warms the spirit. Up to 220 degrees, and when I put the cake on, I lowered it to 180. That’s how I baked my cakes.
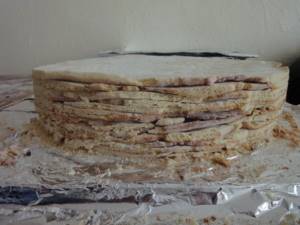
The remaining layers were baked in molds, so there were no problems, just keep in mind that for a height of 12 cm you will have to bake 2 full molds and cut them into 4 cake layers.
I smeared everything and put it on top of each other (the top one didn’t fit in the cold because it was standing separately) overnight. Nothing sank, and the second day I leveled it first with crumbs and butter cream,
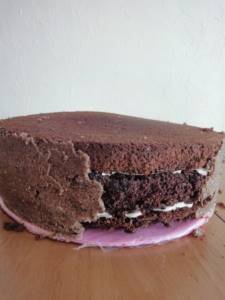
then finish it off with just a thin layer of buttercream. I covered all the tiers, made bows and bought ribbons, and installed it all on site.
The road was difficult, the restaurant was right next to the sea, so we drove along the slopes for a long time and I managed to bite my nails and elbows three times from nerves. I carried the lower tier on a base, 4+3 separately, 2+1 separately.
For the cake stand, I took an ordinary shelf from the closet, covered it with beautiful paper, ideally covered it with self-adhesive tape. Each tier stood on its own base, cut precisely to the diameter of the cake.
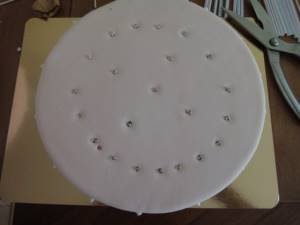
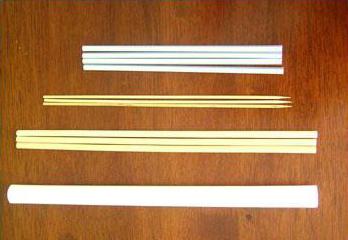
To strengthen the tiers, I inserted supports into the cake in a fairly dense ring. The supports in this case were made of wooden skewers (2 pieces each) in a cocktail tube. Be sure to warn the customer about the straws so that no one gets hurt if they decide to fall face first into the cake!
It is best to insert a skewer first, mark the level of the cake with a pen, and trim the skewers and tubes according to the first measuring skewer. Then insert the supports in a circle and place a couple of supports in a cross in the center.
For transportation.
Be sure to agree with the client on transport, preferably 2 cars that can drive very carefully and slowly to the place of celebration. Turn on the air conditioner in the car, because cakes soften quickly in the heat, and shaking is not good for them.
Be sure to take the icing with you in a cornet or bag so that it does not dry out, it is needed for gluing the tiers together after installation, and a satin ribbon. It will help hide the joints of the tiers if something doesn’t fit very well or gets wrinkled when moving. (in my cake it was by design, but it also hid one crumpled edge of the tier from transportation.) Carry cakes on your knees, you will be a shock absorber for them during shaking, bumps or speed bumps.
And be sure to take a camera!!!
In my case, first we were asked to bring the cake and assemble it on the 2nd floor, and then the administrator said that it would be carried, already assembled, down the spiral staircase to the refrigerator!!! Along with the table on which he stood. I almost fell! I asked to carry it very carefully, to which I was very rude, in the presence of witnesses from the groom, and we left, with the fact that from that moment I was no longer responsible for the appearance of the cake. I still have photos and evidence that I left the cake in excellent condition. People are different, but it’s still unpleasant, because... I really liked the newlywed couple. Now I'm waiting for feedback from them)
That seems to be all, if you ask anything, I hope this MK will be useful to someone, since I once missed it))
How to form a three-tier cake with your own hands
How to avoid the collapse of plans, cakes and hopes? Let's use a trick that will strengthen the structure. And for it we need bamboo skewers and cocktail straws.
Find the center of each cake and mark it. At the second end we measure the radius and set aside the same distance from the center of the lower cake. We make markings and carefully place the second tier on the first. Marking will help avoid distortion. Using the same principle, we place the top layer on our cake.
Working with squares is even easier. And unusually shaped cakes (hearts, for example) are also unlikely to cause difficulties for those who understand the very principle of how to make a three-tier cake.
Now comes the fun part. We make a pierce in the center of the cake using a skewer and pierce all three layers. Let's move the hole a little so that the tube can fit into it. We insert the tube, pour melted chocolate inside (it’s convenient to do this from a syringe), and plunge a skewer into it. In the same way we make several more load-bearing axes around the middle one. They will prevent the cake from falling on its side.
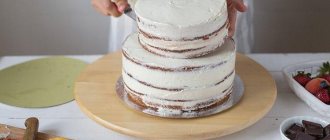
5. Leveling the cakes
The tops of the layers must be completely flat so that they do not tilt or wobble when laid, so leveling the cake is necessary.
A long serrated cake knife works best, especially when cutting the bottom layer. Keep the blade level as you rotate the cake on the turntable. Use a sawing motion rather than trying to push the knife through the cake, which could cause it to tear. You just have to cut off the tops (maybe not all) - all six layers. As you assemble the tiers, turn the biscuits over so that the straight bottoms are facing up (the cut edges are facing down).
Tips for choosing crust dough
It is logical to assume that the lighter the middle and upper tiers are, the fewer problems there will be with stability. Choose a “heavier” dough for the bottom crust. For example, you can use brownies as a base - a very tasty and beautiful recipe. The recipe for honey cakes also works well as a base.
For the second and third tiers, a light sponge cake or puff pastry, like Napoleon, is ideal. Light coconut cakes “Raffaello” will also not weigh down the structure and will add unforgettable notes to the taste.
Wedding cake recipe
Wedding cakes (two-tier) are quite difficult to prepare. And they will require a lot of time and effort from the owner. Not everyone can handle such painstaking work.
To prepare a cake according to our recipe, you need to make a dough from the above ingredients and bake two sponge cakes of different diameters. They must cool, after which we cut each of them into two cakes. Now you can start making caramel.
Pour sugar into a saucepan and heat over medium heat. Gradually the sugar will begin to melt; it must be stirred so that it does not burn. The dishes must be heated until the entire mass is melted. Remove the saucepan from the heat and add milk, stir the caramel and return it to the heat. Heat the mass until it is completely melted. At the end of cooking, add oil, stir and remove the pan from the heat. Caramel is ready. Next, grind the roasted peanuts.
You can mix the nuts with the caramel mixture and coat all layers of the sponge cake with it. While the cakes are soaking, we begin preparing the cream. Mix sugar, vanillin, sour cream and cream, add thickener and beat until peaks form. Cover each sponge cake with the resulting mixture on top of the caramel.
Making soufflé and jelly
The top of the cake can generally be made not from dough, but from soufflé. Any Bird's Milk dessert recipe will work. Beat 10 chilled egg whites, gradually adding sugar (1 tbsp). At the very end, add 0.5 tsp. citric acid. Next, dissolve 10 g of gelatin in 100 ml of water. When the gelatin swells, pour the mixture into the whites in a thin stream, stir with a spoon and place in the mold. The soufflé will harden for at least 12 hours.
A jelly tier would also be an excellent option. To prepare it, add 1/3 less water to instant fruit jelly than the manufacturer recommends.
How decor depends on the time of year
The type of dessert you choose may also depend on the time of year the wedding is being held.
- Summer. “Summer Cakes” are the brightest. They can be green, red, yellow, decorated with sunflowers or ripe berries.
- Autumn. This is a time of muted colors - yellow, brown, dark red. You can decorate the dessert with fallen marzipan leaves or autumn flowers. It will look very original if the same flowers are present in the bride’s bouquet. Autumn cake can also be made chocolate.
- Winter. Such desserts are the “coldest” - they are decorated with white, purple, and blue shades. The cake can be decorated with snowflakes.
- Spring. A time of tenderness, new hopes and the awakening of nature. Use pastel colors - pink, peach, light yellow. And for decoration - of course, flowers.
Cake cream
Before you start, think about what your three-tier cake will look like. Perhaps it is worth tightening the cakes in mastic before the pyramid begins to assemble? Or maybe no mastic is planned at all and you would like to grease the finished cake with cream?
Try to create layers of cream between tiers. And the cakes themselves can be divided lengthwise in advance and soaked well with it.
Avoid creams that are too thin. If you find it difficult to choose, prepare a win-win option: heat 200 grams of butter to room temperature, beat at low speed until fluffy, add 250 g of boiled condensed milk, continuing to beat. Before starting work, keep the cream in the refrigerator for at least 20 minutes.
This cream not only does not flow, but also holds its shape perfectly. And thanks to the viscous consistency of condensed milk, it glues the cakes together, providing additional strength.
Assembling the product
How to make a two-tier cake? Once all the ingredients are ready, you can start assembling the dessert. Place the first light cake on a flat plate, grease it with cream and cover with the second. We coat not only each layer with cream, but also the side parts. Next, apply the mixture to the middle of the top cake and cover with the brown dough. So we gradually collect all the layers and coat them with cream. Our product is almost ready. Using this template you can make a dessert on any theme.
Two-tier cakes made at home are good because you can come up with options for decorating them yourself. We suggest making chocolate sides and adding fruit. To do this, melt the chocolate in a water bath. Next, we will prepare strips of parchment; their width and height depend on the parameters of the cake and your preferences. In our case, the sides will be higher than the cakes themselves, so that there is room for fresh fruit.
We apply chocolate to parchment strips and apply them to the sides of the product, put the cake in this form in the refrigerator for fifteen minutes to allow the chocolate to harden. Only after this can the parchment be carefully removed. Since we made the sides higher than the cakes, we got niches in which we can put fresh fruit. You can also fill them with cream if the fruity option doesn't appeal to you. So the two-tier cake is ready at home.
Excipients, fillers, decor
Are you afraid that your three-tier cake is not strong enough? Use one more trick. Dilute the cool berry jelly by adding no more than a third of the recommended volume of water to the pack. Coat the cakes like glue and connect them together.
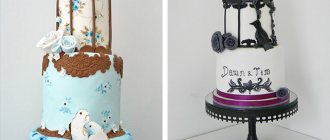
Give free rein to your imagination if you are preparing three-tiered children's cakes. The photos show that they can be decorated in the form of a fairytale castle or decorated with characters from your favorite children's fairy tales.
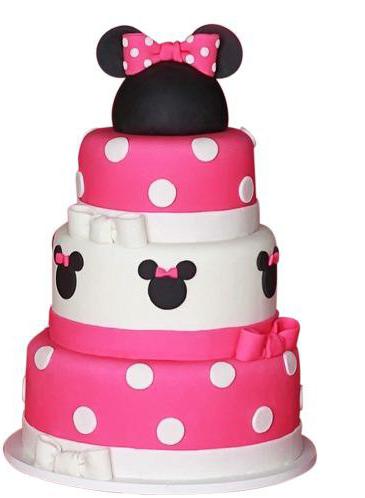
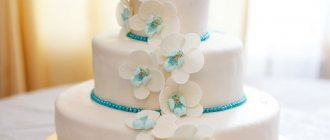
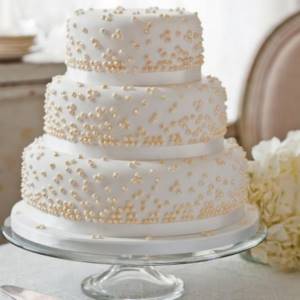
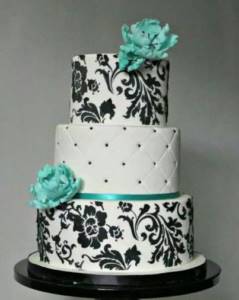
As decoration you can use fresh berries and fruits, marzipan figures, chocolate drops, colored powders, dragees. If you are preparing a three-tier wedding cake, you can go one of two common ways: decorate it with snow-white cream (for example, meringue) and decoration, or use multi-colored cream. The second option is now very popular. Look how elegant the Tiffany style wedding cake looks.
How else to decorate a wedding cake?
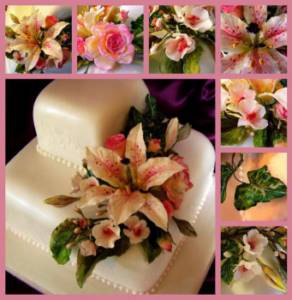
For some people, decorating a three-tier dessert is a real problem. After all, such a product has a large area that needs to be decorated with something. Chocolate is very popular. With its help you can create entire masterpieces. Even flowers cast from such material have an attractive appearance.
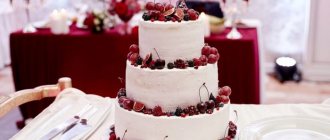
Many confectioners use fruits and berries for decoration. This decoration will be relevant if the wedding takes place in the warm season. Confectioners also create unusual compositions from ordinary protein cream. It can be pure white or any other color.
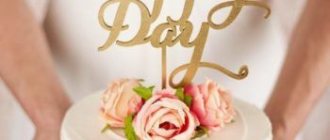
If desired, you can put some kind of inscription . For example, happy wedding day or happy sailing. A cake for such a celebration is, as a rule, a whole work of art that requires a lot of time and effort. Therefore, this work is most often entrusted to the pastry chef.
Alternative methods: unusual dishes
If you really want to make a stunning dessert, but you are afraid that the task will be overwhelming, use a simpler method. Who said that a three-tier cake must be monolithic? Place the cakes on tiers of a special serving dish, as shown in the photo.

This dessert will look no less impressive, especially if you decorate the baked goods in the same style.
Design elements
Your guests will not immediately be able to appreciate the taste of the dessert, but they will immediately see its appearance. Like all other elements of a wedding, dessert should be very beautiful, and what exactly you mean by this concept is up to you. But remember that the cake should reflect the theme of your wedding.
If you are having a wedding in the style of Boho or Hipsters, then it would be strange to order a white cake, because such a wedding involves a riot of colors. It’s also strange to order a bright dessert for a wedding in a shabby chic or rustic style.
Here are the main elements used for decoration:
- figurines of young people (optionally, rings, doves, etc.), as well as any other figurines;
- inscriptions in cream;
- flowers (from cream or mastic);
- print (photo of young people);
- “fabric upholstery” of the cake (for this, the surface is treated with mastic and cheese);
- beads and berries from mastic.
Expert opinion
Alexander Seleznyoff, board member of the Moscow Culinary Association, chief director of the Seleznyoff confectionery house
To ensure that the wedding cake holds its shape well, use soufflé as a layer between sponge cakes: beat 4 egg whites with a glass of sugar. Then add the swollen gelatin diluted in water (1.5 tablespoons), stir and while still warm, pour the mixture onto the sponge cake in a thin layer. Then let it harden in the refrigerator for 1 hour and continue assembling the cake.
Mastic decor
As a rule, to decorate a children's cake you will need a lot of colored details, so using one color of fondant is simply not enough. You will have to mix a lot of different shades. If you want to decorate the entire cake with mastic, then you should roll it out into a thin layer and cut out the details to decorate each tier. Each of them is attached to the product for a while with toothpicks (after a couple of minutes such fasteners are removed). The joints are usually decorated with ribbons made from the same mastic. The upper tier can be decorated with all kinds of figures made of plastic material, beads, and inscriptions. You can use confectionery powder for decoration.