Many of you have probably seen gingerbread cookies in the form of gingerbread men, Christmas trees or snowflakes more than once before the New Year in store windows and confectionery shops. Or maybe you’ve even noticed gingerbread toppers on the cake in the form of numbers indicating the age of the hero of the occasion, multi-colored balls, characters from your favorite children’s cartoons or cute animals.
It seems that such beauty is very difficult, if not impossible, to make with your own hands, but this is not at all the case. I will tell you how to make delicate gingerbread dough, from which you can make absolutely any figures and designs - it all depends solely on your imagination.
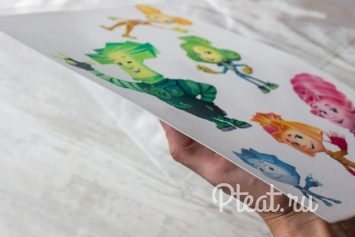
Toppers photo
Toppers are the essence
A topper is a decorative element that has a flat or three-dimensional shape, made from any material - edible and inedible. You can make a topper from gingerbread, chocolate, sugar paper, marshmallows, mastic, wood, plain paper and other other materials that everyone has in the house. The main task of the topper is to decorate the cake and clearly emphasize the theme of the holiday in honor of which it was originally prepared.
You don't need any expensive products or special parts to make the topper. In addition, no special culinary skills are needed. Everything is as simple as possible if you follow the instructions and use the templates that you can also find in our article.
Classic and original toppers: what to choose

Toppers came to home cooking from American confectionery shops. It was there that they came up with the idea of decorating cupcakes, muffins, pastries and tarts with a variety of figures, voluminous inscriptions, and monograms. This decor visually enlarges the confectionery products and makes them more visible on the display. At the same time, a flashy topper helps you save money, because a small decoration stuck into a cake or cupcake will cost much less than an additional portion of marzipan, cream or chocolate ganache.
The idea was picked up by housewives who make their own confectionery. Catchy decor distracts attention from small mistakes, makes modest home-baked goods festive, and gives them originality and individuality. Toppers are sold in confectionery departments, but you can easily make them yourself.
All decorations are divided into 2 large groups: edible and inedible. The second is much larger, it includes a variety of flags, monograms cut out of cardboard, thin plywood or plastic, stars made of foil, figures made of plastic or ceramics. Edible toppers are made from sugar mastic, gingerbread dough, caramel, chocolate, wafer or rice paper. It is more difficult to make such jewelry, but the product turns out to be very beautiful and unusual and looks impressive in photographs and videos. Edible decorations are very popular in children's products.
Types of toppers, list
Toppers come in several varieties, but the main criterion for distinguishing them is the theme of the holiday for which they are used to decorate the sweet.
Here is a list of the main examples of toppers:
- Bride and groom - a topper that is suitable for decorating a wedding cake or dessert for Valentine's Day.
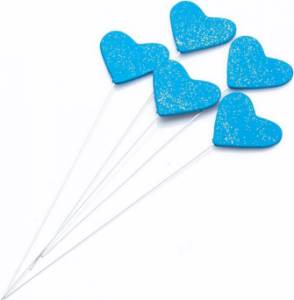
- Hearts are a great option for a cake topper that lovers want to give to each other.
- A topper that highlights the talent of the person for whom the cake is being prepared. You can use a figurine of an athlete, dancer, musician, scientist, etc. as a topper.
- A topper composition in which several figures are used at once to thus convey a scene from life or a cartoon on the cake.
- Character toppers. These can be cartoon or fairy tale characters that are most liked by the hero of the occasion, the birthday boy.
- Toppers - animals and birds. You can make figures of any inhabitant of our planet from the same mastic or chocolate.
- Word toppers or inscription toppers. For example, you can choose the word “Love”, “Happy Birthday”. By the way, all these phrases and words can be done in any language.
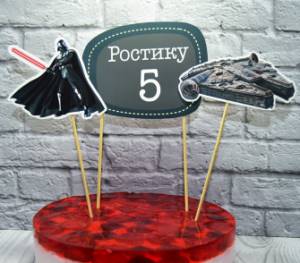
- Number toppers. This topper is very relevant for children, especially since it can also be decorated with a beautiful inscription.
- Garland toppers. A popular trend among modern confectioners who make various flags from mastic or balls, and then they are beautifully displayed in a composition, and the result is an original topper for the cake.
A topper is not always appropriate for dessert. If your cake is supposed to use a lot of berries, small sweets and other decorative elements, then the topper will only make the dessert heavier and spoil its attractive appearance. When choosing a topper, take into account an important feature - the decoration should not be larger in size than the dessert itself.
Simple crafts for beginners: step-by-step production
The easiest and most affordable option is decorations made of paper or cardboard. For the craft to be a success, you need to act step by step, without rushing. First, the overall design of the cake or cupcake is thought out, taking into account the style, color scheme, and products used for the cake layers and cream.
Paper flags hung between skewers stuck into the cake look impressive. They are easy to make: cut out rhombuses from thin colored paper according to a template, fold them in half, hang them on a strong thread and glue the edges together. The thread must be tied between 2 wooden skewers so that it sag slightly. All that remains is to secure the skewers on the top of the cake. Instead of flags, you can stretch a ribbon, a strip of gathered lace, or a garland of corrugated paper lanterns.
You can easily decorate cakes or cupcakes with mini snowflake toppers. This decor is suitable for a New Year's table or a themed winter wedding. Cut out snowflakes from foil, make another blank from cardboard. For one skewer you will need 2 pieces of foil. They are glued to both sides of the cardboard blank, placing a wooden skewer inside. Once dry, snowflakes on sticks can be inserted into the tops of the cupcakes.
Another simple option is miniature pompoms, which can be made from fluffy viscose threads in the desired shade. They are wound onto a cardboard circle with a hole in the center using a thick needle. Then the workpiece is cut along the contour, and a pom-pom is tied with thread in the middle. To make the product fluffy, you need to wind several layers of thread. All that remains is to attach the pompom to the skewer and decorate the cake with it.
Cupcake toppers templates
Templates for toppers download:
on February 23
on March 8
Happy birthday
topper girl
topper princess
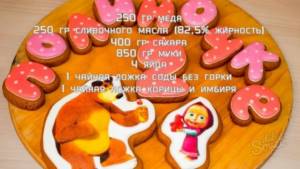
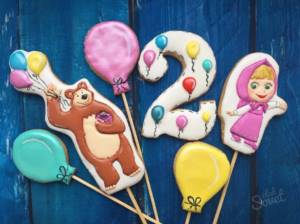
topper Masha and the bear
topper for a one year old boy
topper for a one year old girl
DIY edible cake topper, recipe with photo
If you have never had experience decorating cakes with toppers, then try making a sweet meringue topper first. By the way, if you make it correctly, it will look no worse than a topper made of wood or chocolate.
We present you with step-by-step instructions for making a sweet topper that you can eat along with a piece of cake:
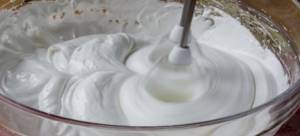
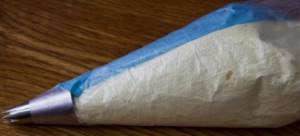
- To begin, beat 150 g of egg whites with 300 g of sugar. You should get a very dense foam.
- You need to divide the resulting cream into 3 parts. Paint 2 of them with different dyes, and leave 1 part white:
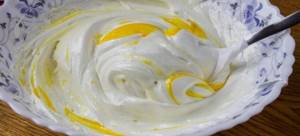
- We will not use white cream for the topper; it can be used at the very last stage of cake design. But place the colored creams in pastry bags, and then combine them using a special nozzle into one bag so that both creams are squeezed out at the same time:
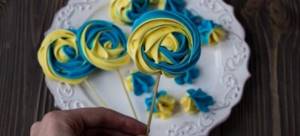
- Plant the required number of roses for decoration, insert a wooden skewer into each (adjust the length of each skewer yourself, based on your decoration idea):
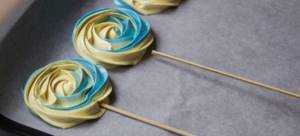
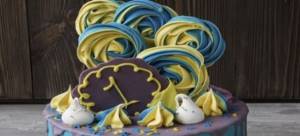
- Place the meringue in the oven for an hour and a half. The optimal temperature for baking is 80°. Insert the finished meringues on skewers into your cake as a decoration:
4Edible topper
If you need to make an edible topper, then you will first have to prepare gingerbread - the basis for such decoration. Such a confectionery product should be light and moderately soft in order to be held on a wooden skewer.
Cooking gingerbread can be divided into 2 stages:
- bakery;
- painting.
Recipe suitable for baking gingerbread toppers:
To implement the idea, you will also need baking dishes.
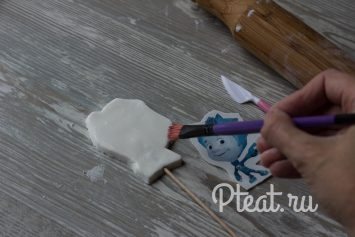
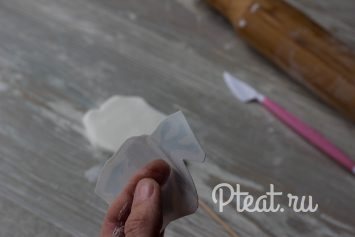
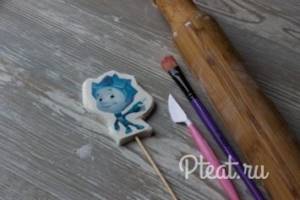
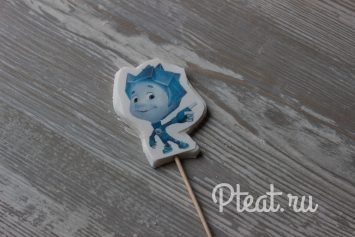
When the gingerbread cookies are ready, you should paint them with icing or use special edible pictures. Stick a wooden skewer into the finished dessert and the topper is ready.
Gingerbread toppers, recipe with photos
You can make any gingerbread from ginger dough, and then paint it with icing, and you will get an amazingly beautiful topper that can be used to decorate a cake for a birthday, March 8, and Defender of the Fatherland Day.
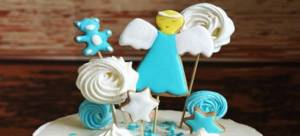
We invite you to learn from the example of a simple angel (by the way, it can be used when decorating a cake for a children’s party):
- First you need to mix the gingerbread dough. To do this, mix 160 g of honey and 100 g of sugar, 1 tsp each, in one container. ginger, cinnamon and soda. All this must be put on fire and boiled for 3 minutes.
- After this, you need to remove the dough piece, add 1 egg, 100 g of butter, 450 g of sifted flour. Knead the dough and then cool it. Let the dough cool for 2 hours.
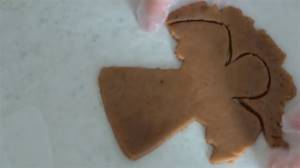
- Roll out the dough and attach the angel template to it and cut out the figure:
- Place the prepared figurine in the oven. It will bake for you for 10 minutes at the highest temperature.
- As soon as the cookies are ready, decorate them with sugar icing, which is prepared on the basis of 1 egg white, 100 g of powdered sugar and citric acid. Also, don't forget to add the color of dye you need for decoration.
- Color the gingerbread and insert a skewer into it. Leave your topper for a while so that the glaze hardens, and then use it for its intended purpose:
Gingerbread Cake Toppers
This type of design is especially popular, as such decorations are not only beautiful, but also tasty. The base is gingerbread dough.
Ingredients
- Honey – 165 gr.
- Sugar – 100 gr.
- Butter – 125 gr.
- Egg – 1 pc.
- Soda – 2 tsp.
- Ground ginger – 1.5 tsp.
- Cinnamon – 1 tsp.
- Flour – 400-500 gr.
Cooking method
- Mix honey, sugar and spices in a saucepan. Place on the stove and, stirring, bring to a boil. Cook for about a minute (until the sugar crystals are completely dissolved).
- Remove from heat and add baking soda. Stir well.
- Add soft butter. Stir until smooth. Let the mixture cool to 60 degrees.
- Add the egg and beat with a mixer.
- We begin to introduce sifted flour in small portions. There is no need to flour the dough. As soon as it becomes plastic (at the same time quite sticky), stop kneading. You may need a little less flour than indicated in the recipe.
- Wrap the dough in cling film and place it in the refrigerator for a couple of hours.
Gingerbread dough keeps well in the freezer for several weeks. Roll out the layer to a thickness of about 4 mm.
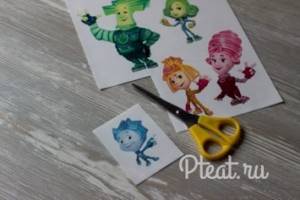
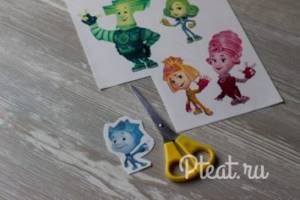
If you want to make gingerbread cookies, for example, in the “Little Balls” theme, you need to print and cut out the image of the characters on sugar paper in advance. You will use these pictures as a stencil to give the desired shape to the gingerbread. Or buy ready-made plastic stencils, which immediately leave an impression for convenient filling of the picture with glaze in zones.
We apply the prepared stencil and cut out the image along the contour (leaving a few millimeters from the edge of the picture).
Bake in an oven preheated to 175 degrees until golden brown (about 8-10 minutes). Do not overcook the products, otherwise they will be too hard.
There are two ways to subsequently decorate a gingerbread topper on a cake:
- use a sugar seal;
- make a drawing with a special glaze for painting - icing.
Both methods are presented in the video below.
How to make toppers:
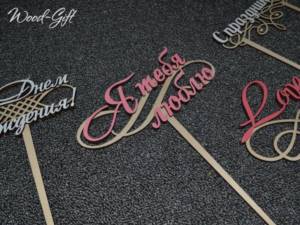
wooden, photo with explanation
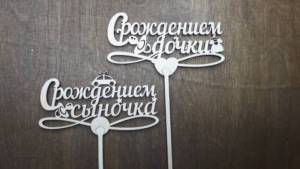
To make such a beautiful topper, you first need to make an inscription on the most ordinary paper. After this, it is applied to a piece of plywood and cut along the contour. To make internal holes, you can first drill them. When the inscription has already been completely cut out, it needs to be sanded and painted on each side, or you can simply varnish it.
for flowers, photo with explanation
The topper for flowers is made in the same way as for a cake. If you decide to decorate your bouquet with a wooden topper, then make sure that it has a long stem that will fit tightly into the bouquet itself and will not fall out when the flowers are transported to the recipient.
topper silhouette, photo with explanation
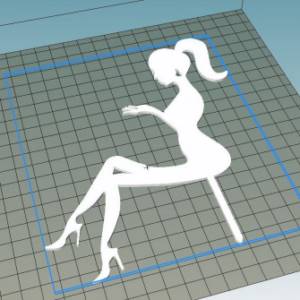
Cut out a paper template of the silhouette you need. It could be the silhouette of a girl, a child, or even a couple in love. Glue this template onto a thick base - high-quality cardboard or plastic. Decorate the resulting topper - paint it or cover it with beautiful paper. Attach a skewer to it and insert it into the cake.
made of mastic, photo with explanation

Take a layer of royal mastic, attach to it a template of the number or shape that you want to make a topper for your dessert, cut it out and give it volume. This will give you a flat figure. If you want to make a more voluminous figure, then in this case you need to have the skills of modeling from plasticine. Once your piece is ready, insert a skewer into it and use it as a topper. By the way, children love to eat such toppers after the whole cake has already been eaten.
waffle toppers, photo with explanation
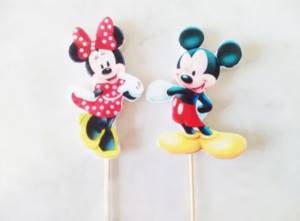
If you like to make toppers from wafer paper because you don’t have the skills to draw beautifully, then simply attach a design on wafer paper to a regular wafer, and then attach a skewer to this blank. You will get an original topper for decorating a homemade cake.
Mastic toppers
Today I’m telling you and showing you how to make beautiful, spectacular, and incredibly time- and labor-saving fondant toppers for a children’s cake! At the same time, we’ll learn how to work with sugar and wafer paper, the topic is interesting, the material has great potential, but we’ve never written anything about it, we need to improve!
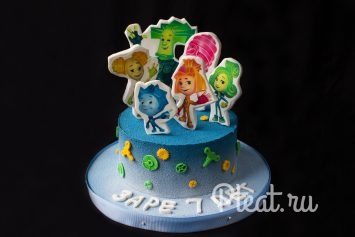
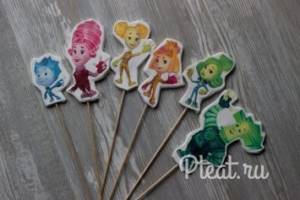
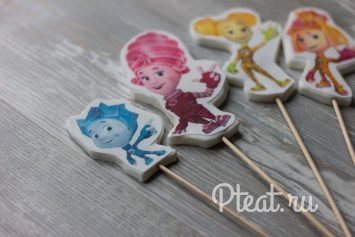
I will demonstrate it using the example of a children's cake with Fixies. I recently had a story with him that is probably familiar to every home pastry chef. Nine in the evening, the doorbell rings - neighbors. Cake for tomorrow. To kid. With the Fixies! “He’s asking very much - he really wants it - it’s a birthday - how would it be without a cake - help me out!” The situation, frankly speaking, is not pleasant, and the most reasonable thing is to refuse, but how? After all, people are not completely strangers. And Fiksikov, meanwhile, wants almost everyone. In general, in such cases, if you can’t refuse, and you don’t know how to draw, the only way out is printing on sugar or wafer paper and mastic toppers. Well, don’t sculpt the whole company, really?
The only condition is the opportunity to make this same sugar or waffle picture somewhere. To print, you need a printer, and not necessarily a special confectionery one (I’m not even sure that such exist), but filled with cartridges with food coloring. The service of printing on edible paper is provided by some confectionery stores, as well as private confectioners at home, those who have purchased a printer and cartridges. So that the paint does not dry out and the printer serves for a long time and properly, you need to print pictures at least once a day, which is why almost everyone who has this printer does not refuse those who want to make sugar pictures. You just need to find a person who lives near you, write to him, agree on a price, send him the file in a jeep and agree on a time when you can pick up the finished picture.
You can print with food dyes on both sugar and wafer paper. Sugar is denser, the image on it is brighter, but it is usually a little more expensive. What to use is up to you.
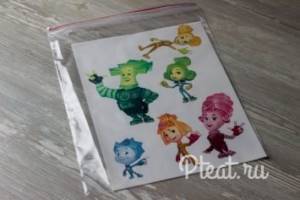
Here is my sugar picture.
You see, it is packed in a zip bag (in this form, including a large thick envelope, the store where I print gives the pictures to clients is very thoughtful and pleasant). If you are not going to use the picture right away, store it in a ziplock bag: it will not allow air to pass through, and your picture will retain its inherent slight flexibility. From a long stay in the open air, sugar pictures dry out, become brittle and brittle. But this, by the way, does not threaten the waffle, but it is brittle in itself.
Let me show you the sugar picture closer. It is slightly rough, and the print is quite bright. The paper itself is glued to a thick film.
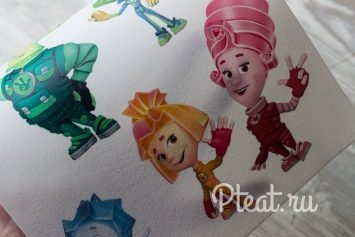
Here you can roughly understand the thickness.
So, let's make a topper for a children's cake!
...along the contour, with a slight indentation, however, as you like.
Take a piece of mastic, which dries quickly. This could be gelatin mastic (but it is not at all tasty, in my opinion, and becomes very hard; I decided that if children decide to chew on the topper, it could simply be dangerous for their teeth)) or purchased mastic like Vizyon or “Top -product”, to which you can add SMS (powder, sold in confectionery stores) to speed up drying. However, if you have time, you can do without SMS, it will just take longer to dry.
I have here white vanilla mastic “Top Product”, probably the most budget-friendly one today, but very good.
I added a pinch of SMS.
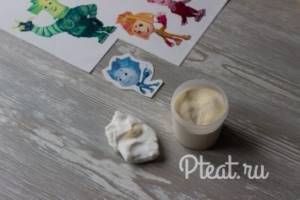
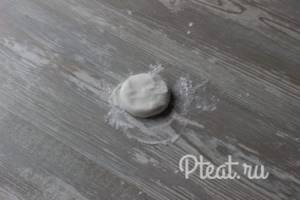
Kneaded it. Rolled it into a ball and flattened it slightly.
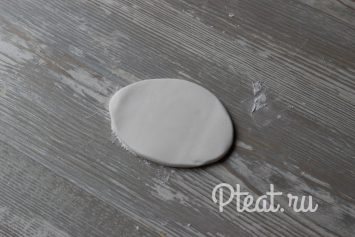
Rolled it out to a thickness of 5 mm (it can be thinner, depending on how thick your skewers are).
I attached a picture. I drew a stack around the outline.
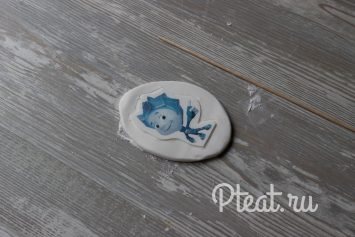
Cut it out. This must be done very carefully!
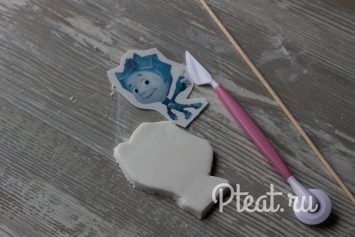
I inserted the skewer a few cm deep so that it would hold well. The thickness of the skewer must be completely immersed in the mastic! In other words, when rolling out the mastic, take into account the thickness of the skewer.
Lubricate the mastic with a thin layer of decorgel (can be replaced with honey diluted in water), very lightly and evenly.
We remove the film from the picture.
Carefully glue the image to the mastic.
Let it dry and you can add it to the cake!
Drying time depends on many factors: mastic, topper size, room humidity. This little Nolik made from Top Product mastic with the addition of SMS dried in at most an hour.
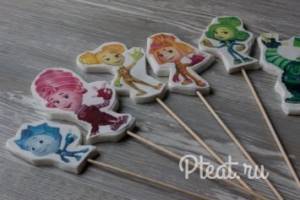
And here is the whole bunch. Bright and beautiful! And most importantly - quickly, if there is somewhere to print the picture.
A solution for those who need everything at once for a 1 kg cake)
Here are our fondant toppers on the cake.
Well, the whole cake.
The cake has a minimalist design. The only decorations are toppers made of mastic and screws, also made of mastic. It was an urgent cake, as you understand, so I had to do everything very quickly and a silicone mold from the CakeUp store literally saved me in that situation. I simply sprinkled it with cornstarch, took small pieces of mastic, painted them in the desired colors, filled the recesses with them, ran a knife along the surface of the mold, holding it flat and cutting off the excess mastic, and took out the parts!
Sugar toppers, recipe with photos
Sugar topper is the same as lollipop in essence because it is made from caramel.
If you want to give the caramel candy a fancy shape, then simply select the one you need in the store, and then pour the following mixture into it:
- combine 0.2 liters of corn syrup with 0.2 kg of sugar and 0.18 ml of water;

- add flavoring and coloring here;
- Boil all this over low heat.
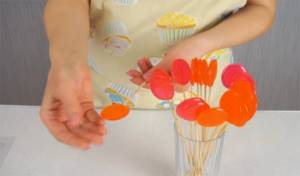
When you pour the caramel into the molds, do not forget to immediately insert the skewers so that they harden along with the caramel. Place the pieces in the refrigerator for a while and remove them before decorating the cake.
Tutorial for Making Fondant Toppers
This article is a translation and the entire first-person narration comes from pastry chef Linley North Beckett.
When it comes to cupcakes and other delicious treats, the most fun part of the process is decorating the finished baked goods! Confidence that you correctly use the materials you have and take into account all the features of a particular baked goods when coming up with the next decoration is a very important point for creating unusual, eye-catching sweets.
Follow these simple tips and you can make the perfect fondant toppers for your sweet cupcakes and other baked goods!
How to learn how to make amazing fondant toppers.
Decide what materials you will use.
You may ask yourself a reasonable question: why should you decide on the materials that you will use when decorating baked goods, if the subject of this article is clearly defined and we are talking specifically about fondant toppers? Yes, you are right, if you know exactly what you want to get in the end and are sure of what materials should be used in your particular case - go for it!
But, just in case, make sure that you have gone through all possible options. Although fondant is the subject of this article, baking toppers can also be made from fondant, which hardens faster, is more durable, and can be used if you need to make a lot of small parts. It can also be successfully used to design flat and three-dimensional compositions.
Photo by pastry chef Kate Sylvian
In addition to fondant and mastic, you can use sculpted chocolate when making toppers. This material can be especially useful when making various figurines because it is more flexible and provides additional capabilities that fondant cannot provide.
Photo by pastry chef Erin Gardner
Another option to consider when making baking toppers is regular chocolate! Like most other confectionery materials, chocolate does not react well to heat and can melt much more quickly than other materials. Therefore, be sure to consider the climate and ambient temperature when making your final decision.
The materials described can be successfully used in the manufacture of baking toppers, but fondant still remains the most popular and beloved material in this area.
Photo by pastry chef Erin Gardner
Decide on the size and weight of the topper.
When making toppers for baking, you first need to decide what capabilities and limitations you have.
If you are planning to decorate a standard sized cupcake, the top surface will average just over 5cm in diameter and you will want to make sure your decoration is the same size or smaller. I usually use a round die, about 5.7cm in diameter, to make a round stand and then base the dimensions on when making my jewellery. This way I can be sure that the decoration will fit on the top of the cupcake and not be too heavy that it will push through!
As already mentioned, you can get creative with the shapes and sizes you need. An example is the Rio de Janeiro Beach Cupcakes pictured above, which combine round and rectangular shapes and decorations in a variety of sizes.
The photo above shows an absolutely adorable little girl topper with bubbles. As you can see, the dimensions of this topper are such that it is too big and heavy for a regular cupcake, but it looks great on a miniature cake! Taking the time to decide on the size and shape in advance will allow you to create a topper that will fit your baked goods perfectly!
Photo by pastry chef Lenley Beckett
Decide on the shape of the topper.
Now that you know what surface you will be working with, it's time to decide on the shape of the topper. If you're planning on going with a simple design and you'll be working on an order with a lot of baked goods, then flat fondant decorations are ideal! Check out the fondant toppers used in the Back to School project pictured above. Fondant cuts perfectly to size and can be used successfully in projects that aren't too complicated.
Photo by pastry chef Lenley Beckett
These cupcakes with fondant decorations are inspired by the cartoon “The Book of Life.” They are slightly larger in size than the flat toppers, although they are not full 3D figures. The textured heart at the bottom of each cupcake topper is roughly the same size and keeps the whole arrangement cohesive, while the shapes themselves are layered and feature a variety of details, like the sugar skull topper at the bottom of the photo. .
Photo by pastry chef Lenley Beckett
Unlike the previous design, the Winnie the Pooh figure on this cupcake is completely three-dimensional, with an additional accent in the form of flat fondant decorations. Again, the disc holder underneath each topper provides unity and allows all the decorations to be placed without extending beyond the top of the cupcake.
The three-dimensional bear figurine is more voluminous and heavier, it is located horizontally, and you can see that it is attached to the cupcake with a layer of fondant applied with a spatula. Conversely, additional fondant toppers placed at an angle on the frosted cupcakes add more lightness to the overall composition.
You can see for yourself how different sizes of toppers affect the overall impression of the entire composition.
Photo by pastry chef Lenley Beckett
Use cupcakes and other baked goods as part of the design.
The decision about what material, size and shape to choose for your topper directly depends on the treat itself! For example, decorating a cupcake takes up less space than decorating a cake and requires the topper to be lighter and smaller in size, but at the same time allows for greater design variation.
When creating fondant toppers, it is necessary not only to constantly keep in mind the appearance of each future element, but also to imagine the future picture as a whole and pay close attention to what the final result will look like.
- Will you be coating your baked goods with icing, fondant or other ingredients?
- What colors are you planning to use?
- What additional materials do you use?
In the “Lunar New Year” collection of cupcakes, the yellow fondant topper base on which all the animals sit is chosen not only because gold symbolizes prosperity, but also because the yellow color pairs well with the red frosting that tops the cupcakes.
Photo by pastry chef Lenley Beckett
In the photo above, the burrowing rabbit cupcake toppers are intentionally made small so they can fit into plastic containers.
Since the contents of these containers consisted of chocolate pudding that would bleed onto the fudge, a layer of crushed Oreo cookies was added on top of the pudding to act as a buffer between the two elements while also representing the ground where the rabbit's hole was located.
Photo by pastry chef Lenley Beckett
In this adorable cupcake, the surface is covered with fondant and the entire cupcake is an integral part of the overall composition. The silver cupcake tin represents a metal pie pan, and in this case its use is mandatory because it is the only way to achieve the desired color and texture.
Photo by pastry chef Lenley Beckett
The Caramel Apple Cupcakes pictured here are another example of how frosting and filling can be an integral part of the overall design. When making the toppers for these cupcakes, the size was specially chosen to be small so that the frosting, partially covered with caramel, peeks out from underneath.
Now that you have decided what the material and size of the topper will be, decided on the overall dimensions of the entire composition and figured out how to make the dessert itself an integral part of it, you have everything to create amazing and unique fondant toppers!
Paper toppers, ideas with photos
Children's toppers, ideas with photos
Decorating cakes with toppers is an excellent decoration technique that makes our life several times easier. The topper can also be made from ready-made chocolate bars, marshmallows and other sweets from the store. But this is a secret for you in case you are running out of time. Be sure to fantasize about your culinary masterpieces so that they turn out better every time!