Useful tips
You don't have to spend a lot of money to make your wedding beautiful and memorable.
.
For example, decorating tables, walls, ceilings and other parts of the room
You can do it yourself, and at the same time, without having special capabilities.
Take a look and read the instructions for some interesting wedding decorations
and try to borrow a few ideas for yourself that you can
turn into reality
.
You can also read about some decorations, gifts and surprises for a wedding
in the article:
Wedding trifles, decorations and DIY decor
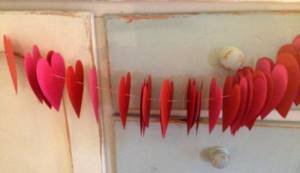
DIY wedding decorations. Heart.
Before you start working on this craft, watch a short video in which you will become familiar with the technique of making shapes using thread.
You will need:
- a thread
- container for glue
- PVA glue
- a long inflatable ball.
A few more ways
You can cut hearts not only from paper, but also from fabric. A sewing machine will help you fasten them into one garland.

Now let's make a garland with voluminous hearts. To do this, cut a bunch of hearts and glue them together on a thread in this order.

This idea is suitable for creating a garland for a wedding.
To make such a garland you will need colored paper, a heart-shaped press and a thread and a needle.
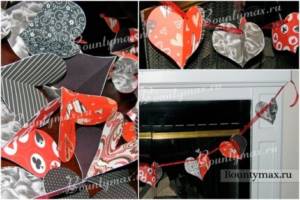
Using a press, we make a bunch of small hearts. And then using a thread and a needle we string the hearts, you can also use fishing line, but then you will need to work hard to hide it behind the hearts. And the garland is ready. It is best to use a garland of one color scheme: if you have a nautical-themed wedding, then use colored paper in turquoise, light blue, blue and white tones, but not red.
Related article: Knitting baby socks for beginners: how to knit soft socks for newborns using photos and videos
To get a more original garland, you can cover the hearts with sequins, beads, or, for example, paint salt.
Also look at photos of other types of heart garlands.

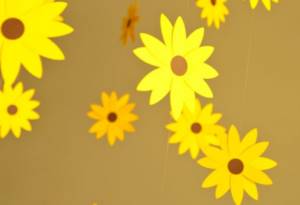
How to decorate a wedding with your own hands. Flower garland.
Quiet paper flags
Bright colored flags on a ribbon are a classic decoration, appropriate for any holiday or just for interior decoration. Today we propose to make an updated version of it, namely from tissue paper or tissue paper and with fringe.
Instructions:
To make your own flag garland you will need: tissue paper/tissue paper of different colors, scissors, pencil, plate (any round object that can be traced), ruler, ribbon that can be folded in half and a glue stick.
- Fold the paper into a stack and draw a circle on the top sheet using a plate.
- Without disassembling the stack, cut out circles. Then cut the stack of circles into halves.
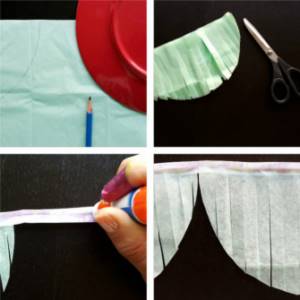
- Start creating fringe on the blanks. To do this, simply cut the semicircle into narrow strips, not reaching 1-1.5 cm from the top edge and maintaining approximately the same interval.
- Now simply glue the top edge of each half circle onto the tape.
- Using the same principle, make a garland of flags and pennants, but use paper of a different color.
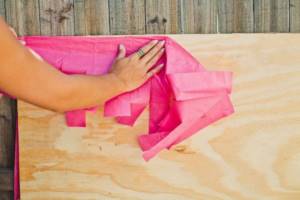
DIY wedding hall decoration. Colorful scenery.

Decorate with bright colors the area where the bride and groom will sit or where the birthday cake will be placed. It’s very easy to make such bright and original decorations and you won’t need a lot of money.
You will need:
- plywood
- thin wrapping paper (corrugated paper can be used)
- glue
- scissors
1.
Fold the paper in half and cut along the fold.
2.
Cut the fringe, leaving a few centimeters to the end of the paper tape.

3.
Apply glue to the top of each paper strip and glue it to the plywood.

4.
Continue gluing until you fill the entire board with colorful tissue paper.
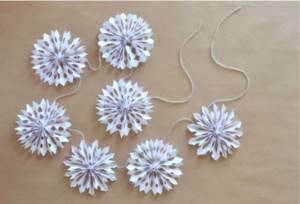
New Year's garland of voluminous snowflakes
We present the first idea for making a garland for the New Year with your own hands - from snowflakes. We probably all remember how to cut a flat snowflake from a square sheet of paper. This method will help you out if you need to make a garland in the shortest possible time. However, if you want to make a more elegant decoration, we suggest assembling it from voluminous snowflakes. They take a little longer and are more complicated to make, but the resulting garland will survive more than one holiday.
Instructions:
Prepare paper, such as regular office paper, a pencil, scissors, a stapler, glue or double-sided tape, and thread.
- Divide a sheet of A4 paper into two equal strips.
- Now assemble each strip into an accordion. This can be done in the following way: fold the strip in half, then fold the half in half again, then also fold the quarter in half and continue until the entire strip has folds. Next, focusing on the fold lines, assemble the accordion.
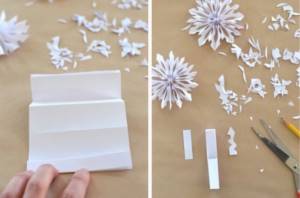
- Cut one small strip from your accordion, cut it in half, and then draw a template on it that you will use to cut out the snowflake patterns. The template is drawn arbitrarily, but so that the edges of the assembled accordion remain uncut in two or three places. An example of the template can be seen in the top right photo.
- Bend the accordion in half and fasten it in the middle with a stapler.
- Use a pencil to trace the outline of the template on one of the halves of your workpiece, and then use scissors to cut off the corresponding parts of the design.
- Repeat Step #5 with the other half of the piece, using the same template.
- Fan out each half of your piece and glue their ends together.
- Hang snowflake medallions on a beautiful thread, such as silver.
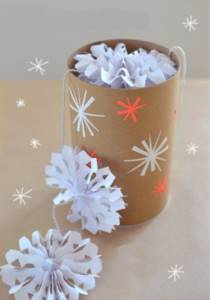
DIY wedding decoration (photo). Sweet souvenir for guests.
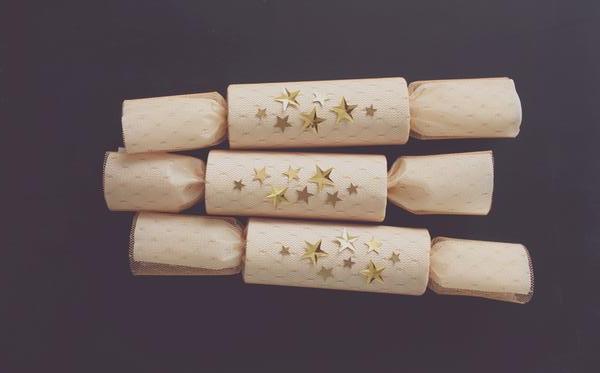
You will need:
— Cardboard cylinder (you can use a cylinder from paper towels or wrapping paper)
- lace fabric
- corrugated paper
- scissors
- double tape
- thick thread (string)
- decorations (stars, sparkles) - if desired
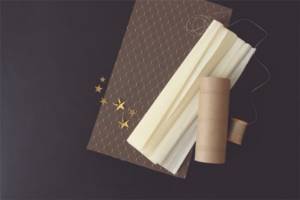
1.
Cut the lace fabric and crepe paper into rectangles. The shortest part of the rectangle should be long enough to wrap around the cylinder.
The longest part should have the length of the cardboard cylinder plus 15-20 cm.
* It is advisable that all souvenirs be the same size.
2.
Wrap paper and fabric around the cylinder so that the fabric is on the outside (see picture).
3.
Secure the structure with double tape, then tie a twine at one end.
4.
Using the open part of the cylinder, fill it with candy and tie the end of the craft with twine.
5.
If you wish, you can decorate your candy gift with stars, glitter, stickers, etc.
Garland of balloons
Can you imagine a wedding without balloons? Such decor will become an original decoration for any, even the most modest room, and will help create a truly festive atmosphere.
You can order a garland of balloons in a specialized store, or you can make it yourself using the step-by-step master class below . This instruction describes how to make decor from balloons of two shades, but if you wish, you can experiment with more colors.
- Inflate the required number of balloons, tying them tightly with fishing line. It is advisable that they be the same size.
- Knit balls of the same colors in pairs.
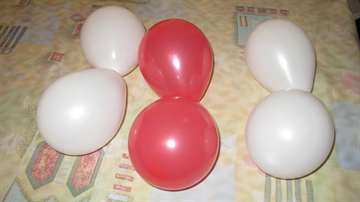
- Take a couple of balls of different colors and connect them together by twisting.
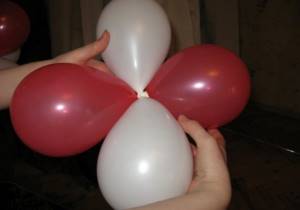
- Secure with a long fishing line.
- Make the remaining details of the garland in the same way.
- Secure the resulting fours to the base line as close to each other as possible. In order for the elements to hold tighter, it is necessary to make 3-4 turns of the fishing line around the connection point of the balls.
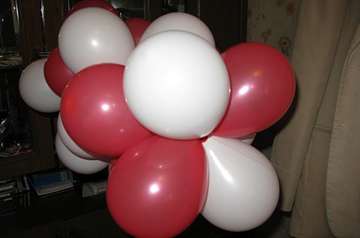
- The stylish decoration of the wedding hall is ready.
What to do with your own hands for a wedding
Window with a message

If the wedding takes place outdoors, then you can make something like this. For it you will need an old window frame, which you need:
- clean with sandpaper
- paint
- write wishes on the glass
- Attach the hooks to the screw and hang them in a suitable place.
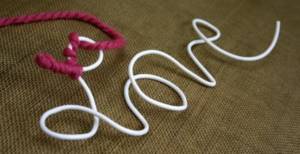
Love made of thread and wire
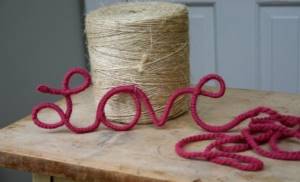
You will need:
- wire
- wire cutters
- thick thread
- scissors
1.
Bend the wire so that it forms a word (in this example, “Love”). Cut off the excess with wire cutters.
2.
Wrap the wire with brightly colored thread.
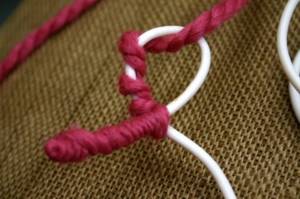
3.
You can hang the craft anywhere to decorate the room.
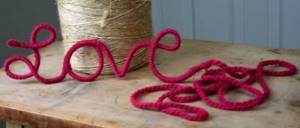
* You can make several similar crafts, wrap them with threads of different colors and decorate the interior.
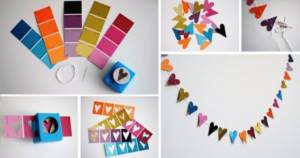
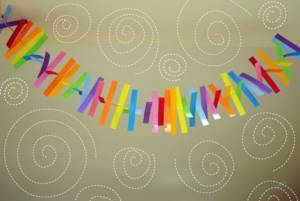
Paper garlands
Try decorating the room with beautiful bright garlands made by yourself.
Everything is quite simple, you just need to cut out any figures from thick colored paper and attach them to a thread using a needle.
After that, hang the garlands where you like best.
If you wish, you can use glitter on the paper figures.

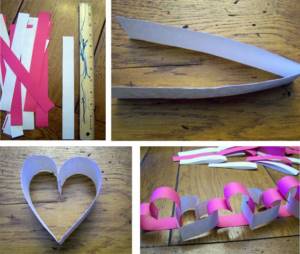
DIY wedding garland made of paper hearts
A heart is a symbol of love, so a wedding garland made from such elements is simply an indispensable decoration for the place of celebration.
Below are the simplest instructions on how to make such a paper decoration..
- Take thick paper or cardboard of the desired color and size. The workpiece should have the shape of a square, so the heart will turn out symmetrical. For convenience, it is recommended to fold the paper several times so that you can make several parts at once.
- Draw a heart on the resulting square. You can use a ready-made template , which is sold in any stationery store.
- Cut out the heart along the outline.
- In a similar way, make the required number of elements.
Editor's choice: Black wedding, celebration in exquisite color
- Thread a long thread into a needle.
- Thread each heart onto a needle and carefully push it to the end of the thread.
- When all the elements are on the base, tie the edges of the thread with a knot.
Templates for paper garlands
If you do not have artistic abilities, then you can make a garland of any kind using ready-made patterns for paper garlands, which are easy to find on the Internet. Print out the drawing, transfer it to thick cardboard, cut out the part and use it as a stencil. Thus, cutting out garlands from paper will take a minimum of time.
You can decorate your home using simple and affordable materials. You can make garlands of a wide variety of types and shapes from ordinary colored paper. In addition, you can always print paper garlands from the Internet, which will only simplify your task.
How to make a paper garland
Birthday paper garland
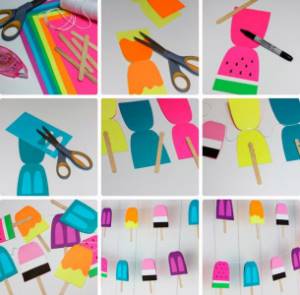
As a rule, birthday garlands are particularly colorful. Consider the option of making a creative festive garland for a birthday, made in the form of multi-colored ice cream on a stick.
- In order to make such a spectacular garland, you will need scissors, double-sided colored paper of different shades, a black marker for decoration, thread, PVA glue or a glue stick, and wooden ice cream sticks.
- To ensure that all the elements of the garland are symmetrical, you can draw an ice cream template on cardboard. Then, using this template, cut out as many blanks as you need from paper of different colors.
- It is advisable to ensure that each ice cream has its own unique design. For example, one piece can be designed in the form of a watermelon slice, another with glaze poured on top, etc.
- Once all the ice cream is decorated, you can start attaching the wooden sticks. We put a wooden stick in the middle of each piece and secure it with glue or tape.
- Now we hang the multi-colored paper ice cream on a stick on a string, thread or ribbon. The lower edges of the blanks should be secured with glue. The festive garland for a birthday is ready.
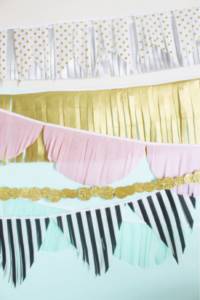
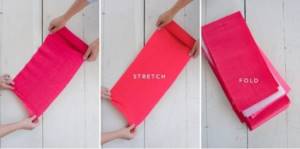
Corrugated paper garland
From corrugated paper you can make a large number of voluminous and spectacular decorations for any festive event. Let's look at a step-by-step master class on making a large garland from corrugated paper of different colors.
- Prepare corrugated paper of different colors, scissors and tape.
- Unroll a roll of corrugated paper and cut it in half.
- Now you need to fold the paper in the way that you can see in the photo. To speed up the process, it is better to seek help.
- Now you will need scissors. Start cutting the fringe on each strip of crepe paper. Do this carefully so as not to cut the middle. With corrugated paper of other colors you need to do the same.
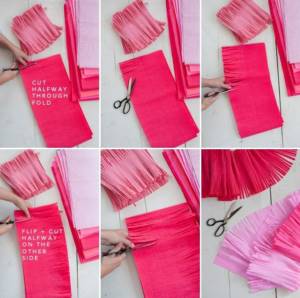
- The festive garland made of corrugated paper is ready. All that remains is to attach it with tape to any surface. You can fix the garland on the ceiling or on the doorway. To make the garland look voluminous, twist the garland around its axis several times.

Paper heart garland
If you don’t know how to decorate a room for a romantic dinner, then you can turn your attention to this master class on making a simple garland of hearts. The garland is made as quickly and simply as possible. Even a child can cope with this task.
- Prepare sheets of double-sided colored paper. The traditional colors of love and passion are pink and red. But you can choose any of the shades. You will also need a ruler, scissors, and a stapler.
- Cut strips of colored paper 1 cm thick and 10 cm long. Use a ruler to make the pieces as even as possible. The number of strips depends on how long the garland you want to make.
- Fold each strip of paper in half. Then the free edges of the strip need to be folded inward so that the outline of a heart is formed. The edges are connected using a stapler.
- Take the next strip of paper, fold it in half again, stretch the bent strip into the first heart, bend the free edges inward and connect them using a stapler. You have 2 paper hearts connected to each other. We continue to make the garland in the same way until we reach the desired length.
Garland of colored paper
In order to decorate the interior for any event with your own hands, you will not need to spend a lot of money. It is enough to arm yourself with colored paper and make a spectacular garland.
- In order to make a garland from small strips of colored paper you will need a sewing machine, double-sided colored paper, a ruler, scissors and a pencil.
- You can make a very colorful garland using paper of the richest shades. You can also make a more “strict” garland if you use shades of white and gray, for example.
- Using a pencil and a ruler, draw strips about 1 cm wide and 8 cm long on a sheet of paper. Before you start cutting out the strips, you need to bend the sheet of paper so that the fold line is in the middle of the strips. You can cut with scissors or a stationery knife.
- After the colored strips are prepared, we begin to assemble the garland. We will do this using the simplest sewing machine. Using a regular stitch, start “sewing” the strips along the fold line. As soon as you sew one strip, immediately substitute the next one. If you don’t want the garland to be too “thick,” then leave a small distance between the paper strips. Continue assembling the paper garland until you reach your desired garland length.
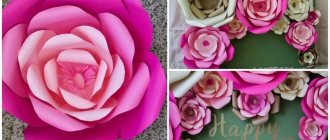
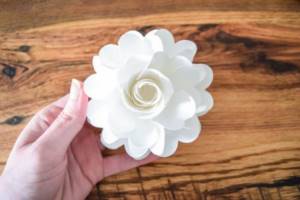
Garland of paper flowers
Paper flowers look incredibly realistic. If you make several lush paper flowers and add them with juicy green leaves, you can make a very elegant garland.
- To make a garland of paper flowers you will need colored paper in white and green shades, scissors, glue, a toothpick, and a cord for collecting the garland.
- In order to make a three-dimensional flower out of paper, you first need to draw and cut out the blanks. You can print out the templates on a printer to make things easier for yourself.
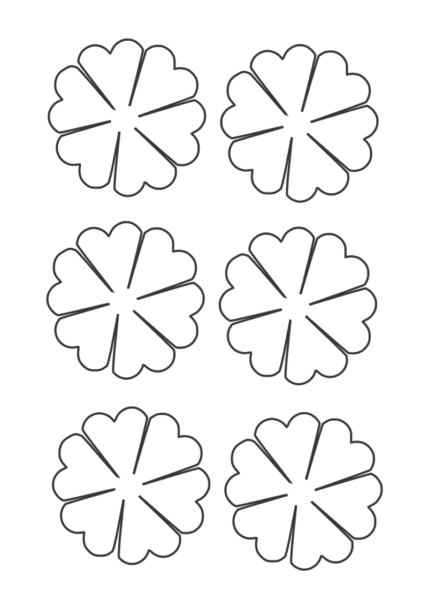
- Transfer the design to white paper and cut out the flowers using scissors.
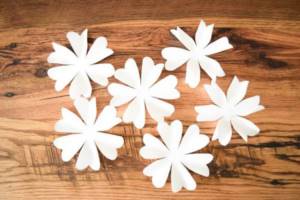
- To prevent the flowers from looking flat, you need to process each petal with a toothpick or any thin stick. The petals need to be wrapped around the stick, lifting its edges up.

- Next you need to combine the prepared blanks into one lush flower. Fasten them in the center with glue. In the very middle of the flower, the blanks should be twisted more tightly.
- Next you need to decorate the flower with green leaves. To make them, you can use the same templates that you used to create the flower. The resulting flower is already very beautiful, and it can easily be attached to a thread.
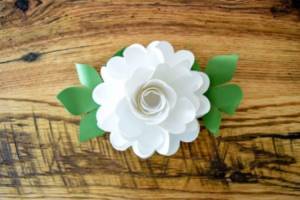
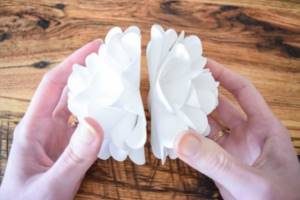
- If you want to make the flowers even more voluminous, you can connect two flowers together with their flat sides using glue. At this stage, you must remember to secure the thread between the flowers.
- Decorate the space on the thread between the flowers with green leaves of paper. The result was a very impressive garland of voluminous snow-white flowers.

Paper garland for children
Children can also be involved in making the garland. The most popular option is a garland or rings of colored paper. If the child already knows how to use scissors, he will be able to complete all stages independently. For a younger child, you can offer ready-made paper strips that simply need to be glued together using a glue stick.
- Prepare sheets of double-sided colored paper, scissors, a ruler, a simple pencil, a glue stick or PVA glue.
- First you need to cut paper strips. Their size can be arbitrary. If you want the garland to look more airy and thin, then make thin and long stripes. If you want the garland to look thicker, then cut the strips wider and shorter.
- Using a ruler and pencil, draw stripes on a sheet of double-sided colored paper, and then cut them out with scissors or a utility knife.
- Now let's start assembling the garland. Glue the free ends of the paper strip together to form a ring. Then take the second strip, stretch it into the finished ring, and glue the ends together. You will get a chain of two rings. We continue to make the garland in a similar way until we reach the desired length. The children's paper garland is ready.

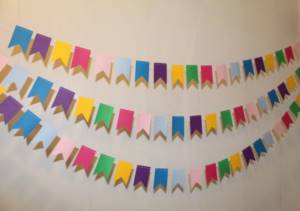
Paper garland flags
A garland of flags is also very often chosen to decorate a room for a birthday or any other important event. You can choose paper, cardboard, fabric, old greeting cards, etc. as material for flags. Let's look at an example of making one of the simplest and easiest options - a garland of paper flags.
- Prepare sheets of colored paper. If you plan to hang the garland on the wall, then the paper can be single-sided. If you want to hang a garland from the ceiling, then it is better to choose double-sided colored paper. You will also need a ruler, pencil, scissors, and thread.
- First you need to draw and cut out the flags. Take a sheet of colored paper and, using a ruler, draw as many flags on it as will fit there. A mandatory condition is that the checkboxes must be the same. Cut out the blanks.
- Once the garland pieces are cut out, you can decorate them. If the garland will decorate a children's party, then on each flag you can paste an image of your favorite cartoon character, for example.
- Now all that remains is to assemble the garland. You can attach the flags to the thread using tape. You can also sew the flags together using a sewing machine. You can pull the thread through all the flags using a needle. A simple but incredibly bright garland is ready.
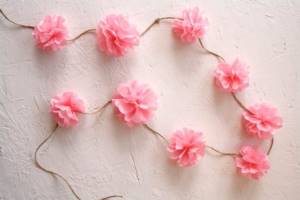
Paper flower garlands
In order for a garland to turn out beautiful, complex techniques for making it are not always needed. For example, a garland of simple paper flowers will look incredibly gentle and airy.
- Prepare double-sided colored paper of the desired color, scissors, glue, thread.
- Now you need to draw the flowers. The most convenient way to do this is with the help of templates that can be easily found on the Internet.
- After the blanks are cut out, we begin to collect the flowers. One flower will consist of two blanks. Before gluing them, place the thread between them. This way you will simultaneously make flowers and assemble the garland onto a thread. In the center of each flower, glue a circle of a contrasting color, which will be the middle of the flower. Place the flowers on the thread with some distance from each other to make the garland look especially delicate and airy.
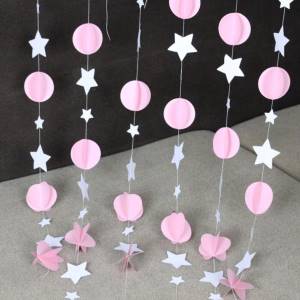
Paper garlands for weddings
A wedding is an important event, the design of which is always approached very responsibly. You don’t have to spend a lot of money on ready-made jewelry, but make some of it yourself. For example, garlands. They can be made to any length, any color and from any material. It is advisable to maintain the general style of the celebration. Consider the option of making a wedding garland from colored paper.
- In order to make a romantic and very airy garland for a wedding you will need colored paper, decorative threads, scissors, and glue.
- First you need to decide on the color of the future garland. Traditional colors for wedding decorations are white, pink, and red. Don't forget that the garland should match the color of other decorative elements in the wedding party. We suggest making a garland of soft pink and white flowers.
- The elements of the garland will be stars of different sizes and circles. To ensure that the elements are perfectly symmetrical, first draw the templates.
- After all the elements are cut out, we begin to assemble the garland. Connect the sides of 4 paper circles with glue, placing a garland thread between them. Then step back some distance and attach the stars in the same way. Continue until the garland is long enough.
Volumetric paper garland
The best material for making a voluminous holiday garland is corrugated paper. Let's look at the instructions for making a garland of incredibly spectacular paper flowers:
- You will need corrugated paper, scissors, decorative thread. It is better to choose the brightest colors of corrugated paper. You can make flowers of the same color or combine several colors in one bud.
- The corrugated paper needs to be unrolled and cut into rectangles. Choose the size of the blanks yourself. Be aware that the size of the finished flower will be equal to the smaller side of the rectangle.
- Place 5 rectangles in a stack and start folding it into an accordion. The finished accordion needs to be secured in the middle with a thread or rubber band.
- Round the edges of the fan with scissors to make them look like petals.
- All that remains is to straighten the bud and attach it to a decorative thread. The festive garland is ready.
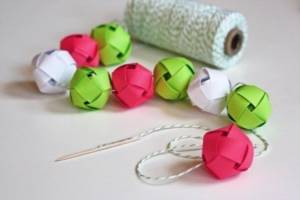
Paper garlands - balls
From ordinary colored paper you can make three-dimensional balls that resemble Christmas tree decorations. Such decorations can be attached to a decorative thread and become a festive garland.
- Prepare double-sided colored paper of different colors, scissors, ruler, pencil, PVA glue or glue stick, and decorative thread.
- Using a ruler, draw identical stripes on a sheet of colored paper. Cut them out.
- Next, we begin to assemble a ball from paper strips. Fix the edges of the strip to create a ring. Next, pull the second strip through the ring and also seal the edges. For one ball you will need 4 strips.
- After you have made the required number of balls, you can start stringing them on decorative thread. A spectacular garland of voluminous paper balls is ready.
Paper garlands for the New Year
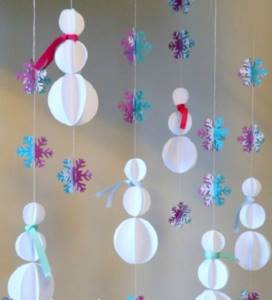
Not only children, but also adults enjoy preparing for Christmas and New Year. Garlands are one of the most popular decorative elements for these holidays. Despite the fact that electric garlands have recently become incredibly popular, New Year's paper garlands continue to retain their special charm. Let's look at an example of making a garland from paper snowflakes and snowmen.
- To make such a garland you will need white paper for snowmen, blue and purple paper for snowflakes, a small amount of “rain” or ribbons for decorating snowmen, and decorative thread.
- Let's start making a snowman. You need to draw and cut out circles from white paper of 3 different diameters. In order to make the “head” of a snowman, bend the circles in half and glue 3 pieces together so that you get a three-dimensional ball. For the “body” of the snowman you will need 4 circles, and for the very bottom of the snowman - 6. At the moment of gluing the snowman, you need to pull the thread between the blanks in time. To prevent the snowman from sliding down the garland, tie a small knot directly under it.
- Tie a “rain” or a thin ribbon around the snowman’s neck for decoration.
- Now cut out snowflakes from colored paper. In order to make a snowflake three-dimensional, you need to glue together 2 snowflakes, folded in half. Arrange the elements in a loose order on the thread. The festive New Year's garland is ready.
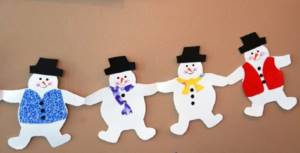
Garlands of paper people
Paper people holding pens look very funny. Instead of people, you can draw whatever you want.
- Prepare A3 paper of the desired color, scissors, glue, small pieces of colored paper to decorate the people.
- A sheet of white paper needs to be folded 3 times like an accordion. Now cut with scissors along the resulting fold lines.
- Each strip must be folded again like an accordion so that the width is equal to the width of the future man.
- After the accordion is ready, we begin to draw the silhouette of a man. On the part of the sheet that is closer to the fold, draw half a man. On the reverse side we draw the second half of the man.
- After you cut out the garland, you will get funny little people holding hands.
- In order to “revive” our heroes, we need to decorate them a little. Cut out eyes, hats, vests, ties, etc. from colored paper. You can make the heroes the same, or you can give each of them their own unique appearance.
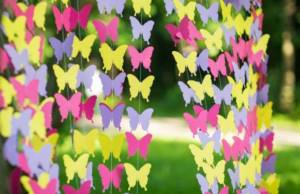
Paper butterfly garland
Butterfly garlands also look very gentle and romantic. Even a child can handle making such a decoration.
- You will need paper of the desired colors, thread for the garland, scissors.
- If you don't know how to draw butterflies, you can print a ready-made template.

- Transfer the design to paper of the desired color and cut out the elements of the garland.
- Now all that remains is to attach the butterflies to the thread. This can be done using tape. You can also glue 2 butterflies together by stretching a thread between them. You can also string butterflies onto a thread using a needle. Light spring garland is ready
.
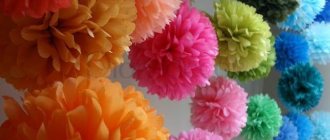
Paper pompom garland
Paper pompoms look especially impressive and festive. Garlands can be made from small, large or just giant pompoms. The best material for making such decoration is corrugated paper.
- Prepare corrugated paper of the desired color, thread for the garland, thin wire, and scissors.
- Unroll the roll of corrugated paper and cut it into equal rectangles. The size of future pompoms will be equal to the width of the narrow part of the rectangle.
- Stack 8 rectangles and fold them into an accordion shape.
- The middle of the accordion must be secured with thread or thin wire. If you plan to hang the pompoms later, you can make a small loop of thread or wire at this stage.
- Round the free edges of the accordion with scissors or make them sharp as desired.
- The paper pompom is almost ready. All that remains is to “fluff” the paper so that the decoration acquires volume. These pompoms can be used to make a horizontal or vertical garland.

Paper tassel garland
To make a garland of paper tassels, you will need a special type of thin crepe paper - tissue. Let's look at step-by-step instructions for making colorful decor for any festive event:
- prepare colored sheets of tissue paper, a glue gun, thick decorative cord, scissors, a ruler, fishing line;
- cut the paper into rectangles. Each rectangle needs to be drawn into strips about 1 cm wide;
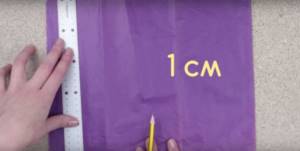
- Next, using scissors, start cutting the fringe, but do not reach the middle. When the fringe is ready on the top of the sheet, step back a couple of centimeters and start making the fringe on the bottom side of the sheet in the same way;
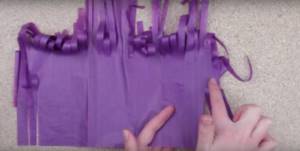
- Next, we twist the sheet with fringe into a bun, then scroll several times and fold it in half. You should end up with an elegant brush;

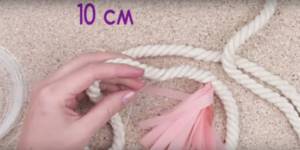
- After you have made the required number of tassels, you can start assembling the garland. To do this, you need to take the fishing line, secure it with the free edge to the decorative cord and begin to wrap it around the cord in a spiral. Attach tassels approximately every 10 cm;
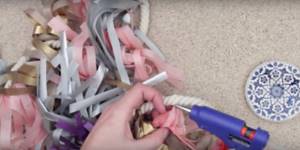
- To prevent the paper tassels from slipping, fix them on the garland with a glue gun. The spectacular holiday attribute is ready.
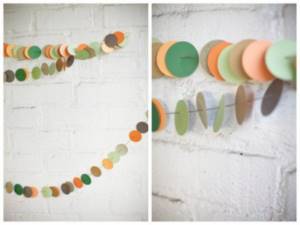
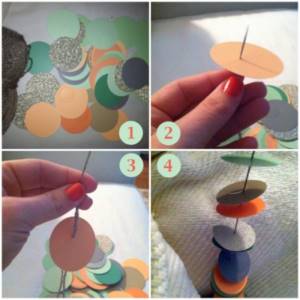
Paper garland made from circles
Ordinary circles of colored paper can be an excellent basis for a garland. It can be used to decorate a doorway, window, decorate a wall, etc.
- First you need to decide on the color of the future garland. You can use one color of paper, several similar shades, or make the garland multi-colored. This example uses colored paper in various blue and cyan shades.
- Let's start preparing the main elements - circles of colored paper. The longer you want to make the garland, the more time you will have to spend cutting out circles from colored paper. If you can find a special hole punch with large holes, you will make your task much easier.
- A garland of paper circles will look much more interesting if you make circles of different diameters.
- After the main elements of the garland are ready, we begin to assemble it. Take two circles of the same diameter and glue them together, after placing a suitable thread between them. Continue attaching circles until the garland is the size you want.