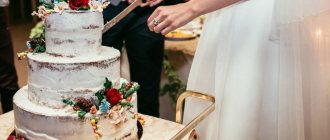
Confectionery skills allow you to create the most unusual dessert options for a wedding. But there are classics that never go out of date, like a wedding cake with swans.
To this day, such a treat for guests is often found at wedding banquets.
But it cannot be called banal at all, since different design techniques are used for production.
If desired, even the future newlyweds themselves will be able to make swans for their wedding cake and decorate it as they wish.
Why do you need dessert?
Traditionally, the main dessert on the occasion of a wedding is served at the end of the banquet, when all the main dishes have already been tasted, gifts have been presented, and the guests are happy and relaxed. It is believed that by cutting a piece of the cake for each person, the newlyweds thereby share their love with those present. Friends and relatives, while eating dessert, wish the newly-made family happiness, prosperity and prosperity.
Previously, the newlyweds treated their wedding guests to baked goods - bread, pie, flatbread, loaf, etc. Then the tradition of serving an ornate cake symbolizing financial wealth arose in Europe. Until now, this particular dessert is considered a priority for weddings, and confectioners can compete in their skills to the delight of the newlyweds and guests.
The cake should highlight the overall style and color scheme of the wedding, so it should be ordered after the main concept of the event has been determined.
Step-by-step recipe for making figurines from mastic with your own hands
Cake figures can be made from chocolate icing and various pastes. But basically the most convenient thing is sugar paste or mastic. If you were previously sure that this was impossible, we suggest you start doing it right now.
Before making figurines and decorations, consider a recipe for making mastic with your own hands
For this we need:
- Gelatin – 2 teaspoons;
- Water – 10 teaspoons;
- Powdered sugar – 450 gr.;
- Vegetable oil – 2 teaspoons;
- Egg – 1 white;
- Lemon juice – ½ lemon;
Preparing gelatin
It swells for quite a long time. It should be diluted with water in a ratio of 1:5. In order to soak the gelatin, you will need cold water.
Some people add warm water to help the gelatin dissolve faster. But under no circumstances should this be done, since gelatin may lose all its properties.
The resulting mass should stand at room temperature for 30 minutes.
- Sift the powdered sugar through a sieve, so that the mass for the mastic is very elastic and elastic, the powdered sugar must be of high quality;
- Make a well and add vegetable oil, then 1 egg white, lemon juice;
- After the gelatin has swollen, it is best to dissolve it in a water bath until liquid. Within one minute, gelatin turns into a liquid base;
- Add the melted gelatin to the powdered sugar. Mix the mastic;
- As soon as we knead the mastic, add 1 tsp. vegetable oil. This will make it pliable and will not tear when you roll it out;
- As soon as you have kneaded it, wrap it in film and leave it for 30 minutes to let it sit, it will be much easier to make products from it;
- After it lies down, we start rolling it out. The mastic should be elastic. If it turns out that it breaks, then it is best to knead it again;
- Roll out very thinly on a surface coated with powdered sugar and starch. The thinner it is, the neater your work will look. Modeling is a very exciting activity.
So, let's begin:
Mastic figures perfectly complement a birthday cake. To make it look even better, we suggest covering it with mastic first. Therefore, for the cake, roll out a thin layer of mastic and cover it.
In order to cover the cake with mastic we will need:
- Silicone mat, which you can buy at a candy store. He is not afraid of cold temperatures or hot ones;
- Rolling pin. It must be perfectly even. Traditional wood leaves nicks in the finish;
- Roll out the mastic and cover the cake with it.
The covered cake should definitely be decorated with hand-made flounces or roses.
Shuttlecocks
Preparatory stage:
- A glass is best for cutting out flounces for decoration. Use it to cut out circles.
- To prevent the mastic from drying out, and it dries very quickly. Place all the circles that you cut out in a pile, then they will not have time to dry out.
Fold the remaining mastic into a ball and put it in the refrigerator.
Mastic can be stored in the refrigerator for one month.
Modeling shuttlecocks from mastic consists of the following steps:
- Take one circle, cut it using a glass, you should get a “crescent”.
- Then take a pastry stick. If you don’t have one, then take a stick with a diameter of 1 cm.
- Using a knife, cut out a cone. And we roll the mastic with such a cone; you should press the cone quite hard. The result should be a wavy line, a “ruche”.
- In order to give the flounces more volume, they need to be glued to each other.
- To do this, lubricate the edge of the shuttlecock with water, and place the next one on it, pressing it. Let's do this process again. It turns out that one consists of three.
- Lightly brush the edges of the cake with water and glue the flounces with the wavy edges down.
- Using a stick, secure the edges of the flounces to the cake, making holes. This will make the mastic shuttlecocks more airy.
Roses
What would a birthday cake be without roses! Do you think that sculpting them is very difficult? But that's not true. We invite you to make them yourself, suitable even for beginners.
Pestle
It is better to make a rose pestle from mastic in advance with your own hands. It should feel firm when you apply the petals to it.
Marbling
To ensure that the roses are not just white, but marble red:
- Add a little red mastic;
- To make red fondant, you need to add red dye;
- In the middle of the white mastic, put the red one (there should not be very much of it, 5-6 petals). Stir until marbling appears.
Modeling
- Roll out a layer of mastic. The thinner you roll, the thinner your rose petals will be;
- Using a glass, cut out circles;
- We begin to apply the petals;
- Take the first circle, rub the edges of half the circle with a tablespoon, do not touch the second;
- We take a leaf and put it on the bud, fasten it;
- Now we take the second one, stitch the next petal with a seam away from us;
- When you make a petal, it should be slightly higher than the previous one;
- First we turn on the right, then on the left. Don’t forget to give the bottom the shape of a bud each time.
Thus we need to make five petals. The more roses you make for the cake, the more beautiful it will be.
Mastic bear
For beginners working with mastic, you can safely take on sculpting animal figures.
To make a bear figurine from sugar mastic we need a minimum of tools:
- skewer;
- modeling kit from a set of plasticine.
Modeling step by step:
- Roll out the mastic into a sausage;
- Divide the sausage into legs. Two equal small pieces. Cut off a piece for the body. And two identical pieces for the front legs. The main part of the head. A small piece for the muzzle and two ears;
- First of all, we make the body of our bear. We also roll it into a sausage and make it slightly flattened.
- Legs. We roll balls. Then we roll them into sausages - droplets.
- Let's make the bear sit. Attach the legs to the sides of the body using a skewer. You can also make soles with toes for him using a tool.
- Head. The bear's head is round and slightly flattened.
- Muzzle. Make a ball and slightly flatten it on the sides.
- We attach the muzzle to the head. On the face we draw eyes with a toothpick and a small nose. The nose can be made from a small ball molded from mastic. We attach the head to the body.
- Pens. Roll out the circles. We recommend making the handles in the shape of a drop. We also draw fingers with a stack;
- Ears. We roll two circles, press them, we get “cakes”. Make dents in the middle of the ears;
- We attach the ears to the head.
We managed to make such an interesting bear figurine with our own hands for the cake.
And now we suggest you try to make a figurine of a charming bunny with your own hands to decorate the cake
To make a hare figure, we will need:
- White mastic;
- Pink mastic;
Manufacturing process:
- Knead the white mastic well;
- Roll up a sausage and mark on it where the head, body, legs and ears of the hare will be located;
- From a piece of paste intended for the body, first roll into a ball and then form a cone;
- Roll out pink mastic into a layer 1 cm thick. We recommend sprinkling the surface with potato starch in advance. Cut the workpiece in the form of a drop. Glue it to the surface of the part. And then give it the shape of a “belly”;
- From a piece of mastic intended for the head, first roll into a ball and then form a cone;
- Cheeks are very easy to make. Form small pieces from small pieces and attach them to the surface of the part, giving them the shape of cheeks. Using a modeling stick, make a mouth;
- Make a spout from sugar paste to simulate pink color and attach it in the same way. Using a toothpick, connect the manufactured parts;
- From a piece of sugar paste intended for paws, first roll into balls, then form into cones and flatten slightly. Using a knife, make cuts on the workpieces, giving them the shape of fingers;
- Roll up pink modeling paste, make oval blanks and attach them to the surface of the part where the indentations were previously made. Attach the paws to the body;
- From the pieces of sugar paste intended for the other legs, first roll into sausages, then slightly flatten on one side and also attach to the body;
- From a piece of sugar paste intended for ears, first roll into sausages and then slightly flatten. Roll out pink modeling paste on a surface sprinkled with starch using a rolling pin into a layer 1 mm thick. And cut out two identical pieces in the shape of a drop, and then attach them to the ears. Next we attach them to the head.
- We recommend sculpting the eyes from black mastic, and the teeth from white in the shape of a rectangle.
These interesting figures can become decorations for a cake! Children will really like this sculpture. Try and fantasize, make your own cake mastic decorations, you will definitely succeed!
| 18536 views
Source: https://ProTorti.ru/ukrasheniya/figurki-iz-mastiki-svoimi-rukami-poshagovo.html
Fortune Teller
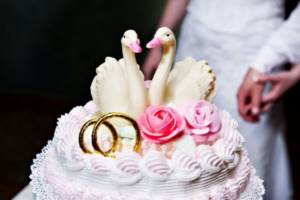
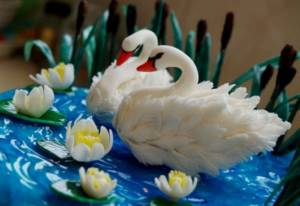
Swans are incredibly loyal, every day they are ready to give each other affection, tenderness and care. A pair of these creatures is identified with the bride and groom, because they must maintain warm feelings and sincere relationships for their entire life together. Tamara Solntseva
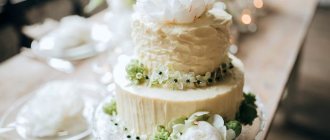
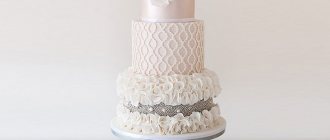
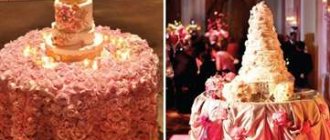
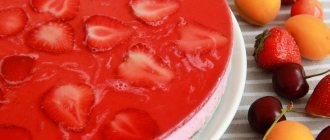
A single-tier wedding cake with swans can look completely different. For some, a creamy design would be ideal, as soft and airy as the birds themselves. Others prefer the elegance and sophistication of swans, which can be emphasized with mastic. You can decorate such a cake in the form of a pond or waterfall, and lilies, roses, a couple of rings or hearts are used for decoration. The swans themselves can be purchased ready-made at a confectionery store, and the birds can be either edible or not. The second option allows you to save the cake decoration as a keepsake.
The newlyweds should determine the taste of such a dessert based on personal preferences. It is not recommended to chase exotic fashion trends, because, no matter how spectacular the design of the dessert, its idea still belongs to the classics. The cakes can be made with vanilla, nut or honey, and for the filling you can use custard or butter cream with the addition of candied fruits or nuts.
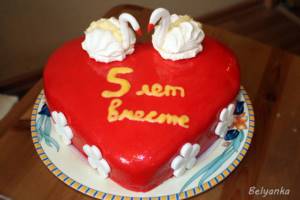
A cake with swans is most often made for a classic celebration that is not associated with any style. Since these birds are white, the dessert itself is decorated in this shade; you can only choose one or two additional colors for decoration. Often such a cake is decorated for a wedding in a certain shade, most often red, blue, pink or gold.
Interesting! Here you can see the filling options. And this article contains instructions on how to choose the optimal size of dessert.
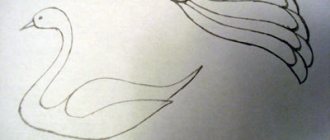
Wedding swan made of mastic. Master class » DIY Design & Decor
Wedding swan made of mastic. Master Class
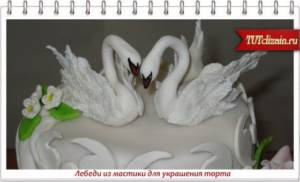
At first glance, it may seem that making such a swan is very difficult and not everyone can do it, but in fact this is not the case. Watch a master class on making a wedding swan from mastic.
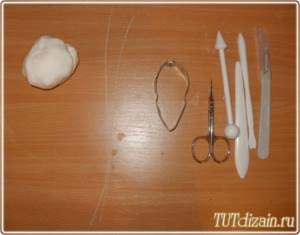
- To make a wedding swan you will need:
- – sweet mastic;
- – stainless food wire;
- – a mold in the shape of a wing;
- – food gel colors;
- – kandurin (food pearlescent coloring);
- – small edible beads;
- – small scissors and other tools with photos below:
Wedding swan from mastic step by step:
Make a swan body from mastic (photo 1). Then you need to make his neck, for which take a small piece of mastic, string it on a wire and roll it out. From the resulting flagellum, form the head and neck of the future swan (photo 2). Connect the neck to the body by inserting the wire into the desired place (photo 3).
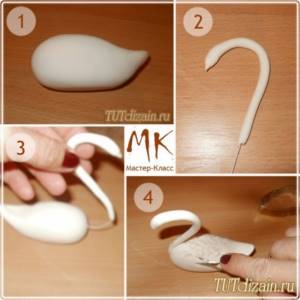
Next, make “feathers” using small scissors (photo 4) and a tail (photo 5).

Then roll out a thin layer of mastic and cut out the wings using a mold (photo 6). Make a drawing in a stack - an imitation of feathers (photo 7). Next, the edges need to be “waved” with a stack with a ball at the end (photo 9).
Start assembling the swan parts - attach the wings to the body using sweet water, which will be used instead of glue (photo 10).
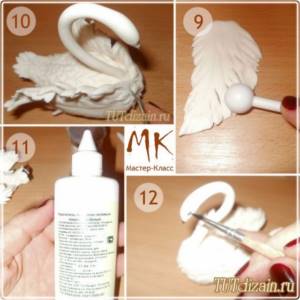
Draw the nose and eyes of the wedding swan (photo 12) using gel food coloring (photo 11). You can also use simple dry dye, previously diluted with water.
The head of the wedding swan will be decorated with a crown, for which cut out the teeth for the crown using a scalpel (we recommend purchasing a pair of disposable scalpels at the pharmacy, as they will be convenient for cutting out small elements) (photo 13). Place the crown on a pencil (for convenience) and decorate with edible beads (photo 14). Cover the finished swan with kandurin (food pearlescent coloring) (photo 15).
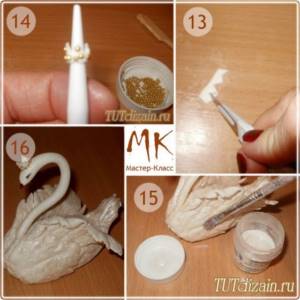
Make the second swan in a similar way, but without the crown and send them to dry. Then you can decorate your wedding cake with such swans.

When copying, an ACTIVE link to tutdizain.ru is required!
Source: https://www.tutdizain.ru/sam/576-svadebnyy-lebed-iz-mastiki-master-klass.html
Options – with flowers and others
First of all, desserts are divided into single-tier and multi-tier. In the first case, several cakes of the same size are used, coated with filling.
The cake can be made round, square or heart-shaped, and in addition to the swans, depict a small lake. You can make two identical single-tier desserts by placing them side by side. The surrounding space can be decorated with lilies and water lilies.
In this case, one swan is placed on each of them, their necks are arched towards each other, and their beaks are touching.
Multi-tiered cakes can be made more original. The swans are located on the top element, and since it is not too large, no additional decoration is required. Only other tiers are decorated, for example, small water lilies are arranged in a cascade along the side. Decorations in the form of flowing fabric or a waterfall will harmoniously fit into the decor.
A multi-tiered cake placed on a stand looks original. In this case, the swans decorate only the top element, and on the rest a neutral design is created, for example in the form of cream flowers. There are also unusual stands on which the tiers are not located on top of each other, but in a free order.
Interesting! You can also use fresh flowers to decorate your cake if you secure them in special floral cones.
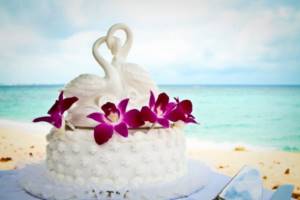
Often a cake with swans is decorated with flowers - lilies, water lilies or roses. The latter option allows you to emphasize the elegance of the wedding, since the queen of flowers is considered a classic for marriage. The roses can be made small so that they frame each tier, and the space around the swans can be decorated with large buds. Flowers are made from cream or mastic, and in the second case the result is more realistic. You can make the white cake decorated with colored roses, and snow-white swans will complement the delicate design.
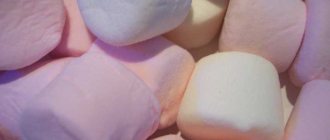
Marshmallow swans for cake decoration (MK)
Ingredients:
- regular white marshmallow
- confectionery mastic white
- thick cream
- mastic or food gel for decoration
Choose marshmallows that are elastic and textured, rather than soft, so that they do not crumble or float.
Preparation
In advance, sculpt necks for swans from confectionery mastic and dry them. Make extra necks just in case.
Necks can also be made from icing or white chocolate.
Divide the marshmallows into halves.
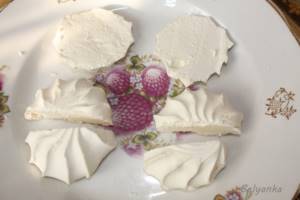
To make the wings, cut one marshmallow half in half lengthwise.
Turn the other half upside down and apply a high strip of thick cream in the center (using a pastry syringe), forming the body of a swan.
Place marshmallow halves on either side of the cream strip, cut side down, to create wings.
Insert the swan's neck into the cream and decorate the head with food markers or colored icing or fondant.
| The book “Sweet floristry. Exquisite Cake Decorations by Peggy Porschen |
| Tescoma “Delicia” cake stand, rotating |
| Charmel marshmallow vanilla |
Source: https://eda.parafraz.space/lebedi-iz-zefira-dlya-ukrasheniya-torta-mk/
How to do it yourself
There are different confectionery techniques and ways to make swans for a wedding cake. Some methods are available even to beginners, so the bride and groom can decorate a wedding cake with swans, as in the photo, on their own, saving a small part of the family budget.
The following options for making swans for a cake are distinguished.
- From cream. Using special attachments for a pastry bag or syringe, you can make the body of swans, but the neck and head will have to be made from another product, for example, mastic, icing or chocolate.
- From mastic. This is a plastic confectionery mass from which you can mold any figures, like plasticine. The body, neck, wings and head are created separately; ordinary toothpicks or professional pastry tools are used to give the desired texture. The mastic itself can be bought ready-made or made independently.
- From caramel. Such swans look unusual and bewitching, since they turn out transparent, similar to crystal. The required figure is cast from the heated sugar syrup, but you need to work quickly, since the mass hardens quickly. Since the products for making caramel are inexpensive, future newlyweds can practice several times to learn how to make such swans perfect.
- Made from chocolate. Swans are created from melted chocolate using special molds. The figurine can be solid, or can be assembled from several parts - head, neck, torso and wings. It is better to use white chocolate rather than milk chocolate, so that it is clear that the bird figures are swans.
- From marzipan. This is an elastic paste made from powdered sugar and grated powdered almonds. As in the case of mastic, any figures can be sculpted from marzipan, which are then decorated with food coloring.
- From glaze. From the white fluid mass you can “draw” swan figures on tracing paper, and when they harden, separate them and decorate the cream base of the body. Each bird will require two identical parts, so it is advisable to put a clear drawing under the tracing paper.
There are not only desserts with figurines of swans, but also entire cakes in the shape of these birds with a 3D effect. In this case, the cakes are made oval to resemble the body of a swan, and the texture of the feathers is conveyed with whipped cream. The only disadvantage of such a cake is that the neck of the bird is made short, otherwise there is a possibility that it will break and ruin the whole impression of the dessert.
Confectionery techniques allow you to create real masterpieces for weddings. A wedding cake with swans and roses can sparkle with new bright colors if you use your own imagination and get inspired for creative solutions.
If the future newlyweds make and decorate such a dessert themselves, they will be able to put their soul into the process, show their own individuality and surprise everyone present at the wedding.
Irina Vasilyeva
Wedding fairy
Previous article
Noble luxury - golden wedding invitations: with pink and other shades
Next article
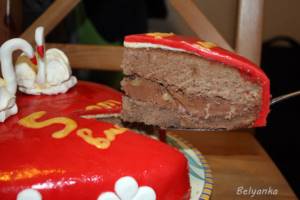
Nutella cake + Master class “Swans”
This is such a chocolate-pre-chocolate cake. This is the most delicious chocolate cream I have ever tried. I recommend trying it, you won't regret it.
- Compound:
- biscuit:
- 6 eggs
- 1.5 cups flour
- 1.5 cups sugar
- baking powder
4 tbsp. l. cocoa
- impregnation:
- water+sugar
- cream:
- 250gr. butter
- 125g condensed milk
- 100g chocolate
- 100g Nutella
- walnuts
Cream for the top crust:
200 g butter 100 g condensed milk - Preparation:
Beat eggs with sugar, add flour with baking powder and cocoa. Bake the biscuit for 30-40 minutes at 180C.
Let the biscuit cool, cut into 2-3 layers. Soak in syrup (water + sugar). Heat the water, add sugar and heat until the sugar dissolves.
- Prepare the cream: Beat the butter until white, gradually add condensed milk.
-
- Next add melted chocolate and Nutella
-
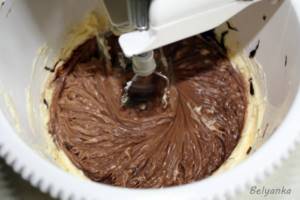
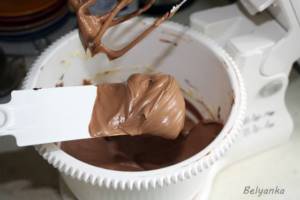
This is how thick the cream should be
Assembling the cake.
We put cream on the first cake (I like there to be a lot of cream, so I put a good layer), then we put nuts
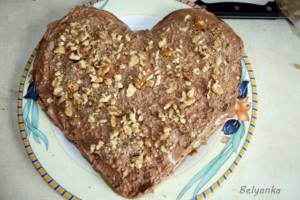
Cover with the top cake layer (or if you still have a cake layer, layer it too) and pour butter + condensed milk cream over it. Using the same technology as the main cream.
The top of the cake can be decorated with nuts.
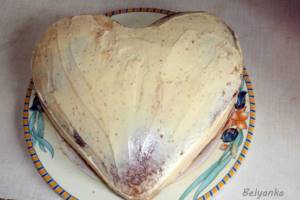
I covered the cake with fondant.
Master class “Swans”
I want to show you how I made the swans.
1. You need to make swan necks in advance. They can be made from mastic, marzipan or chocolate. I made it from white fondant. I did a lot at once, you never know. And so it happened, the very first necks, the clumsy ones, froze and were hard, but for some reason the last, most beautiful ones did not freeze. I had to insert crooked necks into the swans))
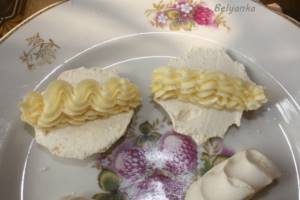
2. You need marshmallows that are elastic (sometimes they crumble - it doesn’t turn out beautifully), and textured (the more textured, the more beautiful the wings)
Take half a marshmallow and cut it in half lengthwise.
This will be the “bottom” of the swans. Next, separate the 2 halves and cut them in half crosswise.
These will be 2 pairs of wings.

3. Take our cream with which we lubricated the top cakes and use a culinary syringe to squeeze out the body for the swans. (it’s better to make the body from “whipped cream + sugar” cream, it’s whiter)

4. Next we place the wings on the sides.
And we will insert the necks into the cream. It turns out like this.
I also made red noses from fondant. So they became like swans)
Source: https://belyanka.blogspot.com/2012/08/blog-post_323.html
Video tutorial on creating a bouquet of candies
A wedding composition made with the help of candies is a great way to make the holiday more interesting and stand out. If this item is used as decoration for the hall at a celebration or the guest decides to surprise the newlyweds with an unusual gift, then ordering the decoration from a confectionery shop is the easiest way out. However, it is much more interesting to create an attribute with your own hands. The main thing is that it is in harmony with the overall style and reflects the theme of the celebration. For a visual example, here is a video that describes in detail the process of creating a sweet candy bouquet.