How to Create an Invitation in Word » Word and Excel Help
The almost limitless possibilities of Word allow you to use it to create not only dry documents or complex tables, but also to dilute them with graphics, beautiful text labels and other elements.
Based on such tools, you can easily create an invitation using only Word. The fastest and most convenient way to make, on the one hand, a simple, but, on the other hand, high-quality invitation is to use the templates that are in the program. To do this, go to the “ File”
" and open the "
Create
" item.
Then enter “ Invitation
” in the search field. In this case, the Internet on the device must be turned on. By clicking on the template you like, you can read a short description and download it for further work.
Text pre-entered in templates is used for example purposes only. You can simply rewrite it, change the design settings, choose a different font, and so on. The same goes for graphics that may be present on these templates.
The number of templates specifically for creating invitations is quite large, so there is an option for any event and purpose.
But if you still need to create something truly unique, then you can use the full potential of Word.
The following option is just one of many possible for creating a high-quality and attractive invitation to Word.
First of all, you should create a blank document by going to “ File”
» à «
Create
».
Then we go to the “ Design
” tab. You can put a backing there. A simple but very attractive tool. Use either your own images or images found using Bing. You can also fill the page with solid text or a gradient. And finally, add borders. In the settings, you just need to select the design style, thickness and color of the borders.
Next, you can work on the design of the invitation itself. Add a welcome banner to the top of the page. To do this, either find your own image or on the “ Insert”
» Click “
Images from the Internet
”, and then enter the desired query in the search field. The same can be repeated at the bottom of the page. After this comes work with the text.
Modern WordArt styles are perfect for our purposes. These can be found on the Insert
" in the "
Text
" section.
Click on the letter “ A
” icon and select the style you like. Less important text can be entered simply by changing only the color, style or font.
Using many other tools, you can write text in multiple columns, add a table, leave a blank space to fill out a name by hand, and much more.
A certain set of templates for creating invitations is also available in older versions of Word. The above instructions are relevant for the latest versions of the program. But most of the actions can be performed with similar success in Word 2003. The only thing is that it is not recommended to use old WordArt styles. They are significantly outdated and will spoil the entire design of the document.
Print a range of pages in a multi-section document - Office
- 22.05.2020
- 3 minutes to read
- Applies to: Word 2013, Word 2010, Office Word 2003
In this article
Office 365 ProPlus is being renamed Microsoft 365 Apps for Enterprise . For more information about this change, see this blog post.
This article explains how to print a page or range of pages in Microsoft Word 2013, Microsoft Word 2010, Microsoft Office Word 2007, and Microsoft Office Word 2003.
Additional Information
In Word, you can create a document that consists of several sections, each using different page numbers. To specify a page or range of pages to print, you must specify both a page number and a section number for the range you want to print. In a multi-section document that contains more than one page 1, Word cannot determine which page 1 to print unless You also won't provide a section number for that page.
To print a range of pages in sections, use the following syntax in the Pages :
Page numberSection number -Page numberSection number
For example, you would enter p1s1-p2s2 to print from page 1 of section 1 to page 2 of section 2.
To print a page or range of pages in Word, follow these steps:
Scroll to the page you want to start printing from and click anywhere in the margins. Note the page number and section number as shown in the status bar.
Scroll to the last page you want to include in your print selection and click anywhere in the margin. Note the page number and section number as shown in the status bar.
In Word 2013, Word 2010, and Word 2003, click Print on the File . In Word 2007, click the Microsoft Office Button, and then click the Print button.
In Word 2013 and 2010, enter the range of pages you want to print in the Pages in the Settings . In Word 2007 and Word 2003, select the Pages in the Page range , and then enter the range of pages you want to print in the box.
When entering a page range, use the syntax p#s# -p#s#. For example, to print page 5 of section 3 through page 2 of section 4, enter p5s3-p2s4. To print nonadjacent pages or nonadjacent sections, use a comma (,) to separate page and section numbers as you enter them. For example, to print sections 3 and 5 (but not section 4), enter s3, s5. To print pages 2–5 of section 3 and pages 1–4 of section 5, enter p2s3-p5s3, p1s5-p4s5.
Click OK to print the range.
This method is the only way to print specific pages using print options along with mail merged documents.
The printing of pages in relation to their section depends on the numbering formatting. If numbering in a document is formatted as continuous, accessing page 1 of a particular section will likely not result in printing. This occurs because when numbering is formatted as continuous, page numbers in all but the first section do not start on page 1. In this case, the page must be referenced according to its overall position in the collection of document pages.
For example, in a document that is formatted like this, here are the pages for restart and continuous numbering:
Source: https://sait-s-nulya.ru/raznoe/kak-napechatat-priglashenie-v-word.html
WE SEND OUT POSTCARDS VIA MS OUTLOOK
So, the greeting card is ready. Now you need to send out congratulations. These can be personalized messages, when the addressee is the only recipient of the message, or sending the same type of messages to several recipients. Let's look at the mailing process in MS Outlook and find out how you can simplify your task.
Launch MS Word
(empty file).
In the Mailings
, select the
Start Merge Step-by-step Merge
Wizard (Fig. 16).
In the Select document type
select the document type
Electronic message
and click
Next
.
Opening the document (Fig. 17). The following dialog box will open - Select Document
, in which we choose the basis for creating a message.
Since we already have MS Word open, we select it, that is, Current Document
.
Then click Next.
Selecting recipients (Fig. 18).
Note that there are two interesting columns in this list: Gender and Title. They will help you correctly address each recipient of your congratulations.
If the list is prepared, in the Select Recipients
put a check mark next to the
Use list
and, using the
Browse
, add a list (Fig. 20).
After adding a mailing list, in the window that opens, you can adjust the list of recipients: check the box next to those entries that should be included in the mailing list (Fig. 21). After adjusting the list of recipients, click OK
.
Since we have a fairly simple mailing text (only the greeting changes), in the Create
Message
we will be interested in the
Welcome
Line (Fig. 22).
Place the cursor at the very beginning of the mailing text and in the Create Messages
, select
Welcome
line .
The Insert Welcome
Line window opens .
Here you can see the greeting format and, if necessary, adjust it, then click OK
(Fig. 23).
To see how the mailing text will ultimately look, in the Create
Messages
select the
Next option. View messages
(Fig. 25):
If during viewing you find any inconsistencies, they can be easily eliminated by going to the
Field
Selection (Fig. 26).
After viewing the message, complete the merge by clicking Next in
the
View
Messages
window .
Completion of the merger
(Fig. 27).
In the Completing
Merge
, select
the Email
option (Fig. 28).
We send postcards.
Compound Emails dialog box that opens, fill
in the
To
,
Subject
(Fig. 29).
In the Send
entries section, select the item
All
. In this case, the letters will be sent to all recipients marked with a checkmark in the list and automatically placed in the “Sent Items” folder in MS Outlook.
How to make wedding invitations in Word with your own hands - instructions
Word is a common computer program that is used everywhere in study or work. Many people don’t consider it when it comes to making invitations, although it has all the necessary tools.
And despite the fact that it specializes in creating text files, the invitations made in it turn out beautiful. Unlike specialized image processing programs such as Photoshop, the Word interface is extremely simple and does not require deep study of instructions.
Original invitations
You will need: cardboard in white and primary colors (for example: beige, pink or blue), decorative stamp and ink, scissors, hole punch, 1 cm wide ribbon.
Master Class
- Trim the edges of a sheet of white cardstock.
- Print the invitation text on white cardstock.
- Decorate with decorative stamps on cardstock in your primary color.
- Place 2 sheets of paper together and make 2 holes using a hole punch.
- Tie the ribbon.
How to use templates in Word
Word samples are rarely used in everyday life, so they are difficult to find on the Internet.

Most of them are on the official website, where you can find stamps for any special occasion for free.
To make your own invitation template, you need:
- Word from 2007 (earlier versions do not support the dotx extension);
- invitation text;
- 2–3 hours of free time to find the required workpiece;
- 30–60 minutes to enter text.

- After the required blank is found, it is downloaded and opened using the program. It contains all the necessary formatting and pictures, so there is no need to look for anything else.
- If the file was downloaded from the official website, then the window that opens contains all the necessary explanations, so you only need to transfer the invitation text.
- Once the text entry is completed, the entire postcard is reviewed for errors or places where anything needs to be changed.
- When everything is ready, you need to remove the explanations.
- Save file.
Elegant invitations
You will need: white cardboard, a figured hole punch, burlap, white lace, white flowers, twine, scissors, glue.
Master Class
- Print the invitation text on sheets of cardboard.
- Fold the sheets in half like a card and decorate using a shaped hole punch.
- Glue a strip of burlap down the center of each invitation.
- Glue the lace and flower.
- Attach a tag to the twine and sign who the invitation is addressed to.
Elegant wedding invitations are ready!
How to make an invitation yourself in Word
When you can’t find suitable templates for wedding invitations in Word on the Internet or you want to create something unique, you can make a card yourself.
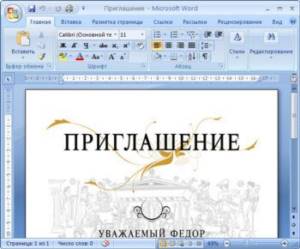
Although working with the program is simple, creating an invitation yourself can be difficult due to the lengthy selection of all the components. When the newlyweds are not professionals in design or other areas related to visual design, homemade cards are noticeable at first glance.
If you can see that you spent a lot of time on them, trying to find the best solution, then they will evoke a lot of positive emotions. Guests will regard such an invitation as a sign of attention to loved ones and an expression of the individuality of the newlyweds. But when the colors, pictures or frames do not combine with each other, then such a postcard can only scare away.
Incorrectly selected elements show a disdainful attitude towards both the wedding and the guests.
To create an invitation you will need:

- pictures (flowers, rings, doves, swans);
- abstract patterns;
- fonts that you plan to use;
- invitation text;
- word program (any version).
At the first stage, choose the size of the invitation; most often it is made in A5 format. They also decide whether it will be in the form of a book, postcard or scroll.
The way the invitation is laid out influences the choice and placement of decorative elements.
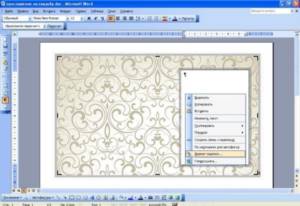
After the choice is made, open the Word program and create a new file.

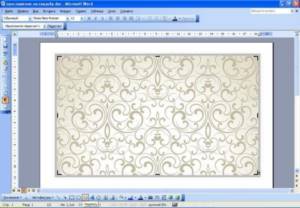
The file first creates a drawing area. To do this, open the “insert” menu, point to “drawing” and select “create drawing” from the drop-down list. In the area that appears, you can insert decorative elements and text blocks.
There are two ways to set the background for the invitation: the first is to fill the sheet completely, and the second way is to fill the drawing area. It is important to remember that the side margins will be cut with scissors, and such consumption of materials is not advisable.
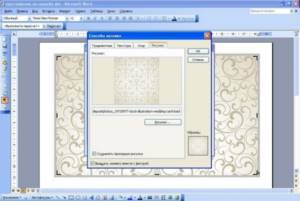
When an abstract drawing is chosen for the background, the fill is made from the downloaded file. It is important to pay attention to the “preserve proportions” checkbox.
If the image differs in size from the work area, then stretching it over the entire area will lead to distortion of the lines.
When you check this box, the image will be enlarged in its smallest part, which will result in cropping in length, but will preserve the structure of the picture.
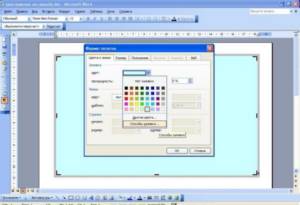
At the next stage, a text block is inserted; it is advisable to make at least 3 fields: the first for addressing the guest, the second for the main text, the third for the signature. By default they are opaque and have a black border. This is unacceptable for an invitation, so you need to remove this formatting.
Place the cursor in the text block so that the working border appears. Right-click on the frame and select “label format”. The same window will appear as when filling the background, but instead of choosing a color, set the values “no fill” and “no line”.
You need to click on the frame, otherwise the text formatting window will appear instead of the inscription menu.
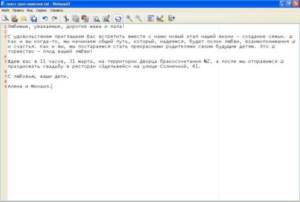
After this, open the text of the invitation and copy it into the required blocks. For each inscription, select the desired font and color that will contrast with the background image.
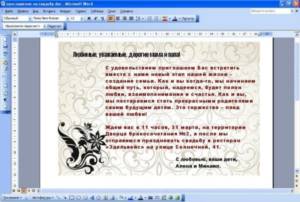
Drawings and photographs are inserted, after which the optimal arrangement of blocks is selected. At the final stage, a text file with the finished invitation is saved.
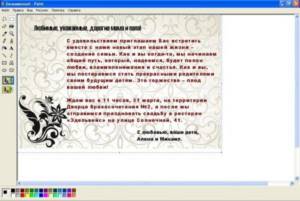
To save a postcard as a picture, you need to right-click on the workspace and copy it to the clipboard. After that, open any graphics editor and insert an image. After cutting off the excess, you can save the postcard as a picture; it is best to choose the Jpeg extension.
Saving as an image is necessary if you plan to use it for an electronic invitation.
In this video there is a master class on how to design a postcard in MS Word:
This precaution also exists to avoid losing selected fonts when printing from another computer.
Word does not require any special knowledge or skills. With enough imagination, it allows you to create beautiful wedding invitations. Before buying expensive designer layouts or image programs, you should try making a postcard yourself using available tools.
Source: https://svadba.expert/podgotovka/priglasitelnye/shablony-v-vorde
WE CREATE A GREETING CARD IN MS POWERPOINT FORMAT
Selecting pictures.
Using the Internet, we find several pictures in PNG or GIF formats (the latter allows you to create animation in a postcard). For example, these (Fig. 1-4):
Open a blank presentation in MS PowerPoint without using any templates. Remove
Slide
Title and
Slide
Subtitle . The result is a completely clean slide.
Create the background of the postcard.
We use one of the pictures as a background. We insert it into the slide field and “adjust” it to the size of the slide (Fig. 5).
Then we place the rest of the pictures on the slide, and move one of them (with the image of Santa Claus) outside the main field of the slide (Fig. 6).
Adding animation.
Now let's add animation (for this we use images in GIF format).
In our example, this is a picture of Santa Claus. Select it by clicking, then on the Animation
select the
Add animation
, then
Other movement
paths (Fig. 7).
In the window that opens, select the path of movement, that is, the trajectory of the image in the future postcard. For example, Sine wave
1
(Fig. 8).
The slide will show the trajectory of movement (Fig. 9), which can be changed with the mouse, like any picture (reduce, enlarge or move). In our example, Santa Claus moves from left to right (Fig. 10). To see what it will look like, press the F5
(slide show mode) and left-click on the slide.
To exit this mode, just press Esc
.
Adding text.
You can now place text in the slide field.
To do this, in the Insert
select the
WordArt
and then select the font you like (Fig. 11).
A frame will appear in the slide field for adding text. It can also be easily adjusted with the mouse. Now let's add animation to the congratulatory inscription. To do this, in the Animation
, select the command
Add animation
, and then -
Figure
. Thus, two objects will move in the postcard - a figurine of Santa Claus and a congratulatory inscription.
We optimize postcard viewing.
And the final touch.
Typically, postcard recipients do not know how many times they need to click on it (or whether they need to) to see the animation. To prevent them from having such questions, we will set viewing parameters in the Animation
Area (Fig. 12).
Since our greeting card contains several pictures with animation, right-click on each of them and select the launch type, for example Launch after the previous one
(Fig. 13). In this case, all animated objects will move without additional clicks on the slide.
We save the postcard.
The postcard should now be saved correctly.
To do this, specify the file type: PowerPoint Demonstration
(Fig. 14).
Browsing
the final version of the greeting card (Fig. 15):
How to Create an Invitation in Word » Word and Excel Help
The almost limitless possibilities of Word allow you to use it to create not only dry documents or complex tables, but also to dilute them with graphics, beautiful text labels and other elements. Based on such tools, you can easily create an invitation using only Word.
The fastest and most convenient way to make, on the one hand, a simple, but, on the other hand, high-quality invitation is to use the templates that are in the program. To do this, go to the “ File”
" and open the "
Create
" item.
Then enter “ Invitation
” in the search field. In this case, the Internet on the device must be turned on. By clicking on the template you like, you can read a short description and download it for further work.
Text pre-entered in templates is used for example purposes only. You can simply rewrite it, change the design settings, choose a different font, and so on. The same goes for graphics that may be present on these templates.
The number of templates specifically for creating invitations is quite large, so there is an option for any event and purpose.
But if you still need to create something truly unique, then you can use the full potential of Word.
The following option is just one of many possible for creating a high-quality and attractive invitation to Word.
First of all, you should create a blank document by going to “ File”
» à «
Create
».
Then we go to the “ Design
” tab. You can put a backing there. A simple but very attractive tool. Use either your own images or images found using Bing. You can also fill the page with solid text or a gradient. And finally, add borders. In the settings, you just need to select the design style, thickness and color of the borders.
Print a range of pages in a multi-section document - Office
- 22.05.2020
- 3 minutes to read
- Applies to: Word 2013, Word 2010, Office Word 2003
In this article
Office 365 ProPlus is being renamed Microsoft 365 Apps for Enterprise . For more information about this change, see this blog post.
This article explains how to print a page or range of pages in Microsoft Word 2013, Microsoft Word 2010, Microsoft Office Word 2007, and Microsoft Office Word 2003.
Additional Information
In Word, you can create a document that consists of several sections, each using different page numbers. To specify a page or range of pages to print, you must specify both a page number and a section number for the range you want to print. In a multi-section document that contains more than one page 1, Word cannot determine which page 1 to print unless You also won't provide a section number for that page.
To print a range of pages in sections, use the following syntax in the Pages :
Page numberSection number -Page numberSection number
For example, you would enter p1s1-p2s2 to print from page 1 of section 1 to page 2 of section 2.
To print a page or range of pages in Word, follow these steps:
Scroll to the page you want to start printing from and click anywhere in the margins. Note the page number and section number as shown in the status bar.
Scroll to the last page you want to include in your print selection and click anywhere in the margin. Note the page number and section number as shown in the status bar.
In Word 2013, Word 2010, and Word 2003, click Print on the File . In Word 2007, click the Microsoft Office Button, and then click the Print button.
In Word 2013 and 2010, enter the range of pages you want to print in the Pages in the Settings . In Word 2007 and Word 2003, select the Pages in the Page range , and then enter the range of pages you want to print in the box.
When entering a page range, use the syntax p#s# -p#s#. For example, to print page 5 of section 3 through page 2 of section 4, enter p5s3-p2s4. To print nonadjacent pages or nonadjacent sections, use a comma (,) to separate page and section numbers as you enter them. For example, to print sections 3 and 5 (but not section 4), enter s3, s5. To print pages 2–5 of section 3 and pages 1–4 of section 5, enter p2s3-p5s3, p1s5-p4s5.
Click OK to print the range.
This method is the only way to print specific pages using print options along with mail merged documents.
The printing of pages in relation to their section depends on the numbering formatting. If numbering in a document is formatted as continuous, accessing page 1 of a particular section will likely not result in printing. This occurs because when numbering is formatted as continuous, page numbers in all but the first section do not start on page 1. In this case, the page must be referenced according to its overall position in the collection of document pages.
For example, in a document that is formatted like this, here are the pages for restart and continuous numbering:
Source: https://sait-s-nulya.ru/raznoe/kak-napechatat-priglashenie-v-word.html
Create a business card using Word. Very detailed MK!
Good evening everyone! I want to share with you my experience, namely one of the ways to create a business card with your own hands, practically “in the field”))) For this we will need standard programs - Microsoft Office Word and Microsoft Office Picture Manager.
Basically, I will show you some of the capabilities of these programs. As practice shows, many are unaware of the resources of these standard assistants.
What will you get as a result of MK:
- a Microsoft Office Word document, when printed, you will have an A4 sheet with 10 business cards in your hands, there will also be serifs on the sheet with which you can easily cut out your business cards (using a stationery knife and a ruler), and they are all they will be even, neat, and of the same size;
- skills in working in Microsoft Office Word and Microsoft Office Picture Manager, with the help of which you can, by analogy, make tags and/or passports for your works and other cute things)))
So, first we need to decide on the size of the business card. I decided to make a business card the size of a standard credit card. A credit card measures 8.5 x 5.35 cm. I round down, my business cards will measure 8.5 x 5.3 cm.
Now we need to prepare the “background” of our business card - we find on the Internet a beautiful picture of a suitable theme, preferably not very bright. The picture quality must be good, I choose more than 1000 pixels on each side. You can also use a photo of your work as a background. I chose this picture, it has a resolution of 1920x1200
The picture is good for everyone, but we still have to “adjust” it to the size we need, so that the aspect ratio is proportional to the aspect ratio of our business card (85x53 mm.) We calculate what resolution the picture should have: multiply both numbers by one number, in my case by 20 , maybe less. I get 1700x1060. To adjust the picture to the desired size, I open it through the Microsoft Office Picture Manager (right-click on the picture (right-click), select Open with from the drop-down menu. - Microsoft Office Picture Manager.
In the window that opens at the top, click the “Change pictures” button. "
A menu opens on the right. We will use two tools from there: Crop and Resize. First, click “Resize” .
Another new menu opens on the right. We put a dot in front of the item “Percentage of the original width and height,” and begin to lower the percentage, in my case to 89. If you have a picture of a different size, or you will make a business card of different sizes, then the number will be different. Below are the original size and the new size of the image. The new size should be as close as possible to the 1700x1060 (we leave a little more, then we’ll cut off the excess). When the percentage is selected, click “OK”.