When planning important events with a large number of guests, you cannot do without a seating plan.
Guest seating plan
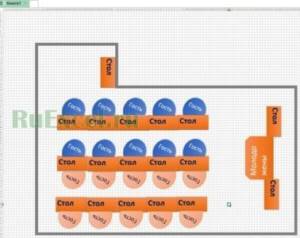
On the plan, it is advisable not only to indicate who is sitting where, but also to maintain the required distances so that guests do not interfere with each other and can move freely if necessary. The Excel program is very helpful in creating a seating plan, firstly, because it does not require special skills in use and design, and secondly, because it allows you to draw a grid and scale objects to maintain all distances. Creating a seating plan for guests step by step (in detail).
We plan seating in advance
Preparing a seating chart is not something you can easily finish the night before your wedding. This is a serious issue, by solving which you can save yourself from numerous problems during the wedding evening. Seating planning should be done in three stages:
- • After the guest list has been compiled and the venue has been selected, feel free to sit down and draw up the very first, “raw” seating plan. It’s worth figuring out how many people will sit at one table, how many tables there will be, how you can divide the guests so that they have fun with each other. The furniture arrangement and the number of tables, and therefore the menu and decor, depend on the first seating plan.
- • After guests have received invitations and answered yes/no by the specified date, a more accurate seating chart can be drawn up. Remove from the plan those who cannot come and distribute the remaining guests according to their age, degree of relationship, hobbies, etc. This is usually done at least 2 weeks before the celebration. It is this seating chart that should be sent to the organizer and decorator to prepare the chart and seating cards.
- • It happens that one of the guests, due to unforeseen circumstances, cannot come, but someone invites their significant other with them, and you find out about it just a couple of days before the wedding. At the time of such clarifications, a few days before the celebration, the final seating plan should be drawn up. All changes must be communicated to your team, and the final list must be sent to the host and banquet manager of the venue.
The sooner you start making a plan, the easier it will be to make adjustments later and keep the numerous cost items associated with seating under control.
Save Saved
Save Saved
Save Saved
Little tricks to help

The fun and popular game “Take a seat on a chair” should be in the middle of the entertainment program, and not at the beginning of the celebration. Therefore, the newlyweds are obliged to think about where each guest will sit.
It’s impossible to remember who sits where. Therefore, there are some programs that allow you to perform simple tasks. To do this, just download them from the Internet and fill in the empty fields.
The planner will be a great way to quickly distribute everyone’s plantings. It contains 3 elements:
– seating chart;
Editor's Choice: Shabby Chic Wedding: Tips for Implementation with Photos
– list of invitees;
– a notepad for notes.
First, enter the guest details. Each person is written on a separate line.
The chart automatically switches to a second tab, allowing you to “sort” friends and relatives as you wish.
Analyzing the guest list
To create a seating plan, you need to analyze the guest list. Make a table in which the first column is the name of the guest; second column - kinship/relationship/family affiliation: for example, friend of the groom or sister of the bride; in the third, indicate the age category. After that, start distributing guests to tables. In this case, you should pay attention to:
- • Age: it is better to seat older guests next to each other so that young people do not disturb them to have a quiet time and relax.
- • With/without a couple: a wedding is a great opportunity to meet interesting people, so it’s better to seat single friends at the same table, but it’s better to seat couples together, so they will be more comfortable.
- • Relationships: if a group of friends have gathered at a wedding and have been together all their lives, regardless of whether they are alone or in pairs, it is better to seat them at the same table. And if former lovers are invited to the wedding, and even with their current significant other, it is worth seating them at different tables.
- • Hobbies and characters: you know your guests and you will certainly understand who will be more interesting with whom at the table: who is quiet, and who will be happy to have fun. Take this into account when creating your seating plan.
But belonging to the family of the bride or groom should be taken into account only when it comes to relatives who will be very happy to communicate with each other. It is better to seat friends together, regardless of which side they are from: in the future they will have to communicate in your common company.
Save Saved
Save Saved
Save Saved

Determining the type of seating
Depending on the list of guests and the features of the venue, you should decide on the type of seating:
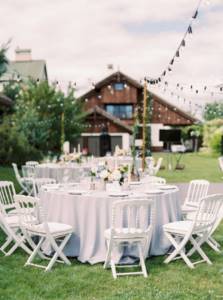
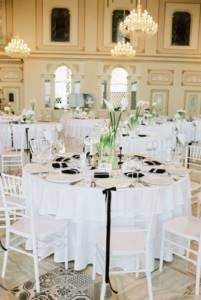
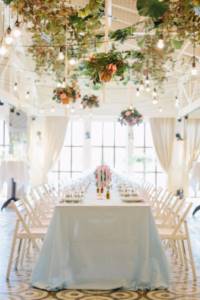
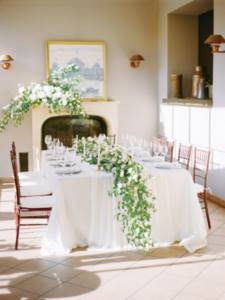
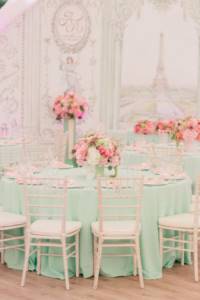
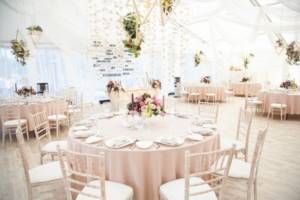
- — European seating: round tables of 8-10 people. This is the most popular seating arrangement and most wedding venues offer this type of seating. If the seating at such tables is too dense, there is a chance that some of the guests will not see the newlyweds during the evening. Therefore, if possible, seat your guests not along the entire perimeter of the table, but only in those places from which you and the groom can be seen.
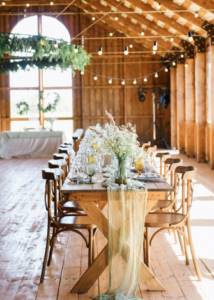
- — Rectangular individual tables: designed for 6-10 people. A great option for those who want to make a less formal dinner and use non-standard table settings. Here you can place the composition along the entire table, seat the guests so that everyone can see the heroes of the occasion. But you should remember that such seating takes up a lot of space in the hall, so plan the space carefully so that there is room for the dance floor and free movement around the hall.
- — Long common table: 1 or 2 common tables without a separate table for the bride and groom. This type is used for small, home weddings, where the number of guests is small, which means there is no need to set up separate tables and separate guests.
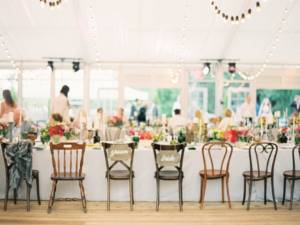
- — The letter “P”: the seating arrangement, familiar to many from the time of our parents, has not lost its relevance, having been slightly adapted to modern standards. The newlyweds' table can be placed a little separately and leave 2 tables for guests. You should avoid dividing guests into two camps: from the groom's side and from the bride's side. This type of seating arrangement is used less and less at weddings: with it, guests from the same company do not have the opportunity to communicate with each other freely, since they can only clearly see the guest sitting next to them and the guests opposite.
Save Saved
Save Saved

Save Saved
Wedding seating plan
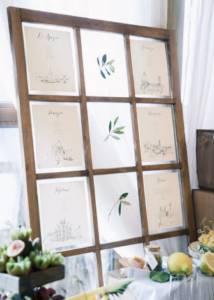
The card is a stand with the names of the guests, their serial number and a number with a specific table. The layout of the tables in the hall will look great. Cards with the table number and friends' names should be placed on the tables. This method allows you to seat all invitees in their seats in a short time.
Editor's choice: Speech at a wedding for parents in prose, words of gratitude
To avoid a crowd around the map at one moment, it is advisable to make a copy of it and distribute it around the hall.
A good alternative for quick and fun seating is a special organizer who will manage the list and lead you to the right place.
An alphabetical list is a great idea. Everyone will be able to quickly find themselves and go to their assigned table.
The design can be a small floor plan. Guests, seeing it, can easily figure out where the table with their number is and which chair is intended for them.
Note to future newlyweds
Seating the most important guests
The most important guests at your wedding are, of course, your parents. And you need to think especially carefully about where to plant them. Firstly, they should be seated at the same table next to each other, because a wedding is a kind of symbol of unity, so they should get to know each other and communicate, and also feel like part of the same family.
Whether you give them a separate table or not is up to you, but you should sit them next to you in order to thereby show your respect and gratitude. If you have chosen a non-European seating plan, then you can sit down with your parents: it will be pleasant for both them and you, because your closest ones will be nearby on such an exciting day.
Save Saved

Save Saved
Save Saved
We don’t overload tables
How often do we face the problem “we can’t separate the guests, so instead of the required 10 people, we have 12 at the table”! Of course, it sounds harmless, but it’s better to think 10 times before making such a decision.
Each table, regardless of seating plan, is designed for a certain number of people for a reason. For a comfortable seat at the table, there should be at least 60 cm per person, and with an increase in the number of people, this space is reduced to 40 cm. This means that guests will sit at the table literally elbow to elbow, and the chairs will be back to back, which will It’s inconvenient for both them and the waiters.
In addition, a large number of guests at the table complicates serving, because there will be much less space for plates, cutlery and food. What to do? Review the seating plan or completely change its type: you can, for example, replace round tables with rectangular ones, and add a smaller table to the rectangular ones.
Save Saved

Save Saved

Save Saved

Making a seating layout
To clearly see what happened after analyzing the guest list, sorting and seating, it is best to make a layout. What will you need for this? If you do not know special computer programs, then prepare a large sheet of paper and cut out tables and chairs in squares and circles, depending on what kind of furniture you will have.
This must be done to scale in order to see the real picture, so ask the venue manager about the dimensions of the room and all the objects that are in it: stage, bar counter, etc. And it’s best to ask him for a diagram of the hall.
Arrange the cut-out tables and chairs according to the seating pattern and to accommodate space for the dance floor or other areas. If in the process of drawing up the layout you see that there is not enough space, it’s time to come up with a plan “B” and change the seating arrangement or move additional areas outside the hall.
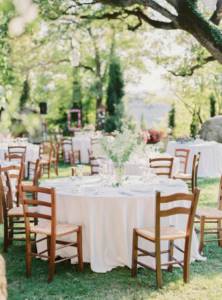
For example, in the summer you can move the dance floor to the veranda or to the street, if the area allows. Or move the photo zone or wish zone to another room. Be sure to discuss the furniture arrangement with the host and organizer to ensure the plan makes sense.
Save Saved
Save Saved

Save Saved

How to Write a Guest List: 8 Tips to Avoid Going Crazy
Already having a headache trying to remember everyone you wanted to invite to your wedding without going over the maximum number of guests? Were you able to reach a compromise with your fiancé and make your lists equal? Have your parents probably already told you who they want and don’t want to see at the celebration? To avoid going crazy when putting together your final guest list, just follow these tips.
Tip 1: Decide how you and your parents will split the list before accepting financial aid.
Let's face it: putting together a guest list can be a nightmare if parents on one or both sides are involved (especially if they're helping financially). That's why it's worth agreeing on everything before accepting help from them. Even if you are paying for the wedding yourself, it is better to get together with the whole family in advance and discuss the guest list so that there are no surprises later. Traditionally, the couple receives half of the guest list, and the parents of each party receive a quarter of the list. That is, if you plan to invite 200 people, you make a list of 100 invitees, your parents can invite 50 loved ones, and your fiancé's parents can invite another 50. Of course, you can divide it in other ways.
Tip 2. Keep information about all guests.
There are many different ways to create a guest list, but the most convenient way is to use online services where registered users can make changes in real time and view the latest version of the list. You can use even basic Google Docs for this; it doesn’t have to be a paid wedding service. It's also a good idea to keep each guest's contact information in an accessible place. And don’t rush to erase the names of those you decided not to invite; copy them to a separate tab. What if someone refuses, and you have the opportunity to invite more guests, but you cannot remember who was removed from the list?
Tip 3: Start with your dream list.
As you start creating your list, write down the names of everyone you could imagine at your wedding, from your friends from summer camp to the fun-loving cousin you see once a year at a family reunion. Count how many guests you have and estimate your maximum budget. In the future, you will, of course, have to shorten the list. And if you later have the idea of inviting someone else, look at your dream list: if this person is not there, does it make sense to consider him as a guest at all?
Tip 4: Be realistic to avoid stress.
Dealing with financial issues is not the most romantic part of planning a wedding, but it cannot be avoided. And your budget and venue size directly affect the number of guests you can invite. If you invite more people than the room can accommodate (in the hope that not everyone will be able to come), you will be nervous every time you wait for a response from the invitees. It is much more correct to invite a little less friends and relatives, and later add more if the budget and venue allow.
Tip 5. Reduce the list according to the rules.
It's time to come back to reality and cut your dream list down to a decent size. The easiest way to reduce your list is to create rules and stick to them, even when it comes to the part of the list that you left to your parents. For example, like this.
Rule 1: If neither of you two have communicated, met, or even heard the name of this guest, cross it out.
Rule 2. Don't want to see children at the wedding? Don't be afraid to let your guests know that your celebration will be for adults only, and remove any kids from the list.
Rule 3: If you haven't talked to a person in three years or more, don't invite them.
Rule 4. If you decide to invite someone just because you are afraid of offending them (perhaps they invited you to their wedding or are simply friends with most of your guests), do not invite them.
Tip 6: Make an A list and a B list.
This little secret will allow you to invite more people without increasing the budget or abandoning the chosen venue. Here's how it works: on your "A" list, include all the obligatory guests without whom you cannot imagine your celebration: family members and close friends. Start sending invitations to people on this list. On your B list, include those you would also like to invite, but don't be upset if they don't come. When you find out who from the first list will not be able to attend your ceremony, invite people from the “B” list to fill the vacant seats.
The main thing is to try to send out invitations as early as possible (for example, it is better to send to list “A” 2.5-3 months before the wedding). In this case, guests from list “B” will receive invitations 1.5-2 months in advance and will not realize that they were a backup option.
Tip 7. Don't let your parents pressure you.
No matter how much you love your parents, this wedding is yours, not theirs. Therefore, your opinion on any issue is more important here. Just because your mom wanted to invite her entire school class to her daughter's wedding, that doesn't mean you have to cross off 25 of your close friends from your list. The solution can be simple: any whims are at her expense. It sounds strict, but if your mother is willing to pay for the presence of 25 more guests, and you don’t mind seeing these people at the wedding, then why not? You can also look for a compromise: invite your mother to choose 2-3 best friends from the class, and add the rest to the “B” list. And remember that all difficult conversations should be face-to-face and in private. A telephone conversation, instant messaging, or argument in front of an astonished audience is not the best way to convey your thoughts and emotions to your parents.
Tip 8. Don't be afraid to refuse.
As soon as you announce your engagement or post on social media with a ring, you will certainly receive a couple of comments in the style: “Great! I can’t wait to be a guest at your wedding!” Moreover, comments may come from those whom you absolutely do not want to invite. The easiest way to answer is: “Yes, of course!” But then you will either have to add the person to the list, or have an unpleasant conversation with him a little later.
Try to let people who are unpleasant for you learn about the upcoming celebration as late as possible. And prepare a universal, tactful response to such questions and comments. For example: “Yes, we would really like to invite all our friends and acquaintances, but, unfortunately, the budget and the size of the hall do not allow.” After this, you can move the conversation to another topic.
And the main advice: don’t worry, don’t blame yourself and don’t waste all your energy and nerves on compiling a guest list. This is just the beginning, and many more things await you, much more interesting and enjoyable.