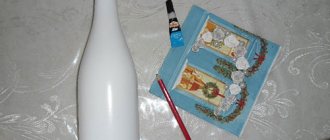
How to decorate champagne as a gift with your own hands
In this master class you can learn how to make a pink lady from a champagne bottle.
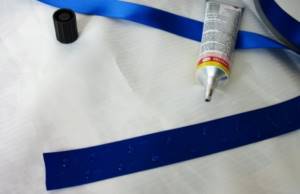
You will need:
- bias binding (10-11 m)
- glue (preferably construction glue)
- scissors
- fabric for bows
1.
To make the top of the dress you can use silver braid. You just need to glue it, covering the emblem on the bottle.
2.
After you have made two overlapping rows, prepare a pink ribbon. Use just a little glue to stick the tape to the bottle. Do it a little obliquely.
When you have reached the middle of the bottle, you should have something like this:
* Next, wrap the bottle completely with a whole cloth, while continuing to apply small drops of glue to the fabric.
3. After you have wound the fabric to the end, its end needs to be glued in the place where it will be approximately covered by the skirt. This way you will hide all the seams.
4.
It's time to make the skirt. To do this, prepare a ribbon for the bow and gather it onto a thread. In this example, the tape is 1.5 meters long, but you can choose it yourself, make it longer or shorter.
5.
The skirt can be attached to the bottle using glue or thread tied around the bottle.
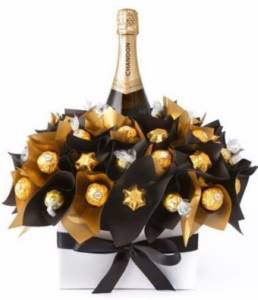
Bottle of champagne with sweets
You will need: chocolates, double-sided tape, tinsel and a bow.
Master Class
- Wrap double-sided tape around a bottle of champagne.
- Glue the candies onto the bottle.
- Wrap it in tinsel.
- Attach a bow at the top.
A bottle of champagne with sweets is ready!
How to decorate a bottle of wine as a gift
How to decorate champagne. Hat for a lady.
In this example, you will be able to make a hat for the lady that you prepared earlier. The only difference is the color chosen to cover the bottle. In this example it's blue, but you can leave it pink, or choose a color that you like best.
* Prepare the bottle by decorating it as in the previous example.
Cooking the hat
1.
Cut a circle from a plastic bottle. The size of the hat will depend on the diameter of the circle.
2.
Inside the cut out circle, cut out another circle - you will have the part of the hat that is attached on top of the champagne. This means that you need to measure the diameter of the neck of the bottle, and make the inner circle a little larger so that the hat is a little larger.
3.
Next, cut out this shape from cardboard (the diameter of the paper circle is equal to the diameter of the hole in the plastic circle).
*Remove strips one at a time.
*Use a stapler to attach the cardboard to the plastic. Next, use your imagination to decorate the hat. In this example, satin ribbon and lace were used.
The photo on the left is a top view, the photo on the right is a bottom view.
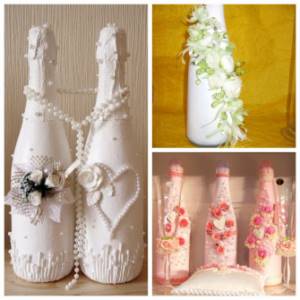
Other options for decorating a champagne bottle
It’s not difficult to buy everything you need in stores; you usually have a lot on hand. You can replace some materials with similar ones: it all depends on your imagination and wishes.
Decoration with Christmas beads
Beads for a Christmas tree do not cost much; often you have torn items on hand that are no longer useful for decoration, but they can be used when decorating a bottle. You need to prepare:
- White corrugated paper.
- Glue gun.
- Beads for the Christmas tree.
- Decor (bow or something else).
To get a good result, carry out the work following the recommendations:
- Cut a piece of paper and wrap the top of the bottle, securing the joints with tape or glue. Also cover the lower part to create a white base from top to bottom.
- At the bottom, secure the end of the beads with a glue gun and carefully wrap the bottle, trying to arrange the rows as tightly as possible. From time to time, fix with a drop of glue so that the beads do not spread.
- Tie a ribbon with a bow or a small New Year's composition on top of the decorated bottle.
You can use beads of two colors and alternate them, winding both rows at once, this looks unusual. Instead of beads, you can choose other elements - twine with an unusual weave, beautiful glass items, etc.
Important!
It is better to choose beads with small balls, they look much more beautiful.
How to decorate champagne with sweets
You will need:
— silent paper (2 orange sheets, 1 green sheet)
*Tissue paper is thin paper, also known as tissue paper. You can find it at gift wrapping racks, as well as in specialized art stores.
- candies (in this example there are 48 pieces)
- raffia
*Raffia are long fibers that can be found on the leaves of the raffia palm tree. They are popular among florists and are used in arts and crafts.
- hot glue
- hot glue gun
1.
Prepare some orange tissue paper and cut it into 7 x 7 cm squares.
2.
Apply glue to the flat side of each candy. Now you need to glue the candy into the middle of the paper square.
3.
Next, you need to fold the edges of the paper towards the top of the candy. Start gluing the candies to the bottle using glue.
* It is better to decorate the bottle with candies from the bottom up in a circle.
* Try to glue the candies tightly to each other.
4.
Making leaves. To do this, prepare green tissue paper and cut out long narrow leaves from it.
5.
The leaves need to be glued together in several layers. Next, you need to decorate the neck of the bottle with them.
6.
Your bottle will look even more like a pineapple if you wrap some raffia around the neck.
Decor with rhinestones and bows
There are simpler ways to decorate wedding bottles. To do this, use rhinestones or bows. You can often see how a lush satin bow is hung on the neck - light for the bride’s bottle and dark for the groom. Types of decor using bows:
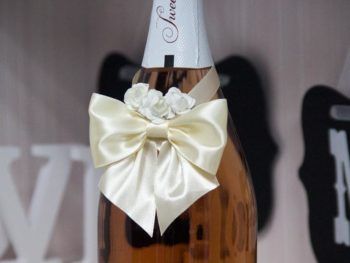
- Tie the neck with a wide ribbon, onto which a fluffy bow is glued to hide the label.
- To tie the middle of the bottle, use either 1 voluminous bow or 3 small flat ones.
- Connect two bottles together by the necks and hang a single bow on them. With this design, it is imperative to remove the labels. Often such garters look unusual; lace or strings of beads can be used for them, and sometimes they are made in the same style as the bride’s garters.
- Connect the bottles in the middle with a wide piece of fabric; to do this, place them tightly next to each other and tie them with ribbon or lace. After this, they hang a large bow of a necessarily different color in order to stand out from the general background and attract attention.
- Gluing small bows in a chaotic order onto bottles.
There are a lot of ways to use bows to decorate wedding bottles, but with such decor you need to be moderate.
If you use too many bows, they will look ugly and sloppy. You can easily decorate glasses in this way.
Wedding bottles can be decorated with rhinestones. Bright shiny stones can either completely cover the surface or partially. The chosen design depends on the style of the wedding, the imagination of the newlyweds and how patient they are.
Ways to decorate bottles with rhinestones:
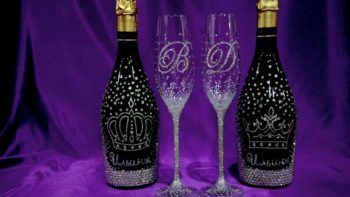
- Full surface coverage with plain stones.
- Full coverage of the bottle, but several colors are used to create a design. These can be either abstract curls or symbolic patterns of newlyweds, birds, rings or hearts. The more complex the image, the smaller the diameter of the pebbles.
- Applying abstract patterns to the bottle, while the rest of the surface remains clean.
- Image on the surface of symbolic drawings.
- Gluing rhinestones in the form of Capitonne (carriage screed).
- Chaotic gluing of stones.
Before creating a rhinestone decoration, you need to clean the glass from labels, and then wipe the surface with alcohol or acetone. This treatment guarantees maximum adhesion between the decor and the glass.
Often bottles are designed with a design that combines these two decorations.
How to beautifully decorate a bottle of champagne
It is customary to decorate weddings with beautifully decorated bottles of champagne. In this master class you will learn about another original way to decorate a bottle. A satin ribbon and your imagination will help you.
It is worth noting that such a decoration is suitable not only for a wedding table, but also for any other holiday, such as March 8 or a birthday.
You'll need:
- silk fabric
— satin ribbons (2 colors, the width of each ribbon is at least 4 cm)
- golden braid
- bias tape
- lining
1.
Preparing a dress pattern. It consists of a bodice and a skirt.
First you need to do it on paper. Take the dimensions of a champagne bottle as a guide and then transfer it to the fabric.
* It is best to use thick satin and silk.
2. Sew along the edge of the satin ribbon, loosening the thread tension on the sewing machine in advance.
Next, pull one end of the thread to tighten the ribbon and create a ruffle.
* It is advisable to put fasteners at each end so that when working with ribbons, the tightened edges do not come apart.
3. Using tailor's pins, you need to attach the ribbon to the bottom edge of the skirt. Make a zigzag stitch using a machine.
4.
Decorate the entire skirt by alternating ribbons of two different colors (in this case, white and burgundy).
* Leave no more than 3 cm between rows.
5. When you sew the ribbons, you should make sure that the top row completely covers the joint seam of the bottom row.
*If you want to hide the stitching on the wrong side, you can use a lining. It is worth placing the skirt on the fabric, drawing the outline of the part and making a lining.
6. Fasten all the parts using pins. It is also worth securing the edge with machine stitching (see picture).
7.
Now you need to edge the edge of the product with bias tape.
8.
Decorate the bodice with ribbon. To do this, you need to put the tape on the bodice and then grind along the edge, i.e. fasten the two parts together and then twist them out.
9.
The seam must be hidden by sewing the bodice and skirt with ribbon.
10.
Start decorating the dress with a bow (brooches, sequins).
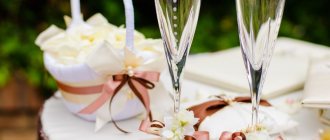
Why should there be champagne at a wedding?
Champagne is a special wine. The combination of taste and decorativeness makes the golden carbonated drink an indispensable participant in big celebrations. However, for a long time, champagne was made only in one province of France, and in small quantities. The wine was so expensive that the richest people could order it for the holidays.
We didn't drink champagne at the wedding. Two bottles were placed in front of the young couple, but were not opened. The men's drink was uncorked on the first anniversary - as a symbol of patience and endurance. Women's champagne was opened after the birth of a child - as a sign of continuation of the family.

Today, sparkling wine is drunk not only during a banquet:
- When carrying out a ransom - an ancient Russian rite. According to custom, the bride had to be bought with vodka, but now the too strong drink is replaced with noble wine.
- At the registry office - after the ceremony, guests go to a special room where they congratulate the newlyweds. Here you can toast the future couple with a glass of champagne. The decor of wedding bottles is modest; sometimes they are simply wrapped in white napkins.
- During the walk, the newlyweds, before the banquet, walk in the park, other locations in the city, and conduct a photo shoot. Here, preference is given to sparkling wine: it is lighter, not sweet, like liqueur or port.
- At the banquet, champagne is served not only to the newlyweds, but to all guests. At European weddings, the drink, along with other dry wines, forms the basis of the bar. Traditionally, the first 1-3 toasts are made with champagne, and then switch to wine and cognac.
The two bottles placed in front of the newlyweds still cannot be opened. Champagne for the bride and groom, richly decorated with their own hands, is saved until the anniversary.
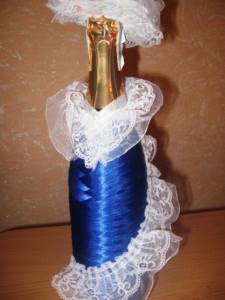
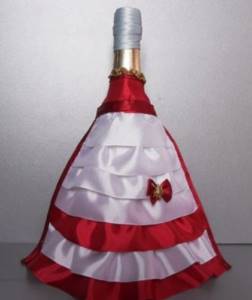
How to decorate a bottle of champagne with your own hands

You will need:
- satin ribbon (1 chocolate color, 1 white color; length 2m, width 3cm)
- white satin ribbon (length 60cm, width 6cm)
- fabric for base
1.
First you need to cut out a dress, focusing on the size of the bottle.
2.
You need to make shuttlecocks from satin ribbons. To do this, sew a stitch along the edge and pull it together to create ruffles.
3.
Sew ruffles onto the skirt.
4.
The first row should consist of the widest strip that needs to be stitched.
5.
From the center of the waist line you need to draw an isosceles triangle (see picture).
6.
Sew white ribbons, 3cm wide, around the perimeter of the triangle.
* In order for everything to work out neatly, you should secure the product with pins, and only then start grinding.
7. Cover the edges of the triangle with a frill made from chocolate-colored satin ribbon.
8.
Next, drape the skirt with chocolate ribbons as shown in the picture.
9.
Use wide white tape (6cm) to cover the gaps in the drapery. On top of this ribbon also apply a narrow chocolate ribbon (3cm) and stitch.
* If you pull the end of the thread, you will be able to tighten the ribbon and distribute the folds beautifully and neatly.
* With this detail you can hide undraped areas.
10. Prepare a satin ribbon (6cm) and sew it onto the bodice of the dress. You can add sequins for beauty and sew on ties.
11.
At the bottom you can decorate the dress with white ribbon bows.
Decorating a champagne bottle for New Year 2021 with pineapple candies
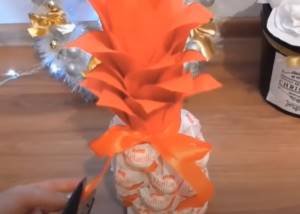
This method allows you to get an original product, which is combined with a delicious treat. The work takes no more than half an hour if you have everything you need at hand. You should prepare in advance:
- Candies "Raffaello" or "Ferrero" - they should be in beautiful packaging and have a round shape.
- Corrugated paper, white for the base, green or orange for the top.
- Glue gun. It is the easiest way to attach candy.
Select the number of sweets based on the size of the bottle. Carry out the work in the following sequence:
- Cut a rectangle out of corrugated paper to cover the bottle and half the neck. Wrap the bottle and glue the joint. Form neat folds on the neck so that the paper is pressed well. Leave until the glue dries completely.
- Heat up the glue gun. Glue the candies from top to bottom, covering the entire surface. Apply a drop of glue and press immediately so that it adheres as best as possible.
- Fold green or orange paper several times and cut out oblong leaves, like a pineapple. Cover the neck with them. To make the petals curl, twist them with scissors or a stick.
Place the finished product in a room with constant temperature and low humidity. Move carefully, as candies often fall off if the bottle is handled carelessly.
For your information!
It is better to place the candies not in even rows, but diagonally, so that the finished version looks like a pineapple.
How to decorate a bottle of champagne with ribbons
For a wedding or anniversary, the following champagne bottle decor will also suit you.
You will need:
- satin ribbon (3.5 m)
– gold brocade ribbon (1.5 m)
- glue (preferably instant)
- scissors
- a bottle of champagne with gold foil
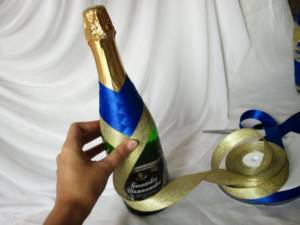
1.
Prepare a bottle and tape and measure its approximate length for the first layer. To do this, attach the tape to the neck of the bottle.
2.
When you have measured the length, cut the desired piece of tape and mark several points on it with glue.
3.
Next, wrap this piece of tape around the bottle to cover the champagne wrapper. It is advisable to tighten the tape well, thereby preventing unevenness.
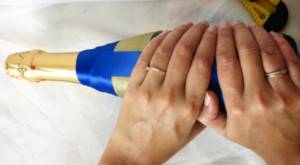
4.
Measure out the second piece of tape. It will be longer.
5.
Proceed with the second piece as with the first piece of tape, i.e. Mark the dots with glue and glue. It is advisable that the ends of the ribbons be positioned equally, this will ensure a beautiful and neat pattern.
6.
Continue gluing the next two layers (3rd and 4th) in a similar manner.
7.
Now prepare the gold ribbon. It also needs to be measured and glued. Make 2 rows (see picture).
8.
Another piece of gold tape needs to be glued to the bottom of the bottle.
9.
Prepare the blue ribbon again. Measure and glue to the bottom of the bottle so that the seam is at the back.
10.
Now we cut 7-8 blue ribbons of the same length and glue them in the same way - so that the seam is at the back.
11.
Here's the rear view. A not very neat seam has formed that can be easily closed. To do this, prepare a stationery knife and use it to make a slot for the end of the tape, which needs to be inserted there.
12.
Apply a little glue to the tip of the blue tape and push it through the gap.
13.
Next, you need to apply glue to the entire tape and press it tightly to the bottle.
14.
Pay attention to the middle of the bottle, there is an open space there. This is where we attach another piece of golden ribbon. The corners that stick out from the front need to be cut off.
15.
Now you can decorate the front of the bottle - add bows, lace, beads, etc.
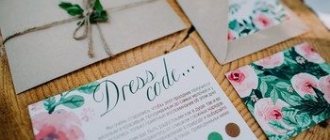
Champagne wedding decoration ideas
Previously, a young family was given a bull and a cow as a wedding gift. Sometimes 2 spoons are tied to the bottles that symbolize them: so that the spouses have something to “sip happiness.”
Decoration of wedding glasses and bottles depends on the concept of the holiday.
- A classic wedding implies sophistication and sophistication. Drinks and glasses are decorated with elegant bows, flowers, appliqué, pearls, and engraving.
- Provence - allows for a more lush, lovely design. Use fabrics in the desired tones: blue, peach, lilac, powder. Knitted dresses for the bride and groom look funny. But they refuse rhinestones and shiny coating.
- Rustic - bottles are dressed up in national or traditional clothes. Hand-painted or Russian-style stickers are also suitable.
- Celebration in nature - preference is given to fresh flowers and leaves.
- Themed wedding - at a seaside celebration, bottles are decorated with striped paper, toy anchors, and shells. At a boho-style party, glasses are decorated with witchcraft amulets.
Decoration technologies are very simple. It is enough to attend one master class to learn how to decorate champagne with ribbons or fabric.
Where to get ideas
Although ideas are in the air, it is important to consider not only their attractiveness, but also the possibility of implementation. So, engraving is done only in a workshop.
And you can decorate champagne with corrugated paper with your own hands after the 1st video lesson:
You can also learn how to decorate a bottle of champagne for a wedding with your own hands:
- on thematic forums - the advantage is the posting of photos without Photoshop, the disadvantage is an approximate description;
- video on YouTube - not only shows the models, but also contains detailed instructions that describe the stages of implementation step by step;
- articles on specialized or general sites provide many design methods;
- at master classes - they describe the creation of decor step by step.
Photos in wedding magazines, films, even illustrations in a book can serve as a source of inspiration.
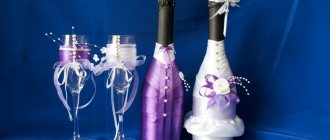
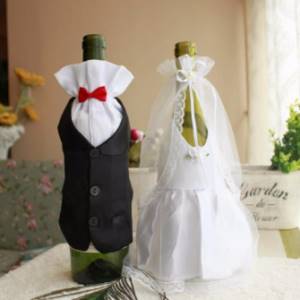
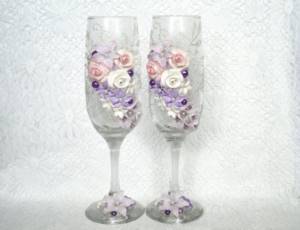
Champagne “Bride and Groom”
This champagne decoration for a wedding is very popular. The materials are the most affordable, and the skills required are artistic taste and the ability to lay the tape evenly.
You need bias tape in different colors: black, white, blue. If the wedding dress is colored - turquoise, emerald - you will need material of the same color for decoration. Ribbon is also used for decoration, as well as rhinestones and lace for the veil and collar. Secure with glue.
Glasses are decorated in the same way. And if the couple already has children, they also decorate small bottles of champagne with trim.
Polymer clay flowers
The method is simple and effective. Roses, lilies, gladioli, daisies are made from acrylic or other plastic clay. They make flowers using ready-made molds and templates for modeling, or they make them themselves. Painting is done with acrylic paints.
Since wine glasses are usually made of transparent glass, flowers are simply attached to the walls. The color of the bottle is too saturated, so first it is coated with aerosol paint: white, pastel colors.
Decorating wedding bottles with ribbons
Decorating champagne bottles for a wedding takes a minimum of time and is very diverse. Satin narrow ribbons are chosen by color: to match the suits of the newlyweds or to match the color scheme of the wedding banquet.
To emphasize the festive nature of the design, use shiny ribbons - gold or lace.
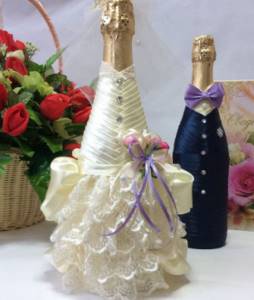
Champagne "in suits"
The bottles are “dressed” in a copy of the young couple’s costumes. At the same time, they try to repeat not only the color, but also the features of the style (fluffy skirt, veil), and the structure of the fabric.
“Outfits” are made from bias tape, brocade, taffeta, silk ribbon, and corrugated paper of the desired color.
The neck of the bottle is decorated with a light ribbon - white or peach. It imitates a collar. Then the body is wrapped with a ribbon in the color of the groom’s suit - black, blue. Attach a tie, button beads, and a rose in the pocket.
The bride's champagne is braided with white or colored ribbon. A skirt is made from fabric. For decoration you need rhinestones, small fittings, artificial flowers.
Painting with paints
Paint bottles with any stained glass paints. You can leave the background dark green or paint the glass first in the desired shade. Then they draw the outline of the design with a marker and fill it with paint. For thin parts - twigs, stamens - use pointed matches. The thinnest elements are cut through with a needle.
After drying, the traces of the marker are erased, and the outlines are highlighted with a gold outline. The gift is complemented with bows, beads, and tinsel.
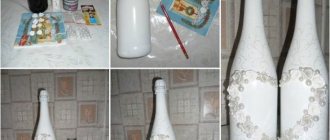
Decor of wedding bottles using decoupage technique
Spectacular decoration of champagne for a wedding with your own hands - decoupage.
Vessel preparation:
- the bottle is cleared of labels. The cork is freed from the foil;
- the glass is thoroughly degreased with acetone;
- then the bottle is primed in 2 layers.
After drying, the surface is wiped with sandpaper with the finest grain. Decoupage holds up much better on a non-smooth surface.
Napkins with images are glued onto the resulting blank and coated with varnish.
Engraving
Champagne and glasses for the young couple are decorated with engraving. This is a very beautiful, but impossible to implement solution on your own.
The engraving is complemented with beads, ribbons, and elegant bows.
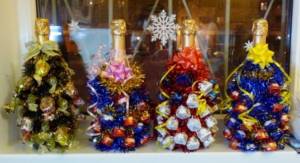
How to decorate champagne for the New Year
You will need:
- thick aluminum foil
- medium thickness wire
- glue
- decorations (artificial or natural spruce branches, tinsel, small New Year's toys, ribbons, beads)
1.
First you need to wrap the bottle in foil. It is advisable to cover in several layers (from 2 to 4 depending on the thickness of the foil). Try to press the foil tightly against the bottle.
2.
Now you need to attach the wire. Wrap it around the bottle, but not tightly, so that you can then remove it when you want to open the champagne.
3.
Proceed to the most important thing - the actual decoration. In principle, there are many options and they depend on your imagination and available materials.
You can take a few Christmas tree branches and use glue to attach them to the foil. This can be done in a spiral (see picture), and it is advisable to start from the base of the bottle.
In those places where the foil is visible, you can attach ribbons, fabrics, wide braid or decorative paper. Places where glue may be visible can be hidden with tinsel.
4.
Add beads, pine cones, toys, candies, small Christmas tree decorations, etc.
Candies
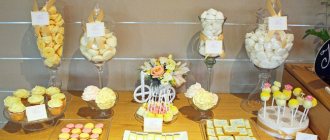
If the gift for March 8 includes not only champagne, but also sweets, the usual set can be combined into an original composition.
The most common design options for a bottle of champagne on March 8:
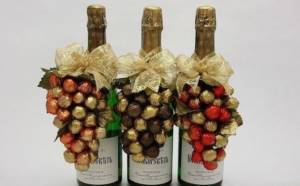
- bouquet. This design method includes a standard set of components. But if the banal three tulips and a box of chocolates with a bottle of champagne in a gift bag are perceived as boring routine, then champagne decorated with sweets will be a fresh idea that will make the giver stand out. When designing a composition, both the bottle and the candies can occupy any position. Champagne can be hidden behind the decor of sweets, or, on the contrary, brought to the fore. For a more finished look, the bouquet can be supplemented with ribbons, bows, flowers and other decorations that match the color and style;
- cake. In this case, a bottle of champagne is placed in the chocolates, becoming the central element of the composition. It functions as a kind of candle rising above the candy cake. In the classic version, long and narrow varieties of candies are chosen for the “cake”. They are evenly placed around the champagne (in circles), fastened together with glue. To make the composition more stable, it is permissible to form it on a cake base, or fasten it with beautiful ribbons or lace. A bow or flowers from the same braid can decorate the neck of the champagne. Such a gift is suitable not only for personal presentation, but also as an element of congratulations to a large group of women;

- a pineapple. If “cake” and “bouquet” are classic decoration options, then “pineapple” refers to more daring and original types of design. This finishing method turns a bottle decorated with candies into a kind of “Kinder surprise”. Under the layer of sweets, the base is completely invisible, and the secret contents of the “pineapple” can only be found out by picking it up. For this type of decoration, choose round candies in golden or yellow packaging. If the color of the wrapper of your favorite sweets does not correspond to the canon, they can be additionally wrapped in wrapping paper of the desired shade. Smooth glass and glossy wrapper do not always stick together well. To ensure that the champagne in the candies is hidden securely, the alcohol must first be covered with a layer of corrugated paper. And then attach the sweets to the paper base. The neck of the bottle is hidden under green paper “leaves”. If the joint is not very neat, it can be covered with original braid, lace or ribbon.

Such decoration options are among the simplest. In this case, all that is needed to decorate bottles with your own hands for March 8 is:
- champagne;
- candies. For a “bouquet” – from 0.5 kg, “pineapple” – about 1 kg, “cake” – from 1 kg and above (depending on the selected diameter);
- glue. Superglue works best (PVA won't give the desired adhesion, and a glue gun can melt the candy). Due to the harmful substances contained in superglue, when working with it, you need to ensure that the glue only touches the candy wrappers and does not get inside the wrapper. If the packaging is not foil, it is advisable to cover the candy with an additional layer of paper before use;
- additional decorations (optional).
When making a bottle with candy decor with your own hands, you should not get hung up on standard options and finishing schemes. Fresh design ideas have always been valued higher than repeated ones.