Peculiarities
To make the accessory worthy of the most luxurious wedding, you need to carefully choose a craftsman who will create the composition you need, as well as the color, shape and materials used.
If you wish, you can make a bouquet of ribbons yourself, especially if the bride is interested in needlework. This will not only save money, but also create a unique composition that expresses the specifics of your couple and carries a piece of the soul.
Before making a wedding bouquet, it is better to practice in advance on small tasks, for example, to make a duplicate bouquet, which you will leave to the girlfriend who caught it.
Advice! Be sure to use high-quality, odorless glue, carefully sew or otherwise secure all elements so that the accessory does not fall apart at the most inopportune moment.
Matching your wedding style

It is important that the bouquet matches the color and style of the wedding theme:
- Celebrations close to nature in country, rustic or eco style look strange with such an accessory ;
- But at a vintage, fantasy wedding or shabby chic style, such an exquisite accessory looks quite appropriate ;
- Since well-made satin flowers cannot be distinguished from natural ones at first glance, such a solution is possible even for a classic wedding . Only the bouquet itself should be made as natural as possible.
If you are having a color ceremony, then it makes sense to make a bouquet in primary colors. In all other cases, brides choose from a huge palette, because ribbons of any, even the most unusual shade, are much easier to find than similar living plants.
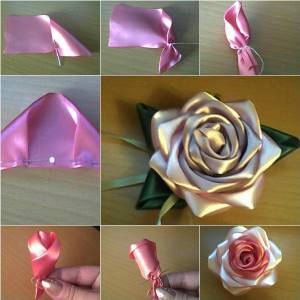
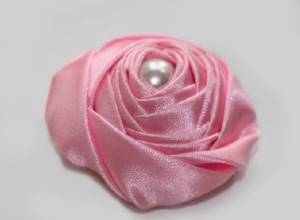
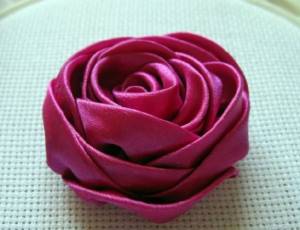
A beautiful rose bud from one satin ribbon (instructions)

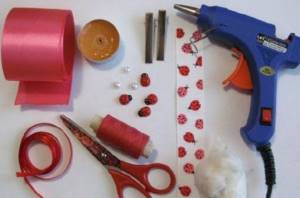
You will need:
- satin ribbon 1 m long and 5 cm wide
- thread and needle or glue gun
- lighter (if necessary).
Below you will find video instructions.
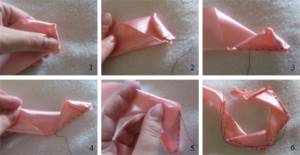
1. You can singe the edges of the tape with a lighter.
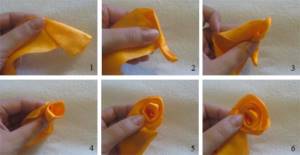
2. Fold 1.5 cm of ribbon diagonally (Image 1) and roll this part to the left (Image 2) to create the center of the rose (3 turns is enough).
Secure the folds of the bud with hot glue or thread and a needle.
3. Holding the workpiece with one hand, try to bend the tape down and around the core. Glue the petal you made to the base of the bud.
4. Fold the top edge of the ribbon back and then down to make another turn around the core. Glue it to the base of the bud.
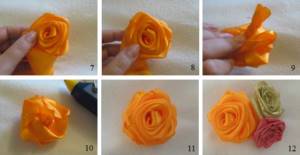
5. Complete all the petals, securing them with glue or thread and a needle, and simply glue the tail at the end to the bottom of the bud, cutting it off or attaching it with wire.
Advantages

There are various options for an artificial wedding bouquet, but satin still enjoys constant popularity. And this is understandable, because the material:
- very beautiful - reminiscent of silk, but much more shiny;
- presented in a huge number of shades;
- budget;
- holds any shape wonderfully, does not wrinkle or deform;
- unlike velvet and felt, it does not accumulate dust;
- goes magically with lace, pearls, rhinestones and any other decor.
Satin, like any artificial material, has a number of advantages over fresh flowers:
- it is cheaper;
- can be stored unchanged for decades;
- will not conflict with your favorite perfume;
- will not stain the dress with pollen;
- will be a salvation for allergy sufferers.

If you want to see some specific flowers in your bouquet - lilies, peonies, hyacinths, but it’s not the season, then you don’t have to spend huge sums on shipping them from afar. A variety of buds are easily made from fabric: exotic, field, and garden.
Materials
Most often, an artificial bouquet is made in a classic round shape.
In addition to ribbons made of satin, velvet, guipure, organza, chiffon or other suitable fabric, depending on the chosen technique, you will need:
- scissors;
- glue gun;
- needle and thread;
- materials for the base and stem of the bouquet.
The basis
For the base you need a ball - the easiest way is to buy a special foam one at a craft store.
An alternative option is newspapers tightly crumpled into a ball , wrapped with twine and, if necessary, painted with paint for a more even texture.
Another solution is a CD and polyurethane foam applied to it in a semicircle. An additional convenience is created by a hole in the disk - it is easy to pass ribbons or wire through it to secure the base.
Leg
For the leg, you can take an ordinary cardboard tube , for example, the kind on which food foil is screwed, or glue together several sushi sticks. Any tube made of plastic, foam, or other lightweight material will also work.
Do not use wood, metal, or heavy elements. Firstly, you will get tired of wearing them all day, because they weigh a lot. Secondly, the design will turn out to be dangerous if you are going to throw a bouquet to your girlfriends. In general, the lighter the composition, the better, fortunately this is another undeniable advantage of artificial flowers.
To ensure that the bouquet fits comfortably in your hand, make the leg from 10 to 30 cm long. If you make it shorter, it will slip out; if you make it longer, it will not allow you to lower your arms freely for beautiful photographs with an accessory at the waist line.
Advice! If you use satin or other loose material, do not forget to burn all cut edges with a lighter, otherwise the fabric will crawl at the most inopportune moment.
Rose from pieces of ribbon (master class)
Such a rose can be made from leftover ribbons that are about 10 cm long. It will be even more beautiful if you use ribbons of different colors.
You will need:
— ribbons (length up to 10 cm)
- pins
- thread (preferably matching the ribbon) and needle.
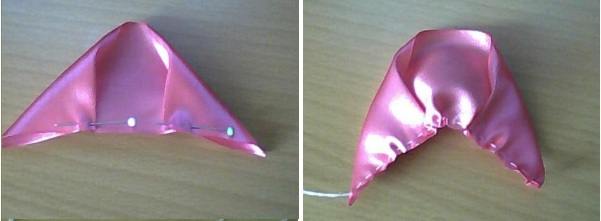
Making a bud:
1. Bend the end of the tape at a right angle. Then you need to bend the corner again.
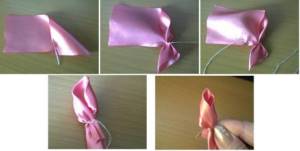
2. Secure the ribbon with a pin and then secure with thread.
3. Repeat steps 1 and 2 with the other end of the tape.
Making the petals:
1. Take another piece of tape and bend its ends at a right angle.
2. Secure with pins. Next you need to sweep and tighten the thread a little.
Connecting:
1. Use a pin to attach the petal to the bud.
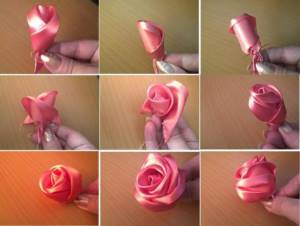
2. Wrap the petal around the bud and sew it to the core.
3. Repeat steps 1 and 2 with the remaining petals.
4. Fix the base of the flower well.
Choosing the shade of satin ribbons
The shade of your bouquet should go well with the overall color scheme of the celebration , your dress and makeup, color type, and hairstyle.
The symbolism of a particular tone is no less important, because the bride’s bouquet is also a talisman designed to set the future family in the right mood, to bring happiness, love and harmony.

Let's take a closer look at several of the most common color schemes for fabric compositions.
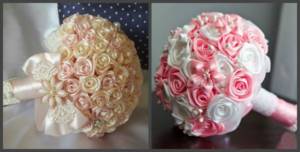
White
A white bouquet speaks of innocence, purity, and the beginning of a new family life. This is a shade of sublime and bright love. But be careful when using it in a fabric bouquet, especially if your dress is also satin. The accessory will simply blend in with the outfit in the photographs.
Important! The pastel palette looks good in the hands of blondes at classic or vintage weddings.
Another shade of white is acceptable as a compromise solution, but it is important to choose it carefully, otherwise a darker item will be visually untidy. However, there is always an option with a colored outfit - and in this case, a white bouquet is undoubtedly irreplaceable. This combination looks especially sensual at a retro wedding if the bride has a dark dress.
Other pastel colors – pink, peach, powder – look cute and romantic in a bouquet of ribbons. Such a choice symbolizes caring attitude towards each other, tender love, trust.

Color
An interesting solution is a green bouquet of ribbons, both light, light green, lime, and rich coniferous. Such shades speak of stability, prosperity and calm cheerfulness of the young.
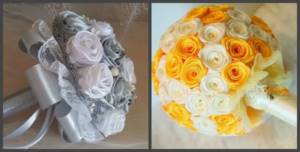
Yellow has long been considered an unsuitable shade for a wedding, but modern designers are increasingly abandoning this prejudice, celebrating the warm, sunny tone that speaks of fun and wealth.
If you want elegance, then choose precious gold, silver or bronze. They create a composition that is both luxurious and avant-garde.
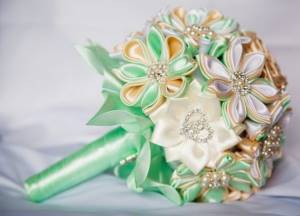
It is not at all necessary to remain in monochrome; feel free to combine both different pure colors (but no more than three) and shades of one leading color. Purple with lilac, blue with white, mint with pink - there are many variations, so any bride will definitely be able to choose something to her taste.

Turquoise
The fabulous shade of turquoise is not so widespread in nature, but with the help of satin ribbons you can easily create even roses of a similar tone.
The turquoise color is primarily interpreted as mutual gratitude for the fact that the newlyweds met each other. Another meaning is well-being and calm, peaceful happiness.
Similar composition:
- wonderfully suits young brides, making them even more touching;
- It’s a good refresher for a hot summer wedding;
- looks magical on spring, autumn, even winter.
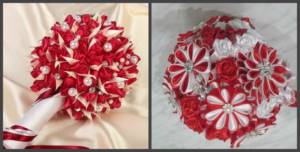
Red
Red color means passion, boiling feelings, impossible attraction. This bouquet stands out brightly and contrastingly against the background of a snow-white outfit, creating the necessary accent. This is not an accessory for a princess, but for a queen, sensual and very elegant.
The darker the shade, the more nobility is implied in the interpretation, while light ones, for example, scarlet, speak of the energy of the one who chose it.
Flaming tones are best suited to burning brunettes , but young ladies with a different hair color can choose a shade from the red palette to suit their color type.

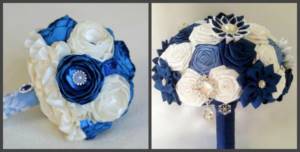
Blue
Blue is the shade of calm people who know what they want and confidently move towards this goal. Stability, harmony and fidelity - what could be better for a wedding combination?
Advice! The color will perfectly highlight a snow-white dress, but to make the look complete, add another accessory of the same shade - shadows, a hairpin, jewelry, shoes.
Blue is often used at nautical, winter and Greek weddings, creating the necessary depth and fitting perfectly into the overall design of the celebration. This is not the most classic option, but in a decent frame it looks great.

Blue
Blue color is interpreted as trust, nobility and purity of thoughts. More delicate than blue, it will wonderfully fit into both a classic and thematic celebration, making the bride’s image airy and romantic.
Blue goes well with yellow, pink, blue and white , but it also looks decent in its pure form. It is suitable for both very young brides and older women, especially those with blue eyes.


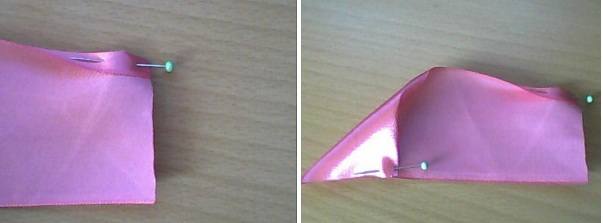
Large rose flower made of satin ribbon (step by step instructions)
You will need:
- satin or silk ribbon 1 m long
- thread and needle
- bead
- hot glue (if necessary).
Below you will find video instructions.
1. First, it is advisable to singe the ends of the ribbon, otherwise unwanted fringe may appear.
2. Step back about 5 cm from the edge and bend the tape towards you at an angle of about 50 degrees. Make the main part of the bud - its core - by tightly rolling the ribbon.
3. Fold the other end of the tape up so that the edges are parallel and meet (image 4). The folds can be secured with a pin.
4. Fold the tape along the line where the edges of the tape touch (image 5). Join using a needle-first stitch, but as close to the edge as possible.
5. Repeat steps 3-4 to fold the ribbon to the end (image 6).
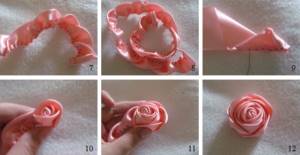
6. Gently pull the thread and secure its end (image 7, 8).
7. Start rolling the ribbon around the core (image 9, 10). You can secure the tape with thread or hot glue.
* You can decorate the bud with leaves.
Decor
Artificial flowers, unlike real ones, do not have strict decorative requirements - satin petals will not begin to fade from glue, needles or pins.
Most often for buds created from ribbons:
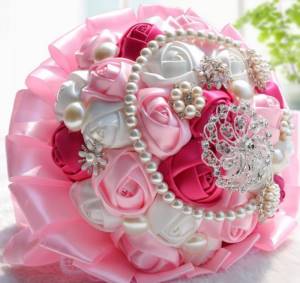
- add a variety of beads , for example, pearls on a wire in the center of each flower;
- No less popular are rhinestones and decorative pendants that echo the theme of the wedding;
- a vintage bouquet will be decorated with small bird cages ;
- composition in shabby chic style - elegant brooches .
The transition to the leg is often decorated with a lace skirt, and the handle itself is decorated with gold cord, fabric of a different texture, and sparkles. The main thing is that nothing prevents you from holding the bouquet.
DIY rose composition
Most often, brides choose noble classic roses as artificial flowers, especially since satin allows you to create them in any color.
There are dozens of tutorials on how to make rosebuds, but we have chosen the easiest one for you, which results in elegant flowers.
Step-by-step instruction:
- Cut the satin ribbon into equal rectangles about 8 cm long - the wider they are, the larger the final petals will be. One rose requires an average of 25 blanks.
- Burn all cut areas with a lighter so that the flowers retain their original appearance for as long as possible. If the pieces are very small, then it is better to hold them not with your fingers, but with tweezers.
- In each petal, bend two corners located diagonally over the entire length of the rectangle and sew with a machine.
- Roll one of the petals into a tube and tighten it with threads from below - this will be the middle of our rose.
- Now, one by one, wrap the tube with the remaining petals , carefully sewing each one to the center.
The rose is ready, you can sew it to the base of the bouquet, glue it with a gun or secure it with a pin with a pearl head.
Step by step video
A wedding bouquet made of satin ribbons is an excellent alternative to compositions made from fresh flowers. An airy, luxurious bouquet will never wither, and will delight its owner with its beauty for many years. For those who want to make this outlandish thing with their own hands, video:
How to make a wedding bouquet
Sequence of work:
- Take a foam ball with a diameter of 20 cm.
- Using a sharp knife (not very short, about 15 centimeters), cut the ball in half.
- Take a handle for a bouquet 20 cm long, 3 cm in diameter.
- On the flat part of half the ball, mark the center with a pen and from it in all directions we set aside half the diameter of the future handle of the bouquet.
- Using scissors or any other thin pointed object, make a depression in half of the ball, about 4-5 cm.
- The recess should be narrow, exactly the diameter of the bouquet handle. You can try on the handle.
- Pour liquid hot melt glue into the recess. We try to get the glue onto the walls of the recess and onto its bottom.
- Lubricate one side of the bouquet handle with hot glue.
- Insert the handle with the lubricated side into the recess in the ball until it stops. This must be done quickly, because hot melt glue dries quickly.
- Apply glue to the joint between the bouquet handle and the foam.
As a result, we get such a unique porta bouquet - the basis for our future bouquet!
Now let's start decorating the base:
- Take the fabric (in this case silk) and cut a piece 6 cm wide and 80-90 cm long. Then cut out a 6 x 6 cm square.
- Glue the square to the back of the handle with the front side facing out.
- And then we glue all sides of the square to the handle.
- We take a long piece, glue two corners on one side with the right side of the fabric facing out. Glue the cut to the handle with the fold towards the edge. Next, carefully apply glue to the handle along the edge.
- We glue the cut to the handle along the edge with the fold towards the edge of the handle; this must be done quickly, because the glue hardens quickly. You can’t apply glue close to the edge, because when you glue a piece, the glue can come out, and when it dries, it turns white, and it won’t turn out very neatly.
- Next, apply glue to the handle (or to the cut from the side of the handle, as convenient) and glue the cut in a spiral to the handle, overlapping so that the double edge of the cut is covered by the folded edge. And so we wrap the handle with a cut to the end, to the junction with the foam, cut off the excess and glue the fabric along the entire diameter.
- Next, we take another piece of fabric 11-12 cm wide, 65 cm long for our ball with a diameter of 20 cm, i.e. the width of the cut should exceed the radius of the foam ball, and the length should exceed its diameter.
- We sew this section in a circle with the right side out, the seam inward.
- We stretch the stitched section onto our foam half and glue it along the edge.
- We gather the other edge around the handle of the bouquet. We get a draped bouquet handle. It is not decorated yet, but you can already start decorating the top part of the bouquet.
- For the bouquet we take various flowers, brooches and other decorations. We cut off the stems of all the roses and treat the ribbon on the cut with a lighter, grease the inside of the flower with glue.
- Next, we begin to cover the entire foam with flowers. It is best to glue from the top. You can first pin the flowers to the foam with pins and decide where the brooches will be located. (Usually flowers are glued joint-to-joint or overlapping, the main thing is that the foam is not visible.)
- We glue it so that the brooches slightly overlap the flowers or are under them. We try to maintain color balance, evenly distributing flowers and brooches of different shapes on the bouquet.
- You can lay out flowers and brooches in some pattern or follow the color order. Let your imagination take flight.
- In this way we fill the entire half of the ball to the very edge.
- Then we glue the flowers close to the edge or even go a little beyond it, then it seems that the flowers seem to be hanging from the edges of the bouquet.
- After we have glued all the flowers and large brooches and covered all the foam with them, we add half-beads, rhinestones and any other decorations to the almost finished bouquet.
- And at the very end we decorate the handle of the bouquet.
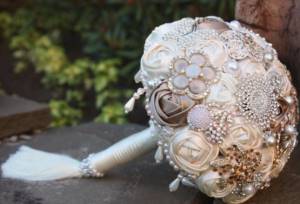
A wedding bouquet of satin ribbons and brooches is ready!
Tips and advice:
- A luxurious bouquet made by your own hands can be presented as a gift. Of course, it will cause admiration: those around you always admire the extraordinary bouquet. Don't forget this when you make it, pay a lot of attention to detail.
- Hot-melt adhesive has an unpleasant feature - it can “reach” for the gun and leave thin sticky white cobwebs, which are very visible on colored fabrics, and are generally noticeable.
- Do not apply too much glue, otherwise it may stick out beyond the borders of the brooch, and since it will turn white when hardening, the bouquet will look untidy.
- The foam should not be visible. If suddenly you have a gap, it is better to cover it with decoration or a small flower. Carefully drape the bouquet skirt. If you were unable to do this carefully, then the flaws can be hidden behind lace and ribbons.
- For a bouquet with a diameter of 20 cm, use sticks with a diameter of 3 cm, for the rest - 2.5 cm, so that the porta bouquets look harmonious. Of course, small bouquets of flowers and brooches require significantly less material and are made faster, so it is better to start with smaller bouquets.
- The color scheme is limited only by your imagination and taste! Sometimes masters try to stick to classic combinations, but in fact, absolutely any combination can look stylish, it all depends on the shades. Try to avoid colors that are too bright and instead opt for deep, rich colors.
- Well, the last thing: do not skimp on materials, since it depends on them how beautiful the bouquet will look.
0 Comments
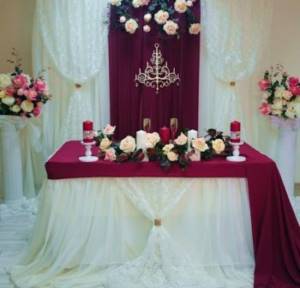
Photo
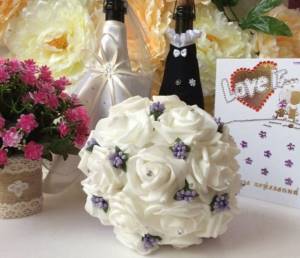
Fresh flowers are beautiful and tender, but short-lived. That is why more and more brides are choosing a bouquet of satin ribbons.
General techniques for making kanzashi roses
For beginners, we will talk about one of the simplest kanzashi techniques. Our lessons show step by step in the photo what the principle of this technique looks like specifically for making flowers and rose buds. When this simple technique becomes clear to you and you learn how to use it to make roses, then further needlework using the kanzashi technique will not be difficult for you. In short, the whole point of making roses and kanzashi buds is to cut the ribbon into square or rectangular pieces, from which you then need to form the petals or leaves of the flower and rose bud. These squares and rectangles must be folded in the desired order, resulting in the details of flowers and buds. After this, the finished flowers are attached where you intended.
Read
How to make beautiful and airy marshmallows using the kanzashi technique