Materials and tools
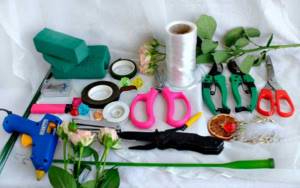
To create floral arrangements, you need to prepare the following materials.
- Floral sponge. It serves as the basis for compositions. It is placed at the bottom of any container - a basket, a hat box, a vase, to fix flowers and other elements. Flowers stuck into it stay fresh longer and can be watered.
- Thin flexible wire. It will be useful not only for strengthening the composition, but also for the manufacture of its individual elements.
- Floral tape is necessary for covering cuts on the stem, wire, packaging and decoration. Its properties are reminiscent of elegant electrical tape made from synthetic non-woven material. It is easily stretched, follows the shape of the element, is tightly and securely fixed thanks to the adhesive layer, and prolongs the life of the cut plant.
- Vases, bouquet holders, satin ribbons of different colors, beautiful wrapping paper, baskets, hat boxes, plugs and other accessories for decoration. We’ll give you a little advice right away: follow fashion trends in floristry. On social networks, subscribe to famous florists or professional communities to keep abreast of all the new products.
- Transparent cellophane film can be used as technical wrapping, for example for transportation or protection against damage.
As for tools, first of all you will need:
- pruner,
- scissors,
- floral knife.
It is advisable to have these tools in pairs: one for household purposes (cutting ribbons, paper, etc.), the other strictly for cutting and processing flowers. Keep your tools sharp at all times. Dull blades damage plants and this negatively affects the overall quality of the arrangement.
- Hot glue gun (the simplest model with a power of 100 to 150 W is enough). It is needed to connect elements.
- Stapler - for the same purpose.
- Wire cutters, thin-nose pliers and pliers for working with wire.
- The color wheel is a very convenient cheat sheet, thanks to which you can accurately choose colors for bouquets and other compositions. For beginners, this is a must-have tool.
Floristry tools must be of good quality so that they are convenient and easy to work with. Cheap models tend to break down very quickly.
How to choose a flower arrangement for the interior
It is very important not only to be able to compose competent flower arrangements, but also to select a suitable vessel for them.
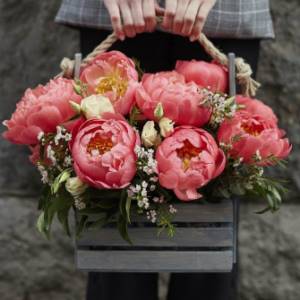
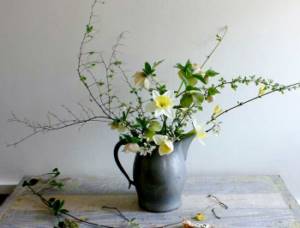
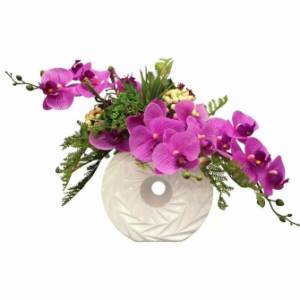
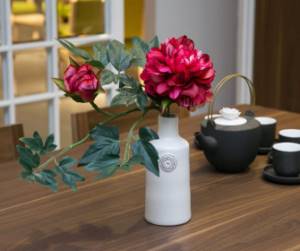
One lush flower will look spectacular in a long narrow vase or decorative bottle. It is better to place spherical small bouquets in a wide square vase or jar. You can put only the heads of artificial flowers in a round vase and complement them with shells, glass stones, beads or colored sand. Nowadays it is popular to create compositions in decorative or small boxes. Small buds will look elegant in ordinary glass glasses.
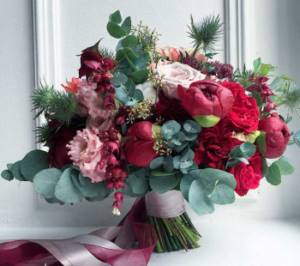
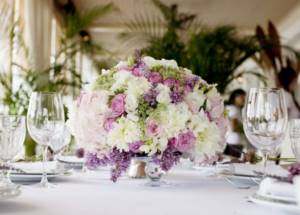
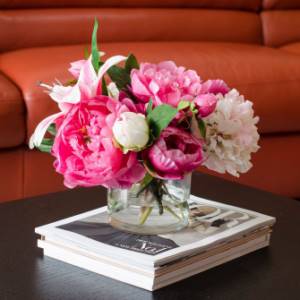
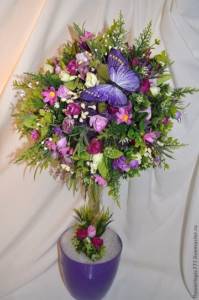
Ball-shaped bouquets in voluminous vases will look harmonious in the living room or in the middle of the dining table in the dining room. Field or climbing plants will add coziness to the kitchen. It is better to choose delicate flowers for the bedroom, for example, lush peonies
If you want to decorate your bathroom with a bouquet, you should pay attention to waterproof materials.
If the interior is made in light colors
, then the bouquet can be in bright colors. It is better to diversify dark rooms with light colors.
In any type of design, there is a rule that it is not recommended to use more than three colors in one work. It’s the same in artificial flower arrangements – a combination of more than three types of plants will look tacky. It is better to place large and dark flowers at the bottom, and dilute the bouquet with delicate light plants on top, for example, wildflowers or graceful twigs.
Principles of composing floral compositions
Floristry, like any other art, has its own rules and principles that must be strictly followed in order to create a beautiful composition that pleases the eye. Even very experienced florists don’t make bouquets at random.
Ideally, a floral arrangement should meet the following requirements:
- harmony, that is, all elements form a single whole;
- the design matches the chosen style;
- variety of textures and structures of plants;
- a well-chosen color scheme, this is where the color wheel will help you;
- dynamism, the presence of one or more focal points;
- compliance with the golden ratio rule;
- balance of all parts of the composition.
Let's look at each quality in more detail so that you can freely navigate the theory of floristry.
Floristry styles
- The vegetative style suggests that the composition should be as close as possible to the natural image. This style is characterized by a muted color palette; twigs, berries, moss and other natural materials are often used in the design. It is important to ensure that the plants belong to the same season. This is a very difficult style for beginners.
- Decorative style. Any combination of plants is allowed here, the main thing is that they look organic and none of them lose their flavor. In decorative compositions, you can safely use the most unusual finishing materials; the more textured they are, the better. Often used for room decoration and composition using a floral sponge.
- Linear style. The composition is built according to the principle: clear lines, minimum materials, maximum naturalness. Most often, such compositions use plants with curved or long stems, and the elements are arranged asymmetrically.
- Massive style. The composition has a clear form. All elements are tightly connected to each other or to the frame. There are no strictly defined focal points; the colors, size of the buds and lines smoothly transition into each other.
The decorative style is used mainly for making bouquets. The rest are most often found in interior design.
Dynamics and focal points
If you arrange the elements correctly, the composition will turn out dynamic. Looking at it, a person will move his gaze from one plant to another, and this will not only bring aesthetic pleasure, but will also relax and relieve stress.
The focal point is the most important element that attracts attention in the first place; the entire composition is built from it. Multiple focal points are allowed. This could be a large flower, unusually shaped leaves, varying degrees of bud opening, or different flower positions in height.
How to combine textures in a composition?
Each flower has its own surface of leaves and petals. This is called plant texture. It is very important to take this into account when composing a bouquet. Facts are divided into several groups.
- With a metallic sheen. This includes plants with shiny smooth leaves and inflorescences, for example, anthurium, begonia, as well as with matte foliage, for example, sedum.
- The glass texture is formed by smooth, translucent petals and leaves, such as those of bells and irises.
- The porcelain texture is obtained from the dense surface of the flowers, shiny-smooth or, conversely, slightly rough and matte. These are, first of all, orchids and hyacinths.
- Velvety texture - the petals feel like velvet or soft suede to the touch. This group includes violet, Saintpaulia, and some varieties of roses.
- The brocade texture also implies a soft surface, only more silky, with rich shades. These are marigolds, primrose, gaillardia.
- The silky texture is elegant large petals, smooth and tender, reminiscent of natural silk. The most striking representatives are poppies and anemones.
- The wool texture is characterized by flowers that are similar in appearance and softness to alpaca wool or cashmere. These include astilbe, ageratum, cotton grass, and some flowering herbs.
- Flowers with a somewhat rough rustic texture: helianthus, rudbeckia and others, make bouquets in a rustic style - cute and unpretentious.
When composing a composition, it is customary to combine flowers either as close in texture as possible, or strictly opposite. For example, shiny flowers look great against the background of matte velvety leaves.
Golden ratio rule
The golden ratio is the basis that every florist must know and strictly observe. It means that the harmony of the composition is achieved by observing certain proportions when assembling it. Thanks to this, the composition looks like a single whole.
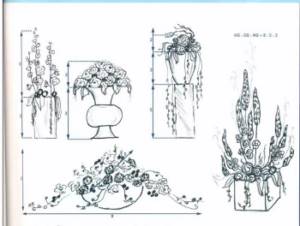
In floristry, ratios of 2:3 and 3:5:8 are used. Let's take a closer look at how they are used in practice.
- Height proportion. If you are making a composition in a vase, then you need to take its height into account. It is better to use a ratio of 2:3. The height of the large vessel will be 3 parts, and the flowers, respectively, two parts. It can also be the other way around: the flowers make up 3 parts, and the vase – two. In a bouquet, proportions are calculated starting from the middle of the bunch. The optimal ratio is 3:5. Three parts - bottom, five parts - top.
- The length proportion is calculated depending on the base or diameter of the vessel according to the same principles.
- The proportion of height and length is calculated for horizontal compositions, taking into account the height of the vessel. Here you should adhere to the ratio of 3:5:8.
- For asymmetric compositions, calculate the proportion of the mass of the material. The main mass of colors is 8 parts, the distant one is 5 parts, the near one is 3 parts.
It is useful for novice florists to copy compositions compiled by experienced florists and carefully monitor compliance with the ratios. So, a professional sense of proportionality will come naturally
Throwing double
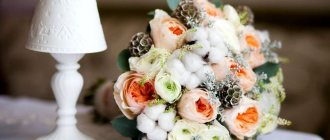
This attribute is necessary if the wedding bouquet itself is made in a complex shape or is heavy. Also, many brides prefer to keep their bouquet as a keepsake for pleasant memories. There is a superstition that a bouquet made with your own hands contains a piece of soul, warmth, affection and care, and it remains in the hands of the bride for a long time and absorbs all the experiences of such an event, and it is not recommended to give it away. This is what understudies are created for.
Editor's choice: How to submit an application to the registry office, possible nuances of filing an application
Symmetry or asymmetry?
Mentally draw the geometric axis exactly in the middle of the composition. If the material is at an equal distance from it, then this indicates symmetry. If all the parts look different, then this is asymmetry.
With symmetry, the main elements are placed in the center of the composition. The remaining elements are less significant; they complement the main ones, emphasizing their color and shape. Symmetrical compositions are usually used on special occasions, as well as when decorating official events and office spaces.
With asymmetry, the main elements are not placed strictly along the axis, but in deviation from it, but it is important to maintain the 3:5:8 ratio, which we wrote about above.
- The main part is usually placed on the left side of the axis, and the remaining elements on the right. The smaller they are, the further away they should be.
- Light flowers enhance asymmetry, dark ones smooth out.
- As a result, the plants look natural, as if we found them in nature.
Asymmetrical compositions are usually used to decorate festive events and spaces intended for relaxation and leisure.
DIY fabric compositions
Making flora is an interesting and entertaining business. It is not necessary to purchase a ready-made bouquet. You can make flowers with your own hands. To do this you will need the following materials:
- a small piece of organza;
- threads, scissors, needle;
- beads or beads;
- glue;
- candle and matches;
- paper for drawing blanks.
So, you will need a piece of paper or cardboard. The preparatory stage is drawing blanks. The most important and beautiful thing about a flower is its delicate petals. Therefore, you need to approach your work with full responsibility. On a piece of paper, draw the required number of future petals of different sizes: large, medium and small.
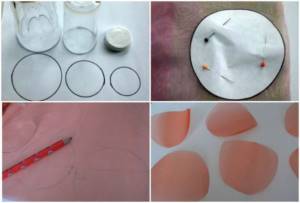
To draw circles, you can take containers of suitable diameter
Place the resulting blanks on a piece of fabric. In this case it is organza. Choose any color of the material. Next, you need to cut out the resulting petals with scissors. You will notice that the fabric may fray a little around the edges. This is easy to fix. Hold the workpiece over a burning candle or match. The fabric will be “sealed” and the petal will acquire a beautiful curve.
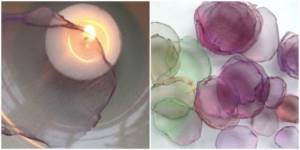
It is necessary to melt the edges of the organza over a lit candle.
Next, you can begin to form the bud. Place large petals at the bottom and small ones at the top. To secure the resulting flower, use a needle and thread that matches the color of the fabric. Make a few stitches in the center of the bud. Decorate the middle of the bud with beads or beads of a contrasting shade. You can secure them in the center of the composition with glue.
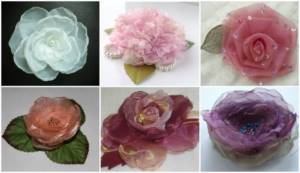
Assembling the flower begins with large parts, stringing them on wire. The middle is decorated to your taste with beads or beads
Decorate curtains, lampshades, and headboards with artificial flora. The panel formed from buds of different colors looks beautiful. Art stores now offer a wide variety of panels. They can be large or small, rounded or square, with or without a frame.
See also: How to properly decorate an aquarium
What else is important to know?
Firstly, it would be a good idea to study the language of flowers. Even though this tradition is a little outdated, many people find it very beautiful and romantic. Special reference books will help you learn basic “phrases” and “words”.
Secondly, be sure to take into account the reason for which you are making the bouquet. Some flowers traditionally accompany funerals, others - weddings, dates, birthdays, and others - are appropriate only in business compositions. The palettes and design are completely different in all cases.
Thirdly, many plants are sworn enemies, and some, on the contrary, are friends with each other and even heal each other. Be sure to check the color combinations in the gardener's reference book.
As you can see, putting together a bouquet of living plants is painstaking work that requires the florist to be thoughtful and knowledgeable about the basic geometry and biological characteristics of each flower.
Floristic techniques
Let's look at a few basic techniques for creating a beautiful, harmonious floral composition.
- A boutonniere is a traditional mini composition that complements a man’s suit at a wedding, anniversary, prom and other celebration. It can also be attached to a women's bracelet. One large flower is placed in the center of the composition, green branches and other decorative elements are placed on the sides. On one side, the boutonniere must be flat so that it can be easily secured. Details on how to make a boutonniere are shown here
- The parallel technique is usually used to create tabletop arrangements and vertical bouquets, which are usually given to men. Flowers with large buds are suitable for a bouquet. The essence of the technique: the plants are laid in a ladder, so that the heads of one row are located lower than the previous one. The stems are secured to each other with tape. If you want to create a tabletop composition, you will need a floral sponge and flowers with stems of different heights. It is composed in the same way as a bouquet: one row is lower than the other. How to correctly assemble a bouquet using the parallel technique is shown here
- The spiral technique is used to create most bouquets. To do this, you need to take flowers with even, dense, long stems. The essence of the technique is that when assembling, one flower is placed at a slight angle in relation to the previous one. If you assemble a round spiral bouquet correctly, it will stand on the table without a stand. You can see how to do everything right here
- The asymmetrical technique is very complex; it requires imagination and knowledge of the laws of floristry to create a truly beautiful elegant composition. The bouquet uses flowers, twigs of different shapes and heights. It is desirable that only one element stands out, and the entire composition will be built around it. See more about this here
How to compose a composition, watch in this video
You can even make a bouquet from one flower, the main thing is to decorate it beautifully and unusually, following the rules of floristry, as shown in this video
DIY flower arrangements for the table
Real fresh flowers are very beautiful and delicate, but they require careful care and attention. It is much more convenient to decorate the interior of your home with artificial species. Elegant compositions of beautiful artificial species, made with your own hands, can serve as a decoration for a room for a long time without losing their decorative properties.
Flower arrangements are a great way to make the interior decoration of rooms more beautiful and sophisticated, and the high quality of materials allows you to make flowers so natural that they are difficult to distinguish from real ones.
To make it, you will need polystyrene foam or oasis; vase, basket, flowerpot or dish for composition; several artificial flowers; tape, wire and scissors.
The work is performed in the following sequence:
- Flowers can be bought or made by yourself. Divide twigs from several elements into parts, remove excess twigs and leaves.
- Make a base for a styrofoam bouquet or an oasis for flowers. To do this, cut out the desired shape from it and place it in a container for the composition.
- Starting with the tallest flowers, stick them into the base in the desired location. Plants of medium length should be placed so that each element is clearly visible. Decorate the front part and the surface of the base with short plants. If you cannot completely cover the foam, you can cover it with pebbles, sand, shells or decorative hay.
- To make a tall bouquet for a vase, you need to gradually secure new flower heads on a tall plant, wrapping them with ribbon.
Each element in the composition should be clearly visible, so it is important to maintain the placement levels by adjusting the length of the stems by adding a piece of wire or cutting off the excess.
What is important to know about bouquets of artificial flowers?
The main advantage of artificial flowers over real ones is that they are durable and can be placed in places where real plants cannot survive. If you decide to create a composition of artificial flowers, choose high-quality products. They are very beautiful and look natural, and also last longer with their rich color and ideal shape.
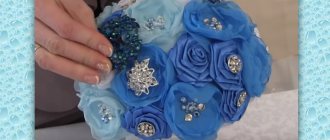
Bouquets of artificial flowers are assembled according to the same principles as those made of real flowers. But here it is important to consider the placement of the composition. We'll give you some interesting ideas.
- For spacious rooms, such as a living room, bouquets of roses, peonies, and lilies are ideal. Here you can also use floor vases with tall flowers.
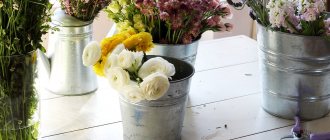
- Place a small bouquet of bright multi-colored flowers on the jardiniere in the hallway - chrysanthemums, asters, gerberas, tulips.
- Delicate compositions of small roses, violets, and peonies will look beautiful on a dressing table or bedside table in the bedroom.
- Artificial flowers in pots will be an excellent decoration for the walls in the bathroom. They can also be placed in the office.
- Small pots of flowers and herbs look amazingly beautiful on kitchen shelves and add coziness to the room.
Also, with artificial plants you can create interesting wall panels, collages and other compositions that will become the main decoration of the interior.
Benefits of artificial flowers
Fresh cuttings quickly wither, and plants in pots require constant watering. If you are a fairly busy person, artificial compositions are just for you.
Low-maintenance beauty
Flora made from materials such as paper, latex and fabric has many advantages:
- does not fade or deteriorate;
- It does not require special care;
- has a budget price;
- safe for people with allergies;
- differs in durability.
Modern artificial analogues are in no way inferior in appearance to living plants.
Just a few years ago, artificial flowers for home interiors were perceived as something clumsy and ugly. Suffice it to recall Soviet roses on plastic branches and “ampeloid” lilies and pelargoniums in dark colors. Today, floristry has reached a new level and the modern market offers consumers stunningly beautiful bouquets and artificial plants made of fabric, plastic and latex.
If you want artificial compositions to smell like life, you can use essential oils
See alsoAquarium design
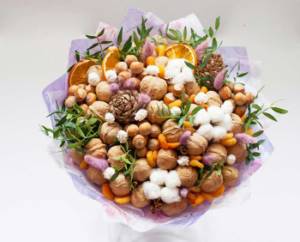
How to make a bouquet of sweets?
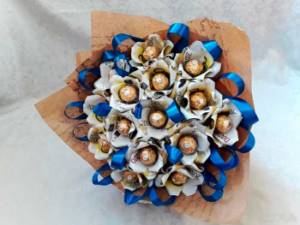
Knowledge of floristry will come in handy if you want to congratulate a loved one in an original way with a sweet gift. For this you will need:
- candies;
- corrugated paper: green for sepals, yellow (or any other color) for petals;
- tape with a green adhesive layer;
- scotch;
- long wooden skewers;
- wrapping;
- small scissors;
- floral sprigs and ribbon for decoration.
Execution order:
- According to the number of candies, cut out blank strips from paper: wide ones for the petals, narrow ones for the sepals. They should be such a length that they can be loosely wrapped around the candy and secured.
- Fold the strip like an accordion, cut out the contours of a petal or sepal with scissors. Repeat the same with the remaining strips.
- Wrap the candy in petals and secure with a piece of tape.
- Wrap the candy in a sepal and secure with a piece of tape.
- Repeat steps 3 and 4 until you run out of candy.
- Attach the resulting buds to wooden skewers with tape, wrap the stem a few centimeters down.
- Collect a bouquet, fasten the stems together with tape or tape. If you wish, you can supplement it with floral branches.
- Wrap in beautiful wrapping paper and tie with matching ribbon.
Done!
A selection of thematic videos for the article
After reading our article, we suggest watching a selection of thematic videos. This will allow us to study this issue in more depth. You can also learn other subtleties and tricks of making compositions. Enjoy watching!
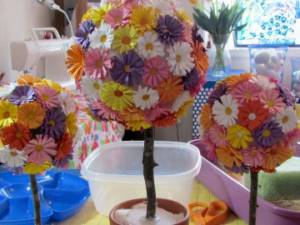
Making a real tree of happiness with your own hands is the dream of every child, but what about a child, and an adult is not averse to mastering this task. And all handmade artists have this opportunity. Topiary made from artificial flowers is like a tree of happiness, which can be created from simple materials, at random or to fulfill a wish.
Look at examples of trees in the gallery of photos and videos, master class - elegant, delicate trees with a beautiful crown, thin legs, and a cutely decorated pot. And as a wedding decoration, and as a bedside souvenir, and as a gift to a friend - no matter how you use it, this topiary looks equally convincing and fresh.
There are several ways to make such a tree with your own hands. It all depends mainly on what kind of flowers you use. If these are ready-made flowers that can be bought in a store, the process of making topiary is simplified. But flowers made from ribbons, felt flowers, silk, and paper can also be artificial.
An example is a master class on creating a topiary from paper roses. Video and photo instructions will also be useful for those who are just trying themselves in this business.
You will need:
- Beautiful pot;
- Plaster (or alabaster);
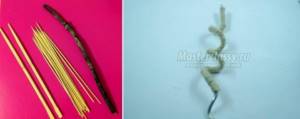
- Tree trunk - pencil, sushi sticks, drumstick, etc.);
- Music paper or book pages in English;
- Leg-split;
- PVA glue and glue gun;
- Base ball;
- Paints, brush;
- Decorative devices.
If you love the shabby chic style, then you can slightly modify this master class, just a little, and get a stylish accessory just in shabby chic aesthetics. But more on that later.
The first thing you need to do is gather all the materials together. First of all, what you are going to make roses from. This could be music paper or old music books, even if they are yellowed. You can also use pages from English-language books and magazines. If the pages here are yellowed, you will get a vintage topiary.
- You need to make the flowers yourself. To do this, cut out petals of different shapes from paper. Roll the narrow and long one into a tube, and around it, place the remaining petals one by one until a bud is formed. The more licentious he is, the better. You just bend the petals with your own hands.
- You can hold the petals a little over the flame of a candle or over a lighter so that their edges turn brownish. This touch of antiquity will make the roses more impressive.
- Each flower is secured with a thread at the base or by gluing the petals.
- Next, the master class follows the usual scenario for topiary. The base ball, it can be, for example, a rubber ball, you cover with paper according to the papier-mâché principle. If this is a foam blank, you can simply paint it the color of roses.
- Using a glue gun, you fix it on the base of the rose, carefully, one at a time. They must fill the ball from all sides. Leave room for a hole for the barrel.
- If there are noticeable gaps, beige or mother-of-pearl beads will close them.
Popular articles Bustier dress
Now we need to make the trunk. You can take a thick pencil and wrap it in several layers with twine. Then the trunk must be inserted into the base ball, secured with glue, without deforming the paper roses.
The master class will be the same if you use other samples rather than paper flowers. The photo and video show that the principle of creating a tree is the same.
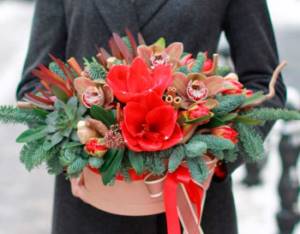
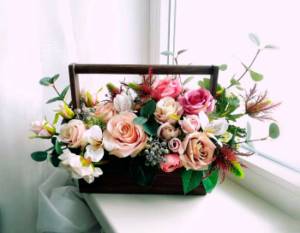
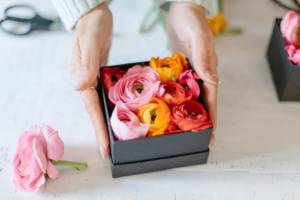
Master class: making a flower arrangement in a box
You will need:
- roses with large buds;
- succulents - aeonium, stone rose, pachyphytum, preferably the same size;
- beautiful decorative box and drawer;
- film;
- floral sponge;
- floral knife;
- stapler;
- ribbon for decoration.
Procedure:
- Cut the sponge to the size of the box or drawer.
- Place the film down and secure the edges along the walls with a stapler.
- Place a floral sponge on the film.
- Trim roses so that they are slightly taller than succulents.
- Fill the sponge with plants as follows: a row of succulents, a row of roses, in any direction.
- Try not to let the sponge show between the flowers. You can fill the gaps with any decor, for example, straws made of paper or other material.
- Wrap the box with ribbon and tie it in a pretty bow.
- Wrap in beautiful wrapping paper and tie with matching ribbon.
Select the palette according to the color wheel. Draw a diagram of the arrangement of flowers in advance so as not to accidentally damage the plants when laying them out.
That's all!
Master classes on creating flowers with your own hands
Lush carnations made of corrugated paper
Necessary materials:
- corrugated paper;
- ruler;
- scissors;
- floral tape;
- glue.
- Cut a strip 8 cm wide. The fuller you want the carnation, the longer the strip should be.
- Bend 3 cm along the entire length of the strip.
- Stretch the strip at the fold.
- Glue the wire to the beginning of the strip and wrap the paper around it, forming a bud.
- Wrap the base of the carnation with thread or wire.
- Bend the edges of the petals, making them fuller.
Paper roses
Necessary materials:
- Using curly scissors, cut a strip 3 cm wide.
- Using a damp sponge dipped in paint, go along the edge of the strip so that the rose appears natural.
- Step back 5 cm from the edge of the strip, and make small cuts along the entire length every 2.5 cm.
- Tuck the edges of the cuts. These will be the petals.
- Make a cut in the bottom center of each petal.
- Glue the edges of the cuts overlapping so that the petals are convex.
- Twist the strip to form a rose.
Felt flowers
By printing a photo of the template, you can make very simple but elegant hanging roses
, which will be an excellent decor for a children's room. Cut the flower along the white lines and twist. At the end, secure with threads. To create a composition, hang many of these flowers on a round base using threads. You can complement them with beads and butterflies.
Useful tips for beginners
- Before making a bouquet or composition, soak the flowers with water for several hours. You can add Crisal powder to the water. This will help the flowers stay fresh longer.
- Remove all leaves and shoots that will be under water or inside the package.
- Cut the stem at an angle and only in water, using pruning shears or a florist knife.
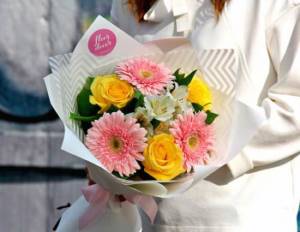
- For women, it is customary to make round bouquets, and for men, tall, elongated bouquets.
- The optimal number of flowers in a bouquet is no more than three types.
- Use flowers with half-closed and newly opened buds; such a bouquet will last longer.
- Lighter flowers of calm shades should be located along the edges, and darker and brighter ones should be placed closer to the middle.
- You cannot combine exotic and wildflowers in one composition. It's vulgar.
You will find some more useful tips in this video
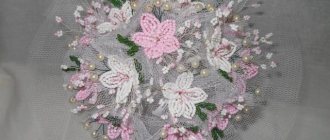
Panel made of natural and artificial flowers
The breadth of imagination is limited only by the size of the walls. A panel of flowers in the decor is your personal contribution to comfort, it is also the use of creative potential, it is also an opportunity to add an accent to a monochromatic room or a cunning trick to hide an uneven surface. A panel of flowers is a natural picture that looks three-dimensional. As we have already noted, the panel is assembled from natural flowers and from, for example, paper glued together right there on the coffee table on your own or in the company of a child. Other ingredients can be cereals, dried flowers, berries, twigs, leaves. Textile elements: burlap as a background, ribbons, faux fur, knitted pieces of thread of different textures. If we summarize all of the above, then from scrap materials, adding imagination and a little glue, it is pleasant and interesting to create a panel at home.