Step-by-step instructions for making a head wreath with your own hands
At fashion shows in recent seasons, you can often see the demonstration of dresses and sundresses in combination with wreaths adorning the heads of models. The sizes of the compositions are very diverse, as are the colors. The trend for this accessory was immediately appreciated by the fair sex. Moreover, age does not matter. Everyone can choose the ideal model for themselves, highlighting their natural beauty.

Suitable for whom and for what occasions?
Almost all women can use a wreath to decorate their hair. Another question is the choice of floral composition and flower sizes. Teenagers and girls can safely try on any form. The main criterion is compatibility with the outfit. For women, discreet compositions of small buds are more suitable. The color scheme should consist primarily of pastel and light colors.
The main purpose of the wreath is considered to be special occasions and holidays. In recent years, there has been a popularity of using the accessory in the image of a bride. Little girls and grown ladies look equally good with delicate little buds on their heads. This emphasizes femininity and gives the appearance a delicate note and charm.
Folk festivals and holidays can also be an occasion to transform your hair by decorating your hair with a wreath. Today's youth love to celebrate Ivan Kupala. Girls with a floral arrangement on their heads look mysterious and charming. This holiday is not complete without an obligatory attribute - a wreath woven from fresh flowers.
When using a floral accessory, it is important to remember that it is appropriate in the spring and summer. Although some fashionistas manage to combine it with fur coats and high boots. You can adapt the accessory to the time of year using decorative elements that correspond to the flowering time. Fall decorations look beautiful and appropriate with yellowed leaves.

The wedding hairstyle can be complemented with delicate wreaths made of beads or flowers.

It is appropriate to wear the accessory even in everyday life

Little girls and grown ladies look equally good with delicate little buds on their heads

Cute little ladies can wear a wreath for a photo shoot
How to make it yourself
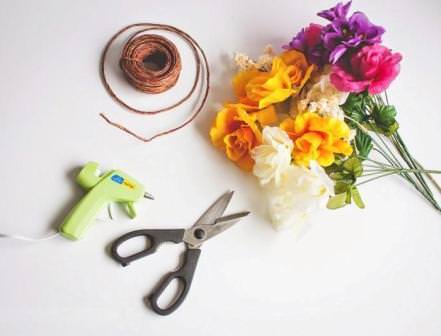
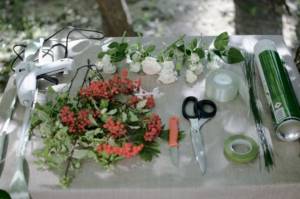
For manufacturing you will need the following materials:
- wire;
- flowers on branches or individual buds;
- tapes.
To ensure that the base is firmly fixed on the head, you can use a headband. It is recommended to complement the flowers with beads and various greenery. This way the composition will look more beautiful and richer.
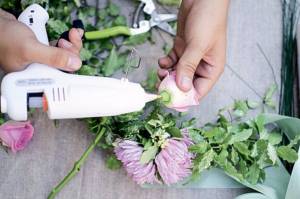
The only tools you need are scissors. To make it easier to attach flowers, stylists recommend using a glue gun. The hot fixation method will quickly and reliably fix the desired fragment to the base. This will save a lot of time drying the surface.
Elements for the composition are used from different materials. For celebrations and stately events, the hair is decorated with a headband of live inflorescences. But plastic and paper are more often used. A composition made of fabric looks very impressive. The skill is honed over the years, resulting in buds that cannot be immediately distinguished from real flowers.
Made from artificial flowers
Step-by-step instruction:
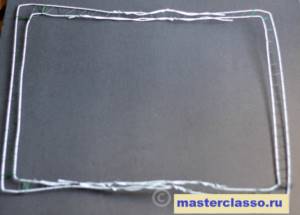
- Measure the circumference of your head to create a wire frame. If it is not possible to take measurements, then you should make a wire rim with open ends to which the ribbons are fixed. By tying it at the back of the head, the wreath can be worn in different sizes. If you use a measure, you need to cut 3-4 wire rods with a length equal to the circumference of the head plus 4-5 cm to fix the ring. Twist the base from them without closing the ends.
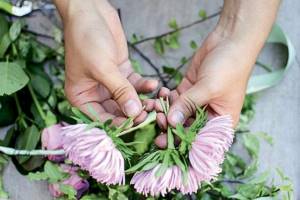
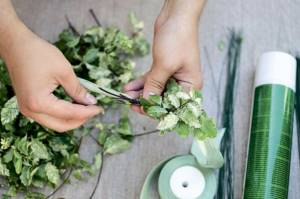
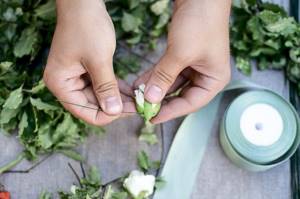
- Take branches of artificial flowers and separate them into individual buds and leaves. Short branches are also suitable for the composition. Flowers need to be cut close to the base so that the stems do not interfere with the fastening.
- First make a preparation of buds and leaves, laying them out on the table. Larger fragments are placed in the center, and smaller ones are placed toward the back of the head. Flowers should have the same tone and size, and the overall composition should be complemented by greenery from leaves and twigs.
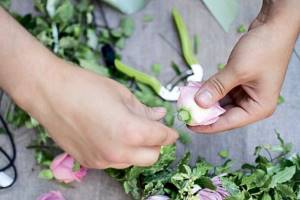
- Cut circles from felt with a diameter smaller than the flower buds.
- Glue a felt piece onto each fragment so that there is a free strip 0.5-0.7 mm wide in the center.
- String all the elements one by one , pulling the wire base into the empty space in the center of the felt.
- Distribute and adjust the composition.
- Twist the ends of the wire , wrapping each other several times.
- Cover the junction of the rim with flowers.

From fresh flowers
Step-by-step instructions for making a wreath:
- Make a wire frame. To do this, you need to cut 3-4 twigs, the length of which will be equal to the size of the head circumference plus 3-4 cm for fixing the ends.
- Prepare the plants by cutting their stems into 10-14 cm pieces. To prevent the flowers from wilting quickly, they should be treated with a floral spray. This way the wreath will maintain a presentable appearance for a long time.
- Wrap the resulting ring with 4-5 cm of floral tape, then place the wreath fragments one by one. Secure each stem tightly with tape, making 3-4 turns. The elements need to be placed closer to each other. The elements will be primary flowers, field herbs, and other greenery. As an addition, you can use beads and pebbles mounted on pieces of wire. In combination with fresh flowers, the decor will look elegant.
- The stems of the last elements are hidden under the fixed plants and tightly fixed with tape.
For a flower nymph: creating a wedding wreath with your own hands
Let's remember our childhood, in which every girl wove wreaths from dandelions or other wildflowers. Florist Nikolay Zyko in
told
Wedding
about how to create floral masterpieces for your wedding look.
Flowers can refresh an image, making it individual. This is probably why the floral wreath has recently become as popular among brides as the veil. Wedding wreaths can be large and small, narrow and thick, made in completely different styles.
If you don’t specifically select “long-lasting” flower options, then the wreaths “serve” for about 3-4 hours, after which they wither. In this regard, about half of the brides use them exclusively for the photo shoot before the official registration and during the ceremony itself.
Wreaths made from statice, gypsophila, limonium and all kinds of berry-like plants (St. John's wort, viburnum, blackberry) last longer, since the plants themselves can be perfectly preserved in the form of dried flowers. Next come those that hold up well without water - carnations, eustoma, alstroemeria, succulents.
Before making a wreath, peonies, roses, anemones, buttercups and others need to be properly watered and taped well, only then will the wreath last for several hours.
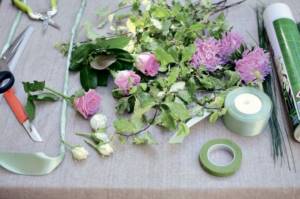
Creating the Foundation
Before you start weaving wreaths, you need to create a base for them. It will be the same for all three compositions.
You will need:
floral wire, wide satin ribbon, glue gun, tape, scissors.
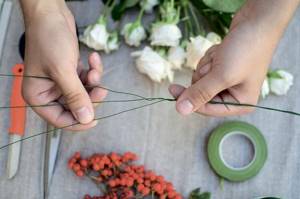
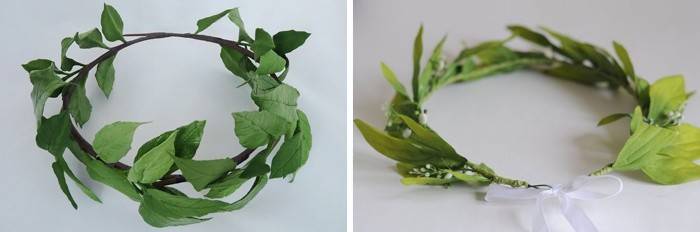
1. First, let's make the base for the wreath. Take 3 wires and twist them tightly together.
2. We tape the ends of the wire (wrap it with tape) so that the headband does not pierce the tape and damage the head.
3. Cut the satin ribbon to the desired length (the ribbon should tie around your head without any problems). In the center of the length, closer to the edge, we place twisted and taped wire. Using a glue gun, fix the ribbon and carefully twist the wire into the ribbon, forming the base for the wreath.
Forest wreath

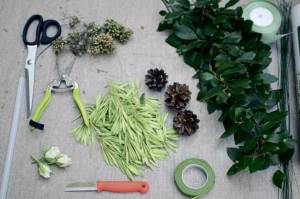
You will need:
any small-leaved bush with berries, sprigs of allspice, ash brushes, juniper berries, cones and moss, pruning shears.
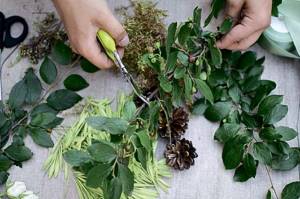
Action plan
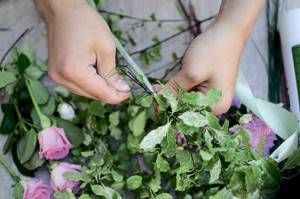
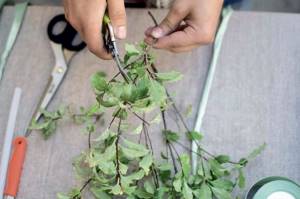
1. Cut a branch of a small-leaved bush into small pieces, from which it will be convenient to form staffage. Each of them is sequentially attached to the base using wire.
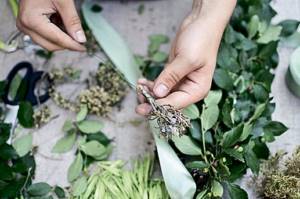
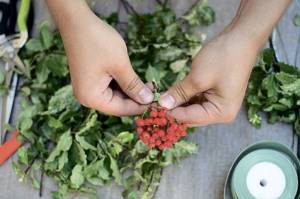
2. We form small “bouquets” from allspice, ash tassels, and juniper berries, which we attach to the staffage using the same wire.
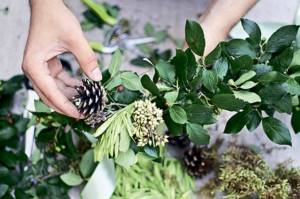
3. To fix the cones on the wreath, carefully thread a wire under the lower scales, wrap it around and fix it. We also attach the moss with wire - we crush it, giving it the desired shape, and fix it.
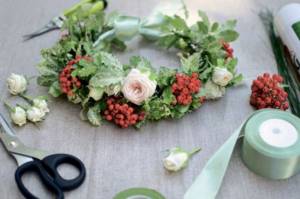
Seasonal wreath of garden roses and aster
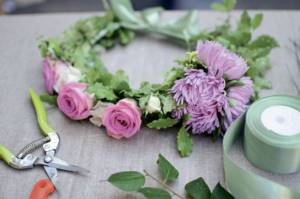
You will need:
base, roses, aster, pittosporum, tape, wire, pruning shears.
Action plan
1. Cut off pittosporum branches up to a maximum length of 7 cm, twist them with wire and attach them to the base, thus forming a staffage along the entire length of the base.
2. Cut off the stem of the aster and tape it to extend the life of the flower in the wreath.
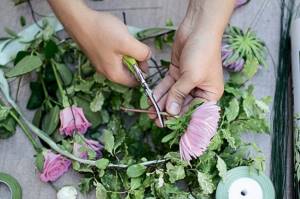
3. We collect a “bouquet” of taped flowers, wrap them with wire and attach them to the third quarter of the wreath on either side.
4. Cut off the stem of the rose almost to the bud itself. It will not be possible to tape such a cut, so we “seal” it using a glue gun.
5. We pierce the bud with floral wire and bend its ends down so that the structure resembles a hairpin.
6. We put the flower on the finished staffage and fix it well, creating any composition that you like.

Seasonal wreath with rowan
You will need:
base, rowan, bush rose, pittosporum, floral varnish, scissors or pruning shears, tape, wire.
Action plan
1. Cut off pittosporum branches to a maximum length of 7 cm.
2. We form cute “bushes” out of them, twist them with wire and attach them to the base.
3. We cut off a rowan branch of the same length, tape the trunk so that the plant retains its freshness longer, and use the same wire to fix it to the base.
4. Thus, from pittosporum and rowan we form a staffage wreath.

5. Cut the rose almost to the bud itself. We pierce it with wire and attach it to the wreath on top of the staffage, carefully screwing it to the base.
6. Spray varnish from a can onto the finished wreath, trying not to get it on the flower, since the resulting thin wax film makes the berries and leaves brighter and more stable, but spoils the flowers.
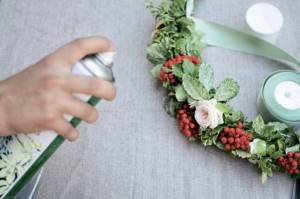
Photo: Katerina Bugakova
Text: Tatyana Yakovleva
How to weave a wreath of artificial and wild flowers. We weave flower wreaths on the head
The tradition of weaving various wreaths and hats from fresh flowers has deep roots. Our ancestors mastered this art since childhood and knew about the secrets that preserved the freshness of plants and the shape of such decoration. Thanks to fashion trends, the tradition of wearing flower crowns has been revived, and modern girls are happy to follow it. Bringing such natural beauty to life is easy. Using the tutorial below, you will learn how to weave a flower wreath. Find out what rules to follow and what plants to use.
Wildflowers are the main assistants in weaving
The most accessible and cheapest material for creating bright decorations are wildflowers. But do not underestimate them - the smells of wild plants create an aromatherapy effect, and their beautiful appearance gives the decoration tenderness and naivety. Before weaving a wreath of wildflowers, it is better to understand what they mean. Poppy is a symbol of passing beauty and youth. White field chamomile has long been considered a symbol of innocence and tenderness. Cornflower is a sign of modesty and holiness, strength and health. Periwinkle meant a declaration of love, yarrow meant free will, and immortelle meant health.

Previously, before weaving a wreath of wildflowers, ribbons were woven into it, each of which had its own meaning. For example, a red ribbon meant that the girl was engaged. Green was worn by those who had reached the age for marriage, but had not yet acquired a groom. Blue ones were intended for orphans, and white ones adorned the heads of girls under marriageable age.
Basic rules of weaving
For a flower wreath, choose only young buds that have just blossomed, then the finished product will remain beautiful and fresh longer. It is necessary to pick many flowers that have long stems, since some of them may break during work. Don’t be afraid to use a combination of plants that at first glance seem incompatible; in a wreath they can look very original.

The choice of flowers for a wreath depends on the availability of specific plants, your tastes and desires. When summer comes, the first flowers used for weaving are dandelions. In addition to them, it is preferable to use plants that have a long, flexible, reliable and durable stem. It is convenient to use cornflowers, daisies, clover and other wildflowers. You can use tree leaves, a variety of herbs and the fruits of rowan and viburnum. The more varied and larger the bouquet you collect, the more beautiful the decoration will be.
- Place three flower stems together and start braiding like a regular braid.
- When the first curl is ready, weave the next one in the middle and make a second twist. This weaving principle must be repeated until the wreath reaches the desired size for the circumference of the head.
- If you are making an accessory from artificial flowers, then at the end you can decorate it with ribbons and weave in various decorative elements: beads, beaded threads and other materials.
- The flowers need to be placed very tightly together so that the product does not fall apart and looks lush.

There is another way to weave:
- Place several long-stemmed buds into a bunch.
- Insert new ones into the resulting base, twisting the stems so that each new flower secures the stem of the previous one. Plants need to be placed tightly together, which will help hide the base and protruding short tips.
- When the wreath of the desired size is made, connect the sides into a circle with a strong thread, a blade of grass, bast, or ribbon.
You can weave a wreath with a ready-made base:
- Prepare a hoop on which the buds will be wound.
- You can glue artificial plants to it.
- Make the base from several different plants, wire, willow branches, securing them in a ring.
- The main thing is to use more lush or small buds so that the base is not visible.
- Traditionally, the finished product is decorated in the center with multi-colored ribbons that flow beautifully down the girl’s back.
What can we make wreaths from?
A wreath was traditionally considered a decoration for Slavic women. It was a ring woven from branches, herbs, and flowers, which was worn on the head. The wreath existed even in Ancient Greece, where it was awarded to heroes, competition winners, and warriors. Products were hung at the entrance to protect oneself from the evil thoughts of people and evil spirits. Making a wreath is a whole ritual, which in most cases was performed by girls. Previously, this process implied a certain weaving time, shape, size, composition.
From dandelions

Many children love to weave dandelion wreaths. This is a fun, interesting activity, as a result of which you will receive a wonderful decoration. It can be used for a themed photo shoot or as a regular accessory during outdoor recreation. Dandelions in decoration look very beautiful, bright, thanks to the lush yellow bud. The wreath can be neat and small, or voluminous and large.
From wild flowers

Weaving wreaths and skullcaps from wildflowers is a fascinating ancient activity. There are a lot of legends and traditions associated with this item. Wildflowers look especially attractive: the finished product looks lush and voluminous. Additionally, various leaves and blades of grass are woven into it. Having mastered the creation of an accessory, you can decorate your head or a child’s head with it while relaxing in nature, on the holiday of Ivan Kupala, in honor of another folk festival.
Made from artificial flowers

Wreaths, headbands, crowns made from compositions of artificial flowers have long become popular, crowning the heads of models at fashion shows and the pages of glossy magazines. In combination with open shoes, a light dress, and soft makeup, this accessory will perfectly complement a delicate girlish look. It is better to choose a hairstyle for such decoration that is as natural as possible: a careless low bun, a voluminous braid, slightly curled loose hair. Such accessories are especially relevant when creating a wedding look.
Laurel wreath
Laurel is a tree or bush native to Mediterranean countries that was sacred in the cult of the sun god Apollo. The evergreen plant was endowed with many symbolic meanings and was considered an emblem of triumph, victory, glory, protection, peace, immortality, and purification. Winners of music, poetry and sports competitions were crowned with wreaths of laurel leaves and branches. Afterwards, this tradition extended to anyone who won.
How to make a wreath on your head: master class
Do you want to learn how to weave a beautiful flower wreath? The following master class on how to make this fragrant decoration will help you. You can choose a variety of fresh or artificial flowers for weaving. This tutorial shows you how to create a natural daisy decoration. To make it you will need:
- We cut off the ends of the flowers, leaving a stem at least 12-18 cm long.
- We place two flowers crosswise, as in the picture.
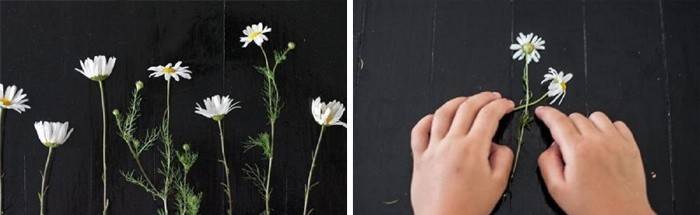
- We wrap the stem of the upper bud around the stem of the lower one, making a hook. We lay the stem of the second flower, which needs to be pulled down a little, along the first.
- We continue to weave in the sequence described in the previous step. We place the buds closer to each other.
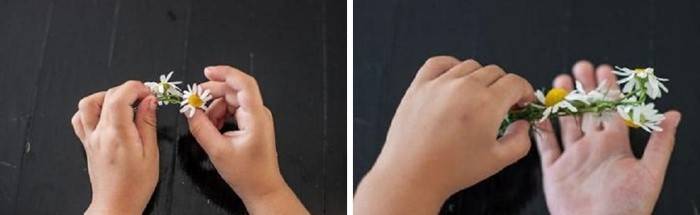
- To complete the product, we put the ends of the wreath together and tie them with soft tree bark, a blade of grass or a piece of thread. Then we cut off the stems that are too long. Finally, tuck all the ends into the braid.

Flower wreath on your head: ideas
A wreath of flowers on your head can make you a real queen of a themed celebration. To make it you will need flowers of different sizes, plant leaves, floral tape and wire for the frame. Trimmed flowers are attached to a wire ring equal to the circumference of the head using tape. The length of their stems is about 5 cm. Thus, they cover the entire wire, forming an elegant and sophisticated product.
It's summer outside, which means a lot of flowers, sun and bright colors. It's the perfect time to have photo shoots and have a great time with your girlfriends in nature! And so that your photos are even more charming, and time with your friends does not fly in vain talking - we present a beautiful master class from Natalya Erokhina.
Natasha has been professionally engaged in floristry since 2007. She worked in a florist salon for several years, while simultaneously studying at the Nicole International Floristic School. It was there, communicating with famous Russian and foreign florists, according to her, that she took a different look at floristry. I wanted to be creative and... create my own small business. This is how the florist workshop “Flower Charm” appeared.
You can get acquainted with Natalia’s works.
To make an original accessory you will need the following materials:
- Wire for the base.
- Tape
- Secateurs
- Decorative wire
- Flowers (spray roses, two types of carnations, eucalyptus).
Step No. 1 – wrap the wire with tape.
Step No. 2 – bend the wire to the size of the head and carefully wrap the ends of the wire.
If you don’t know the size of your head, you can make this option with loops for ribbons:
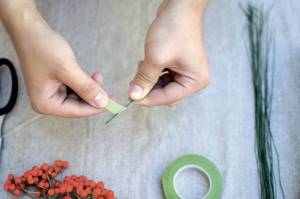
Step No. 3 – we trim the flowers and form small bunches of flowers and greenery, wrapping them with tape. Tape is a special floral tape that helps a flower survive without water for a longer time.
Step #4 – start making a wreath. We attach the finished bundles to a wire base using tape and decorative wire for reliability.
Step No. 5 - we continue to weave a wreath, alternating roses and carnations. We place flowers only on the outside of the wreath base.
Step No. 6 – having reached the middle of the wreath, we will mark the center with larger and more open roses. Having passed the center, continue with medium open ones and finish with buds.
The wreath is ready!
Tip: in order for a wreath of fresh flowers to last you longer, the flowers must be placed in water several hours before you start working. After the wreath is ready, put it in a cool place and sprinkle with water.
How often in the summer you can see little girls and even older girls with a beautiful headband decorated with bright yellow dandelions or blue forget-me-nots on their heads. The tradition of weaving such decorations is very ancient, and the history of a wreath of flowers on the head is incredibly interesting.
Video: DIY wedding wreath on your head
One wedding wreath of fresh flowers will instantly transform the image of any bride for the better. A fragrant, sophisticated, original accessory will harmoniously complement a simple veil or replace it. Flowers are a feminine decoration, as if specially created by nature itself for young brides. If previously it was important to decorate complex hairstyles with buds, which restrict movement and make you worry about the safety of the entire structure, now this has been replaced with a wreath, which is convenient. How to weave such a decoration for the bride, watch in the video below.
Head wreath made of fresh flowers: how to make?
Creating such accessories requires a sense of style. This is due to the fact that wreaths made from several plants look best. They are intertwined with small flowers and green leaves. All this must be harmoniously selected in size and color.
You will need:
- Medium thickness wire
- Wire cutters
- Floral ribbon
- Satin ribbon
- Flowers
- Herbs
Manufacturing instructions:
- First, measure the volume of your head. To do this, apply a measuring tape to the back of your head. Directing it above the middle of the forehead. Using wire cutters, tear off a piece equal to the volume of the head plus 2 cm. Connect the wire into a ring. To do this, make hooks from the extra 2 cm - 1 cm on each side. Bend them or simply wrap the free ends around each other.
- Trim each plant. The length of the stems should be 5 cm. Take a floral or satin ribbon. Place each flower on the wire base. Place the stem horizontally along it and wrap it with ribbon. Do this step with each flower until almost the end of the wreath. Wrap the remaining area with tape.
- A head wreath made of fresh flowers can be slightly transformed. To do this, plants are grouped into small bouquets. Each is then attached to the wire in the manner described above. In order for the wreath to be lush, you need to make about 10-12 such bouquets.
Tools and materials Time: 2-3 hours • Difficulty: easy
For a wreath of artificial flowers:
- a wreath made of grapevine with a diameter of 40-45 cm;
- artificial pink peonies of large sizes;
- miniature artificial peonies with stems and leaves;
- artificial Gypsophila flower stem with buds (or any other artificial stem);
- strong wire;
- wire cutters or heavy duty scissors.
For a wreath of dried peonies:
- dried flower heads and peony buds;
- a grapevine wreath with a diameter of 30-45 cm;
- glue gun and glue sticks;
- thin rubber cord;
- acrylic matte or semi-gloss varnish.
For the hydrangea wreath:
- fresh or dried hydrangea flowers;
- 4 wire hangers;
- sticky tape or floral wire.
A flower wreath is a charming craft that you can make with your own hands. This product is very easy to create, and step-by-step instructions with detailed photos will help you make it correctly.
Artificial flower wreath
Fresh flowers are certainly the most beautiful, but artificial ones also look charming. Therefore, if you do not have fresh or dried peonies on hand, you can easily replace them with artificial ones. A wreath made from this material looks quite presentable, and it is also very easy to make!

How to do it?
Note: For this project we used an old grapevine wreath. To save money, you can use a smaller wreath that will require fewer flowers. You can also reuse an old wreath base, or add artificial flowers you have lying around at home.

Step 1: Trim the Flowers
Using wire cutters or heavy scissors, cut off the flowers, leaving about 7-8cm of stem. For this 45cm wreath we used two faux peony bushes. Each of them had 8 flowers.

Step 2: Attach Peonies
Using strong wire, attach four peony flowers evenly to the wreath.

Note: Use a thick grapevine wreath so you don't need glue. Plus, you can reuse the flowers and wreath in the future.
Then place four more peonies between the first four flowers. Place them at different angles, some pointing inward and some pointing outward.
Branch wreaths
Using the gifts of nature - spruce or deciduous branches, you can make original wreaths to decorate your home for the New Year, Christmas or Easter.

A festive wreath is a symbol of warmth and homeliness and can also be made from artificial materials.

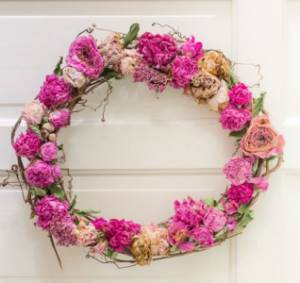
Wreath of dried peonies
Peonies are stunningly beautiful and fragrant flowers. Unfortunately, their flowering period is very short. So why not dry them and then create a charming spring wreath of flowers for your door? This craft will delight you with its appearance for months!
How to do it?
Step 1: Dry the Peonies
Cut as many fresh peony flowers and buds as possible.

Wash the flower heads in cold water. This will remove dirt and insects from inside.
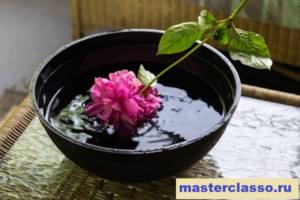
Place the washed flowers on the table and let them dry a little.

Collect flowers into bouquets and tie them with a rubber cord to secure them. After that, hang them to dry in the basement.

After about two weeks, the peonies will dry out. These time frames may vary depending on the humidity in your home. Some of our peonies were placed too close together and didn't look as good as others. Therefore, it is advisable to place them at a distance from each other.

Step 2: Place Flowers on Wreath
Attach the largest of your flowers to the wreath first. Use a glue gun for this.
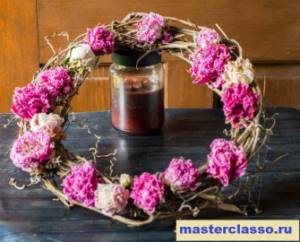
Then add small flowers and buds to the wreath.
Freshen up the piece with a few green twigs and leaves.
Note: If you don't have enough peonies, you can add other flowers to the piece, such as hydrangeas or roses. You can also use a smaller base.
Step 3: Secure the product
To protect the wreath, coat it with several coats of acrylic matte or semi-gloss varnish. It will still be very fragile, so find a protected place indoors to hang it.
This wreath looks very distressed, but at the same time chic and romantic, and we're excited to extend the life of all those beautiful peonies!

This project did not cost us a penny, and we were happy to implement it. You can also make this flower wreath for a special occasion such as a wedding or someone special's birthday. Not all flowers will dry as well as others, but if you're going to throw them away anyway, why not give it a try?!
How to weave a wreath of dandelions?
Dandelion wreaths are what symbolize spring. Bright inflorescences look very cheerful and cheerful. Learning how to weave such a wreath is not particularly difficult. It is worth choosing the right copies of colors and learning just 1 movement.

You will need:
- Long stem dandelions
- A piece of thread of medium thickness
Manufacturing instructions:
- It is better not to pick dandelions in advance. While you weave, some flowers will wither. It is worth plucking them directly during weaving. For a wreath you will need specimens with a long stem (about 15-20 cm) and large flowers.
- Weaving comes down to the fact that each subsequent stem wraps around the previous one. We begin to make a wreath by taking the 2 largest dandelions. Fold them so that the stem of the left one “lies” to the right side. We place the right dandelion vertically on top of it. Let's move on to making the loop. We pull the right stem under the left. Then we make a movement over it to form a loop. Pull it to the right side. Both dandelion stems lie together. We carefully hold them and move the inflorescence of the right dandelion to the left. They should be located next to each other. The loop looks tight.
- Let's take the next dandelion. Again we place it vertically on top of the now 2 stems. Then we drag it under them, forming a loop. The final movement is that the stem comes out from above and crosses itself. It is directed to the right and lies together with the 2 previous ones.
- We repeat this stage several times with other dandelions. We periodically try on the wreath on our heads. You should stop at the moment when the length of the strip of flowers is equal to the volume of the head.
- Then the wreath must be secured. To do this, take its end and beginning and connect it with a thread.
- The main thing to remember when creating a dandelion wreath is a strong weave. Flowers should fit tightly to each other. They can be strengthened with woven long grasses.
Unfortunately, dandelion wreaths also have their downsides. If you do not want to stain your hands and clothes with their milk, then it is better to refuse such an activity. In addition, this wreath is not suitable for allergy sufferers, since the flowers shed a lot of pollen.
Square wreath of hydrangeas
Hydrangeas are stunningly beautiful flowers, painted by nature in a variety of shades. And if you live in a private house, and hydrangeas grow in your garden, why not create a wreath from them and decorate your home with them?
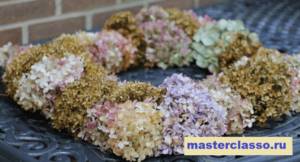
If you don't have a grapevine wreath available, you can easily substitute other materials. For example, wire hangers! Read on to our master class and you will learn how to do it right!
How to do it?
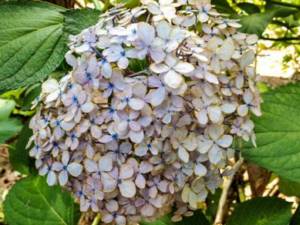
Step 1: Dry the Hydrangeas
Drying hydrangeas is a great way to preserve beautiful flowers for use in your home decor. Wait until the end of the season when the flowers begin to dry out on the bush. At this time they will begin to take on a washed out antique appearance. Some will even feel dry to the touch.
Cut the flowers and place them in a bucket or vase with a small amount of water (3-5 cm).
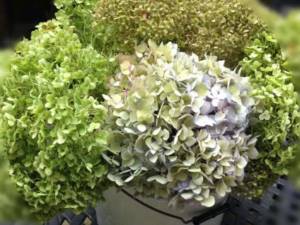
After about a week or two, the water will evaporate and the flowers will dry in place. Pretty simple, right?
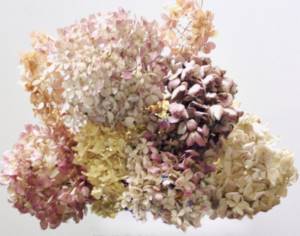
Step 2: Prepare the Hydrangeas for the Wreath
Before you begin, immerse the dried flowers in a bucket of water.
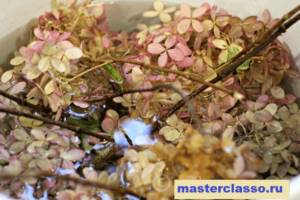
It's incredible how flexible and pleasant hydrangeas will be if you soak them in water first. Even though they have been completely dried out for several months, they are able to absorb some water in a short time. Perhaps that is why they are called "hydra".
Step 3: Make the Base
Take the wire hangers and unroll them.

Use two hangers to make a square.
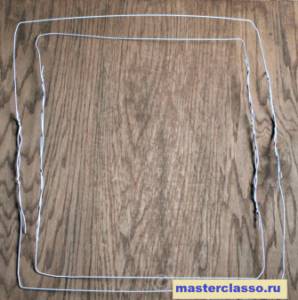
Then make another wire square, slightly smaller in size. Connect both squares together using floral wire or tape. When you're finished, your design will still be a little fragile, but strong enough to hold the flowers in it.