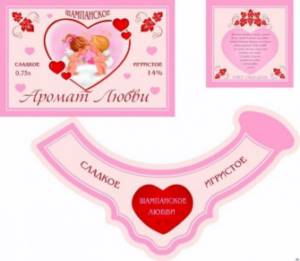
What materials are traditionally used to decorate a wedding bottle?
It is advisable to decorate both bottles using the same technique so that the paired combination can be seen.
For example, if it's just white spray painting, you can buy one larger bottle and decorate it with a homemade hat and a bow tie for the neck. Then a smaller bottle may have a white veil or skirt with 2-3 rows of flounces.
They can be gathered with elastic or sewn from a beautiful and light white fabric, gathered with a drawstring:
- tulle;
- atlas;
- silk;
- organza;
- tulle;
- veil;
- guipure;
- lace;
- embossed ribbon.
More attention is paid to the design of the “female” bottle; the “male” half of the table decoration looks more restrained. Modest decor can be sophisticated if you think through every detail.
You can spy on other people's ideas or make something from scrap materials that no one has ever had before, when you have such a desire.
Advice. The design of wedding glasses and bottles should not be taken lightly. These attributes will be in full view, so there is another opportunity to surprise your guests.
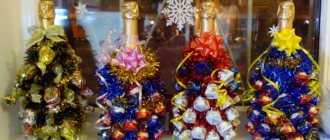
If the wedding is non-alcoholic, you can arrange any fizzy drink in a beautiful bottle. Some people want to decorate a bottle of cognac or other strong drink. The basis of the decoration is the same - wedding theme:
- he and she;
- rings;
- hearts;
- color;
- elements of the bride's outfit.
You can use beads and stones with a flat base (for gluing), sparkles and beads, small artificial flowers and fragments of jewelry.
If you are ready to do the work yourself, do not put this part of the wedding props on the back burner. It may take longer than expected. To choose something creative and unconventional when you don’t have your own ideas, look at the topic of decorating wedding bottles with your own hands, master classes and step-by-step explanations.
Of course, such a wedding attribute can be bought ready-made or offered to a craftsman to make it to order.
This won’t surprise anyone today, but where is the guarantee that your guests didn’t celebrate another wedding at a table with exactly the same decor? It can get awkward when asked, whose champagne is it? Therefore, it is better to choose something original so that no one around you has this.
An order for a craftsman will cost 2-3 times more, but it’s not even a matter of saving, although everything can be done from scrap materials. No one can put as much warmth into decorating your wedding as the bride and groom themselves or their loved ones.
Important! You can vary the color of the decor of wedding bottles with your own hands, but it should not bring disharmony to the overall design of the festive feast. If this is a wedding in lilac, gold or turquoise tones, then it is better to complement a white bottle of champagne with decor in the agreed upon range.

The original decoration can be made in duplicate and sold to guests at an impromptu auction. Or offer a souvenir as a prize in the most beautiful or original competitions.
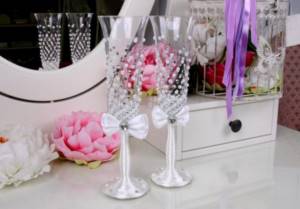
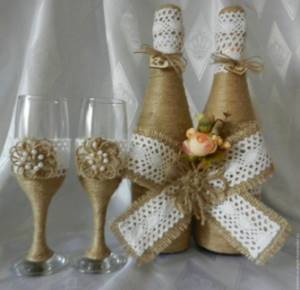
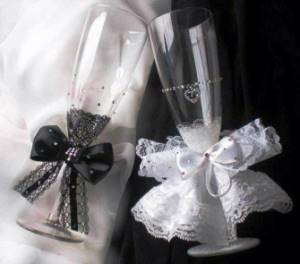
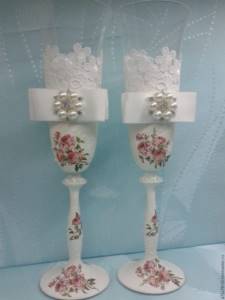
Glass decoration
For decoration, it is not necessary to take glasses of the same size. So, if you want to decorate the vessels in the “bride and groom” style, then it is more logical to take one large and tall glass as the groom, the second should be smaller, round in shape and with a thin stem, reminiscent of a woman’s silhouette.
The glasses are decorated with almost the same materials as champagne bottles. As decoration you can use:
- satin ribbons;
- polymer clay;
- lace;
- artificial flowers;
- rhinestones;
- feathers.
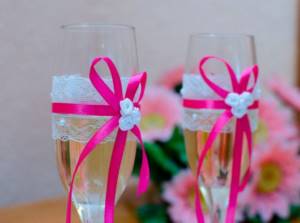
Decor of glasses with ribbons and lace
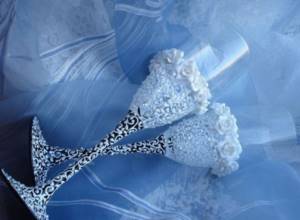
Decorating glasses with polymer clay Decorating glasses with feathers
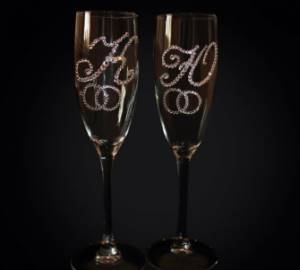
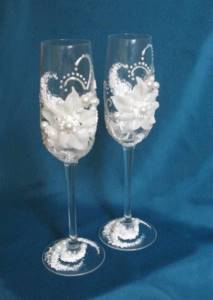
Decorating glasses with rhinestones
Glass is often decorated with mother-of-pearl beads. They can be glued in the middle of a decorative flower or placed evenly over the entire surface.
Types of decor for wedding bottles
Designing and decorating champagne bottles for a wedding can be done using several methods.
Types of decor:
- ribbons;
- photos;
- polymer clay;
- fabric trim;
- engraving;
- decoupage;
- paints;
- rhinestones.
Before carrying out it is necessary to prepare all the tools, as well as the bottle itself. The surface must be cleaned of labels and thoroughly degreased. This will help achieve high quality results.
Note. When decorating, it is recommended to adhere to the general style of the hall in which the celebration is taking place.
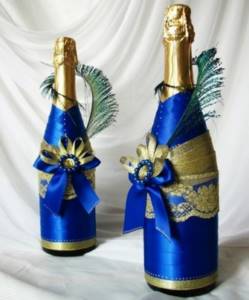
Decor with rhinestones and bows
This option can be used either as a single design or in addition to the methods described above. Rhinestones are useful when decorating with ribbons or painting; bows are used in the design of the neck and complement outfits for bottles made of ribbons or fabric.
When decorating bottles only with rhinestones, it is recommended to clean the surface of labels and degrease.
For more comfortable work, contours for gluing are outlined with paint. It is recommended to prepare in advance sketches of the drawings that will decorate the festive champagne.
How to choose a decor style?
Champagne is the most traditional drink for wedding celebrations; any festive table is abundant with it. Many wedding competitions and games also use bottles of this drink. This is a good reason to make champagne a small highlight of the holiday.
You can turn bottles into real exclusives by showing a little imagination and ingenuity. You can do the decoration yourself, which will save money.
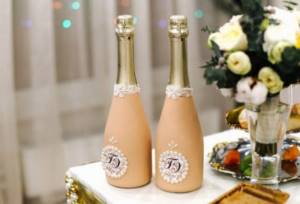
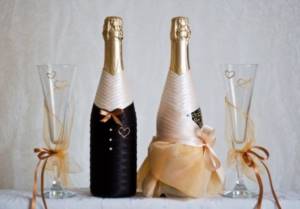
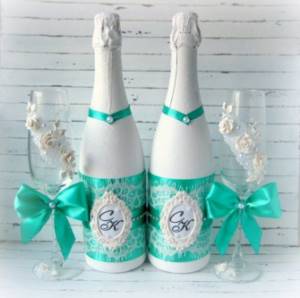
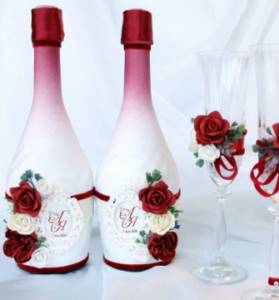
There are a lot of design options for champagne bottles. The most common option is to decorate the sparkling wine in the “bride + groom” style. Such a “couple” is usually placed on the newlyweds’ table. The classic color scheme in this case is black and white.
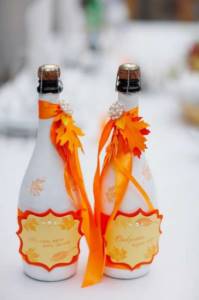
But if the celebration involves the use of some bright color (this is fashionable now), then the bottles can also have colorful elements.
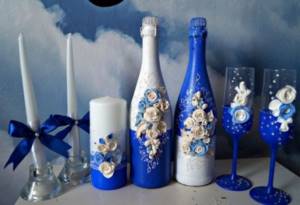
It is popular to celebrate weddings using bright colors in addition to classic colors (white, ivory, champagne, milk). It can be turquoise, blue, orange, purple and even red.
The holiday will clearly become bright and unforgettable, but then it’s worth thinking about color accents in everything. Including in the decoration of wedding attributes.
There are a lot of design options - decoration with three-dimensional elements, fabrics and lace, pearls, scrapbooking, modeling. The drink looks good in bottles hand-painted with acrylic paints.
The most important thing is not to overdo it and create such decor that the bottle of champagne does not stand out from the overall style of the holiday.
Two beautifully decorated bottles are usually made and it is not customary to open them during the celebration. They remain for the couple for the future: one for their wedding anniversary, the second for the birth of their first child. Here is another reason to make a bottle of champagne beautiful and unusual.
The main rules of decoration are compliance with the given level of solemnity, combination with the furnishings, dishes, and outfits of the newlyweds
. For example, gold and silver engraved bottles would be completely out of place at a boho or Provence style wedding. But delicate floral motifs and lace are an excellent decorative option for a classic wedding with aristocratic notes.
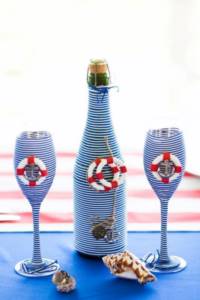
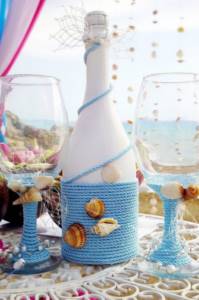
If the wedding takes place under the auspices of a specific theme, for example, maritime, then the decor may include appropriate details. Bottles of champagne can be painted to resemble a sailor’s vest or decorated with anchors and chains, painted with sea waves, etc.
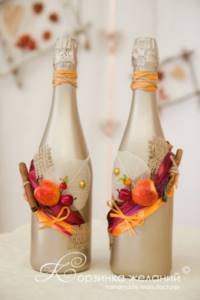
An autumn wedding in the Russian style presupposes the presence of autumn fruits and vegetables in the paraphernalia and the use of a red-red color scheme. Here bottles can be decorated with stylized painting, autumn apples or leaves.
The main thing in decorating is to show your imagination.
You can find many master classes on the Internet, which detail the sequence of actions and the necessary materials for the work. It’s these little things that make up the overall atmosphere of the holiday, so pay due attention to decorating not only the newlyweds, the cortege and the banquet hall, but also small accessories.
Wedding glasses and traditions
As you know, after the main wedding procedure - the wedding ceremony of the newlyweds, the newly-made husband and wife clink their wine glasses. And then, during the celebration itself, they drink from special ones - beautiful ones. It has long been believed that the more fragments there are, the happier and richer family life will be. Of course, there is a whole list of wedding traditions, customs, and signs. But decorating wedding glasses with your own hands is a trend of modern times. So far, no one can answer for sure where this “fashion” came from. But the fact remains: more and more couples prefer to drink champagne from handmade glasses at a banquet.
A similar creation can be ordered from the master. Many handmakers offer such services. Or you can do everything yourself.
There are many ways to decorate glassware for a sparkling drink. It all depends on the imagination and skill of the needlewoman. In addition, such work will allow the future wife to show what a craftswoman she is and to show her creative potential.
It doesn’t really matter what shape the glasses are chosen. Technology does not depend on this. Although more often newlyweds prefer a romantic drink - champagne.
For help in decorating glasses, you can contact a master
You can beautifully decorate wedding glasses yourself
See alsoWedding table decoration
DIY wedding bottles with ribbons
So there are at least two bottles of champagne. Making it exclusive is not at all difficult, the main thing is to prepare well.
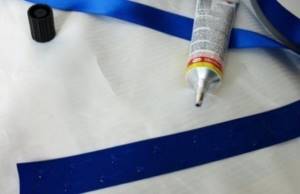
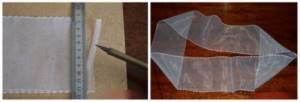
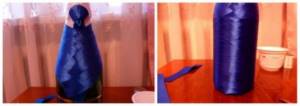
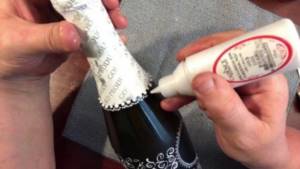
To begin with, get rid of unnecessary labels, only carefully so as not to scratch the glass. Then you can start decorating. One of the most popular methods for decorating champagne is using satin ribbons. This method is simple and affordable, but the result is a bottle that looks gorgeous.
Ribbons are needed to wrap vessels with sparkling wine, and also as an additional decoration. The satin ribbon should be the optimal size and color.
ADVICE. It is better to process the edges of the tape (carefully burn it) so that it does not diverge.
Decorating champagne with satin ribbons master class
The method is simple and universal; satin ribbons can be selected to suit your taste.
Materials:
- tape – 2.5-3.5 m;
- gold brocade ribbon – 1.5 m;
- instant glue;
- champagne with gold foil;
- scissors.
How to decorate a bottle with ribbons master class
1. Let's get started! First you need to measure out enough tape for the first layer.
2. Cut the tape and use glue to mark the points.
3. Wrap a satin ribbon around the vessel, pulling it tightly. Do the same with the other cut, which will be larger as the bottle expands. Make the third and fourth layers in the same way.
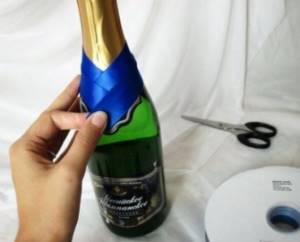
4. Now it's the turn of the brocade ribbon. Two layers are enough.

5. Glue the gold ribbon to the bottom of the bottle so that the seam is at the back. And also cut 7-8 ribbons of the same length of the chosen color, glue them in the same way so that the seam is at the back.
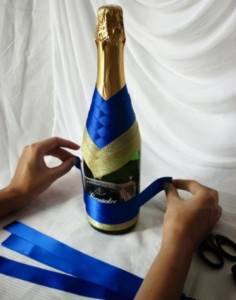
6. You can remove a sloppy seam using another tape.
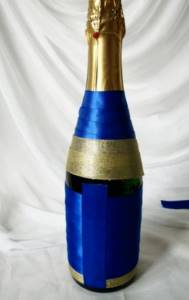
7. Cover empty spaces with gold tape.
8. Carefully trim off any protruding corners.
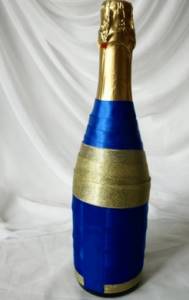
9. For additional decor, you can use beads, lace, bows - whatever you like, the main thing is not to overdo it.
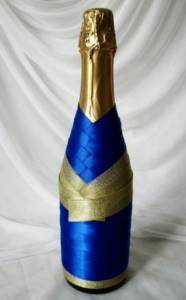
10. DIY wedding champagne is ready!
Decorating wedding bottles with velvet
You can decorate champagne for the newlyweds' festive table using velvet. This luxurious and elegant material looks great.
Even an ordinary container is transformed thanks to the velvet decor.
Decorating champagne for a wedding with your own hands is very easy to do. You only need stretch velvet, thread, paper and a pencil, as well as two bottles and decor.
ADVICE. It is better to lightly burn the pieces of fabric needed for processing along the entire perimeter.
How to decorate champagne for a wedding with engraving
Perhaps not everyone can do this work with their own hands. Engraving on glass requires a special machine, so in this case a professional will do everything in the best possible way. The main thing is to decide on the pattern, image, inscription and the master will create an exclusive, impeccable decor.
Engraving is an original design for wedding glasses and bottles; you can add decorations with flowers, ribbons, beads and bows with your own hands.
Decorated wedding glasses using decoupage technique
Another popular way to decorate wedding glasses today is the decoupage technique. This design looks interesting, bright and quite attractive.
The main thing here is to choose napkins with a suitable pattern, cut them correctly and transfer them to the glasses. It is better not to decorate the part of the glass with which your lips come into contact, as moisture can ruin the decoupage.
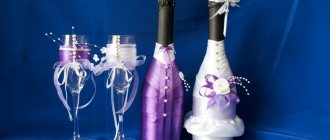
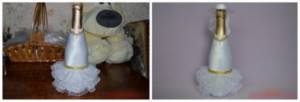
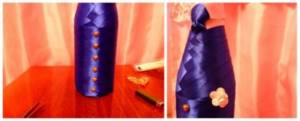
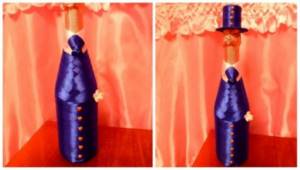
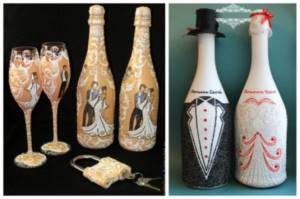
Decorating bottles for a wedding with your own hands: champagne for the bride and groom
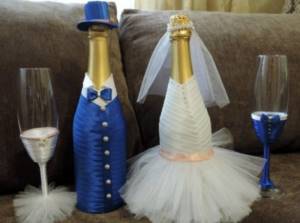
The bride and groom at a wedding can be not only at the table, but also on the table. Of course, we mean decorated champagne. You can make a bottle bride and groom with your own hands using bias tape or ribbon.
For two bottles you will need the following materials and tools:
- 10 m of white bias tape;
- 8 m of blue or black bias tape;
- 4 m of bias cream binding;
- 10 cm white lace;
- 3 m of wide lace, bow or piece of tulle;
- glue in a pencil (super glue moment);
- scissors;
- decorative ornaments;
- cardboard for hats.
Below is a step-by-step process for making wedding bottles.
Bottle for a wedding - Bride: step-by-step master class with photos
- Just like a real bride, the bottle of champagne in this outfit should be the center of attention, and this requires perfect execution of the job.
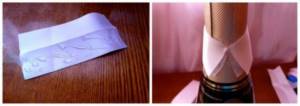
- Initially, use a marker to draw a straight line in the front center, along which you will need to glue the edges of the tapes. Try on the lace at the neck, cut off the required piece. Spread the bottle with glue and glue the lace. Coating the glass of the bottle, glue the bias tape, cutting off its long part after gluing.
- Continue oblique gluing until the middle of the bottle. From the middle, the bias tape is glued in a circle to the very bottom of the bottle.
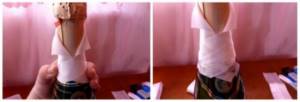
- Take a wide bow near the subway, use an iron ruler and a hot soldering iron (a knitting needle heated over a fire) to solder the edges of the bow. It should look like this.
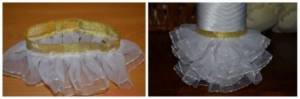
- Fold it in half and sew with a cast-on stitch. Put the resulting skirt on the bottle, tighten the thread to its size. Remove part of the skirt and follow the same example to make two more skirts.
- Determine the place where the skirt will be attached. From its upper part you need to mark a place for two petticoats, coat these places with glue and glue two blanks.
- Sew golden bias tape to the overskirt. Glue it onto the bride bottle.
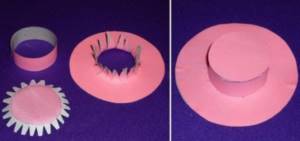
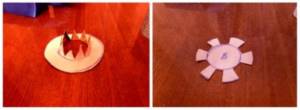
- Fold a piece of a wide bow in half. Using a mug and a hot soldering iron, make a circle (the edges will stick together under the influence of the heat). As shown in the photo, cut out the darts so that the brim of the hat can be glued on.
- Make a ring out of cardboard to fit the diameter of the bottle neck. Cut out a circle with teeth for the top of the cap.
- Bend the teeth, glue the top part of the cap and brim. Glue a white ribbon in a circle on the outside and tie an organza ribbon.
- Glue beads to the bride’s “neck” and put on a hat. The bottle-bride is ready for the celebration.
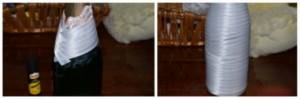
How to sew holiday covers
Velvet wedding champagne vestments look especially expensive. Any container decorated in this way will turn into a center of attention. The simplicity of the pattern, along with the availability of materials and tools, are among the advantages of this decoration.
Required:
- two pieces of velvet white and black;
- threads to match the fabric;
- cardboard or pattern paper;
- pencil, scissors;
- beads, lace, organza.
Stages of sewing covers:
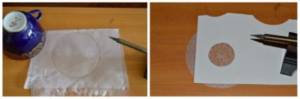
- Place the paper on the bottle and take measurements with a pencil;
- Draw the pattern on paper, cut it out with seam allowances;
- Along the contour, the pattern is applied to the fabric. The case for the “bride’s” bottle is cut out on white velvet, and for the “groom’s” champagne - on black.
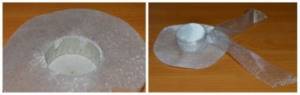
- The material is cut out according to patterns, sewn along the contour from the wrong side, and turned inside out.
- They put the prepared outfits on the bottles.
- Champagne for the “bride” is decorated with an organza veil and lace and beads are attached with a glue gun.
- The “groom’s” bottle is decorated with beads and ribbons.
Velvet can be used to decorate newlyweds' glasses, money chests and bouquets of flowers. Velvet covers are then used repeatedly; they will come in handy at other important events.
Bottle for a wedding - Groom: step-by-step instructions for working with photos
The bride is ready, now let's get down to creating the groom. The work is carried out identically to the execution of the bride bottle.
First, fold the white ribbon in half and try it on the neck of the bottle.
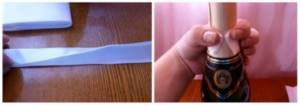
- Apply glue to one half of the folded tape and glue it to the neck of the bottle so that the upper part can bend.
- Raise the top of the collar of the first tape, glue another 2-3 rows to the bias underneath it.
- Measure out the main color of tape to attach to the bottle. Raise the collar and tie a ribbon tie for the groom.
- Lower the collar and continue gluing the blue ribbons (on top of the tie) onto the bottle.
- When the narrowed part of the neck ends, cover the bottle in a circle with ribbons to the very bottom.
- Glue buttons to the groom's jacket. Decorate the “chest” with a boutonniere.
- Prepare such parts for making a top hat for the groom.
- Glue a cylinder out of cardboard. Cover it with ribbons and decorate it to match the jacket.
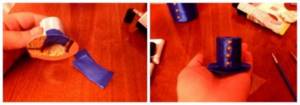
- Place the top hat on the bottle and the groom is ready.
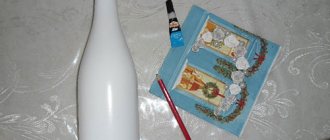
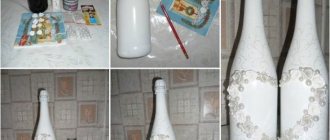
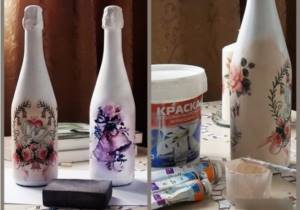
Do-it-yourself champagne bottles for a wedding using decoupage technique: instructions with photos
Decoupage is a decoration technique based on transferring an image onto a specific object.
To make a wedding bottle using this technique, you will need to spend a decent amount of time, but the end result will certainly please both the newlyweds and their guests. To complete the decor you need to prepare:
- napkins with the image or decoupage cards that you want to apply to the bottle;
- primer for glass of the desired shade;
- sponge;
- acetone;
- fine abrasive sandpaper;
- brush;
- tweezers or clothespin;
- glue;
- acrylic paints;
- clear nail polish.
Initially, clean the bottle from stickers, dry it and spray it with acetone. Apply glass primer to the bottle. If you don't have one, it doesn't matter. Mix acrylic paint of the desired shade with PVA glue in equal proportions. Cover the bottle with the mixture.
Gently secure a piece of sponge in tweezers or a clothespin and apply the composition using patting movements.
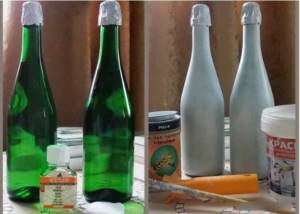
The primer must properly matte the green color of the bottle, otherwise the end result may be spoiled by the green color showing through.
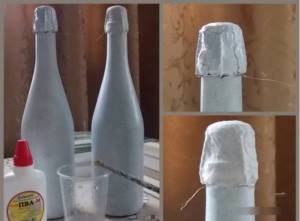
- After the primer has completely dried, you need to go over the bottle with sandpaper. The surface of the primed glass must be smooth. Place napkins on the cork and prime it so that the top does not differ from the rest of the composition.
Separate the lower layers of the napkin, leaving only the top one with the pattern. Cut out the selected picture, stepping back from the beginning of the image by 2-3 cm. Use your fingers to carefully tear off the remaining strip so that the edge of the decor is not more than 0.5 cm from the starting line of the image.
The torn structure of the edge will help smooth out the sharp transition of the decor to the background of the painted bottle.
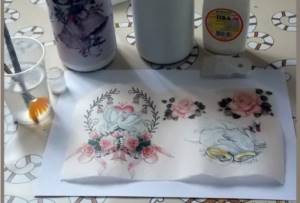
- Place a napkin on the surface of the bottle. Use a brush dipped in glue to cover the entire pattern.
- You need to start from the center, smoothing out all the bubbles and irregularities towards the edges. Wait for the picture to dry.
- If the base of the napkin was not white, then using acrylic paints you need to select the appropriate shade and paint the white spaces between the pictures with a brush. After complete drying, the entire bottle must be coated with clear varnish.
When it dries, if desired, you can glue sparkles to the picture, decorate the composition with sequins or beads.
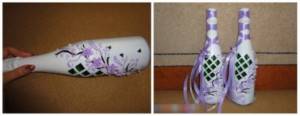
Decoration with ribbons
Decorating a bottle of champagne or wine with your own hands is not such a difficult task. Several master classes with a step-by-step description of the work will tell you about popular techniques and the features of their implementation, and the novice designer can only choose. The simplest option is to create a fabric covering on the glass in “layers”. Work starts from the neck. A “loop” is made from a piece of tape, which is placed on the thinnest section of the glass container.
Its ends are trimmed if necessary and glued to the surface of the bottle. Then they take the next strip, create the same “loop”, partially lay it on the previous layer (so that the base does not show through) and attach it in the same way. In this way, a continuous fabric covering is created with beautiful joints (overlapping). Colors and materials are combined. Then the resulting background is complemented with other decorative elements.
Creating relief
Another technique is creating a relief texture. The effect is achieved by gluing tapes or pieces of textile to the surface and then squeezing them with your fingers. As a result, folds are formed that most accurately imitate the thin fabric of clothing. It is necessary to glue the entire piece completely, and not its individual parts. As a base, paper or other fabric of a neutral shade is attached to the glass.
Kazashi technique
To create flower arrangements, they use the Kazashi (Kazashi) technique, which originated in Japan, where girls crowned their heads with similar decorations. Many have seen complex floral arrangements with hanging “buds” on long threads, adorned on the high hairstyles of Eastern women. The essence of the method is to specially fold shreds and pieces of ribbon in such a way that sharp and rounded ends of leaves and petals are obtained.
They are carefully collected with tweezers, and the free ends are fixed to the surface with glue. Elements with multi-layered flower buds look the most beautiful. In the Kazakh technique, they collect petals and place blanks of the same type on top of each other, but of different sizes and colors. This way a volumetric effect is achieved. Kazashi flowers are combined with openwork, beads, and braid.
Shibori technique
Another gift from Japan is shibori ribbons. Most often they are used to create body jewelry (necklaces, earrings, bracelets), but they are also suitable for bottles. The ribbon is a “crumpled” piece of fabric that is dyed in different colors with an ombre effect. When creating the material, it is crumpled and tied into knots so that the result is a rainbow color, opening the way for the artist’s imagination. Shibori tape is usually glued to a fabric base, but in the case of a bottle it is attached directly to the glass. It is worth noting that material without additional decor looks impressive, but boring. Ribbons are always surrounded by various kinds of accessories, among which beads, cabochons and glass beads to match the main color prevail. The composition gains volume due to the folds of the material and looks festive and solemn.

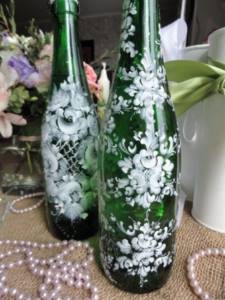
DIY champagne bottle painting for a wedding: painted bottles
You can beautifully decorate bottles of champagne for a wedding using your talents. We offer several options for painting bottles at home.
Painting with decor.
Glue pieces of paper tape in the shape of the chosen decor onto the prepared bottle. Paint the bottle with spray paint. To ensure an even color, the bottle is painted 3 times. Before applying the next layer, you need to wait until the previous one has completely dried.
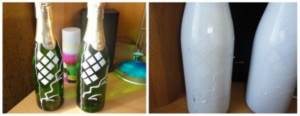
- Remove the tape from the dried bottle. Decorate the pattern with flowers, butterflies, beads, etc.

- Paint with acrylic paints and tie a ribbon.
- Spot painting. You can beautifully paint a bottle of champagne for a wedding using a glass outline.
- You can apply the design to the glass itself, or by pre-matting the bottle in the desired color.
Decoration using photographs of young people
Festive bottles of alcoholic drinks, decorated with photographs of young people, look quite original. Photos can even be placed on labels, the main thing is to use your imagination in time and not be limited to standard ideas.
In addition, sometimes images are placed on glass using a special decoupage technique.
You can create such an original decoration yourself. If you don’t have enough time for this, contact a printing company, where they will print a label or a separate photograph on thin paper.
Engraving on bottles
For true lovers of luxury, an excellent option for bottle design is glass engraving. But here you cannot do without the help of a professional. Only a master will be able to apply any pattern you choose, regardless of complexity. Even simple and small patterns will look great on dark green glass.
With this decor you will add luxury and aristocracy to the bottle.
The choice of bottle decoration depends on the personal wishes of the newlyweds. Some people choose patterns in the form of angels, curls, rings, doves, etc. Any version of the design looks great, and you can choose engraving in silver or gold.
But modern experts can offer you images in other shades, even transparent ones.
Engraving
This method is durable. Engraved inscriptions and images will not lose their attractiveness even several years after the celebration. It is recommended to entrust the decoration to a glass specialist in order not to damage the bottles and to obtain high-quality images.
For decoration, you can use drawings or inscriptions.
The image itself can be either glossy or matte. When choosing a suitable shade for engraving, you should pay special attention to color combinations. For example, on dark bottles images of a golden or silver palette will look especially impressive and attractive.
Engraving on bottles has many advantages compared to the decoration methods described above.
This design is almost impossible to damage or spoil. If minor dirt or buildup occurs, the bottles can be gently rinsed in cool water. The liquid does not have a negative effect on the drawing. In addition, it is worth highlighting its versatility: champagne decorated with engraving will be appropriate at any wedding, regardless of the style.
Decor of bottles using original techniques.