How to decorate champagne for a wedding
Champagne is the main drink at every wedding. They raise it to the glory of the young, they celebrate this day with it, they drink it to the dregs, chanting: Bitter! And if wedding glasses should at least be made of crystal, decorated with ribbons and flowers, then a bottle of sparkling drink should be one too. If you want everything at your wedding to be harmonious, stylish and exclusive, then start creating right now. With this master class you will learn how to make a festive accessory from an ordinary bottle of champagne.
Decoration with napkins
Using napkins, you get a stylish and delicate decoration using the decoupage technique. You can decorate the dishes yourself. Napkins with interesting scenes and designs are sold ready-made, so those who do not have artistic talents can decorate the bottle. Here's what you'll need to get started:
- napkin with a picture;
- acrylic paint of a suitable color;
- decoupage glue;
- foam sponge;
- brushes;
- white acrylic paint or primer mixture;
- a bottle of champagne.
To paint a bottle of champagne for a wedding, it is better to take brushes with natural bristles. Instead of glue for decoupage, you can use PVA, but you just need to dilute it with water in a 1:1 ratio.
First prepare the bottle. It is well cleaned of labels and glue residues, degreased and the surface dried.
Further actions:
- Apply primer to the surface with a wide brush (or white paint with a foam sponge).
- When the layer is dry, apply the design elements cut from the napkin.
- Coat all parts with glue from the middle to the edges.
- If any air bubbles remain, remove them using a wide brush.
- The glass surface not covered with a pattern is painted over with acrylic paint to match, using a sponge.
- When the paint dries, the product is coated with a fixative;
- After drying, the bottle is ready to be on the holiday table.
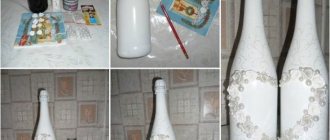
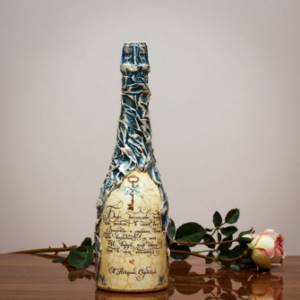
How to decorate champagne for a wedding. Master Class.
To decorate champagne for a wedding with your own hands, we will need:
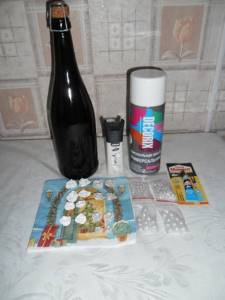
- a bottle of champagne (washed, cleared of labels, degreased, I use dishwashing detergent);
- white aerosol paint in a can;
- contour on the glass of the desired color (mine is white-pearl);
- pearl beads of different sizes;
- super moment gel glue;
- flowers (I have thermoplastic roses). As an alternative, you can get ribbon flowers from a fabric store or buy boutonnieres and cut them into flowers.
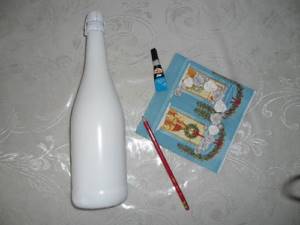
We paint the bottle in several layers (at intervals of an hour or two) so that the paint has time to dry and does not cause smudges. Then we lay out flowers and beads on a napkin as they should be on the bottle. Use a pencil to mark the location of the design on the bottle.
I made flowers of different sizes, starting and ending with the smallest ones so that the middle of the bottle did not seem empty. And we begin to glue the decor. I started from the bottom up, it’s so convenient for me.
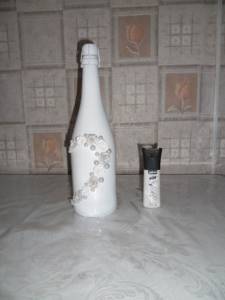
After all the decor has been glued and the glue has completely dried, we begin painting the bottle. Thus, we fill the voids.
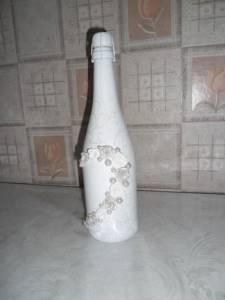
This is such an elegant bottle! In classic wedding colors.
Painting silver and creating texture
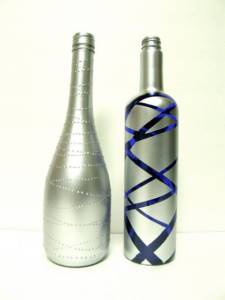
Dot painting of dishes and using stripes
To transform these bottles you will need:
- A bottle with colored glass and a bottle of unusual shape;
- Adhesive tape or paper;
- Spray silver paint;
- Volumetric paints for design;
- Gloves;
- Newspaper/fabric that you don’t mind getting dirty.
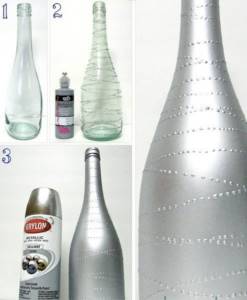
Step 1
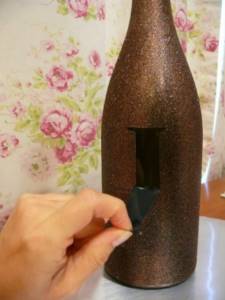
Take a bottle with colored glass and remove the label from it. We glue tape or paper onto the bottle the way your imagination wants. Be sure to run your finger over the glued part to remove any air bubbles.

Step-by-step technique for creating stripes on a bottle
Step 2
Lay down newspaper/cloth and wear gloves. Apply 2 coats of paint and let dry. Carefully remove the paper or tape;
Take your time to avoid jagged edges.
Apply volumetric paint, then apply 2 coats of paint
- We take an unusually shaped bottle and remove the label from it.
- dotted volumetric paints to the bottle Let it dry.
- Apply 2 coats of paint to the bottle and let dry.
TIP: Volumetric paint can be replaced with any thick glue, such as “liquid nails”
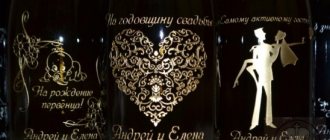
Using the same technology, you can make letters of the newlyweds on a bottle: first we apply adhesive paper in the shape of the letter, paint it and remove it after drying.
Making letters on a wedding bottle
You can use the same method to make vases from a bottle: photos and Master classes in this article
How to paint a bottle of champagne for a wedding - 5 lessons
Do you dream of having a beautiful wedding? Then our 4 master classes on how to unusually paint a bottle of champagne for a wedding are definitely for you! Economical, hand-made decoration will not leave guests indifferent and will significantly reduce spending on trifles. But a beautiful bottle, painted with safe acrylic paint, is also pleasant to open and pour into glasses!
Do you want to know how to paint a bottle of champagne for a wedding so that guests exhale in admiration? Then hurry up to prepare the necessary tools and let's get started!
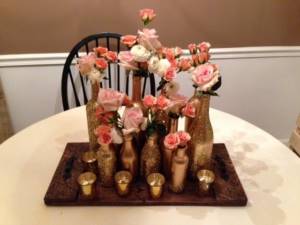
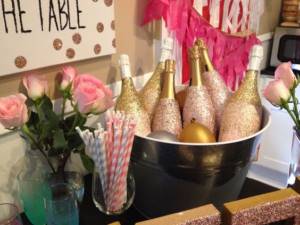
Champagne bottles covered with gold paint
To make wonderful gilded bottles we will need the following tools:
- Newspaper/fabric that you don’t mind getting dirty;
- Decorative gold sparkles (gold glitter) - you can buy ready-made ones, or you can work a little and cut them yourself;
- Aerosol gold paint;
- Empty bottles/alcohol bottles;
- Glue – you can use both aerosol and special liquid for decoration;
- Paper towels;
- Gloves;
- Shallow bowl.
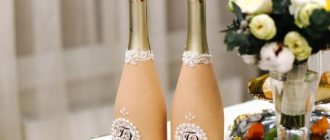
Universal decor
The combination of white and gold colors is considered wedding and is suitable for a celebration decorated in any style. This range gives positive emotions and emphasizes a joyful atmosphere. Decorating champagne bottles with gold and white ribbons is relatively easy. For this you will need the following materials:
- foam sponge;
- glue;
- gold paint;
- acrylic paint;
- primer mixture (can be replaced with white acrylic);
- rhinestones;
- white ribbons;
- gold leaf;
- twigs and leaves cut from gold paper;
- 5−7 polymer colors for each bottle.
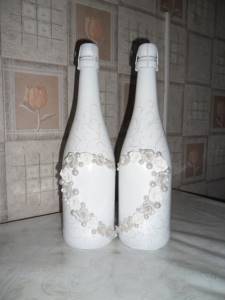
Before the creative process begins, the artist coats both bottles with white acrylic or a primer mixture. Leave them until they dry, after which they begin to decorate. Instructions for decoupaging wedding champagne bottles with your own hands:
- The neck and stopper are decorated with gold foil.
- Golden branches with leaves are glued diagonally to the bottle.
- The elements are placed taking into account the fact that later there will be polymer flowers in these places.
- Glue the flowers so that the leaves are visible from under them.
- The surface, free of decor, is painted with a thin layer of gold acrylic paint, scooping it up with a foam sponge.
- The lower edge of the foil covering the neck is coated with glue, then wrapped with tape.
- The edges of the ribbon are tied with a bow, and to hide the knot, a large semi-precious stone or several beads are attached.
- A pattern of rhinestones is made on the neck.
- The entire bottle is treated with a fixative.
How to paint a bottle: 5 painting techniques
Glass and plastic bottles are an excellent material for making various original crafts that you can easily make with your own hands. With such unique, stylish and very beautiful things you can decorate the interior of any apartment or house, making them even more comfortable:.
And such crafts will be a wonderful gift for loved ones. To create various original gizmos from glass or plastic bottles, you can leave them in their original form, but they will look much more advantageous if the bottle is pre-painted.
What can be made from these bottles:
When will these beautiful bottles come in handy:
Following all the links you will find Master Classes on how to do this!
Using the same technique you can paint any glass: glasses, jars and wine glasses.

The bottle is structured by the shell
Wedding bottle with hearts
To create this magic bottle we will take:
- A simple glass bottle;
- Eggshells;
- Liquid glue special for decoration / you can experiment with other glues;
- White napkins/toilet paper;
- White acrylic paint;
- Medium hard brush;
- Colored pencils/crayons;
- Scissors.
Step 1
- Take napkins or toilet paper; if you took paper, separate the second layer, otherwise you won’t be able to complete your plan.
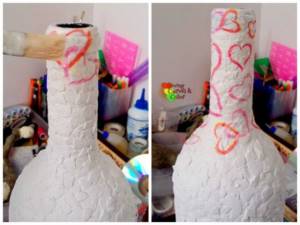
- Using pencils or crayons, draw hearts on a napkin the way you like and cut them out, slightly retreating from the drawing.
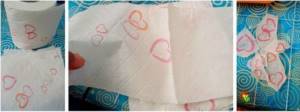
Take napkins and draw hearts on them
Step 2
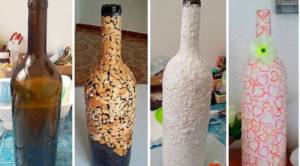
Let's take the shells and break them into small pieces. Let's let them dry and start applying glue to the bottle.
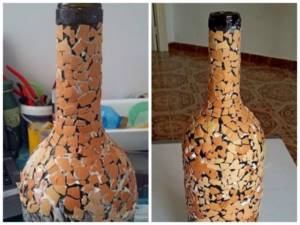
Apply eggshells onto the still wet glue with your hands.
Step 3
- We will leave only the base of the neck and the bottom of the bottle free of shells.
- We paint the bottle with white acrylic paint, carefully painting over the joints of the eggshell.
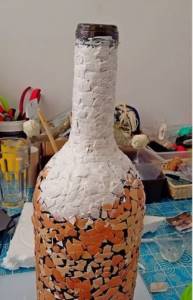
Apply any acrylic paint with a brush.
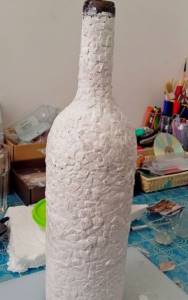
Let it dry well
STEP 4
Carefully glue the hearts using glue and a brush
Carefully apply the napkin with hearts to the bottle and, with careful movements, from the center to the edge, apply a brush with glue. Don't forget that this paper is very thin and will tear easily if you work hastily.
STEP 5
Take your time and you will succeed! You can apply the design to the entire bottle or to part of it. To consolidate the result, it is ideal to coat it with matte or glossy varnish.
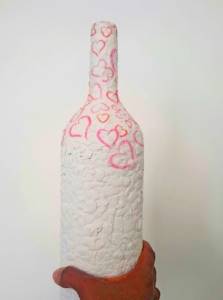
These are the stages our bottle went through before becoming a real beauty!
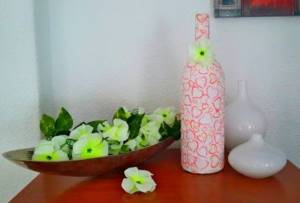
This decorated bottle will fit into any interior, adding romance and comfort.
This master class showed only a small part of the ways you can decorate bottles for a wedding, adding original bright accents to them.
Glass bottle paint
You should be very careful about the choice of paint, since the final result will depend on this.
- Regular waterproof paint works well , as well as acrylic paints, which come in matte and glossy, transparent and dense, they are sold in cans and sprays
- Acrylic paints can be used in the form in which they are sold, or they can be diluted with water, it all depends on what effect you want to achieve.
- universal paints on sale that are perfect for painting glass and plastic bottles.
How else can you decorate a bottle?
Decorating a bottle only with napkins will give a flat, volumeless decor. If you want something more, then barely dry acrylic can be sprinkled with coarse salt or sugar, imitating beautiful fluffy snow. Just first get rid of any black inclusions, if any. Such unwanted contrasting elements will greatly stand out from the design and spoil the image.
Decorate the neck of the champagne with satin ribbons, and if you decide to add paper ribbons, you can curl the free ends with scissors.
The stores also have various accessories for decoration: artificial flowers, plastic fruits and vegetables, lace. They perfectly complement decoupage and make the bottles truly festive and original.
If you have no ideas at all, then you can take a look at what bottles other users are making. Or go to the nearest store and look at napkins, thematic covers of notebooks and books, product and box labels. Such visual training will help you catch inspiration and make beautiful work that will delight your family and guests not only on the holiday table, but also after the holiday, when an empty bottle can be used as a vase.
What paint to choose for a plastic bottle
How to paint a plastic bottle for crafts? For decoration, you can use exactly the same paints as for glass. It is best that they are not aggressive.
- Acrylic paints are perfect for painting plastic bottles, but to protect the surface, you need to coat them with colorless acrylic varnish.
- Colored acrylic varnish is an ideal way to paint plastic bottles for crafts.
- Spray paint is also suitable for decorating a plastic bottle.
- The most durable and beautiful effect is produced by car paints ; plastic bottles painted with this paint will not change their color for several years.
- You can also paint with regular enamel paints.
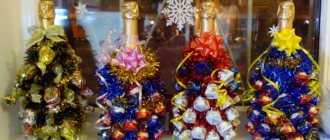
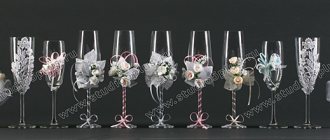
Decoration with kanzashi flowers
Kanzashi is a technique that uses pieces of fabric folded in a special way. Most often, holiday flowers are made this way. Creating such decor is relatively simple if you use ready-made flowers. It is better if they are silver or pastel shades with a pearlescent tint. To decoupage wedding champagne you need to prepare the following:
- 7−9 flowers of different sizes;
- silver satin ribbon 2.5 cm wide;
- 1 cm thick ribbon to match the kanzashi elements;
- glue;
- multi-colored beads or rhinestones.
Cut a piece from a wide satin ribbon and glue it to the very top of the bottle, where the cork is located. The ends of the tape should extend slightly onto the sides of the cork. The following actions:
- Wrap the neck with tape to a height of 5 cm, starting from the edges of the first segment.
- Starting from the end of the upper winding and extending slightly onto it, wrap the neck with another tape (1 cm wide) until it widens.
- The process should result in a pattern resembling a “Christmas tree”.
- The corners of the herringbone should be directed downwards.
- The places where the tape intersects are coated with a thin layer of glue; there should be just enough of it to fix the satin.
- Take a thick silver ribbon and make one herringbone circle, starting from the edge of the previous winding.
- The entire bend is wrapped using the same technique using thin tape.
- The straight part of the bottle is also wrapped with colored satin ribbon, but without the “Christmas tree”.
- Kanzashi flowers are glued onto the wrapped surface, placing them diagonally.
- The upper flower is placed opposite the second thick winding, and the lower one should not reach the bottom by several centimeters.
- Rhinestones and multi-colored beads are attached to the second thick winding.
The second bottle is decorated in the same way. If the region has a tradition of placing “bulls” on the table, they should also be decorated in this way. By the way, this decoration option is suitable not only for a wedding.
Decoupage a bottle of champagne with your own hands allows you to prepare a gift for another holiday, for example, a birthday, anniversary, and so on. Decorated bottles with expensive drinks are best given to women or married couples.
How to paint: sponge, brush or spray
- In order to paint a glass or plastic bottle, you can use a nylon brush , but in this case it will be very difficult to achieve a perfectly flat surface.
- You can use a sponge and dip it into the paint using point movements to apply it to the surface. This way the marks will not be visible, but you will have to cover the bottle with several layers of paint, each of which must dry, and this will take some time.
- The fastest and easiest way to achieve an even paint job is to use spray paint, which dries very quickly.
But you shouldn’t spray paint in an apartment, because it has a strong smell and takes a long time to air out.
DIY wedding champagne: photos of decorated bottles
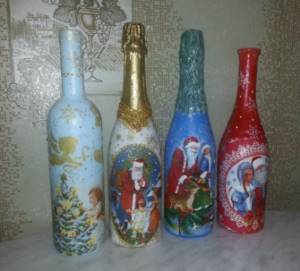
More ideas for decorating wedding bottles using various coloring techniques can be seen in the gallery. Keep in mind that you can paint both the bottles for the newlyweds and the rest of the champagne for the guests.
You can cover wedding bottles with aerosol and acrylic paints, silver and gold, broken New Year's toys and glitter.
The top can be decorated with ribbons, bows, satin and polymer flowers, petals, tulle and lace.
Use your imagination, and you will definitely get exclusive wedding bottles that will perfectly fit into the wedding concept and emphasize the individuality and creativity of the couple.