09.22.2019 Bender Rodriguez Homemade Products Many people are trying to find step-by-step instructions on how to make an arch out of balloons, a stand out of wire, mesh and fishing line with their own hands, and create decorations for the frame. After familiarizing yourself with it, you can independently decorate the hall where the festive event is planned.
Preparatory work
Originally designed arches will become the most striking decoration of the festive event. For this reason, it is not at all surprising that many turn to experienced craftsmen to order beautiful arches that differ in:
- sizes;
- forms;
- plot design;
- using color combinations.

However, the services of such masters are not cheap at all. To avoid unnecessary expenses, but still decorate the hall in which the festive event will take place in an original way, it is better to do everything yourself, adhering to the following action plan:
- decide on the theme of the design;
- come up with the shape of the future arch;
- develop a decoration scheme;
- calculate the required number of balloons and additional material for decoration.

All necessary materials and tools must be purchased in advance. Fortunately, the list will not be so extensive, so you can buy everything when visiting one retail establishment.

Easy way
Of course, the easiest way would be to buy such an arch, but since we are talking about the fact that we can make it with our own hands, we will consider another, no less simple method.
First of all, we need to make the base for the arch. To do this, we will use a strong, rigid hose and small cinder blocks to secure it to the ground, in case the party is taking place outdoors. It is enough to arrange the blocks at the required distance, and secure the hose to them, additionally wrapping them with electrical tape for greater strength. To make the blocks more stable, they can be filled with gravel or sand.
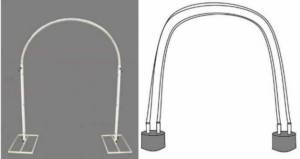
If the party will be held in the house, you can use ordinary wire of medium thickness, it is quite stable, or even thick fishing line.
Related article: Master class “How to make a bow from a satin ribbon for hair or for a Christmas tree” with video
Next, inflate the balloons (it doesn’t matter with helium or regular air). The balls should surround the arch on all sides, so first inflate about a dozen, attach to the base to understand how many more balls you will need.
And finally, it's time to tie the balls to the base. You can use the basic pattern of weaving the balls or tie them one at a time, the main thing is that the balls are close enough to each other, there should be no empty spaces.
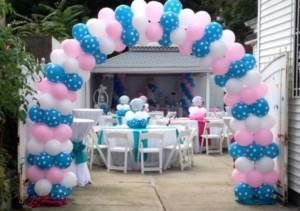
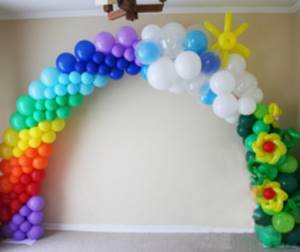
Check out some photos of balloon arches for inspiration:
Ball selection
So, the main material is, of course, balloons. When choosing balls you need to pay attention to the following details:
- color shades (you need to purchase balloons that correspond to the previously developed design scheme);
- balloon size.

Designers recommend choosing balls:
- large size (from 30cm and more), when the arch is supposed to be installed on the street;
- small in size (ranging from 12 to 25 cm) when it is planned to decorate the hall indoors.
The number of balls depends on the size of the arch and the pattern of their location on it. It is advisable to purchase balls with a good supply. During operation, some of the balls may burst, and when decorating the structure, you may need a larger number than was previously calculated, based on the drawn diagram.

Where to begin
First of all, you need to choose the type of arch you want to make: with or without helium. When choosing, you should take into account that the cost of helium is quite high; such an arch is easier to assemble, but will not take up a lot of space; it will rather float elegantly. An arch without helium is more difficult to install, but noticeably cheaper. We often see similar arches at opening ceremonies of stores, departments, and on stages. They are wider and catchier.
After determining the type of structure, we purchase materials. Balloons of the required color (one or more - up to four), braid, 1mm fishing line, helium in a balloon or we order already filled, compressor for balloons with air. If you decide to inflate the balloons yourself, you will need a calibrator - this is a hole equal to the width of the inflated balloon, so that they are all the same. It is quite difficult even for masters to do this by eye, especially with a large amount of work.
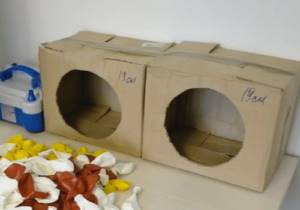
You don’t have to buy a calibrator; you can easily create it yourself.
- Inflate the balloon to a round shape of the required size.
- Trace it on the big box.
- Cut a hole.
The calibrator is ready. In the future, “try on” all the balls in this hole.
For a helium arch, take at least 15 balloons if people plan to pass under it. It can be done in two or three rows, increasing the number of balls proportionally.
We calculate the balloons of the air arch based on their size. For one meter you will need approximately 60 5" balls, or 25 12" balls. For arches that have nothing to attach to, free-standing or outdoor, a frame is needed. Take the APV wire - it bends easily and is durable. Buy according to the length of the arch.
Additional materials and tools
You will have to work with a large number of balloons that must first be inflated. You should not rely on your own strength, it is very tiring.
To build a frame, you can take as a basis:
- hose;
- wire;
- strong fishing line;
- metal-plastic pipes;
- other.
Depending on the design of the arch, it may be necessary to construct a stable foundation. Very often, to solve this problem, they take buckets filled with gravel, in the center of which the arch posts are placed.
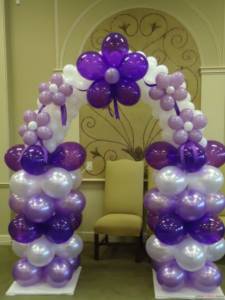
DIY balloon arch in the form of flowers
For the frame, you need to purchase metal-plastic pipes, for decoration, balloons of any shade and braid. From the available tools you will need: a centimeter, a knife or scissors and a cardboard box with two round holes (1st by 15 cm, 2nd by 21 cm).
Metal-plastic pipes must be of the following sizes:
- 2 pieces one and a half meters long with a diameter of approximately 26 mm (for racks);
- 4 pieces 3 meters long 75 cm with a diameter of 16 mm (for legs);
- 1 piece exactly 3 meters long with a diameter of 16 mm (for an arc).
Gallery: arch made of balls (25 photos)
Instructions
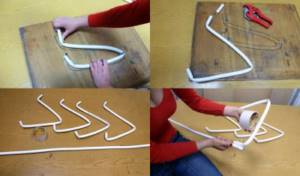
- We make a frame. We take short pipes and bend them so that we get legs for the arch. Then we glue them with tape to the posts, make an arc and later secure it in the same way.
- To make the frame heavier, we attach balls to the legs (we fill the balls with water so that the frame does not fall).
- We begin to inflate the first five balloons of the same color. Using a cardboard box, we form the dimensions (the size of all 5 balls should be 21 cm).
- Then inflate one ball of a different color (this will be the center of the flower) measuring 15 cm.
- Using braid, we connect all the balls, forming a flower out of them. The first part of the flower can be considered ready.
- Making the second part of the flower. Inflate the next 5 balloons of the same color and size as the previous balloons. In this case, making a core is not required, so we connect them without a core.
- To make our flower more voluminous, we connect the connected parts of the flower to each other.
- After this, we place the flower on the arch, passing it through a metal-plastic pipe (arch and posts).
- In the same way, we form the finished flowers (you can only change the color, the shape should be the same) and place them on the arch tightly to each other.
- By the end of the work, gaps will appear at the bottom of the frame, which must be filled with flowers of 4 balls (petals) measuring 21 cm.
- To give the arch a completely finished look, you need to place the flowers on the same plane. After this, you can consider the decoration of flower balls complete.
- For the base (frame) of the arch, you can use other methods, for example, making a design from twine;
- if you make all the flowers of the same type (for example, white petals and a yellow core), then the arch will turn out to be in the form of beads or pearls; looks original and great for a wedding.
Step-by-step instruction
Now that all the materials are available, the tools are prepared, you can begin to put the idea into practice. If you want to get not only a portion of useful theoretical material, but also see with your own eyes how a festive arch is built, then you can watch videos of master classes.
The process of creating an arch will not be difficult even for beginners if all steps are performed without haste according to step-by-step instructions:
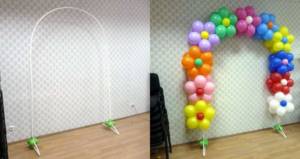
- First, an arch frame is created from wire or other prepared materials. The wire bends well, so you can create a variety of shapes. The simplest version of the frame is considered to be a structure consisting of two vertical supports with a rounded top.
- Since the frame will be installed in the place around which guests will move, you need to take care of its stability. The legs are attached to the bottom of the supports. You can use buckets filled with gravel; they will provide maximum stability. Subsequently, the buckets are covered with balls, so the aesthetics of the structure will not be affected.
- All balloons, the number of which corresponds to preliminary calculations, are inflated using a pump.
- They take two balls of the same color and connect them together, using this principle to form numerous pairs of the same color.
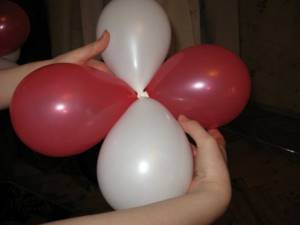
- Now take two pairs that differ in color and connect them together so as to get the shape of a four-leaf clover.
- Such groups of balloons are attached to the bottom of the frame by twisting adjacent balloons around a wire or simply tying them to the frame with a thread.
- All other groups of balls are attached to the frame in the same way, placing them above those that were previously attached.
If everything is done correctly, you will get a voluminous and bright arch of balls.
Basic option
Of course, there are many different ways to weave balls together to create a garland, but first, let's look at the basic one. These are two elements, “two” and “four”, which together form the combination “two-four”.
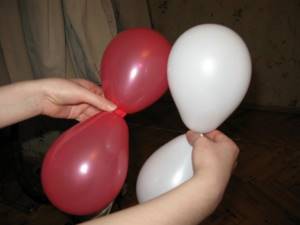
Blow up two balloons of the same color without tying the tails.
To make sure that the balls have the same diameter, you can use a pan of the appropriate size. If the balls fit freely into the pan, you need to inflate them a little, but if, on the contrary, they do not fit, deflate them.
Now that we are sure that the balls are the same size, we need to cross them together, twist them and tie a knot.
Next, we proceed to the “four” element: we place two twos across each other and twist them. So, you have learned the basic principles of weaving balls, now you can start assembling the garland!
For a two-color garland, you need to make a four from two pairs of balls of different colors and twist them so that one color is opposite the other, and the colors alternate in a circle. The following photo shows possible options for a two-color design of a garland of balloons.

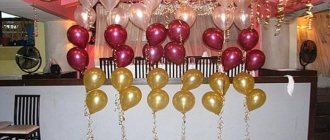
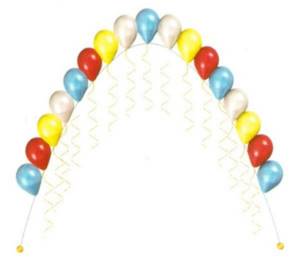
Aerial arch made of rope, balloons and helium
The air arch is also considered the simplest due to balloons filled with helium and air in equal quantities, since they will balance and compact the structure. It turns out to be a beautiful cascade of balls. The only downside is that it is not designed to be placed outdoors.
Instructions
- Measure the length of the twine and cut it.
- Then we decorate the rope (we wrap the rope with corrugated paper) and secure the first end of the twine.
- We fill some of the balloons with helium and some with air; We attach them to our air arch from the end of the rope.
- When all the rope is in balls, firmly attach the second end of the rope.
Adviсe:
- It should be remembered that helium balloons can deflate after some time, so this design should be made shortly before the event so that all the balloons are the same size;
- In order not to get confused when making an arch in helium balloons and balloons filled with air, it is better to use two colors of balloons.