More about the accessory
It used to be as fashionable to make a “honorary witness” ribbon as it is now to make an armband for bridesmaids. But this tradition is gradually becoming a thing of the past (just as the custom of dressing girlfriends in identical dresses is going out of fashion). But stylish bracelets or headbands for bridesmaids, on the contrary, are at the peak of popularity.
Wedding planner
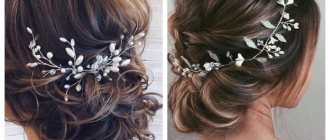
The headband should be in harmony with the bridesmaid's dress and with her overall look. As a rule, headbands are made in soft pastel colors. But you can make a bright, eye-catching accessory if it matches the concept of the wedding and is agreed upon with the bride herself. For example, if the bridesmaid chose a bright dress and retro-style makeup, a headband with one large and catchy flower would be suitable. If the girlfriend wants to appear in a romantic image, the headband should be made of white or soft pink material.
Elena Sokolova
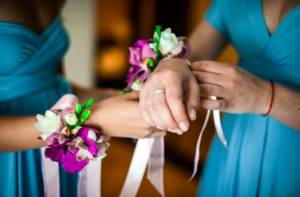
Ribbon bracelets
Jewelry made from ribbons looks very beautiful. They are perfectly capable of emphasizing the tenderness and femininity of the image. Typically, such bracelets are also complemented with some kind of decoration, for example, stones, rhinestones or flowers.
Ribbons are selected several tones lighter or darker than the festive outfit. If the dress is bright red, then it is better to take the ribbons in a light pink shade, and you can complement them with red tea roses and pearl beads. This decoration can be made with your own hands.
Editor's choice: Fashionable jewelry 2021 - current new items of the season with photos
Reader
Wedding armbands for the bridesmaids should be the same, because they will be the distinctive sign that will make the bridesmaid stand out from all the other guests. Kira
Handmade items are always valued more than standard factory items, especially when it comes to a wedding, because handmade jewelry will look original and unique.
Since the custom of dressing bridesmaids in identical dresses is going out of fashion, an armband is an original and stylish accessory that will help girls look great on their wedding day and stand out in the crowd of invitees.
Why is it better to do it yourself?
You can buy a ready-made bandage in a specialized store or make it yourself, especially since it’s quite easy to do.
Today, many brides refuse the services of salons and managers, preferring to organize the wedding themselves, delving into all the details and thinking through everything down to the smallest detail. Such self-organized weddings turn out to be very warm and touching. And if you make headbands and other accessories with your own hands, they can become a wonderful souvenir that will preserve the warmth of the hands of the bride and her bridesmaids, as well as the memory of this wedding.
In addition, making a headband with your own hands will allow the bride to once again meet with her bridesmaids on the eve of the wedding and have a pleasant time, as well as minimize the costs of holding the celebration.
General selection rules
- The decoration should also be in harmony with the appearance of the main hero of the occasion. If it is made with flowers, they should be combined with the buds from the bride's bouquet.
- Do not forget that the bridesmaid plays an important and active role in the wedding celebration - she will not sit still, but will take part in many competitions and dances. The bandage should not only be beautiful, but also durable, so that it does not fall or lose any parts with a careless wave of the hand. It is important to make sure that the decoration is firmly fixed on the hand, and that all design elements, in turn, are firmly attached to it.
This is interesting! An original move is to make a boutonniere for the groom's friend exactly the same type as the bandage on the bridesmaid's arm.
Option with chiffon flower
Here, for example, is how you can make a headband on an openwork ribbon with an artificial chiffon flower:
- To begin, make an oval petal template from cardboard or thick paper and carefully cut it out with scissors.
- Then take a piece of chiffon measuring approximately 20 by 50 cm, attach a pattern to it and cut out thirty-three petals along the contour.
- The edges of each resulting petal must be melted over the flame of a candle or lighter so that the fabric does not fray.
- Give each petal a cone shape. To do this, you need to fold the petal and bring it to the fire with the sharp end, and then press the edges with your fingers as quickly as possible. This must be done with all the petals from the workpiece.
- Cut out the base for the flower from cardboard - a circle with a diameter of three to four centimeters.
- Carefully glue eight petals to the cardboard circle.
- Continue gluing the next petals, decreasing one in each layer. That is, there will be seven petals in the second layer, six in the third, and so on.
- Make a flower core. To do this, you need to take a circle of silk or chiffon with a diameter of four centimeters, stitch it with thread along the edges, put scraps of fabric or cotton wool in the center and tighten the thread. You will get a fabric ball.
- This ball needs to be covered with rhinestones or small beads glued on. Then glue it into the center of the made flower.
- Take a beautiful lace ribbon, cut 35-40 centimeters so that you can wrap it around your wrist and tie a beautiful bow. Carefully sew or glue the flower to the ribbon. The bandage is ready!
DIY satin ribbon headband + photo
Girls - they are such girls! They love everything beautiful, new, original and so that only she has one. And this applies to everything: prom dresses, shoes, handbags, accessories, jewelry.
Well, do you want something exclusive? Then make this very decoration with your own hands. For example, we suggest that you soon create a headband from satin ribbons with your own hands.
It turns out simply amazing, and most importantly, it is 100% exclusive.
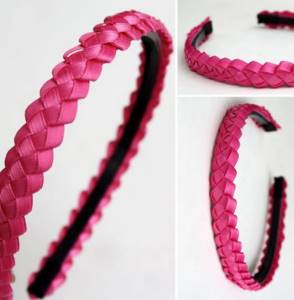
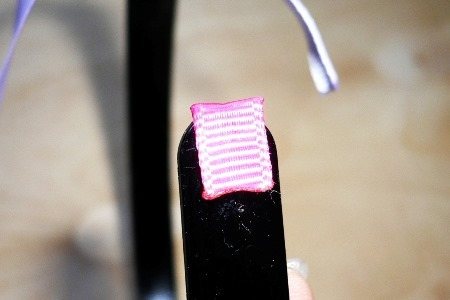
Satin braid
The simplest, but no less original option for decorating a headband is to weave a braid from two satin ribbons. We offer a master class on this decoration. What we need:
- two satin stripes, half a centimeter wide and 150 cm long - for a child’s head, and about 3-4 meters for an adult’s;
- scissors;
- glue gun or any other glue that is suitable for our materials;
- headband
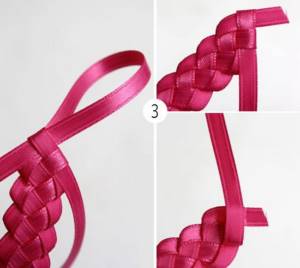
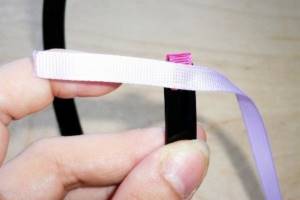
Let's start weaving. At the end of each of the ribbons you need to make a loop the size of the width of the strip, so that it can be pulled through the loop. Or, more precisely, you need to thread the loop of another ribbon into the loop. See what it looks like in the photo:
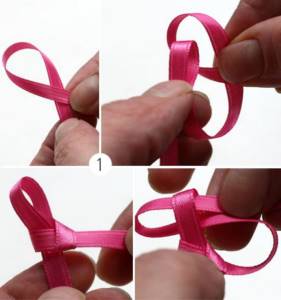
Now you need to do a similar action with the other ribbon - thread the loop into the loop in the same way. Gradually, by doing such manipulations, you will end up with a very beautiful braid. The ends of the strips will need to be cut and burned a little so that they do not crumble.
Now you need to attach the ribbon to our hoop, and you will get a very beautiful and elegant decoration for a girl or girl. The satin can be multi-colored, plain or colored, but transparent, it’s up to your taste and wishes.
Hair decoration with kanzashi flowers
You can do the most incredible manipulations with the ribbon, which as a result turn into very original and almost real flowers - flowers using the kanzashi technique. We will decorate the headband with them. It can be one flower, but large, or several small ones. Let's create an unrivaled dahlia, we need:
- satin ribbon, up to 3 cm wide;
- glue gun;
- scissors;
- flower core;
- base made of felt or cardboard, or a piece of fabric;
- candle or lighter.
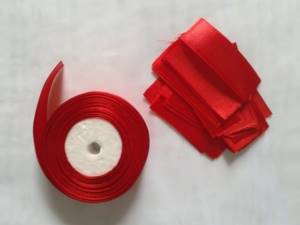
For the preparation we must create the petals of the future flower. Why cut the satin strip into squares of about 5-6 cm. We will need a lot of these squares, or, more precisely, even rectangles, about 35-37 pieces. If you want the flower to be lush, make more petals. The splendor directly depends on how many blanks you create.
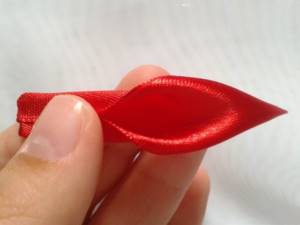
Now take each piece, fold it in half lengthwise, wrong side inward. We cut off a corner of the workpiece and use a candle to process the edge. After this procedure, unfold the petal, carefully bend the lower corners and seal it with fire again, only this time the base of the petal, as shown in the photo:
The following manipulations must be done with all workpieces. Now, onto the circle that will serve as the base, you need to glue the petals one by one in a row. There may be a small distance between them, but then the next row of petals will have to cover the gaps. Each subsequent row will consist of fewer and fewer blanks.
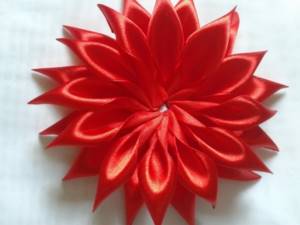
The center of a dahlia can be made from anything. For example, from a suitable button, you can prepare the stamens in advance, or you can simply cover everything with petals.
All that remains is to attach the finished dahlia to the blank, but don’t forget one more important point - to cover the rim itself. When you braid it with ribbon and secure it well, you can attach the flower itself.
Instead of a headband, you can take a wide elastic band for the head or the same satin strip.
Braided headband
How to braid a headband? Yes, very simple and fast! The set of materials is the most common:
satin ribbons, preferably narrow and contrasting in color;
- glue gun;
- scissors;
- several clothespins;
- lighter or matches.
You need to glue two pieces of tape about 2 cm each to the edges of the rim.
Now we glue another tape to it, glue it to the outside of the workpiece, leaving about 3-4 cm on one side for wrapping the edge.
Then you need to bend the long end over the rim and glue it a little. The second strip needs to be glued obliquely, but from the inside of the rim and directly along the other strip. See what it looks like in the photo:
The short edge of the white stripe needs to be secured on top of two layers of tapes. Then, obliquely, gluing the surface of the rim, you need to braid it with ribbons. The drawing on both sides turns out equally beautiful.
When you start braiding, your hands will tell you with what density and how exactly you need to weave the ribbons. It's actually quite simple, the main thing is to start doing it. Your design will come out in the form of multi-colored triangles, but what exactly they will be depends on the angle at which you lay the fabric.
- The other edge of the headband also needs to be secured so that it looks neat and complete.
Headbands made of satin ribbons always look very gentle and feminine. This decoration can also be decorated with beads or small plain flowers. It can be one bright flower and delicate pearl beads, emphasizing the romance of the image.
You can decorate a wide velvet headband with beads and ribbons; it will take even less time and will look very original. And using a wide satin, you can drape a headband in the form of an impromptu crown on your head. How to make such beauty is in the next master class.
Ribbons and beads on the head
We will need one wide ribbon, one thin one. It is desirable that they be of different but compatible colors, large beads, glue, thread and needle, and a thin bezel.
You can make this decoration in a matter of minutes. Place a thin ribbon on a thick one, take a needle and thread and begin to assemble them like an accordion, and insert a bead between each fold. If you remember, this is also how they create bracelets a la mandala.
- Such a bracelet can then be attached to a thin headband and you will get a very unusual hair decoration.
- In order to consolidate the result, we invite you to watch a video master class on creating an exclusive satin hair decoration:
- Handmade things always have a special energy, don’t forget about it!
Source: https://zhenomaniya.ru/hobby/prochee-rukodelie/kak-obmotaty-obodok-atlasnoy-lentoy
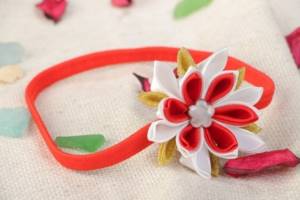
Interesting video: bracelet with a pink flower
On the Internet you can find many videos with master classes that also describe in detail and step-by-step the making of wedding decorations.
For example, this video describes the process of creating a headband for bridesmaids from satin ribbons with a beautiful flower:
You will need:
- a meter of pink satin ribbon 2.5 centimeters wide;
- several more satin ribbons of different shades, but similar colors, different widths;
- one large pink bead;
- lighter;
- needle and thread;
- 30 centimeters of white openwork ribbon.
Is everything in stock? Then let's get to work:
- To begin, process the edges of the cut tape over the fire of a lighter. Then zigzag along the entire length of the tape.
- Pull the thread and gather the ribbon into an accordion shape.
- Gather the thread onto one edge of the resulting flower petals without breaking it. You should get a blank that resembles a ring.
- Roll the ribbon several times to make a flower. It must be double-layered.
- Sew a bead into the center of the flower and prepare openwork ribbons.
- Sew a bead with white thread to the bottom of the flower.
- Take any ribbon suitable for the bracelet, for example organza. 30-40 centimeters of such tape should be enough.
- Sew several ribbons together and sew them to the main ribbon. The bandage is ready!
Interesting! The bracelet can be beautifully decorated with flowers. We wrote more about this option in this article.
The benefits of bracelets for a wedding
- A beautiful and elegant accessory.
- Convenient - does not take up your hands, unlike a bouquet.
- Complements the bride's own image and style.
- Looks great in photographs, decorating them and adding a certain charm.
- Thanks to a special impregnated tape, a product made from fresh flowers will not fade and will look perfect throughout the day.
There are several rules for creating successful bridesmaid bracelets. They should be small in size so as not to attract too much attention to themselves. It is also recommended to perform them in the same color scheme and in accordance with the overall wedding decor. What materials and style to make the accessory from is decided individually, taking into account fashion trends and the personal wishes of the newlyweds.

Organza option
Here's how to make a simple and elegant decoration using artificial roses:
- Cut out organza petals.
- Stack them one on top of the other, gather them on a thread and twist them into small buds. For the smallest rose, two petals are enough; for a large one, seven may be needed.
- Make a hole at the base of the bud and thread the wire through.
- Make leaves. To do this, take two pieces of green fabric, place a glue web between them and carefully iron the fabric with an iron.
- Then draw a leaf on top and cut it out.
- Glue the petal cups to the base of the buds.
- Fold a small piece of satin ribbon into the shape of a bow, secure it with thread, and sew the satin bow to the headband.
- Carefully sew the wire from the stem of the roses to the headband in several places.
Making unusual bows from colored satin ribbons: photo
Making an original bow from ribbons is as easy as shelling pears. Don't believe me? Then look at the photo below and experiment. By following the step-by-step photo instructions, you will certainly make exclusive bows from colored satin ribbons.
Foamiran accessories
Foamiran is a soft and elastic decorative material, ideal for making artificial flowers. It is distinguished by increased wear resistance, while flowers made from it look very similar to real ones.
You can make armbands for the bridesmaids from foamiran, which will contain a composition of one large and three small flowers, as follows:
- make templates for the petals. Draw three squares of different sizes and cut out a drop-shaped pattern from them;
- prepare 15 small petals and 5 small and large petals. To do this, attach the pattern to the foamiran and trace along the contour with a toothpick.
- turn on the iron, apply it to each petal for a couple of seconds and quickly fold the petal like an accordion;
- twist its edges in different directions;
- straighten the petal and stretch its middle;
- form all the petals in this way;
- take the stamens and cover each with a small petal;
- cover the stamen in a circle with five petals, then cut the thread as close to the bud as possible;
- using the same pattern, make three small flowers;
- for a large flower, take several stamens and cover them with large and medium petals;
- make foamiran leaves for each flower. To do this, use a toothpick to draw four leaves connected in the center on the material and cut them out;
- form the leaves in the same way as you formed the buds;
- glue the sepals to the buds;
- take a ribbon 2 cm wide and 30 cm long, singe the edges over the candle and fasten a large flower in the center, and three small ones around it.
Thus, we will get excellent foamiran headbands for bridesmaids.
Conclusion
As you can see from the above examples of making an armband for a bridesmaid, making a decoration is not at all difficult - every girl can do it if she purchases the necessary materials, carefully reads the instructions and shows a little patience.
A wedding is an important event in the life of any married couple, and it is not surprising that the bride and groom want to make it unique and inimitable. DIY accessories like bridesmaid armbands can help with this.
Andrey Andreev
Wedding planner and wedding photography guru
Previous article
Mother and son dancing together at a wedding: choice of music and video example
Next article
Boutonnieres
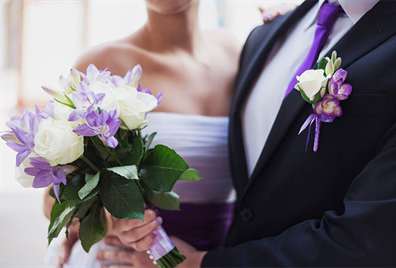
Boutonnieres are used to decorate men's wedding suits. They are most often selected to match the color of the chosen tie or the shades of the bride’s wedding bouquet. We offer several options.
- If the bride has shades of purple in her bouquet, then the tie should be a bright lilac tone, and the boutonniere should be in purple and white tones. You can tie it with a thin satin ribbon of white or lilac tone.
- The most classic option is to attach a white rose to a green leaf and tie it with a white ribbon.
- If the tie is red, then you can attach a burgundy rose tied with black satin fabric to the suit. And all this against the backdrop of a green leaf.
Editor's choice: Is it possible to wear gold with silver, tips and tricks on how to wear jewelry