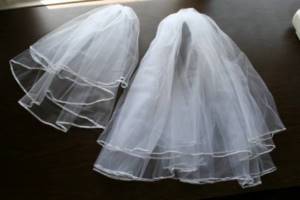
On the eve of the bachelorette party, your imagination is given complete freedom of choice, and you decide for yourself how to make a veil for the bachelorette party with your own hands. It can be created in various types and designs, because... The basis for it can be a comb or a hoop.
A spectacular look will be provided by your personal design, which can also be different: from non-standard bright and colorful to strictly white or delicate. You can add a special color to your veil using various stones, small flowers or beads, as well as everything that your soul desires and that will successfully fit into the composition.
How to make a veil for a bachelorette party?
Even the most inept girl can make an accessory for a bachelorette party. There is the easiest way to create this accessory, using regular tulle, which can be bought at any hardware store. In this case, the material can be either delicate or bright colors.
Materials and tools
To make an accessory at home, you will need:
- material. Tulle is often used (width - 150 cm, length - 135 cm);
- threads;
- scissors;
- measuring tape;
- felt, which will serve as decoration;
- bobby pins and hairpins that can be used to secure the accessory.
Step-by-step instruction
Making this accessory at home will take a little effort, but if you follow the instructions below, it will work.
- Initially, you should measure several pieces of tulle and cut them into 30, 45 and 60 cm.
- Then, you must sew these three parts in such a way that you can later assemble them together by pulling the fabric together. Arrange the material so that its largest size is 60 cm at the bottom, put the 45 cm size above, and then 30 cm. The next step is that you must sew these three pieces using a sewing machine.
- Then pull the loose threads, thereby collecting the seam.
- Now tie these threads into a knot, cutting off their excess ends.
- After this, use scissors to straighten the ends of the material.
- Next, you should attach the material to the comb.
- To hide the comb, you must sew the ends of the material to it.
Thanks to this sequence, you can sew an accessory at home. To decorate your bridal shower veil, you will need the following steps.
- Cut out hearts from felt or come up with your own image, decorating with various flowers, stones, etc.
- If you chose hearts, sew them onto the veil.
- And the last step is just look at your beauty!
This veil is the most budget option.

Materials for veils
To make your own veil, you don’t need to have professional sewing skills. First, you need to know what it is made from and what necessary materials are needed:
Editor's Choice: Wedding Calendar for 2021
– tulle fabric of a certain color;
– satin ribbons, in a suitable color;
– rhinestones, beads;
– artificial flowers or other accessories you like;
– threads;
– a needle or sewing machine.
To get a delicate veil, choose a soft tulle; for a more voluminous one, choose a hard one.

Veil on a hoop
Also, when coming up with the look of your veil, you can choose a veil whose base will be a hoop, instead of a standard comb. This accessory option is very stylish and easy to use.
Materials and tools
To make a bridal accessory, you will need to purchase the following.
- Hoop.
- Glue gun.
- Ribbon.
- Tulle (two colors).
- Scissors.
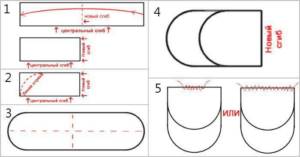
Step-by-step instruction
To make such a simple accessory, you should adhere to the following factors.
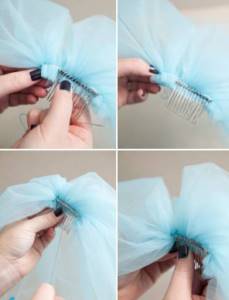
- The first step is to make a neat fold by folding a piece of tulle overlapping several times.
- Stick the tulle to the hoop.
- Glue the same pieces on the left and right sides of the center.
- Add a different color tulle
- Trim any unnecessary pieces of material protruding beyond the edges of the base.
- Now, in order to hide the tulle glued to the hoop, you must cut off a couple of centimeters.
- Glue a ribbon of a different color to the tulle.
- Adjust the length of the veil by trimming the ends of the tulle.
How to sew a simple veil with your own hands
Sewing does not require much time or sewing skills. You can involve girlfriends or sisters in the process.
White tulle veil
For independent creativity, they initially stock up on the necessary materials. Before making a batting veil for a bachelorette party, prepare:
- a piece of fabric measuring 2x1 m, white;
- milky satin ribbon for edging;
- light beads made of artificial mother-of-pearl;
- scissors, needle and thread, hair clip.

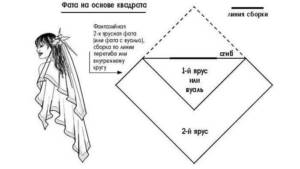
Pattern based on a square
Having collected all the necessary materials, we begin the creative process:
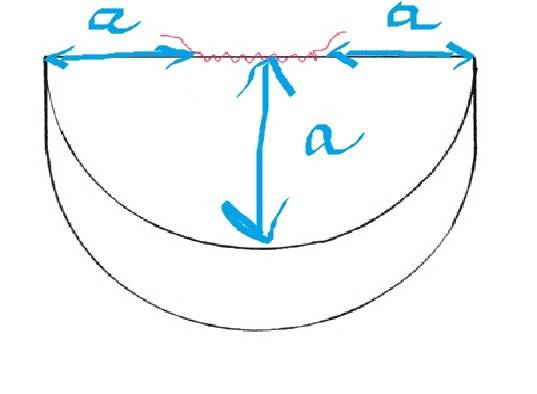
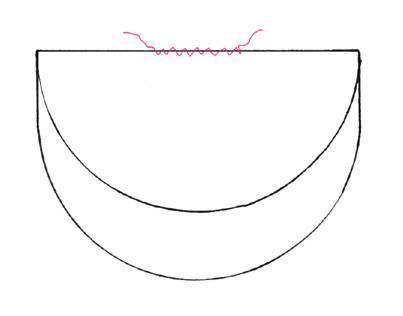
- On a flat surface, in particular on a table, place a piece of fabric measured to size and fold it lengthwise to form two equal parts. Then it is folded again, but now doubled across.
- Armed with scissors, they cut off a corner in order to give the ends of the future veil a rounded shape.
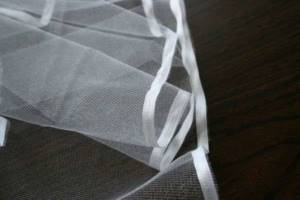
- Then they unfold the cut fabric and, using a needle and thread, carefully baste a satin ribbon along the edge of the veil, after which they finally sew it on with a zigzag machine.
- At the next stage, the fabric is folded so that the top layer of the future veil is slightly shorter than the bottom.
- To ensure that the accessory is correctly placed on the top of the head, the material is gathered in the middle with a fine seam, departing from the edge on both sides by approximately 22 centimeters. The result is a gathered top.
- The veil is secured using a hair clip, which is sewn to the fabric on the reverse side.
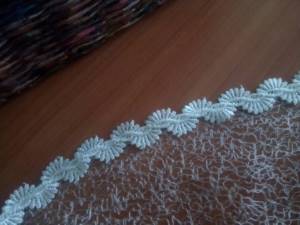
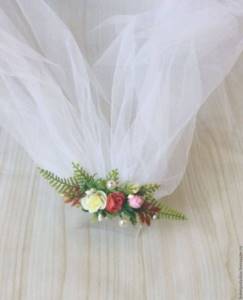
- For decoration, an artificial flower is made, for which five circles of different diameters are cut out of the same material and folded as they decrease in size. The resulting decor is sewn in the middle, then faux pearl beads are glued in the center. Finally, the flower is sewn to the top of the veil.
Sewing patterns
Ideas for sewing and decor
For decoration, various decorations are used, which are added during the sewing process. These can be artificial daisies, roses, chrysanthemums with a scattering of transparent beads that act as dew drops, small feathers and lace.
Using layers will help you sew a lush veil for a bachelorette party. The secret is that the width of the piece of fabric should be two to three times its length. The resulting folds will give the product the necessary volume. In addition to tulle, tulle, organza, lace, mesh, and veil can serve as materials for creating a textile masterpiece.
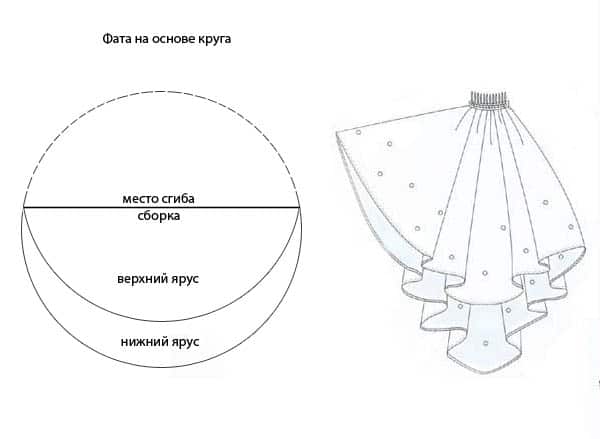
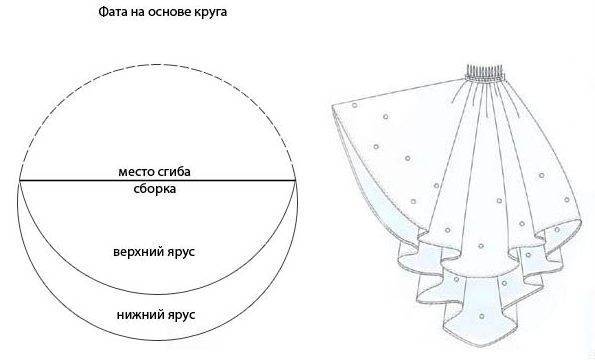
Circle-based sewing option
A veil at a bachelorette party makes the bride’s image unique and memorable, creating a special atmosphere on the eve of the special wedding day. The hair attribute is original in that it has many variations, from which it is easy to choose the one most suitable to the character and internal state of its owner.
Wreath with ribbons - an alternative option
If all the previous compositions have not yet amazed you, then we can offer you an alternative - a wreath with ribbons.
Materials and tools
You can make products by purchasing the following materials.
- Ribbons.
- Textile flowers.
- Wire.
- Floral ribbon.
Step-by-step instruction
In order to create a product, you should proceed to the following.
- The first step is to cut off the stems of the inflorescences and attach them to the wire, filling the entire base with them. Also, you should wrap the wire with floral tape.
- Then all you have to do is tie the ribbons to the wreath, and your unusual accessory is ready to use!
How to sew a wedding veil with your own hands?
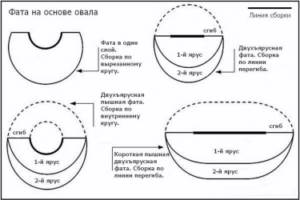
Constructing a veil pattern
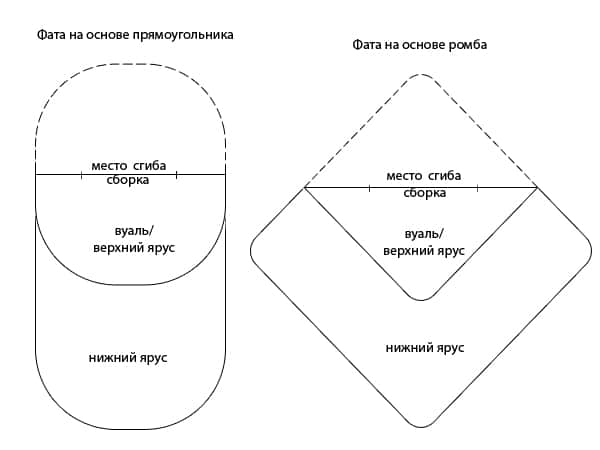
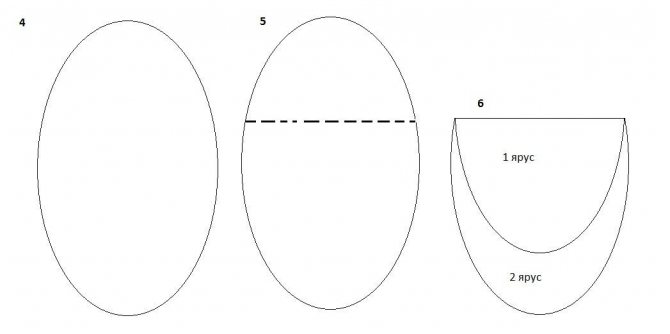
After you have decided on the length of the veil, we choose based on which figure we will build the pattern:
Oval.
Circle.
Square.
Rectangle.

Ring.
All proposed models assume the presence of a veil, or your veil will turn out to be two-layer.
This way, at the front, the veil veil will form a neat circle.
Progress of pattern construction:
- We determine how the veil will be attached and where. The place where the veil is attached will be our reference point for measurements.
- We measure the length of the veil.
- Determine the length of the veil.
- We decide what shape we will build the pattern.
- We build a drawing of an oval, circle or rectangle.
- Fold a sheet of paper or wallpaper into four.
- Cut the corner.
- Let's expand.
- Let's trim.
- We mark the location of the assemblies.
Cutting and sewing
Cutting operations can be carried out directly on the fabric, but if you are using a paper pattern, you need to transfer the drawing to the fabric:
- Place the pattern on the fabric.
- Let's shallow it. We do not make seam allowances.
- Cut it out.
- We try it on and find out how narrow your veil should be at the highest point.
- Determine the fold location according to the pattern.
- We measure the height of the veil on the sides.
- The width of the fabric on the fold, remaining from the sides, is removed into folds.
- There are two options for working with the assembly: make even, symmetrical folds, or simply assemble the assembly on the fishing line.
- When working with folds, divide the required width by the number of folds and lay them as consecutive or counter.
- Sweep it away.
- We stitch by car.
- If the fabric allows, then steam it using an iron.

If your material does not crumble, then you can leave the edges as they are, or you can decorate them with ribbon or lace.
The problem with decorated hems is that one layer of veil will always be wrong side up.
Therefore, try to sew the lace as carefully as possible strictly along the edge. In this case, the difference will not be noticeable.
Using lurex threads, you will make the reverse side quite decorative.
How to sew a veil for a wedding?
As noted, for the sacrament of marriage held in a church, the veil is selected so that it covers the bride’s head as much as possible, and often it also hides her face. Thanks to the peculiarities of the cut, the front part can always be folded back, turning it into an upper tier, so such an accessory will not cause any inconvenience. An important point: there should be no jewelry on the wedding veil!
You can try to sew a veil using a classic basic pattern, tried by many girls, where the detail of the toilet is created from a rectangular cut. To transform it into a finished product, fabric is required: soft organza, tulle or chiffon is preferable - any translucent tulle material in white or a color similar to the shade of the dress. Additionally - a comb and sewing accessories, including a ruler, soap, scissors, etc. The length of the fabric cut is selected individually, based on complete concealment of the face, head and shoulders. How much you want to lower the bottom edge of the veil depends on the style of the dress. Approximately, purchase at least 1.5 m. Before sewing, the fabric is steamed with a hot iron. Then it is laid out on a flat surface and bent along the measured average vertical line, aligning the corners. After which you will have to fold the fabric again, but this time across. The final part of the preparatory stage is carefully rounding the ends with scissors. The degree of it does not matter and depends only on your preferences. Along the perimeter, the resulting rectangle with rounded corners should be treated with fire so that the threads from which the fabric is woven do not begin to unravel
You must act carefully, trying not to break the lines. If possible, you can process the edges with an overlocker with thin transparent threads inserted into it. You can resort to another method: purchase a narrow satin ribbon to match the fabric and sew it on a machine with a zigzag seam along the perimeter of the future veil
The ends of the tape are first scorched over a fire, and the tape itself is attached to the fabric with thin needles. It is important to maintain the tension of the product without distorting its direction. The final stage of sewing involves bending the top edge of a vertical rectangle so that it is enough to hide the face. This will be the top tier - the veil. In the middle of the fold, with an indentation of 10-15 cm from the edge, the veil is gathered onto a thin transparent thread to form folds, and is attached to the comb. This can be done either by sewing, if the texture and shape of the comb allows it, or by gluing. If the bride's hairstyle does not allow attaching a comb to it, you can secure the veil with a thin headband.
Attaching the veil
After the veil is ready, you need to think about how to attach it. Consider these options:
Invisible pins and clips
Not suitable for all hairstyles, especially if you dance and move a lot. Alternatively, they are suitable for hair tied up in a ponytail or for an updo. Pierce the upper fixed part of the veil with hairpins and insert into the hair. Use bobby pins for a secure result or beautiful hair clips.
The easiest and fastest way to secure a veil. First you need to sew it to the comb, then insert it into the hairstyle. By the way, this accessory is sold in various shapes and types, it can be either metal or plastic.
An excellent option for a small veil. We attach it in the same way as a comb, only using a latch. Advantage: easy to put on and take off.
They will give you a festive look. Instead of thread, it is better to take a transparent fishing line so that the fastening is not visible.
A popular accessory to a veil, it can be a headband in the shape of bunny ears, horns, etc. Or it can have a classic look. The veil stays on it very securely.
Cap or hat. We sew the veil to the back.
Fabric for veil
If the bride wants the veil to keep its shape, she will need to buy stiff fabric. Soft material is suitable for flowing, falling styles of a wedding bedspread. The fabric is selected to match the dress.
Most often used for sewing:
- Fatin. Can be hard or soft.
- Guipure. A piece of clothing made from this material looks rich and delicate.
- Veil. This is the same tulle, but with a fine mesh.
- Tulle. This material can be purchased at a curtain store. There are many white, thin curtains on sale now.
- Organza. The material is rigid and retains its given shape well. The only drawback is that the edges fray at the cut site, so during the process it is recommended to use a French seam, thanks to which the cuts will be stitched inside the seam.
- Lace. This material is most often used to decorate veils made from tulle or veil.
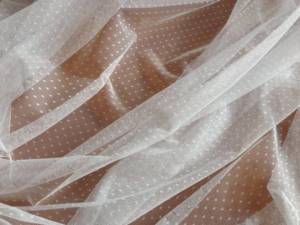
Tulle is used to make veils
How to sew a veil for a bachelorette party with your own hands
Light and airy fabrics, such as organza or tulle, are suitable for it.

Materials you will need to sew the decoration:
- Fabric 2 meters long and 1 wide;
- Thread and needle;
- Satin ribbon in the color of the veil;
- Scissors;
- Sewing machine;
- Candle;
- Jewelry (beads, rhinestones, etc.).
Steps to create a veil
There is nothing difficult about sewing a veil yourself. After spending a little time you will create a unique accessory for your party.
- First you need to iron the fabric with a not very hot iron;
- The fabric is folded in half along the long side; if it slips too much, the folds are ironed;
- Next, the material is folded crosswise in half;
- If you want it to have a rounded shape, then you need to cut off the edges of the future veil, but this is not necessary if you prefer models with straight ends;
- The material unfolds and begins to be covered with tape, the edges of which must be pre-treated with a candle flame. Stitches should be made tightly and very carefully, using a small needle;
- Using a machine, the ribbon is attached to the edges of the veil. For this, either a zigzag stitch or a standard double stitch is better suited;
- The material is folded in half, because the veil will have two layers, the top layer should be shorter than the bottom;
- Next, the material is gathered at the top of the head; to do this, you need to step back about 20 cm from the edge and hem it with a simple seam;
- The veil is fixed with knots;
- At the end of the work, decorate the veil to your taste.
What to attach the veil to
The veil should complement your look, but not get in the way, so you should take care of how it will be secured.
- Hairpins. This item will be perfectly attached to collected hair. To prevent it from falling out of your hair, you need to bend one side of it up and towards you, thereby creating a hook;
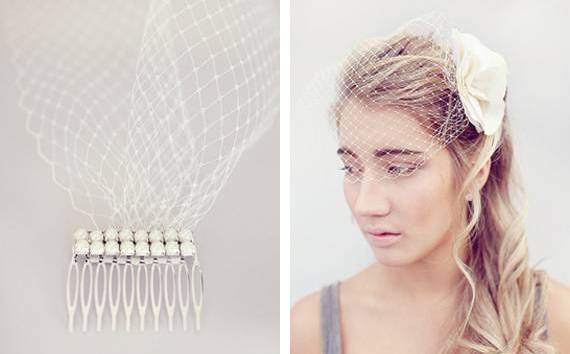
- Crest. This accessory is traditional for a wedding. It can have a completely different look, for example, transparent or the color of the hair, or, on the contrary, it can be bright and decorated with all kinds of rhinestones and beads. The comb is easy to put on, fits any hairstyle, and besides, the fabric is sewn to it very simply;
- Barrette. This accessory is less versatile and is only suitable for collected hair. But, if the veil is miniature, then you can collect only part of the hair, leaving the rest loose. Of course, you can use the most ordinary hairpins, but it is better to opt for metal hairpins with a latch; they can be easily hidden under your hair;
- One of the fastening options could be the simplest elastic band. It can be used if the veil is narrow (triangular, widening towards the bottom);
- Headdress. A very interesting option to which you can attach a veil. For a bachelorette party, you can wear an elegant hat, a straw hat or even a baseball cap, it all depends on the theme of the holiday and your imagination;
- Wreath. Very beautiful decoration. A wreath can be made from flowers and decorated with rhinestones, twigs, and feathers. This accessory is suitable for any hairstyle and will make your image very interesting and eye-catching;
- The crown is one of the favorite accessories of brides. A light and miniature veil can be easily hemmed to the headband of the crown;
- Headband. The fabric is easily sewn to the headband, and this accessory is suitable for any hairstyle. There are an endless number of options for decorating the headband, you can use rhinestones, beads, feathers, flowers, etc. If the theme of your bachelorette party allows it, you can attach cute little ears or horns to the headband.
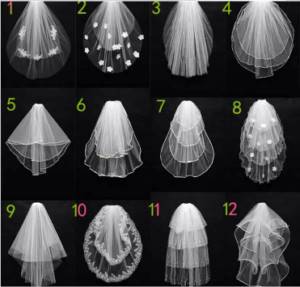
How to choose a veil style
In any case, it is customary for a veil to be made brighter and more cheerful than a traditional wedding one.
- For a bachelorette party in a restaurant, a discreet veil in delicate colors is suitable. It can be decorated with pearls or flowers;
- If you decide to hold a bachelorette party outdoors, then you can opt for fabric with folk motifs;
- Polka dots or other fun designs are perfect for a pajama party;
- For a party at a club, a bright and short veil is suitable that will not interfere with dancing.
Design and color
The wedding attribute is sewn from white fabrics, choosing the style to your liking.
- Fantasy. It is made from several layers of fabric, decorated at the edges with ribbon or frills. The bottom edge may be oval or angled.
- Classical. This is a bunch of collected lightweight material that is attached to the bottom of the hairstyle. Most often, such an attribute does not have additional decorations. The veil covers the bride's face only during the formal part of the holiday.
- Wedding. Since a girl must enter church only with her head covered, the veil must meet this requirement. The hair is completely covered with fabric, complemented by rich accessories in the form of a wreath, tiara, and hairpins.

Wedding
- Mantilla. Lovers of Spanish or oriental style will appreciate this piece of jewelry, made of thin white material. Fixed on the hair using bobby pins.
- Veil attached to head decorations. A similar wedding crown is made from beads, flowers and seed beads. Before fixing it on the bride's head, a veil is sewn to it.
You might be interested in this Manual for the Podolsk 142 sewing machine: how to set up and repair
Choosing mounting options
In order to diversify your look, you can choose one of many ways to attach the veil to your hair. So, it can be fixed using:
- Invisible means , such as ordinary hairpins, hairpins, thin elastic bands or even a headband in the color of the hair;
- Neat decorations such as a festive comb or the same hairpins, this time decorated;
- With the help of an original accessory , for example, a wreath of flowers or a small tiara, and in the case of a themed bachelorette party - even a headband with horns or ears;
- For a headdress - a sports cap or even a cowboy hat, which can certainly decorate the image of the future bride.
To ensure that your girlfriends are not late for the holiday, send out original invitation cards 2 weeks in advance. To do this, you can download a ready-made template, or you can do it yourself.
You can organize a great holiday at home. Be sure to read this article about how to do this.
Choosing the right color
During a bachelorette party, you can neglect the classic white color and choose something brighter and more memorable:
- A white veil during a celebration with her bridesmaids is ideal if the images of the other girls also involve the use of the same accessory of a different color, so the bride will stand out, and the white color will emphasize her status;
- A bright and colorful veil of any shade , from bright pink and red to lemon yellow, will fit perfectly into a playful girls' holiday, cozy get-togethers with friends, as well as some cheerful holiday scenario;
- A dark veil , even black, will fit perfectly into a gothic and gloomy image;
Different colors are perfect for a themed bachelorette party, more original and interesting than a regular celebration.
Veil for a party for the bride and bridesmaids
At bachelorette parties you can increasingly see girls wearing veils. This is a unique way to stand out from the crowd of vacationers. For greater originality, it is customary to use a colored veil.
Moreover, it is often a different color for each girl. You can decorate it with beads, rhinestones, and colored ribbons. However, even without them, such an accessory will look bright and original.

It is better for the bride to stand out from the general background of her friends and choose a white veil. As an option, make all your friends red, and the hero of the occasion wear pink or another color different from your friends’ option.
Accessories on girls will look stylish and original. You should take care of their tailoring in advance, so that every young lady has the opportunity to try it on at home, carefully fixing it on her hair.
From a wedding story
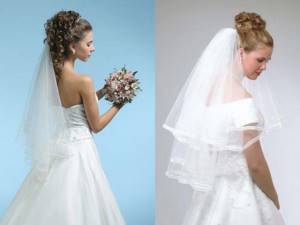
The bride's headdress at a wedding has changed with each generation. Modern fashion has removed all restrictions and allowed the bride to choose what she will decorate her head with during her wedding. Many people refuse to cover their heads with fabric, preferring to decorate their hair with wreaths or tiaras. But most newlyweds still prefer to wear a white fluffy cloud of a veil, which will emphasize the lightness and purity of the image.

Completes the bride's look
When deciding how to sew a veil with your own hands for a wedding, you must first choose the right style. To do this, take into account the style of the wedding dress and the purpose of using the attribute.
Styles
Veil length
The length of the bride's headdress can be of the following types:
- Above the shoulder. This style is suitable for painting in the registry office and a modest celebration of the occasion.
- Up to the shoulder. An attribute of similar length is manufactured in single-layer and two-layer types.
- Up to the elbow. Most often it is sewn in two layers and complemented with a veil.
- To your fingertips. This style of veil can be used in combination with any style of wedding dress.
- Wedding. This headdress differs from other styles in its rich finishing and decoration. Suitable only for elegant long dresses. They dress it for the wedding ceremony.
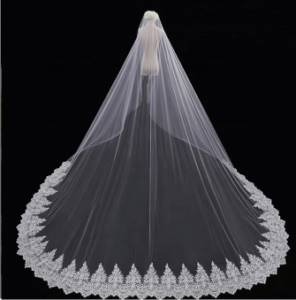
The length of the wedding attribute may vary
. Important! The amount of material directly depends on the length of the product. For a veil at shoulder level you will need up to 60 centimeters of fabric, at elbow level - 80 centimeters, for the entire length of the arm - 1 meter 10 centimeters. If you plan to sew a wedding bedspread with a train, you need to buy 2 meters of tulle.
You might be interested in: Making patterns and sewing leather wallets and purses with your own hands