While preparing for the wedding, the newlyweds can feel like real fashion designers when they are engaged in sewing wedding dresses and skillful decorators when decorating the place of celebration. A young couple can use all their imagination to decorate their wedding with paper flowers, and the photos will turn out simply magnificent.
- Paper used for decoration is an inexpensive material and will help save material costs when organizing a wedding;
- Flowers and various paper details will harmoniously fit into any chosen wedding style and perfectly highlight it, as well as make it unique;
- Anything made with your own hands is doubly pleasing to the eye;
- This type of decor can be done by anyone without any special skills or training;
- Decorations made from paper flowers will last a long time and can also be used as decoration for the newlyweds’ bedroom, if there is no major renovation there yet;
- If there are various imperfections in the room where the wedding will take place, then paper decorations will hide them;
- Paper decor does not require special care, unlike if you use fresh flowers. And at the same time it will look light, airy and unique
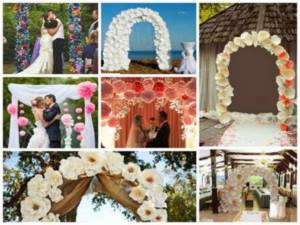
Arch
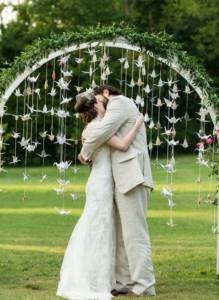
The trends for 2021 are outdoor ceremonies. In this case, the wedding place can be decorated with an arch, using paper flowers as decoration. They are also good to combine with fabric, ribbons or fresh flowers.
KNOWLEDGE BASE: Blue wedding decoration: unusual modern ideas
When designing an arch, you should adhere to the following rules:
- Color selection. The only or primary color is white. It can also be diluted with others if there are one or two more colors in the color palette, but no more. Don't use colors that don't go well together.
- Flower sizes. It is better to use flowers of different diameters. This way the arch will look more rich.
- Accuracy in making flowers. Perfectly executed flowers are the guarantee of a luxurious arch. It is necessary to use high-quality paper. Try to make the flowers carefully so that the paper does not wrinkle or the glue or staples from the stapler are visible.
- Fastening strength. It is also necessary to fix the flowers to the arch carefully, but also firmly. So that when there is a slight blow of wind, the arch will not be left without flowers.
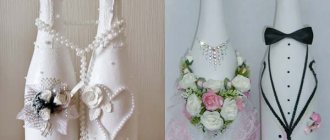
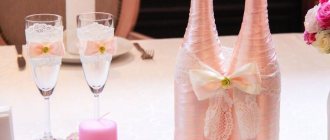
Wedding bouquet of paper flowers
When studying the issue of wedding decoration with paper flowers, you can often see that such artificial elements are used even in the bride’s bouquet. With the help of a paper duplicate bouquet, you can get the best memory of your Wedding Day. You can buy a bouquet of fresh flowers and complement it with this analogue. Moreover, the prices for the latter are affordable and low.
If you are looking for a unique prop for a wedding photo session, choose one huge flower made of paper or isolon. It can contrast brightly with your holiday outfit. In addition, you can purchase several pieces of artificial flowers for your invited guests - witnesses, relatives and closest ones who will participate in a professional photo session.
MK: flowers on a stand
To create a large flower on a stand, there are several ways. Let's consider one of them, making a delicate peony from corrugated paper. To make the stem, metal-plastic pipes are most often used, which bend and hold their shape, as well as PVC pipes and cement.
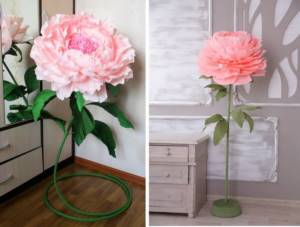
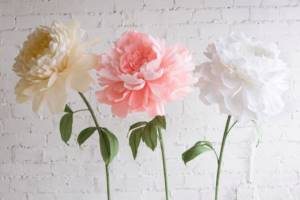
The photo shows large flowers on stands to decorate the room.
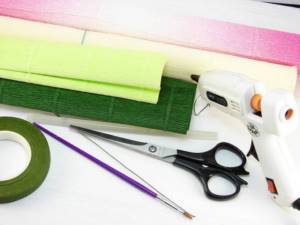
Tools and materials:
- Corrugated paper pink and green (3 meters).
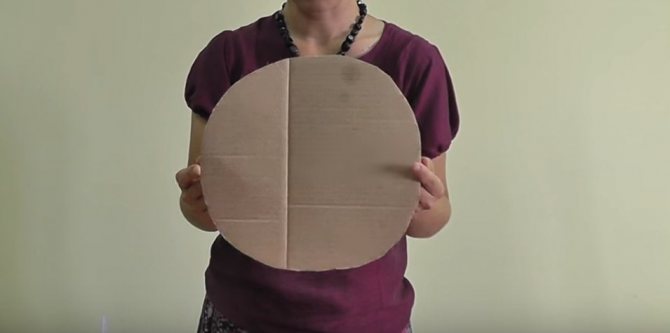
- Cardboard circle (any box will do).
- Metal-plastic pipe (20-25 mm, sold in the plumbing department).
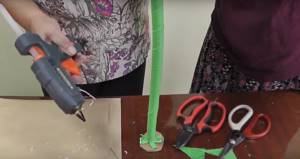
- Glue gun.
- Ruler.
- Scissors.
Step-by-step instruction:
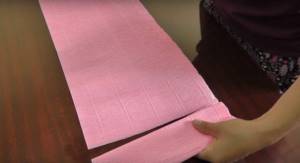
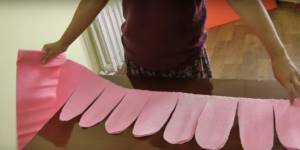
- Let's get to work. Take 3 meters of paper and fold it in half along the long side. We measure a 6 cm segment from the edge, fold the paper into three layers:
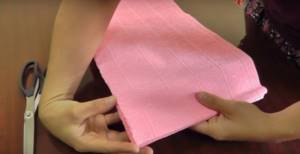
- We cut the workpiece as shown in the photo, leaving about 3 cm from the bottom:
- We cut the accordion on both sides, giving it the shape of a petal.
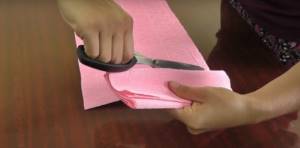
- Its size should be approximately 20x8 cm:
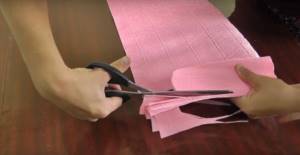
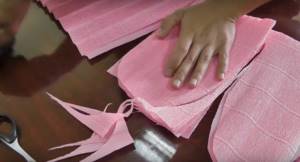
- Using the same pattern, cut out a strip 1 meter long:
- We proceed to the second meter, but this time we increase the elements by 2 cm (22x10).
- The third part should have petals measuring 24x12 cm.
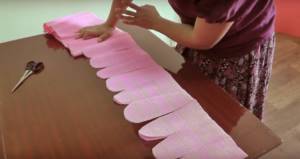
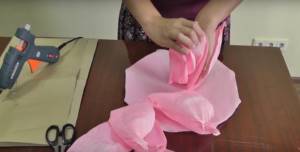
- We twist the ends of the blanks:
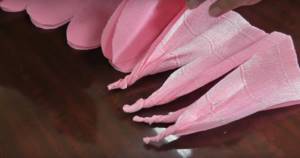
- We straighten the paper and stretch it a little:
- We make a circle of cardboard with a diameter of 30 cm. We cover it with corrugated paper.
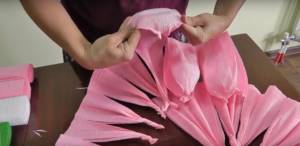
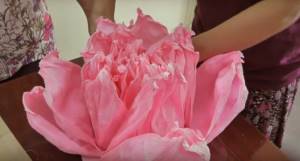
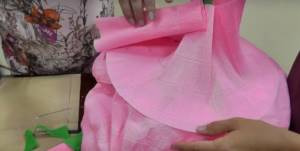
- Take a glue gun and fix the smallest part in the center of the circle. The petals must be glued one at a time.
- Glue the other two parts in a circle, gradually increasing and straightening the flower. To give it more splendor, you can glue in additional petals.
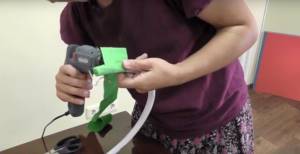
- Let's start making the stand. We bend the metal-plastic pipe so as to make the base stable. If necessary, we decorate it with green corrugated paper, securing it around the pipe, or paint it.
- We fix the cardboard circle to the upper edge of the “stem”:
- Firmly glue the barrel to a large cardboard circle:
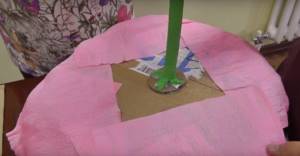
- We decorate the base of the flower with corrugated paper.
- This creates large, realistic peonies.
Here you can see detailed instructions for making a large peony using the ribbon method:
And how to make a stand from cement and plastic pipes at minimal cost is described step by step in this video:
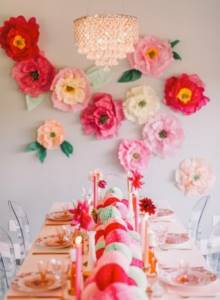
Decorating the walls and background of the wedding hall with paper flowers
Today, decorating a wall with paper flowers can be literally anything. The option of creating a photo wall is extremely popular. In this case, we are talking about decorating the background, which is located in the attention zone at the celebration - behind the backs of the newlyweds and witnesses. In addition, you can decorate the background of a dessert table or a stage of musicians - the options are different. Modern decorators create such a unique and sophisticated decoration of a wedding hall with paper flowers that it is simply impossible to look away.
As for the size of the flowers in the hall, the choice is yours. You can buy large paper flowers to decorate the hall and create not the usual wedding decorations, but a world of science fiction and fantasy - a floral fairy forest.
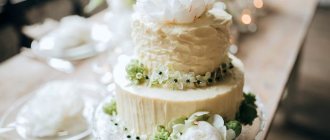
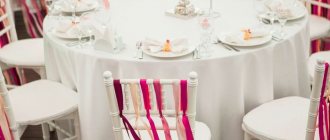
Paper flowers give room for imagination. They are chosen to decorate any elements of weddings and other celebrations. They are often used to decorate chairs and tables, the entrance area, they are laid out on a table runner, or they are used to decorate a cake. And in any case, wedding decor with paper flowers looks original and stylish.
How to make voluminous paper flowers for beginners?
Those who create giant buds undergo many paid and free master classes, constantly improving their skills. But not everyone immediately becomes a professional; everyone started somewhere. I want to give you step-by-step master classes, where the photo very clearly describes the progress of the work.
For example, the idea to create such a rose. No, it's not difficult, it just requires a lot of material.
We take a roll of paper, you can use designer sheets, but for beginners it is better to take a corrugated roll. It is easier to work with, it takes different shapes well, and the color range of this paper is very diverse.
The cut leaf is in the shape of a drop, stretch it across the width, so the leaf will curl up a little and take on a concave shape.
If you want to make an unopened bud, then take fewer parts; for a blossomed one, you will need more of them.
Make asters from simple colored A4 sheets. This is one of the simplest flower options. Each petal will need to be rolled inward, but if on the contrary you want to turn them out, then use scissors. Running them along the outer edge.
For this aster you need to use layers of petals of different diameters. The top one is the smallest. I would remove about 8mm from each subsequent row.

I present another master class on creating a flower arrangement - a ball. Depending on the selected diameter of each template, the size of the ball will depend. If you want to use it for assembly halls, for a wedding or birthday, then feel free to take the diameter of the plate.
I found the idea of creating fluffy flowers out of toilet paper interesting. This material is easy to work with because it is soft and easy to cut and roll. Modern toilet paper now comes in a variety of colors - from white to blue. Can you imagine what composition you can create?

You need to fold the strip in half and start making a cut towards the middle of the strip. Do not cut to the edge, leave at least two centimeters.
Now begin to roll this blank into a spiral, periodically gluing the spreads so that the flower does not fall apart.

Of course, there are so many ideas for creating these giants that I offer you one more video to watch. I really liked the simplicity and elegance of these crafts.
To make these decorations more like the real thing, look for paper with a gradient, where the sheet has a smooth transition from light to dark. The dark one is usually used at the bottom of the petal, because there is shadow there, and the lighter side goes to the top.
Analogues of wedding decoration with paper flowers
If you are interested in decorating a wedding hall with artificial flowers or you decide to choose live compositions, contact the Fleur Artdan company. We will offer you, among other things, large flowers made of isolon and panels of flowers for photo sessions, which are incredibly beautiful and affordable.
Check out the offered range and examples of decorations, and you will understand how your celebration should be decorated. You can make your holiday truly unforgettable and preserve some of the memories in flowers.
Particular attention should be paid to the decor of the celebration. Decorating a wedding with balloons and fabric is becoming a thing of the past. And paper wedding decor is becoming increasingly popular. And it’s not surprising, because it’s stylish and budget-friendly! What is paper decor? Where can you use paper decorations? Find out in the article!
A selection of videos for beginners
We have selected several interesting video instructions, in each of which you can learn a lot of new and useful things, and most importantly, enjoy the result and be inspired to create!
Stunningly stylish and large flower made of black corrugated paper plus coloring:
And this, according to the craftswoman, is an economical option. You can mix techniques to create picturesque flowers for wall decor:
You can make a beautiful three-dimensional rose from white corrugated paper:
You can learn how to make a large flower from corrugated paper with a double stem in this video:
As a bonus, here's another inspiring video on how to make a bouquet of small paper flowers. You can hide sweets in them and give them to a loved one, or decorate your apartment with such a flower basket.
Benefits of paper wedding decor
Paper decor has a number of important advantages that make it so attractive to newlyweds all over the world:
- Paper decor is an ideal option for newlyweds who want to save a little money.
- Paper decorations will make your wedding truly unique and unlike other celebrations.
- Paper decor is an excellent alternative to traditional decorations, which are already quite boring.
- Paper decorations are quickly made and easily attached to any element, be it a wall, ceiling or table.
- Paper decor makes the space lighter and airier.
- Paper decorations will delight you at any time of the year; unlike flowers, they will not wither even on a hot summer day.
How exactly can you use paper decor in decoration?
Paper decor is used to decorate the banquet hall, photo shoot area and tables for guests. If you are planning an outdoor registration, then you can decorate trees , a wedding tent or a gazebo with paper decorations. This decor can also be used to decorate a wedding cake or sweet table.
Some brides even replace real flowers with paper flowers . The same applies to the groom's boutonniere. It looks extravagant and unusual.
A bouquet is not always made from paper: one large bud for the bride and one each for the bridesmaids looks original
pompons or origami figures , such as cranes, are used for decoration
Paper wedding decor options
Cranes made using the origami technique, beloved by many, can be used as elegant decorative elements. They can be used as banquet cards, or you can make garlands based on them and decorate a hall or wedding arch with them.
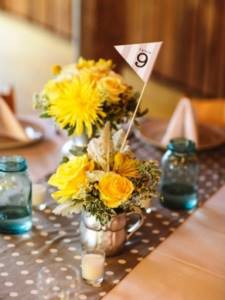
Paper flags and pinwheels on a stick
Fun paper flags and pinwheels can make eye-catching wedding decorations. In addition, they can be used as props for a photo shoot. Bright pictures are guaranteed to you!
Paper fans
Paper fans can be used as the basis for a stand installed at the table of the newlyweds. Such a strong decoration will highlight the table of the young people and make
19 889
What's a wedding without flowers?
Well, if fresh flowers are too boring, uninteresting or expensive for you, there are plenty of options to replace them.
Today we will tell you how to make giant paper flowers. This is not only unusual, but also universal and at the same time simple decoration.
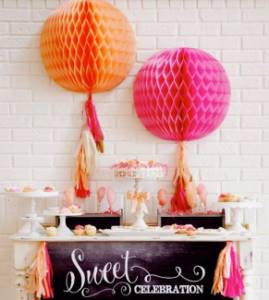
How to make a paper pompom
How to make a pompom yourself and what you need for it. This is done quickly and easily - thin tissue paper or crepe paper is suitable for the job. You will also need scissors, thread or thin wire. The work is presented step by step as follows:
- Cut the paper into sheets with sides 20x30 cm, or take any size. One pompom requires 8 sheets.
- Fold them like an accordion with a fold increment of approximately 1.5 cm.
- Bend the workpiece in the middle and tie it with wire.

- Cut the edges of the accordion with rounded edges or a triangle - this will affect the appearance of the pompom.
- Spread the workpiece and “fluff” it.
Different sizes of pompoms can be used to decorate the hall, arches, garlands to hang on the walls and wedding car. There are a lot of options.
Don’t think that decorating a wedding with paper decorations is ugly and tasteless. If you approach this issue with imagination, the wedding design will be bright, cheerful and unusual.
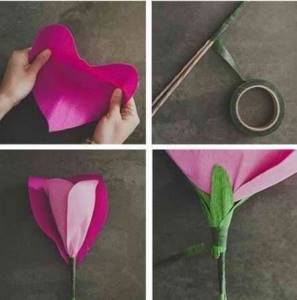
How to make a giant paper flower
Step 1
Draw stencils for future flowers. You will need two types of blanks, as in the photo. Their size depends on how large the flowers you want to end up with. We wanted to make giant ones, so we used size A petals. If you want smaller flowers, reduce the size of the stencil as needed.
Step 2
From the resulting stencils, cut out blanks for the future flower.
Step 3
Transfer the stencil onto corrugated paper. You will need 6-8 petals of the first type and 16-18 petals of the second.
Step 4
Cut out all the petals along the outline.
Step 5
One by one, take each petal in turn and fold it gently on each side. This will give the workpiece the shape of a real petal.
Step 6
The petals should take a slightly concave shape.
Step 7
Take a pencil and twist each side of the petal around it.
Step 8
Now the petal becomes like a real one.
Step 9
Set the petals aside and grab some floral tape and wire.
Step 10
Wrap the wire with tape to make it thicker and stronger. This will be the stem for our flower.
Step 11
Start forming a flower: take a smaller petal, attach it to the stem and wrap it with tape. Fix securely and add the next petal. Continue until all the smaller petals are gone.
Start with the larger petals.
Step 14
Continue until you have used all the petals. Fix the latter especially carefully, it will hold the entire structure.
Step 15
Hooray! Your giant paper flower is ready! It's big enough to use solo, but you can make 2-3 more to make a giant bouquet!
Happy preparations and a flourishing wedding!
My best friend and I decided to DIY our wedding decorations. We are always happy when we can get together with the girls and do something really beautiful. Close attention to small details is our specialty. A friend is a generator of ideas, ideas, and I am the one who embodies them... we are simply an amazing working team.
Making your own wedding decorations
We were just at her sister's bridal shower and although the table looked perfect, we felt like something was missing... and that's when the tissue paper came into play. With just some paper and a little patience, we created these amazing paper shapes to help decorate your wedding venue. …aaaand that’s how I did it!
Step 1. Tools and materials
What you will need:
A pack of tissue paper. You'll need about 20 sheets (I like different colors and even cool colored papers will look good. I did one with dog teeth prints and it looked amazing... but in this case, we're going to stick with classic white).
Thin wire...I used wire from the floral section at the craft store
Drawstring for hanging suction cups
Pliers
Scissors
Partner (doing anything is always better with a friend)
Step 2: Prepare the paper
This step may seem easy, but I know from experience that it is one of the most important. When you open a pack of tissue paper, make sure you straighten and align the sheets as best as possible.
Having no folds on smooth sheets will make the folds you'll encounter in the next steps more consistent.
Step 3. Twist
Set aside 2.5 - 3 cm from the edge of the paper and fold it along the line.
Make sure the crease is nice and crisp and that you press down hard enough so that the crease shows up on all 20 layers of paper.
Then turn the stack over and fold it again. You should now have an accordion.
Step 4. Making it beautiful
Fold all the paper to the end, as described in the previous step.
You may have some excess left at the edges, if so you will need to cut it off.
Unfold everything and iron all the folds again to make sure they are all nice.
Step 5: Wire the paper
Tie a thin piece of wire around the center of the folded tissue paper. Don't tie it too tight or too loose. If you wire the paper too tightly, it will be difficult to separate the sheets from each other, which will cause you to tear and throw. And if you tie it too loosely, the whole structure will fall apart. I like to tie it medium, so that the paper holds, and at the same time can move freely.
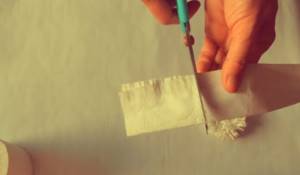
Once all the paper is tied, cut off the excess wire.
Step 6: Trim the ends
There are two ways to cut the ends... I made rounded edges, but you can make sharp edges.
Cut and round the edges of all folds until the end of the work. They don't have to be perfect.
Do this on both ends... and voila!
Step 7. Let's breathe life into it...
Open the accordion, holding the center tied with wire.
Then take the cord and tie it around the wire.
Make sure you tie the cord well first, because once you start separating the pieces of paper, it will become difficult to find the cord in the center of the wire.
Then carefully peel away the layers of fabric one by one... starting at the very top, and slowly down to the bottom.
The paper is easy to tear, so try to grab it as close to the center of the wire as possible.
Step 8. Now for the other side
I realized that my arms get very tired because I have few muscles. So I'd like to find a door or something that I can hang the ball on and finish the other half. You don't want to put it on the table because it might wrinkle the paper...
Once you've hung it...keep peeling away the layers!
Step 9. Masterpiece!
TA-dah! done!
Hello everyone, dear readers! Today I propose to move away from the classics and get a little rowdy. Already interested? No, I'm not suggesting doing something out of the ordinary. “What then?” you ask. And I will answer you. Today I will tell you about how original and solemn wedding decoration with large flowers can be.
In fact, this decorative design became popular not so long ago; previously, such decorations could be seen on theater stages. However, in my experience, I have seen many weddings decorated in this way. And I’ll tell you it looks very beautiful, both in photos and in life. So I’ll tell you in more detail.
How to make an arch in an apartment with your own hands, and what materials are needed
In ancient times, arches symbolized the firmament, the road of life, freedom, victory (triumphal arches among the Romans), protection (the arched form of city gates among the Slavs). And now designs of this type have not been forgotten, and most importantly, they are not difficult to make. So, a unique arch in the apartment and at the same time - with your own hands!
Create an arch of any shape
Arch versus arch (or how to choose the type of arch)
In standard-plan apartments, the arch performs both decorative and practical functions - it separates neighboring rooms, making them more spacious, original, and organic. It also highlights functional areas and creates an atmosphere of coziness and comfort in the interior.
If the decision to make an arch with your own hands is made, you will first have to resolve a number of questions, the answers to which will affect the financial and time costs.
Should I make one arch or several? A successful design move is to make both the door and window opening arched. An interesting choice is the use of identically shaped door openings and wall niches. The column and arch look original together.
What size should I make the arch? Its parameters match the dimensions of the doorway or slightly exceed it. If the design is made on the entire wall, then we are talking about a vault, not an arch.
The choice of the shape of the arched structure depends on the design and style and is limited only by imagination. Choose from the main directions:
- round (semicircular) arch - a classic, common option;
- Arabian (Moorish, resembles a horseshoe);
- pointed - two arcs intersect in one corner;
- concave - convex arcs go inside the opening;
- keeled - a semicircle with a pointed corner at the top;
- elliptical - the upper part of such a structure is an ellipse;
- parabolic - the upper part is made in the form of a parabola.
These are not all the options, but if the goal is to make an arch with your own hands, then preference is given to the traditional semicircular shape.
Classic (round or semicircular) arch
The choice of material is not limited: everything is used - from plywood to brick, but plasterboard remains the “top” due to its relative cheapness and versatility (allows you to make an arch of any complexity and shape in a doorway), ease of finishing and speed of installation with your own hands.
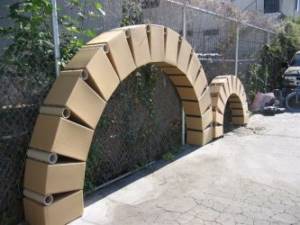
The work involves arched plasterboard (AGD), due to the use of durable cardboard and reinforced fiberglass, this material can be easily bent without damage.
Preparing a cardboard mockup
The first stage in finishing the doorway is preparatory. It is associated with taking measurements and making a template for the future arch.
Experiment by drawing the outlines of the planned structure on the wall, this will allow you to clearly visualize the result.
The installed arch will visually reduce the opening by 20 centimeters, so if its size cannot be increased, it is better to abandon the idea of installing an arch. Otherwise, instead of a noble arched structure, you will end up with a “hole in a hole.”
Removing the door frame
So, the arch visually reduces the opening, conclusion - increase the size if the ceiling height allows. How to determine how much? Do this so that the height of the expanded opening exceeds the top point of the planned arch by five centimeters.
An important condition for ensuring a good result is the evenness and verticality of the walls. Otherwise, the arch will turn out skewed. Conclusion - the walls are pre-finished with plaster and allowed to dry.
After expanding the doorway, prepare the surface by smoothing out uneven areas, get rid of excess material, removing dust and dirt.
Doorways in a load-bearing wall cannot be altered without the appropriate permits.
This is how a profile is cut
Installation of an arched structure
Making a frame yourself is not that easy, but it is quite possible. For this, builders recommend using a U-type metal profile (the so-called pawn, or more precisely, a 27/28 guide profile).
The size of the guides is determined by the width of the arch, quantity - 2 pcs. Install the frame on both sides of the doorway, slightly deeper inside (after fastening the drywall and applying putty, it will be flush with the wall).
Starting from the top, attach the first profile, then be sure to mount the second parallel to the first. Then they are fixed on the sides, from the upper corner to the point of curvature of the arch.
In order for the profile to bend effortlessly, cuts are made on it at an average interval of 6.5 cm, for which metal scissors are used.
You can give the profile the desired shape by bending it according to the layout. When the frame arc is ready, it is attached to the ceiling and walls.
An example of bending a metal profile according to the layout
The profile frame is fastened to brick or concrete walls with dowels; self-tapping screws are also suitable for wooden ones.
Preparing drywall for installation in an arched frame structure
Draw the arched line of the arch using two identical sheets of drywall. If you don’t have a compass, use the means at hand - an awl (or self-tapping screw), thin rope and a simple pencil, or a ready-made flexible blank.
Make two identical halves along the marked line using a metal saw (a simple hacksaw or an electric jigsaw).
The process of cutting drywall along an arc line
Bend drywall
To finish the lower end side of the arched arc, cut a strip of a given size and bend it. For deformation, it is recommended to place a weight on the sides of the strip. To simplify the procedure, drywall is moistened with water and the surface is pierced with a needle roller.
Next, the still wet deformed strip is attached, starting from the middle of the arch, fixing it with metal screws along both sides. In accordance with the work technology, the drywall is allowed to dry. The time allocated for this is 12 hours.
What to make it out of?
Big flowers. It seems there are not many options for what they can be made from. And everyone will ask the question “What if it rains?” or “Will they be heavy?” But in fact, there is an answer to every question, because there are several options for the material from which such paper design can be made. Even the most picky newlyweds will be able to please large flowers. So!
Paper
The easiest and most inexpensive option is paper decorations. The flowers are voluminous, light, airy and are perfect for decorating a banquet hall. This option is suitable both for florists and for every amateur who wants to make decor with their own hands.
And if you are interested in decorating with large paper flowers, then I will introduce you to a small master class.
Textile
Fabric flowers are less common, as making such flowers is very labor-intensive. Therefore, most florists prefer more convenient and durable materials. We'll talk about them next.
Izolon
Izolon. Strange word. And certainly its meaning does not fit in any way with the delicate floral meaning. But it's still compatible. Oh yes! I forgot to say that isolon is nothing more than insulation. Exactly. Such rough material in the skillful hands of a master turns into an excellent flower that can be decorated to suit any wedding style.
Foamiran
Well, here’s another unclear name. Of course, for lovers of needlework, the word is very familiar, but for everyone else, it is a foam material that is resistant to weather conditions. With such characteristics, foamiran is excellent for making voluminous flowers, both for banquet halls and, first of all, for wedding celebrations.
Wedding arch made of metal-plastic pipe step by step
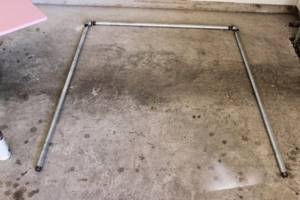
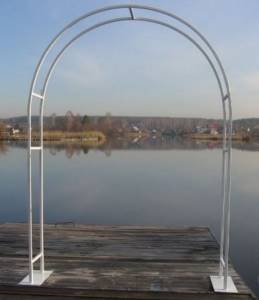
To create an arch from metal-plastic pipes, you need to purchase two pipes, each 3.5 m long. The diameter of the pipe is 2.5 cm.
If you make an arch in the form of a horseshoe, then the pipe must be carefully bent into an arc. If the arch is made with the letter “P”, then you need to purchase two corners, two pipes 2.4 m high and one piece long enough for two people to pass through. The arch is assembled at the corners.
Next, we dilute the cement and pour it into pots or buckets. After this, we place the arch strictly in the center, using a plumb line to level the arch so that it is horizontal.
We leave the arch for a week and a half so that the cement hardens well. After this, you can start decorating.
There are other options for making fastenings to stabilize the arch if you don’t want to mix cement. You can use additional pieces of pipes to make stands for the arch.
You can also use two metal sheets for the racks as a platform, and make the arch itself double.
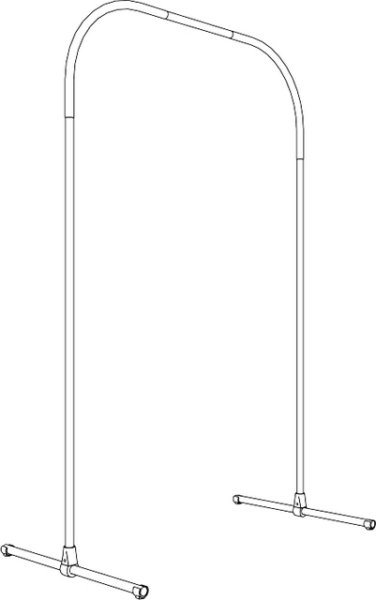
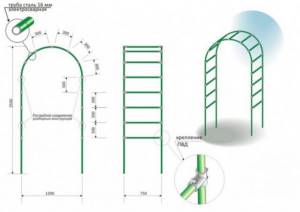
By the way, wedding arches are similar in structure to garden arches, and therefore they can later be used in the garden plot. And the assembly scheme for both wedding and garden arches is the same. Below is a drawing of the assembly of an arch made of steel pipes; using this scheme we make a metal-plastic one.
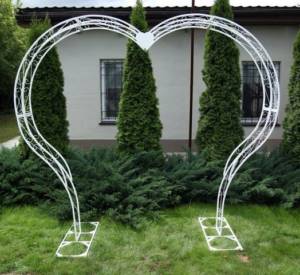
If you have enough time before the wedding, then the arch can be made with patterns. For example, here is such a wonderful version of a heart-shaped arch. Note. That her racks are also made of pipes.
So there are many options, it's up to you to choose.